QDI WinneX 3 User manual

ManualforWinneX3
Chapter1
Introduction
1
Chapter1
Chapter1
Introduction
Overview
The WinneX3green mainboardutilizesthe Intelfirstgenerationintegratedgraphics chipset
—Intel®
810Chipset, providing afullycompatible,high performanceand cost-effectivePC/
microATXplatform.Thenewintegratedtechnologies,togetherwiththe softwareconfigurable
AC’97 audioand modemsystemgivecustomersanadvanced,multimediasolution atan
extremelylowprice.It provides66/100MHzsystembussupportforallIntel®
Pentium®
III,
Pentium®
II,andCeleronTMSlot1processors.100MHzSDRAMsaresupportedupto512MB.
It alsoprovidesadvancedfeaturessuchasWake-on-LAN,Wake-on-ModemandKeyboard
PasswordPower-on functions.SuspendtoRAM,theoptimalimplementation oftheAd-
vanced Configuration and PowerInterface(ACPI)specification,makesthePC’spower
consumptiondroptothelowestpossibleleveland enablequickwakeup.ManageEasy,our
systemmanagementapplicationisalsosupplied toenableremotemonitoringandconfigura-
tionofthesystem.
FlexibilityinDesigningCost-effective System
TheIntel®
810 Chipsetisahigh-integrationchipsetwhichconsistsofaGraphics and
MemoryControllerHub(GMCH)HostBridge andan I/OControllerHub(ICH)Bridge.There
aretwoversionsofthe GMCH(GMCH0/GMCH)andtwoversionsofICH(ICH0/ICH).The
Intel®
810 ChipsetSystemprovidesaddedflexibilityindesigningcost-effectivesolutions
byusing differentcombinationsoftheGMCHandICH.
Thefollowing describesthethree kindsofIntel®
810 chipsetcombinationand theiradded
features.Pleaseidentifywhichkind ofmainboardyoupurchased.
1.Intel®810DC-100:GMCH(Intel®
82810-DC100)+ICH(Intel®82801AA)
Addedfeatures:
•Includes4MB,32-bit100MHzSDRAMDisplayCache.
•SupportsUltraATA/66.
2.Intel®810:GMCH0(Intel®82810)+ICH (Intel®82801AA)
Addedfeatures:
•SupportsUltraATA/66.
3.Intel®810L:GMCH0(Intel®82810)+ICH0(Intel®82801AB)
Thisisthebasicsystemcombination.
All informationcontainedinthismanualappliestoall three kindsofsystem,unless
otherwisespecified.

ManualforWinneX3
Introduction
2
Key Features
Formfactor
l MicroATXformfactorof244mm x188mm.
Microprocessor
lSupportsIntel®
Pentium®
III Processorsat450MHzand futureprocessorswith
100MHzbusspeed.
lSupportsIntel®
Pentium®
IIProcessorsat233/266/300/333MHzprocessorswith
66MHzbusspeed.
lSupportsIntel®
PentiumII®
Processorsat300/350/400/450MHzprocessorswith
100MHzbusspeed.
lSupportsIntel®
CeleronTMSlot1Processorsat266/300/333/366MHzand future
processorswith66MHzbusspeed.
lSupports66/100MHzhostbusspeed.
lTheCPUcorevoltageadjustablefrom1.3Vto3.5Vautomaticallythrough onboard
switching voltageregulatorwithVID(VoltageID).
lProvidesonboard1.5V,1.8V,2.5Vand 3.3Vstandbyregulator.
Systemmemory
l Providestwo168 pin3.3VunbufferedDIMM sockets.
l Supports64-bitwideDIMM moduleswith100MHzSDRAMdevices.
l Supports8MBto512MBSDRAMusing16Mb/64Mbtechnology.
l Supports512MBSDRAMusing128Mbtechnology.
l SupportssuspendtoRAM.
OnboardIDE
l SupportstwoPCIPIOandBusMasterIDEports.
l TwofastIDEinterfacessupporting fourIDEdevicesincludingIDEharddisks and
CD-ROMdrives.
l SupportsuptoPIOMode4timing.
l Supports“UltraATA/33”SynchronousDMAmodes,transferring dataup to33MB/s.
l Supports“UltraATA/66”SynchronousDMAmodes,transferring dataup to66MB/s.
(forIntel®
810 and Intel®
810 DC-100 only)
l Integrated16x32bitbufferforIDEPCIBurstTransfers.
OnboardI/O
l WinbondW83627HFLPCI/Ochip.
l Onefloppyportsupportingup totwo3.5”or5.25”floppydriveswith360K/720K/
1.2M/1.44M/2.88Mformat.
l Twohighspeed16550compatibleUART(COM1/COM2/COM3/COM4selective)with
16-bytesend/receiveFIFOs.

ManualforWinneX33
Chapter1
l USB hostinterfacesupporting 2USB ports.
l Onejoystick port.
l ProvidesonboardMIDI/Joystick Connector.
l Infrared interface.
l All I/Oportscanbeenabled/disabledintheBIOSsetup.
OnchipAGP
l Integrated 2D/3DGraphics Controller.
l IntegratedH/WMotion CompensationEngine.
l Provides4MBSDRAMDisplayCache(forIntel®
810DC-100only).
OnboardSound
l IntelAC’972.1SpecificationCompliant.
l 18bitstereo codec.
l Multiplestereo inputmixer.
l Monoandstereo volumecontrol.
l ProvidesonboardLine-inJack,Microphone-inJack,Speaker-outJack.
Advancedfeatures
l PCI2.2SpecificationCompliant.
l ProvidesTrend ChipAwayVirus®
OnGuard.
l SupportsWindows95/98softwarepower-down.
l SupportsWake-on-LANandWake-on-Modem.
l SupportsKeyboardPasswordPower-onfunction.
l OnboardI/OWinbond83627HFsupportssystemmonitoring(monitorsCPUand
systemtemperatures,systemvoltages,chassisintrusionand fanspeed).
l SupportsmanagementapplicationssuchasLDCM(LANDesk®
ClientManager)or
QDI’sManageEasy.(manufacturingoption)
l Providesonboard3.3VregulatortosupportATXpowersupplywithout3.3Voutput.
l SystemstatusresumesafterACpowerfailure.
l SupportsQDI’sinnovationssuchasSpeedEasy,RecoveryEasyetc.
l ProtectsthesystemBIOSfrombeing attackedbyseverevirussuchasCIH.
l SupportsSuspend toRAM.
BIOS
l Licensed advancedAWARDBIOS,supportsflashROMwith4Mbmemorysize,plug
and playready.
l SupportsIDECD-ROMorSCSIbootup.
Greenfunction
l SupportsACPI(Advanced Configurationand PowerInterface)andODPM(OS
DirectedPowerManagement).
l SupportsfourACPIpowerstates:Full-on,StopGrant, Suspend toRAM,and soft-off.

ManualforWinneX3
4
Expansionslots
l 3PCIslots.
l 1AMR.
IntroductiontoNewFeatures
FWH(FirmwareHub)Protection
The BIOSofthe mainboardisinsidetheFWH.SomeseverevirusessuchasCIHvirus
aresodangerousthatitmayoverwritetheBIOSofthemainboard.IftheBIOShas
beendamaged,thesystemwill be unabletoboot. Weprovide thefollowing solution
whichprotectsthesystemBIOSfrombeing attackedbysuchviruses.
Herearetwochoiceswhichimplementsthisfunction.
1.Setthejumper(JAV)asclosed,theBIOScannotbeoverwritten.
2.Setthejumper(JAV)asopen,meanwhileset“FlashWriteProtect”asEnabled in
AWARD BIOSCMOSSetup.Inthisway,the BIOScannotbeoverwritten,butthe
DMIinformation canbeupdated.
Refertopage16 fordetailed information onjumpersetting,andpage26forrelated
BIOSsetting.
SuspendtoRAM
SuspendtoRAMisacost-effective,optimalimplementationoftheAdvancedConfigu-
rationand PowerInterface(ACPI)1.0specification,whichmakesaPC’spowercon-
sumptiondrop tothelowestpossiblelevelandenablesquickwakeup.Whenthe
systemisinSuspend-to-RAMstatus,thesystemcontextismaintained insystem
memory,thesystemconsumesonlyasmall fractionofthepowerusedforfullopera-
tion.Instead ofshuttingdownthe systemtosavepowerwhen notinuseandthen
having torebootlater,Suspend-to-RAMsolutionenablesthesystemtoquicklywake
up,restoring all applicationsand features,enabling operationinafewseconds.
Toimplementthisfunction,thefollowing requirmentsareessential:
1.Powersupplyrequirements:Thecurrentof5VSBline ofthepowersupplyshould
bemorethan0.75A.
2.The BIOSoption“ACPIfunction”shouldbe enabled,and “ACPISuspendType”should
besetasS3inAWARD BIOSCMOSsetup.Refertopage28 fordetailed information.
Introduction

ManualforWinneX3
3.AnACPI-enabledoperating systemsuchasWindows98 orWindows2000 familyis
needed.
a.Inordertoinstall ACPI-enabledWindows98operating system,thesetup command
shouldbe typedasshownbelow:
D:\SETUP/PJ
(ThismanualassumesthatyourCD-ROMdevicedriverletterisD:).
b.Inordertoinstall ACPI-enabledWindows2000 Bata3(build2031)operating sys-
tem,justsettheBIOSoption ‘ACPIfunction’itemas‘enabled’in‘PowerManagement
Setup’.
c.IfyourinstalledWindows98 systemisinAPMmode,youcouldenterACPImode
throughupdatingyoursystem,followthestepsasbelow,
Choose“Plug and PlayBIOS”in“SystemDevice”,followtheprompttoupdatedevice
driver,in“UpdateDeviceDriverWizard”,selectthe“Displayalistofall thedriversin
aspecificlocation,soyoucanselectthedriveryou want”andpressthe“Next”
button,thenselectthe“Showallhardware”item->selectthe“AdvanceConfigura-
tionandPowerInterface(ACPI)BIOS”andpress “Next”button,followthe prompt
and restartyourcomputerwhenfinish,thenyoursystemwill startupusing theACPI
mode.
4.ThreewaystoenterSuspend-to-RAMstatus:
lUnderWindows98/Windows2000,clickingStart-Shutdown-Standbyen-
ablesthesystemtoenterSuspend-to-RAMstatus.
lUnderWindows98/Windows2000,click Start-Setup-ControlPanel-Power
Management-Advancedand chooseStandbyitem,the systemwill enterSus-
pend-to-RAMstatuswhenyou presspowerbutton.
lUnderWindows98/Windows2000,fromPowerManagementPropertiesin
ControlPanel,setthe latencytimeinSystemStandby,the systemwillenter
Suspend-to-RAMstatuswhentimeout.
Thesamewaysusedtopowerupthesystemcanbe usedtowakeup thesystemfrom
Suspend-to-RAMstatus.Forexample,pushing thepowerbutton,through theWake-on-
LAN,Wake-on-Modemfunction orRTCAlarm.Ifthe keyboardpasswordpower-onfunc-
tionisenabled,thekeyboardpasswordshouldbeused towakeupthesysteminstead of
pushingthepowerbutton.
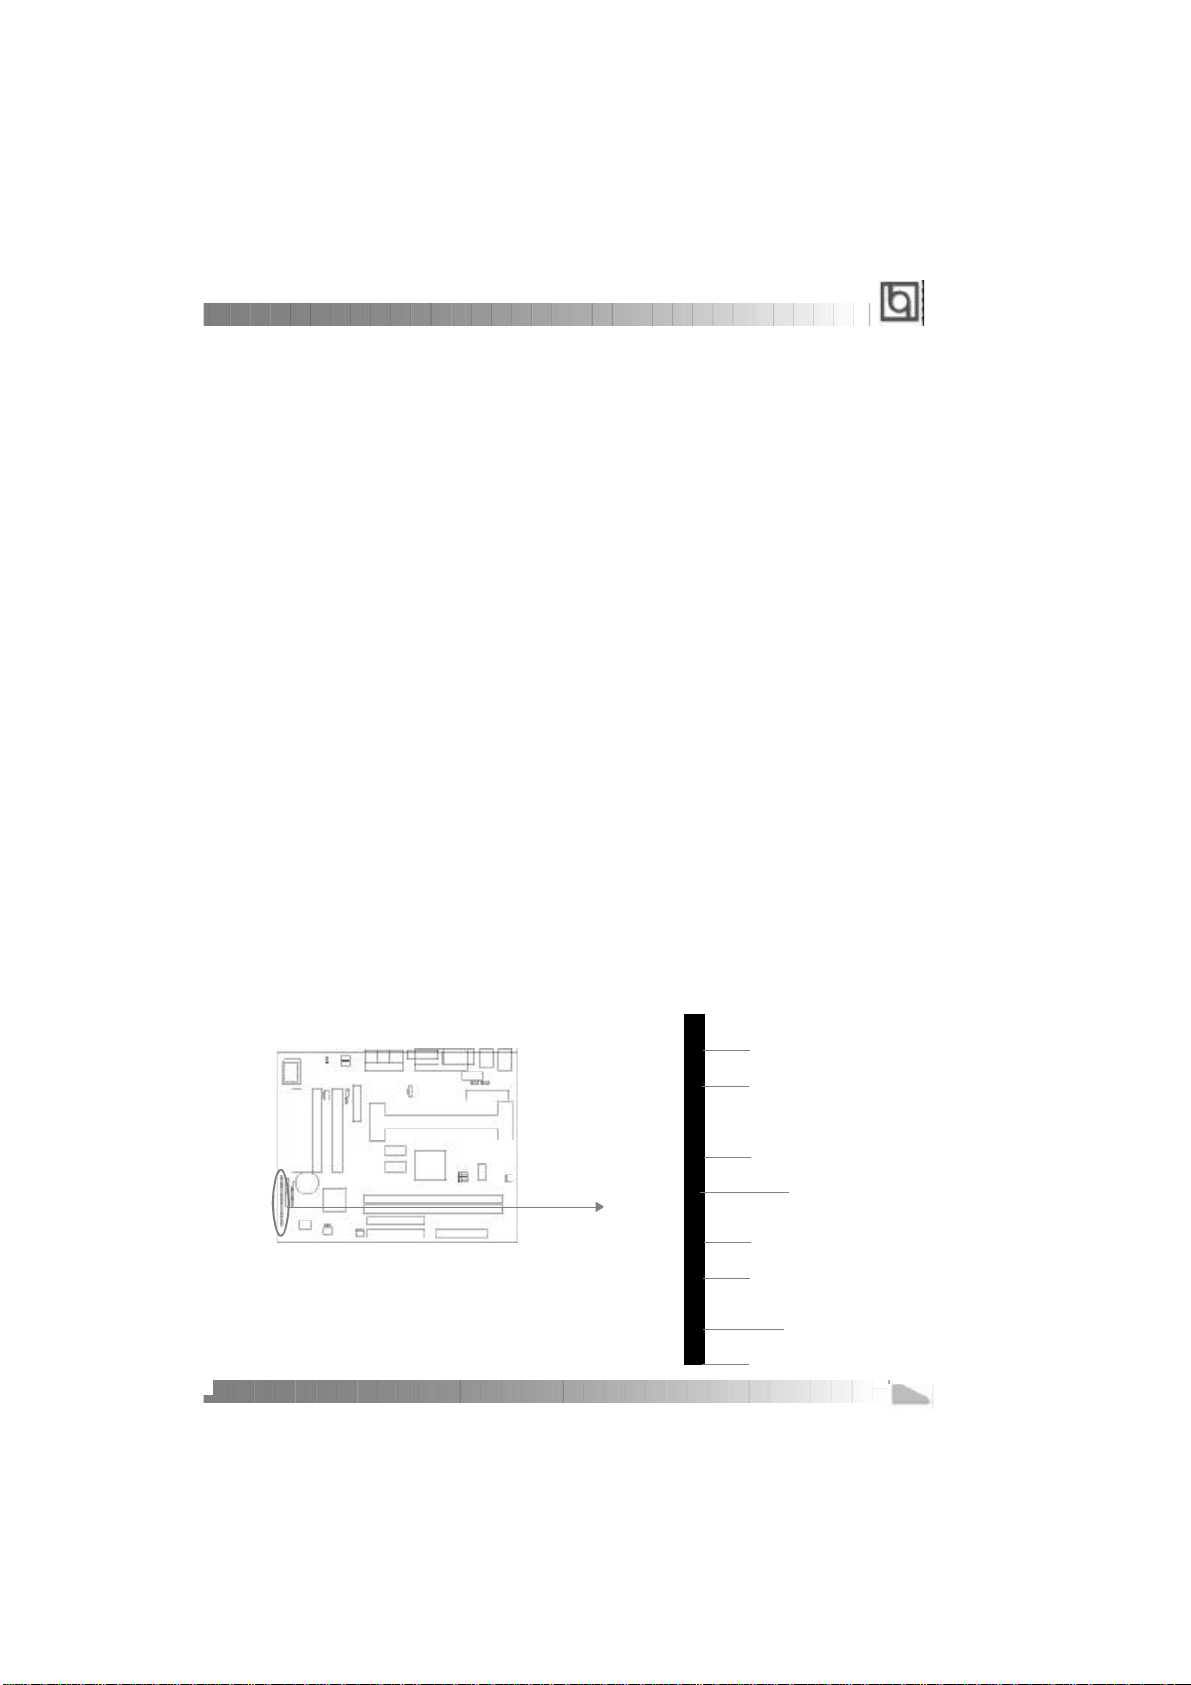
UltraATA/66(forIntel®810andIntel®
810 DC-100only)
AccordingtothepreviousATA/IDEharddrivedatatransferprotocol,thesignalingwayto
senddatawasinsynchronousstrobemodebyusingtherising edgeofthe strobesignal.
TheUltraATA/33 protocoldoublesthebursttransferratefrom16.6MB/sto33.3MB/s,by
using boththerising and falling edgesofthestrobesignal,thistimeUltraATA/66 doubles
the UltraATAbursttransferrateonceagain(from33.3MB/sto66.6MB/s)byreducing
setuptimesandincreasing thestrobe rate.The fasterstroberateincreasesEMI,which
5
Chapter1

ManualforWinneX3
6
cannotbe eliminatedbythestandard40-pincableusedbyATAand UltraATA.Toeliminate
thisincreaseinEMI,anew40-pin,80-conductorcableisneeded.Thiscableadds40
additionalground linesbetweeneachofthe original40 ground and signallines.The
additional40lineshelpshieldthe signalfromEMI,reducecrosstalkandimprovesignal
integrity.
UltraATA/33introducedCRC (CyclicalRedundancyCheck),anewfeatureofIDEthat
providesdataintegrityand reliability.UltraATA/66usesthesameprocess.TheCRC
value iscalculated byboththe hostandtheharddrive.Afterthe host-requestdatais
sent, thehostsendsitsCRCtotheharddrive,and theharddrivecomparesittoits
ownCRC value.Iftheharddrivereportserrorstothe host, then thehostretriesthe
commandcontaining theCRC error.
UltraATA/66technologyincreasesbothperformanceand dateintegrity.Howeverthere
arebasicallyfiverequirementsforyoursystemtoruninUltraATA/66mode:
1.The systemboardmusthaveaspecialUltraATA/66 detectcircuit, suchas
WinneX3mainboard(forIntel®
810and Intel®
810 DC-100 only).
2.ThesystemBIOSmustalsosupportUltraATA/66.
3.Theoperating systemmustbecapableofDMAtransfers.Win95(OSR2)and
Win98 arecapable.
4.AnUltraATA/66 capable,40-pin,80-conductorcableisrequired.
5.UltraATA/66 compatibleIDEdevicesuchasaharddriveorCD-ROMdrive.
Introduction

ManualforWinneX3
Chapter2
InstallationInstructions
chapter2
7
PS/2MouseConnector
PS/2KeyboardConnector
USB1
USB2
ParallelPort
UART1
Chapter2
InstallationInstructions
ThissectioncoversExternalConnectorsandJumperSettings.Refertothe mainboard
layoutchartforlocationsofall jumpers,externalconnectors,slotsand I/Oports.Further-
more,thissectionlistsall necessaryconnectorpinassignmentsforyourreference.The
particularstateofthejumpers,connectorsandportsareillustratedinthefollowingfig-
ures.Beforesetting thejumpersorinserting theseconnectors,pleasepayattentiontothe
directions.
Besuretounplug theACpowersupplybeforeaddingorremovingexpansion
cardsorothersystemperipherals,otherwise yourmainboardand expansion
cardsmightbeseriouslydamaged.
ExternalConnectors
PS/2KeyboardConnector,PS/2Mouse Connector
PS/2keyboardconnectorisfortheusageofPS/2keyboard.If using astandardATsize
keyboard,anadaptershouldbeusedtofitthisconnector.PS/2mouseconnectorisforthe
usage ofPS/2mouse.
USB1,USB2
TwoUSB portsareavailableforconnecting USB devices.
ParallelPortConnectorandSerialPortConnector(UART1,UART2)
The parallelportconnectorcan beconnectedtoaparalleldevicesuchasaprinter,whilethe
serialportconnectorscanbeconnected toserialportdevicessuchasaserialportmouse.
Youcanenable/disablethemand choosetheIRQorI/Oaddressin“Integrated Peripherals”
fromAWARDBIOSSETUP.

ManualforWinneX3
Installation Instructions
8
UART2
1
MIDI/Joystick
SpeakeroutLineinMicrophonein
POWER
TheserialportUART2isnotavailableonthe back panel.Therefore,weprovidea9-pin
ribboncablewithbracketforUART2port. (manufacturing option)
Line-inJack,Microphone-inJack,Speaker-outJackand
MIDI/JoystickConnector
TheLine-injackcanbe connectedtodevicessuchasacassetteorminidiscplayerfor
playbackorrecording.TheMicrophone-injackcan beconnectedtoamicrophoneforvoice
input.TheSpeaker-outjackallowsyou toconnectspeakersorheadphonesforaudio
outputfromtheinternalamplifier.
TheMIDI/Joystick connectorallowsyoutoconnectagamejoystick oraMIDIdevice.
ATXPowerSupplyConnector&PowerSwitch(POWER)
Besuretoconnectthepowersupplyplug tothisconnectorinitsproperorientation.The
powerswitch(POWER)shouldbeconnectedtoamomentaryswitch.Whenpowering up
yoursystem,firstturnonthemechanicalswitchofthepowersupply(ifoneisprovided),
thenpushoncethepowerswitch.When powering offthesystem,you needn’tturnoff the
mechanicalswitch,justPushonce*the powerswitch.
ATXPowerSupplyConnector
20
1
5V5V
-5V
GND
GND
PSON
-12V
3.3V
GND
12V
5VSB
5V
GND
3.3V
GND
5V
GND
PS-OK
3.3V
GND

ManualforWinneX3
chapter2
9
Note:
Ifyouchange“Soft-off byPWR-BTTN”fromdefault“Instant-off”to“Delay 4
Secs”inthe“POWERMANAGEMENTSETUP”section oftheBIOS,thepower
switchshouldbepressedformorethan4secondsbeforethesystempow-
ersdown.
HardDiskLEDConnector(HDLED)
The connectorconnectstothecase’sIDEindicatorLEDindicatingthe activitystatusofIDE
harddisk.Theconnectorhasanorientation.Ifonewaydoesn’twork,trytheotherway.
ResetSwitch(RESET)
Theconnectorconnectstothe case’sresetswitch.Press the switchonce,thesystemresets.
SpeakerConnector(SPEAKER)
Theconnectorcanbeconnectedtothespeakeronthecase.
PowerLEDConnector(PWR_LED)
The powerLEDhastwostatus.Whenthesystemisinpower-offstatus,theLEDisoff.
Whenthesystemispoweredup,theLEDison.Theconnectorhasanorientation.
Key-LockConnector(KEY_L)
Theconnectorcan beconnectedtothekeyboardlock switchonthecaseforlockingthe
keyboard.
ACPILEDConnector(GREEN_LED)
The ACPILEDhasfourstatus.Whenthesystemisinpower-off status,theLEDisoff.
Whenfirsttimeplug inthe220Vpowersupply,theLEDisdimmish.Whenthesystemis
poweredup,theLEDison.Whenthesystementerssuspendmode(including Suspend to
RAMstatus),theLEDwill flash.Theconnectorhasanorientation.
HardwareGreenConnector(SLEEP)
Pushoncetheswitchconnectedtothisheader,thesystementerssuspend mode.
GND
SLEEPSLEEP
LED-
LED-
LED+GREEN_LED
GND
KEYLOCKKEY-L
LED-
LED+POWER_LED
LED-
SIGNALIN
POWERPOWER
VCC
GND
NC
SPKDATASPEAKER
RESET
GNDRESET
LED+
LED-HDLED

ManualforWinneX3
Installation Instructions
10
InfraredHeader(IrDA)
Thisconnectorsupportswirelesstransmitting and receiving.Whenusing thisfunction,
configurethesettingsforIRAddress,IRModeand IRIRQfromthe“INTEGRATED
PERIPHERALS”sectionoftheBIOS.
FanConnector(CPUFAN,CHSFAN)
Thefan speedofthesetwofanscanbe detected andviewedin“PCHealth”section of
the BIOS.Thesetwofanswillbeautomaticallyturnedoffafterthe systementerssus-
pend mode.
Wake-UpOnLAN (WOL)
ThroughtheWake-UpOnLANfunction,awakeeventoccurringfromthe networkcan
wakeupthe system.Ifthisfunction istobeused,pleasebe surean ATX2.01power
supplyofwhich5VSBline iscapableofdelivering 720mA,and aLANadapterwhich
supportsthisfunction isused.Thenconnectthisheadertotherelevantconnectoronthe
LANadapter,set“Wake-UpbyLAN/Ring”asEnabledinthe“POWERMANAGEMENT
SETUP”sectionofthe BIOS.Save&exit,then boottheoperatingsystemoncetomake
surethisfunction takeseffect.
FANGND
FANGND
CHSFAN
+12V
SENSE
+12V
SENSE
CPUFAN
VCC
IRRX
GND
IRTX
NC
VCC
1
+5Vstandby
GND
Signalforwakingup(activehigh)

ManualforWinneX3
chapter2
11
Wake-UpOnInternalModem(WOM)
Through theWake-UpOnInternalModemfunction,thesystemwhichisinthepower-off
statuscanbepowered onbyaring signalreceivedfromtheinternalmodem.Ifthis
function istobe used,be sureaninternalmodemcardwhichsupportsthisfunctionis
used.Thenconnectthisheadertotherelevantconnectoronthemodemcard,set“Wake-
UpbyLAN/Ring”toEnabledinthe“POWERMANAGEMENTSETUP”sectionoftheBIOS.
Save&exit, thenboottheoperating systemoncetomakesurethisfunction takeseffect.
AudioConnector(CDLIN,MODEM)
CDLINisaSonystandardCD audioconnector,itcanbeconnectedtoaCD-ROMdrive
through aCD audiocable.The MODEMconnectorallowstheonboardaudiotointerface
withavoicemodemcardwithasimilarconnector.Italsoallowsthesharingofmono_in
(suchasaphone)andmono_out(suchasaspeaker)betweentheonboardaudioand
the voicemodemcard.
4pinSMBusConnector(SMBUS)
ThisconnectorallowsyoutoconnectSMBusdevices.SMBusdevicescommunicateby
meansoftheSMBuswithanSMBushostand/orotherSMBusdevices.The SMBusor
SystemManagementBusisaspecificimplementationofan I2Cbus,whichisamulti-
masterbus,thatis,multiplechipscanbeconnectedtothe samebusand eachonecan
actasamasterbyinitiating datatransfer.
1
+5VstandbyGND
Signalforwakingup(activelow)
CDLIN
Common
CDRightChannel
CD LeftChannel
GND
Phone-In(fromModem)
Mono-Out(toModem)
MODEM
1
2
3
SMBDATA
SMBCLK
5VSB
GND
4

ManualforWinneX3
Installation Instructions
12
SoundConnector(PC-PCI)
Thisconnectorprovidesabridgebetweenthe mainboardandPCIsoundcardtodeliver
sound compatibilityunderDOSreal-modeenvironment.
ChassisSecuritySwitch(CHSSEC)
Theconnectorconnectstothe chassissecurityswitchonthecase.Thesystemcan
detectthechassisintrusionthroughthestatusofthisconnector.If theconnectorhas
beenclosed once,the systemwillrecordthestatusand indicatethechassishasbeen
opened.Youcan receivethisinformationfromQDIManageEasysoftware.
Audio/ModemRiserInterfaceConnector(AMR)
TheAMRInterfaceConnectoristheinterfacebetweenthemainboardand theAudio/
ModemRisercard.Theconnectorprovidesall necessarysignalswhichsupports
severaldifferentconfigurationsofaudioand modeminthesystem,suchasaudioand
modemontheRiser,audioonthe mainboardand modemonthe Riser,ornoaudiowith
modemontheRiser.WinneX3mainboardprovidesyouwithaudioonboardsolution,
onboardaudiocanbeenabled/disabled.EitherAMR(Audio/ModemRiser) cardorMR
(ModemRiser) cardcanbeused onthissystem.IfyouchoosetousetheaudioonAMR
card,theonboardaudiocanbesetasdisabled.ThissoftwareconfigurableAC’97 audio
and modemsub-systemgivescustomersanadvanced,multimediasolutionatan
extremelylowprice.
GND
SERIALINTERRUPTREQUEST
PC-PCIDMAREQUEST
PC-PCIDMAACKNOWLEDGE
GND
135
246
NC
GND
Indicatesignal

ManualforWinneX3
Expansion Slots&I/O PortsDescription
Slot/PortDescription
PCI1FirstPCIslot
PCI2SecondPCIslot
PCI3ThirdPCIslot
IDE1PrimaryIDEport
IDE2SecondaryIDEport
AMRAMRslot
FLOPPYFloppyDrivePort
JumperSettings
Jumpersarelocatedonthemainboard,theyrepresent, clearCMOSjumperJCC,enable
keyboardpasswordpower-onfunctionjumperJKB,andenable/disableonboardaudio
jumperJSDetc.Pin1foralljumpersarelocatedonthe side withathickwhiteline(Pin1→
),referring tothemainboard’ssilkscreen.Jumperswiththreepinswill be
shownastorepresentpin1 &pin2connectedand torepresentpin2
&pin3 connected.Fordefaultjumpersettings,pleaserefertothefollowing table:
JFS01-2(Auto)JKB1-2(EnableKB Power-on)
JFS11-2(Auto)JUSB2-3(Optional)
JCC2-3(NormalStatus)JSBClosed (ConnectPCI3.3Vsb)
JSD2-3(EnableAudio)JAV Open (EnableFlashBIOS)
Overclocking JumperSetting(JFS0,JFS1)
Jumperslabeled JFS0andJFS1arelocatedonthemainboardproviding userswithCPU
overclocking feature.Thehostbusspeedcanbesetas66/100/133MHzorAUTOselect.
Refertothechartbelowforthelocationofthesejumpers,and thetableforinformationon
howtosetthem.
13
chapter2
AMRInterfaceConnector
JFS1
JFS0
CPUFSB66MHz100MHz133MHzAUTO
JFS12-32-3OPEN1-2
JFS02-3OPENOPEN1-2
‘1-2’representspin1&pin2closed.
‘2-3’representspin2&pin3closed.

ManualforWinneX3
IfCPUFSB issetasdefaultsetting Auto,thesystemdetectstheCPUfrontsidebus
automatically.IfCPUFSB issetas100MHz,thesystemwill run at100MHzeven ifa
processorwith66MHzFSB isinstalled.Setting up to133MHzisalsosupported.
However,whetherornotthesystemcanbeoverclocked dependsonyour
processor’scapability.Whethertheprocessorisbusratiolockedorunlockedshould
alsobetakenintoaccount.Forbusratiounlockedprocessor,thisoverclockingfeature
canbeimplementedbysetting CPUFSB as100/133MHz,meanwhileadjusting thebus
ratio(multiplier)lowerin“CPUSpeedEasy Setup”inAWARD BIOSCMOSSetup.Wedo
notguarantee theoverclockingsystemtobe stable.
ClearCMOS(JCC)
If youwanttoclearCMOS,unplugtheACpowersupplyfirst, closeJCC (pin1&pin2)once,
setJCC back tothenormalstatuswithpin2 &pin3 connected,thenpoweronthesystem.
Enable/DisableOn-boardAudioCODEC(JSD)
Ifyou wanttousethe on-boardaudioCODEC,setJSDwithpin2 &pin3 closed(default).
Otherwise,setJSDwithpin1 &pin2 closedfordisablingthisfunction.
EnableKeyboardPasswordPower-on Function (JKB)
Themainboardprovidestheadvancedkeyboardpasswordpower-onfunction.Before
usingthisfunction,setJKB withpin1&pin2closed.Otherwise,setJKB withpin2 &pin3
closedfordisabling.
Installation Instructions
14
Normalstatus:
ClearCMOS:
(UnplugtheACpowersupply)
Enableon-boardaudio:
Disableon-boardaudio:
1JCC
2
3
1JCC
2
3
JSD
JSD
1
2
3
1
2
3

ManualforWinneX315
Furthermoreinordertoimplementthisfunction,set“POWERONFunction”toPassword
andenterthekeyboardpower-onpasswordinthe“INTEGRATEDPERIPHERALS”section
oftheBIOS.Saveandexit,thenpoweroff yoursystem.Inthiscase,thepowerbutton’s
power-on functionhasbeen disabled.
Note:1.Ifusingthisfunction,5VSBlineofthepowersupplyshouldbe
capableofdeliveringenoughcurrent(eg.200mA)forall thedevices
connectedtothekeyboardport,ifnot,youwill beunabletopowerup
thesystemusingthekeyboard.
2.Ifyou setJKBwithpin2&pin3closed,set“POWERONFunction”to
BUTTONONLY,don’tsetittoPassword,oryou’llbeunabletopowerup
yoursystembythekeyboardorthepowerbutton.
3.Ifyouencountertheaboveproblems,clearCMOSandsetthejumper
and BIOSoptionagain.
PCI3.3VSBVoltageJumper(JSB)
Setting JSB opencandisconnectthe3.3VSB voltagetoPCIslots.Thiscan preventthe
mainboardfrombeingdamagedifyou addorremoveexpansioncardswithoutunplugingthe
ACpowersupply.However,ifyouwanttousethePCI2.2specificationcompliantexpansion
cardstowakeupthesystem,forexample,anetworkcardwhichsupportswake-up on LAN
function butwithouttheWOLheader,setJSB asclosed,meanwhileset“Wake-UpbyPCI
card”asenabled in“PowerManagementSetup”sectionofthe BIOS.
Note:IfAMRcardisused,thisjumpermustbesetasdefaultsetting closed.
chapter2
DisconnectPCI3.3VSB
ConnectPCI3.3VSB
(Default)
JSB
JSB
Disable:
Enable:
JKB
123
JKB
123

ManualforWinneX3
EnableUSBDevice Wake-up Function (JUSB)
ThemainboardprovidestheadvancedUSB devicewake-upfunction.Thesystemcanbe
wakenup fromitspowersaving including ACPIS3byactivating USBdevice.Beforeusing
thisfunction,setJUSBwithpin1&pin2closed.Otherwise,setJUSBwithpin2&pin3
closedfordisabling.
Note:Notallsystem(BIOS)supportthisoptionalfunction.Pleasecontactyourmainboard
providerorvisitourwebsitetogetthe latestinformation.
FWHProtectionJumper(JAV)
TheBIOSofthemainboardisinsidetheFWH.IfthejumperJAVissetasclosed,youwill
beunabletoflashtheBIOStothemainboard.Howeverinthisstatus,thesystemBIOSis
protectedfrombeingattackedbyseriousvirussuchasCIHvirus.
SettingthejumperJAVasopen (default),meanwhiledisabling the“FlashWriteProtect”item
inAWARDBIOSCMOSSetup,allowsyoutoflashtheBIOStothe flashROMinFWH.
The DMI(DesktopManagementInterface)systeminformation suchastheCPUtype/speed,
memorysize,and expansion cardswill bedetectedbytheonboardBIOSand storedinthe
flashROMinFWH.Wheneverthesystemhardwareconfigurationischanged,DMIinforma-
tionwill beupdatedautomatically.However,setting jumperJAVasclosedmakesflashing
BIOSandupdatingDMIinformation impossible.
Refertopage4forthetwochoicestoimplementFWHProtectionfunction.
16
Installation Instructions
FlashWriteDisabled
FlashWriteEnabled
JAV
JAV
Disable:
Enable:
JUSB
123
JUSB
12 3

ManualforWinneX3
Installation ofAll Drivers
AQDIMainboardUtilityCD-ROMissuppliedwitheachmainboard.Alldriverscan beinstalled
fromthisCD-ROM.Beforeinstalling all thedrivers,checkthesystemrequirementssuchas
theenough systemmemory(atleast32MBforWindows95/98 systemor64MBforWin-
dows2000system)andenough diskspace.Windows95orWindows98mustbefully
installedand runningonthesystem.All runningapplicationsshouldbeclosedbefore
installing thesedrivers.
1.Install INFFileforIntel®810Chipset
TheINFFilesforIntel®
Chipset810containsWindowsdeviceinstallation (*.INF)filesthat
outlinetotheoperating systemhowthechipsetcomponentsshallbeconfiguredforthe
properfunctionality.UnderWindows95/98,run \ChipDrv\Intel\Whitney\inf\Setup.exefor
installation.PleaserefertoREADME.TXTinthedirectory\ChipDrv\Intel\Whitney\inf\for
moreinformation.
2.InstallINFUtilityFiles forIntel®810 Chipset
UnderWindows95/98,run \ChipDrv\Intel\Whitney\infutility\Setup.exeforinstallation.
PleaserefertoREADME.TXTinthedirectory\ChipDrv\Intel\Whitney\infutility\formore
information.
3.InstallVGADrivers
UnderWindows95/98 Englishversion,run\ChipDrv\Intel\Whitney\Display\win9x\Graph-
ics \Setup.exeforinstallation.
UnderWindows95/98Chineseversion,the VGAdrivershouldbeinstalledmanuallyfrom
theDisplayPropertiesWindow.Locatethedirectoryto\ChipDrv\Intel\Whitney
\Display\win9x\Graphics\Win9xwhenprompted.
PleaserefertoREADME.TXTinthedirectory\ChipDrv\Intel\Whitney\Display\win9xfor
moreinformation.
UnderWindowsNT4.0,run\ChipDrv\Intel\Whitney\Display\NT40\Graphics\Setup.exefor
installation.
PleaserefertoREADME.TXTinthedirectory\ChipDrv\Intel\Whitney\Display\NT40\for
moreinformation.
UnderWin2000,theVGAdrivershouldbeinstalledmanually.Forinstallation guide,refer
toREADME.TXTinthedirectory\ChipDrv\Intel\Whitney\Display\win2k.
4.InstallSoundDrivers
UnderWindows95,run \DevDrv\Codec\ad1881\95\driver\Setup.exeforinstallation.
ForWaveSynthMIDIfunctionunderWindows95,ich.infcontainedinthedirectory
\DevDrv\Codec\ad1881\95\95synthshouldbeinstalled.(Pointtothefileich.inf--- Right
click themouse---selectinstall).
UnderWindows98,run \DevDrv\Codec\ad1881\98\Setup.exeforinstallation.
17
chapter2

ManualforWinneX3
UnderWindowsNT4.0,run\DevDrv\Codec\ad1881\nt40\driver\Setup.exeforinstallation.
RegardingtheWaveSynthMIDIfunctionunderWindowsNT4.0,pleasereferto
README.TXTinthedirectory\DevDrv\Codec\ad1881\nt40\MIDI.
PC-cillin98
Newvirusesareappearingfrequently;the chanceofyourPCbeinginfectedincreases;
antivirussoftwaresarebecomingamust.PC-cillin98 offersyoufull-timeactivevirus
protection aswell asmanualscans,plusviruscleancapability.Keeping up todateonthe
latestthreatsand updating significantfilesarecrucialinkeeping antivirussoftwareeffec-
tive.PC-cillin98providesFreeVirusPatternFileUpdatesfromtheTrend MicroWebsite:
http://www.trend.com/download/pattern.htmor
http://www.antivirus.com/download/pattern.htm.
Installation ofPC-cillin98
ForWindows95/98Englishversion,run Setup.exeforinstallationfromtheutilityCD direc-
tory\Pccillin\Win9x.
ForWindows95/98Chineseversion,run Setup.exeforinstallationfromthe utilityCD
directory\Pccillin\PWin9x.
ForWindowsNT4.0,runSetup.exeforinstallation fromtheutilityCDdirectory
\Pccillin\WinNT4.0.
S/NisPNEF-9991-6558-5857-5535.
QDIManageEasy
Itiswellknownthatguaranteeing the computer’ssecurityand reliabilityisessential.Espe-
ciallytoday,effectivelymanaging andmonitoringthecomputer’shardwareisevenmore
important; becauseprocessingandexchangingcriticaldatathrough computerandnetwork
arehappeningeveryday.Movingwiththe computer’sdevelopment, the systemofthe
computerwill becomemoreand morecomplex;atthesametime,the controlofcomputer’s
hardwarewillbestrengthened.Today,itispossibletomonitorand manage yourcomplex
hardwarefromWindows9Xand WindowsNT.QDIManageEasyisasystemtool,likea
bridgebetween the complexhardwareandOS,used toaccesshardwarestatusandto
executesomecontrolfunctions.ItsupportsstrongerfunctionsforWindows9Xand Win-
dowsNT.Thesefunctionsenablesyoutoviewmorethanonehundredofthebasic
information aboutyourcomputerandmonitorsomekeyreferencedataaboutcomputer
healthinrealtime.QDIManageEasyalsohelpsyou touseremoteaccessandcontrol
computersinyourlocalarea network.WithQDIManageEasy,youcanimproveyourman-
agementlevel.
Installation ofQDIManageEasyV2.0
RunSetup.exefromtheutilityCDdirectory\QME2toinstalltheQDIManageEasyV2.0.The
QDIManageEasy Setup Wizardwill guideyouthrough theinstallationprocess.
Fordetailed informationonhowtouseQDIManageEasyV2.0,pleaserefertothe QDI
ManageEasyV2.0onlinehelp.
18
Installation Instructions
Other manuals for WinneX 3
1
Table of contents
Other QDI Motherboard manuals

QDI
QDI Advance 6T User manual

QDI
QDI P5I915PL User manual

QDI
QDI PlatiniX 1 User manual

QDI
QDI P6I440BX/B1S User manual

QDI
QDI Pentium P5I430TX/IIB TITANIUM IIB User manual

QDI
QDI Superb 4 Series User manual

QDI
QDI KinetiZ 7T User manual

QDI
QDI SynactiX 5EP User manual

QDI
QDI P61440FX Commander User manual

QDI
QDI LEGEND-V User manual

QDI
QDI PlatiniX 2E/333 User manual

QDI
QDI CenturieX 2 User manual

QDI
QDI K7VM400M Pro Series User manual

QDI
QDI P5I945P User manual

QDI
QDI SynactiX 2EP User manual

QDI
QDI ZillioX 9 User manual

QDI
QDI K8N4 Series User manual

QDI
QDI J6A User manual

QDI
QDI CenturieX 1 User manual

QDI
QDI Advance 10T Series User manual