ReChargx RX207 User manual

TonerRellKits.com RechargX™RX207
Mon-Fri8am-5pmET©1995-2011ReChargX™,EmptyX,TonerRellKitsandTonerRellKits.com,theTonerRellKitslogo,the 2011.05.17
800.527.3712or352.343.7533ReChargX™andEmptyXlogosaretrademarksownedbyTonerRellkits,LLC.Allrightsreserved. Page1of6
TheToshibaZT170Fisthetonercartridgemost
frequentlyfoundintheToshibaEStudio170F
andothersusingthesameunderlying“engine”
(gure1).
These toner cartridges are quite easy to rell
using our ReChargX™ RX207 Premium Print
TonerRellKit.
WithintheseReChargX™RX207PremiumPrint
Toner Rell Kit instructions, we will be adding
new toner and replacing the toner cartridge
resetchip.
Step 1: Orient the Toner Cartridge
Orient the toner cartridge vertically, standing
itstraightuptoexposethesidewiththetoner
hopperplugtowardtheceiling(gure2).
Inthisorientationthetonerhopperplugwillbe
clearlyvisibleasshownbythewhitearrowin
guretwo.
Step 2: Remove the Toner Hopper Plug
With the cartridge in the same orientation as
shown in gure 2, we will remove the toner
hopperplugfromthecartridge.
Usingaat-bladescrewdriver,inserttheedge
betweentherimofthetonercartridgeandlip
ofthetonerhopperplug,asshowningure3.
ReChargX™ RX207 Instructions
For use in the Toshiba ZT170F toner cartridge
Figure 1:ToshibaZT170Ftonercartridge
Figure 2:Cartridgeorientedwithcartridgeplugfacing
ceiling
Figure 3:Removethetonerhopperplug
í

TonerRellKits.com RechargX™RX207
Mon-Fri8am-5pmET©1995-2011ReChargX™,EmptyX,TonerRellKitsandTonerRellKits.com,theTonerRellKitslogo,the 2011.05.17
800.527.3712or352.343.7533ReChargX™andEmptyXlogosaretrademarksownedbyTonerRellkits,LLC.Allrightsreserved. Page2of7
Using the rim of the toner hopper hole for
leverage,liftuponthetonerhopperplugby
pulling back on the at-blade screwdriver,
poppingthetonerhopperplugupandoutof
thecartridge,asshowningure4.
Step 4: Preparing to Rell the Cartridge
Withthetonerhopperplugremoved(gure5),
youarenowreadytorellthetonercartridge.
Figure 4:Removethetonerhopperplug
Figure 5:Tonerhopperplugremoved

TonerRellKits.com RechargX™RX207
Mon-Fri8am-5pmET©1995-2011ReChargX™,EmptyX,TonerRellKitsandTonerRellKits.com,theTonerRellKitslogo,the 2011.05.17
800.527.3712or352.343.7533ReChargX™andEmptyXlogosaretrademarksownedbyTonerRellkits,LLC.Allrightsreserved. Page3of6
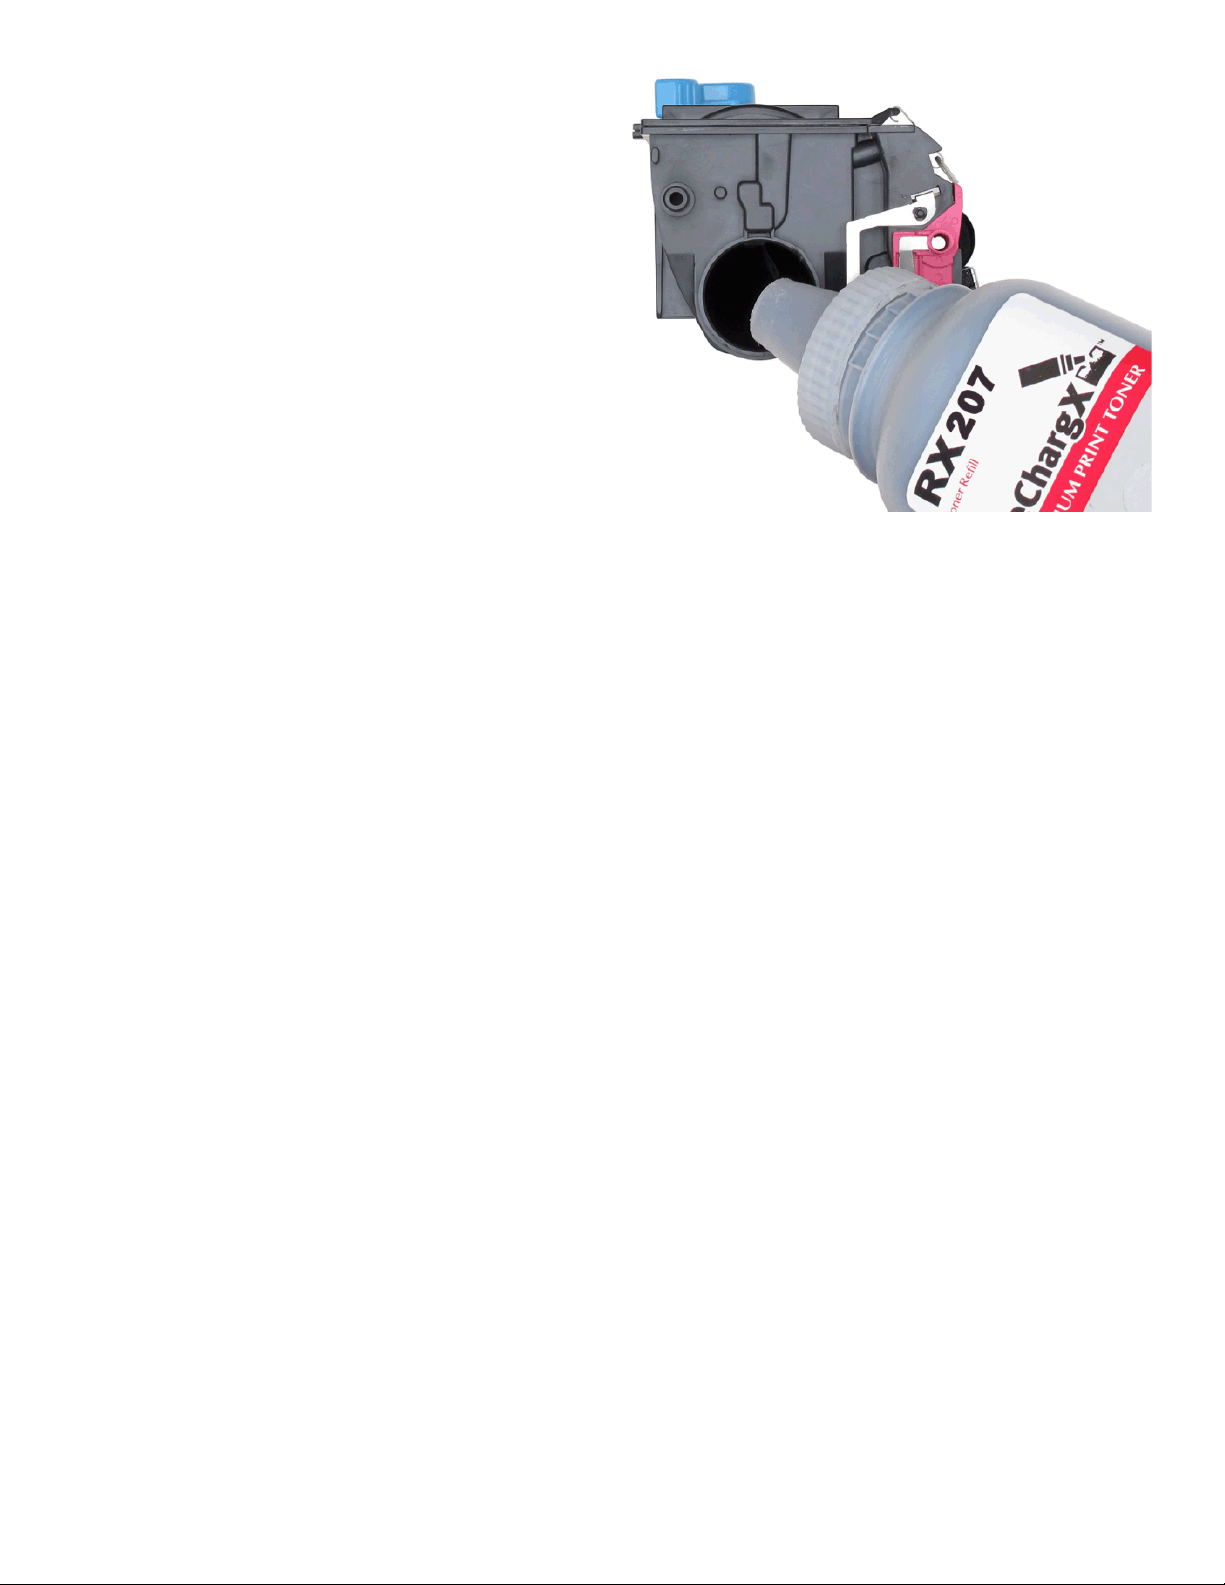
Step 5: Add ReChargX™ RX207 Premium
Print Toner to the Toner Hopper
Now we will ll the toner hopper with the
ReChargX™RX207PremiumPrinttoner.
Toensurethetonerowsfreelyfromthebottle
duringlling,makecertainthecapisscrewed
tightlyonthebottle,thengentlyrock/shakethe
bottletofreeupthetonerthatmayhavesettled
duringshipping.
Next,removetheoriginalcapfromthebottleand
replaceitwiththeplasticdispenserspoutfrom
theReChargX™RX207TonerRellKit.
To make the adding of the toner to the toner
hopperaseasyanddust-freeaspossible,tiltthe
endofthecartridgewiththeholeinitupata
45degreeangleandslowlyanglethedispenser
spoutonthebottleoftonertomeetupwiththe
hole,asshowningure6.
Tiltingthebottleupalittlemorewillstartthe
tonerowingintothetonerhopper.
Note:Ifatanypointthetonerstops owing,
simply stand the bottle upright to loosen the
tonerandstartthepouringprocessoveragain
(resisttemptationtosqueezethebottleasitwill
makeaspillormessmorelikely).
Fillthehopperuntilitappearstobefulloruntil
itappearstonernolongerowseasilyintothe
hopper(anytonerleftinthebottlecaneasily
beadded in the future after youhavedone a
considerableamountofprinting).
Figure 6:FillthetonerhopperwithReChargX™
RX207PremiumPrintToner

TonerRellKits.com RechargX™RX207
Mon-Fri8am-5pmET©1995-2011ReChargX™,EmptyX,TonerRellKitsandTonerRellKits.com,theTonerRellKitslogo,the 2011.05.17
800.527.3712or352.343.7533ReChargX™andEmptyXlogosaretrademarksownedbyTonerRellkits,LLC.Allrightsreserved. Page4of7
Step 6: Clean the Area Around the Toner
Hopper Plug Before RePlugging
Unfoldtheyellow/orange“tonergrabber”cloth
fromtheReChargX™RX207PremiumPrintToner
RellKitandstretchitalongbothdimensions(it
willstretchconsiderablyinonedimensionand
nottheother).
Stretchingtheyellow/orangetonergrabbercloth
activatesthetonerretainingsubstancethatis
embeddedwithinthecloth.
Youwillusethisclothtocleantheoutsideofthe
tonerhopperplug,asshowningure7.
(Note:Onlyusethetonergrabberclothonthe
exteriorofthetonercartridgearoundthetoner
hopperplugarea.Donotusetheclothtoclean
anyoftheinternalcomponents,thedeveloper
rollerortheimagingdrum.)
Step 7: Plug the Toner Hopper Hole with
the Toner Hopper Plug
Lowertheplugdownintothetonerhopperhole
andpressrmlyaroundtheentireplugtoensure
itsecurelysitsinsidethecartridge,asshownin
gure8.
Step 8: Orient the Toner Cartridge
Orient the toner cartridge so the top of the
cartridgeislayingontheworksurfaceandthe
underbellyisfacingupward.
Inthisorientation,thecartridgeresetchipwill
belocatedonyourleft side, as shown by the
whitearrowsingure9.
Figure 7:Cleanthetonerhopperhole
Figure 8:Plugthetonerhopperhole
Figure 9:Orientthetonercartridge
î í

TonerRellKits.com RechargX™RX207
Mon-Fri8am-5pmET©1995-2011ReChargX™,EmptyX,TonerRellKitsandTonerRellKits.com,theTonerRellKitslogo,the 2011.05.17
800.527.3712or352.343.7533ReChargX™andEmptyXlogosaretrademarksownedbyTonerRellkits,LLC.Allrightsreserved. Page5of6
Step 9: Locate the Cartridge Reset Chip
Theresetchipislocatedontheleftsideofthe
tonercartridgeasshownbythewhitecirclein
gure10.
Step 10: Remove the First Screw
Thecartridgeresetchipisheldinplacebytwo
smallscrews.
Tobegin,useasmallphilips-headscrewdriver
toremovetherstoftwoscrews,asshownin
gure11.
Setthisscrewasidetobeusedlater.
Step 11: Remove the Second Screw
With the rst screw removed, use the
philips-head screwdriver to remove the
second of the two screws, as shown in
gure12.
Setthisscrewasidetobeusedlater.
Figure 10:Locatetheresetchip
Figure 11:Removetherstscrew
Figure 12:Removethesecondscrew

TonerRellKits.com RechargX™RX207
Mon-Fri8am-5pmET©1995-2011ReChargX™,EmptyX,TonerRellKitsandTonerRellKits.com,theTonerRellKitslogo,the 2011.05.17
800.527.3712or352.343.7533ReChargX™andEmptyXlogosaretrademarksownedbyTonerRellkits,LLC.Allrightsreserved. Page6of7
Step 12: Cartridge Reset Chip Removed
The toner cartridge reset chip has now been
removed,leavinganemptyspotwhereitonce
sat,asshowningure13.
Step 13: Replacing the Reset Chip
RemovetheRX207-RCresetchipfromthesmall
pinkbagincludedwiththeReChargX™RX207
tonerrellkit.
Placetheresetchipintoplaceinwhichtheold
resetchipsatwithinthesameorientationshown
ingure14.
Step 14: Replace the First Screw
Usingthephilips-headscrewdriver,replacethe
rstscrewbackintoplace,showningure15.
Figure 13:Removetheresetchip
Figure 14:Replacetheresetchip
Figure 15:Replacetherstscrew

TonerRellKits.com RechargX™RX207
Mon-Fri8am-5pmET©1995-2011ReChargX™,EmptyX,TonerRellKitsandTonerRellKits.com,theTonerRellKitslogo,the 2011.05.17
800.527.3712or352.343.7533ReChargX™andEmptyXlogosaretrademarksownedbyTonerRellkits,LLC.Allrightsreserved. Page7of6
Step 15: Replace the Second Screw
Again, using the philips-head screwdriver,
replace the second screw back into place,
showningure16.
Completion
Congratulations!You havesuccessfully relled
yourToshibaZT170Fcartridgeandreplacedthe
cartridgeresetchip.
Enjoyyoursavings.
-EndofReChargX™RX207Instructions-
Technical Support
Tofurther help yourReChargX™RX207Toner
Rell procedure, we are always ready, willing
andhappytoansweranyofyourquestionsor
commentsviatechnicalsupport.
Please contact us at 352.343.7533 or
800.527.3712M-F8am-5pmET.
Additionally, you may also chat with us using
LiveHelponourwebsite(M-F8am-5pmET)or
submitatechnicalsupportticketat
www.TonerRellKits.com/Tech_Support.php
Figure 16:Replacethesecondscrew
Table of contents
Other ReChargx Printer Accessories manuals

ReChargx
ReChargx RX006 User manual

ReChargx
ReChargx RX022 User manual

ReChargx
ReChargx RX160 User manual

ReChargx
ReChargx RX211 User manual

ReChargx
ReChargx RX052 User manual

ReChargx
ReChargx RX163 User manual

ReChargx
ReChargx RX411 User manual

ReChargx
ReChargx RX230A User manual

ReChargx
ReChargx RX201X User manual

ReChargx
ReChargx RX292 User manual