ReChargx RX211 User manual

TonerRellKits.com RechargX™RX211
Mon-Fri8am-5pmET©1995-2011ReChargX™,EmptyX,TonerRellKitsandTonerRellKits.com,theTonerRellKitslogo,the 2011.06.14
800.527.3712or352.343.7533ReChargX™andEmptyXlogosaretrademarksownedbyTonerRellkits,LLC.Allrightsreserved. Page1of12
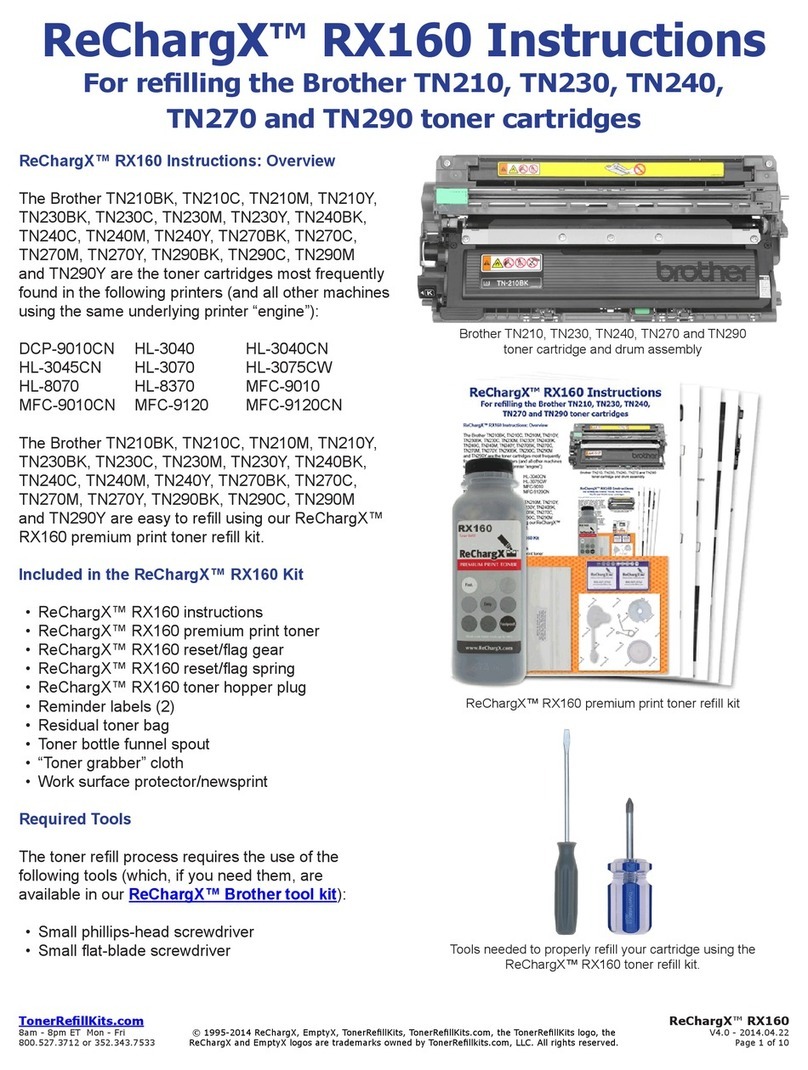
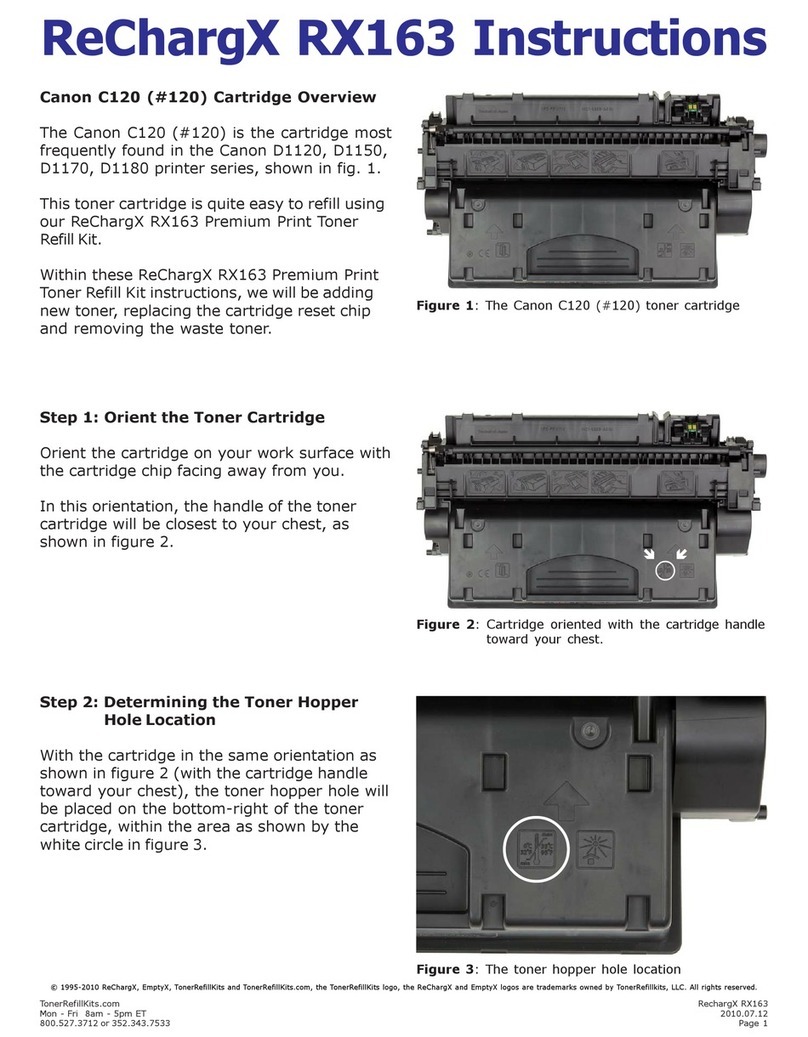
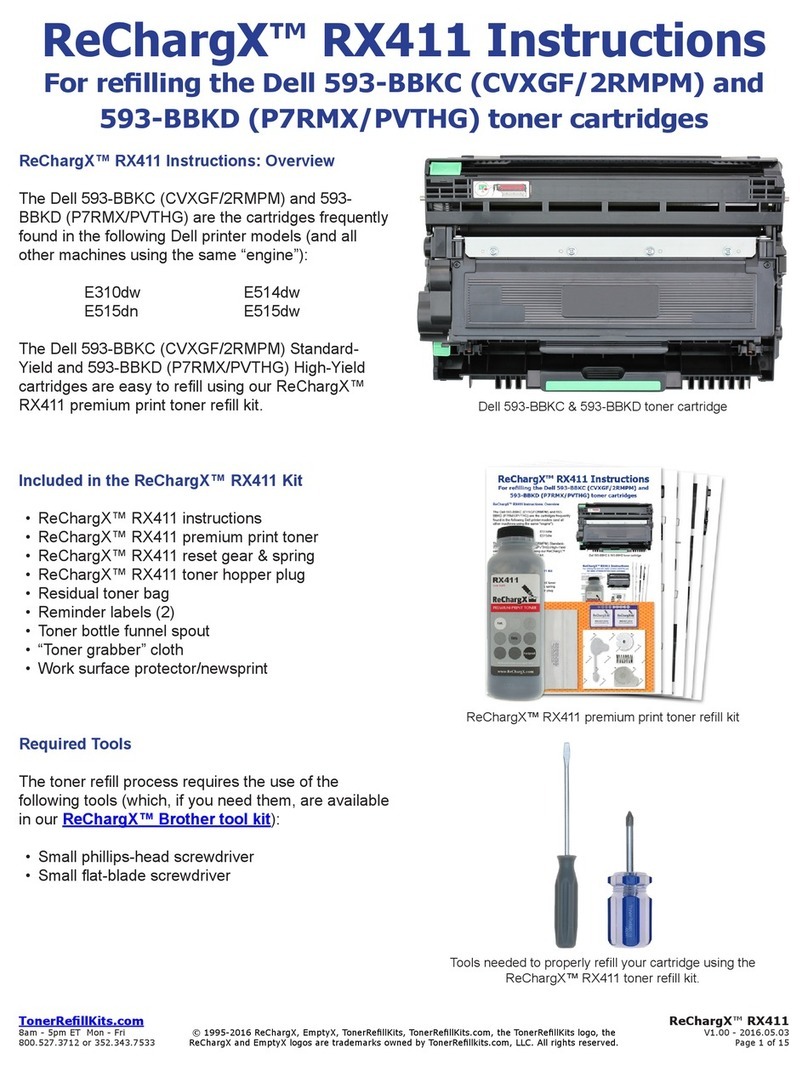
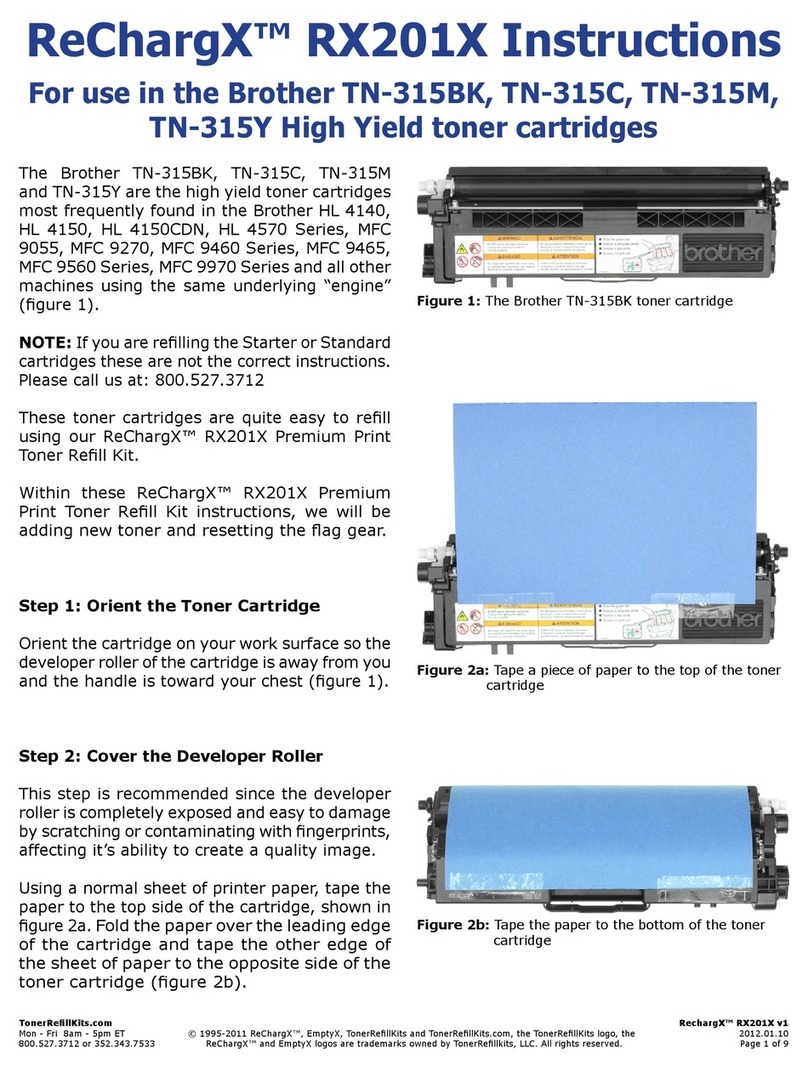
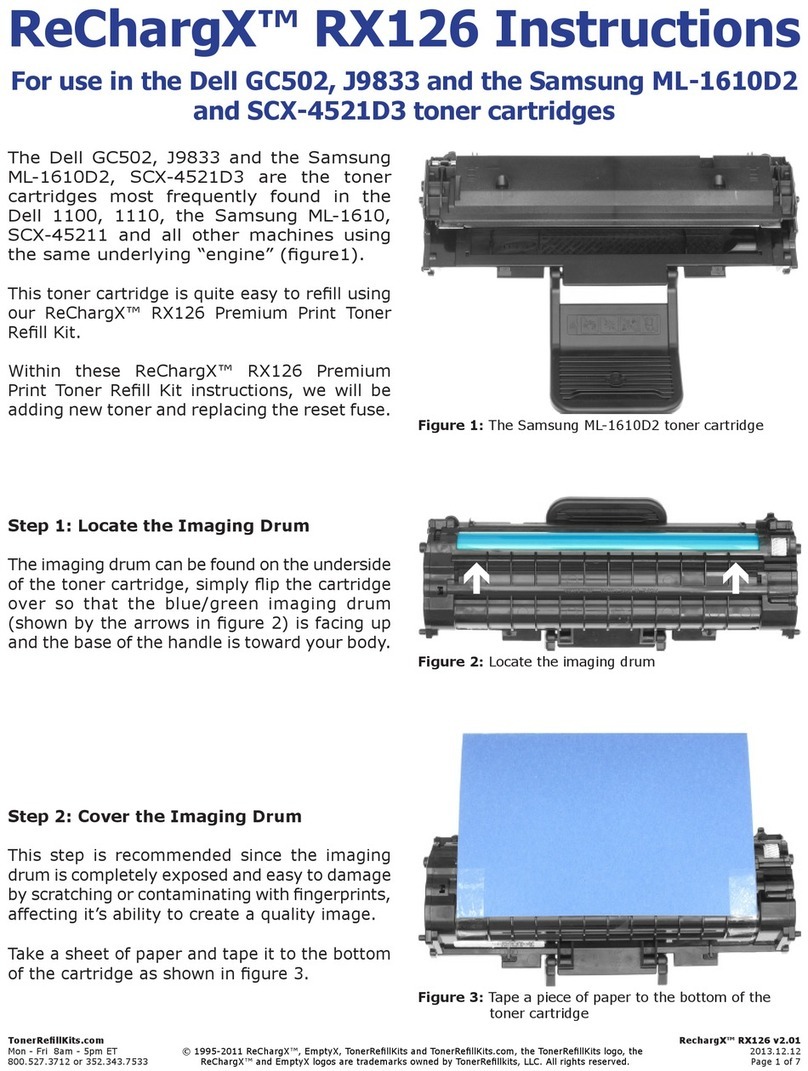
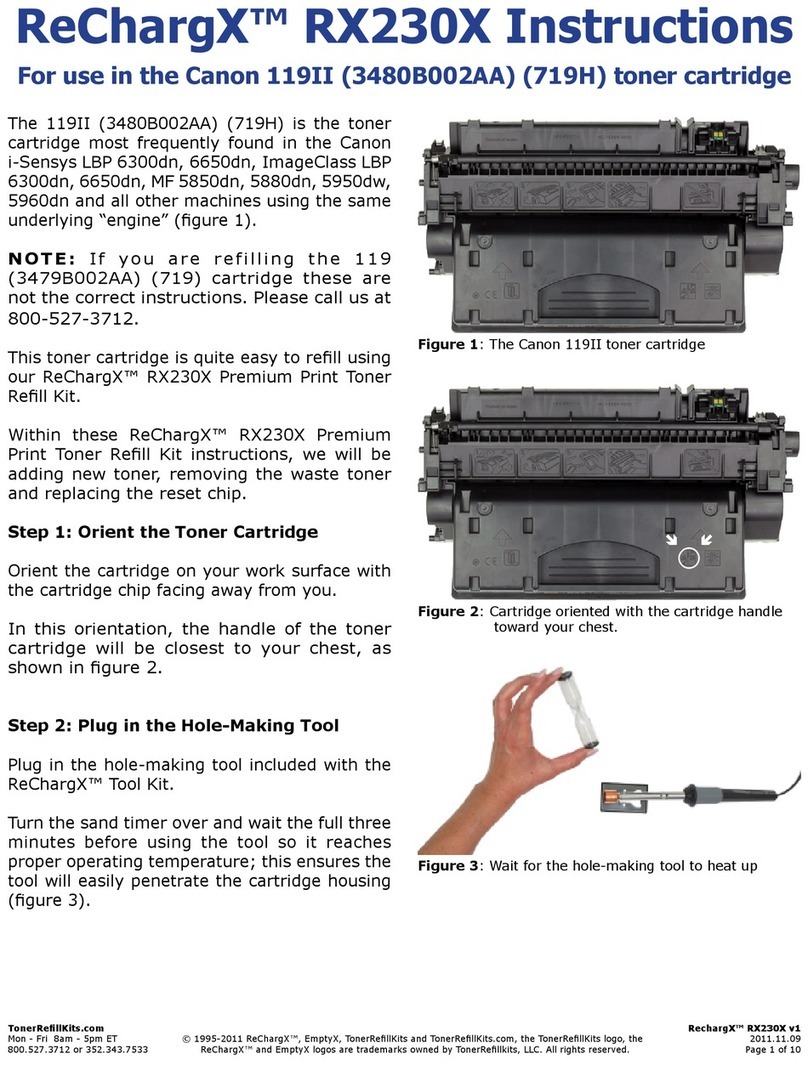
ReChargX™ RX211 Instructions
For use in the
Canon 116 series toner cartridges
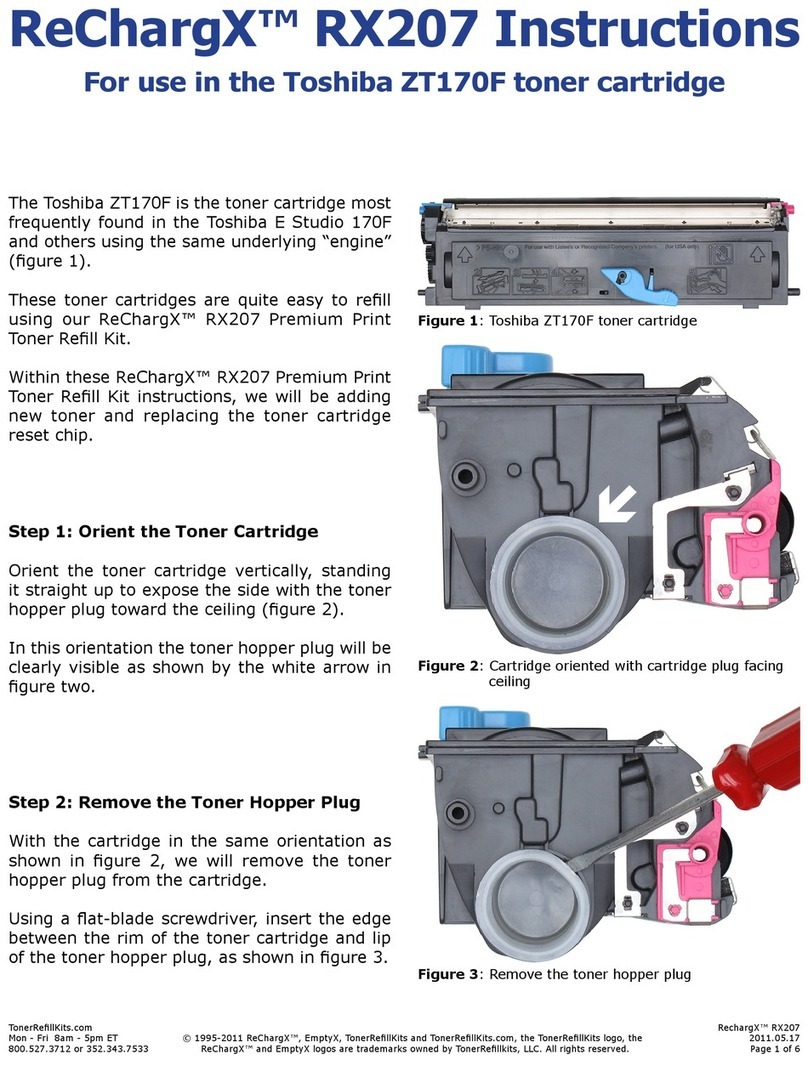
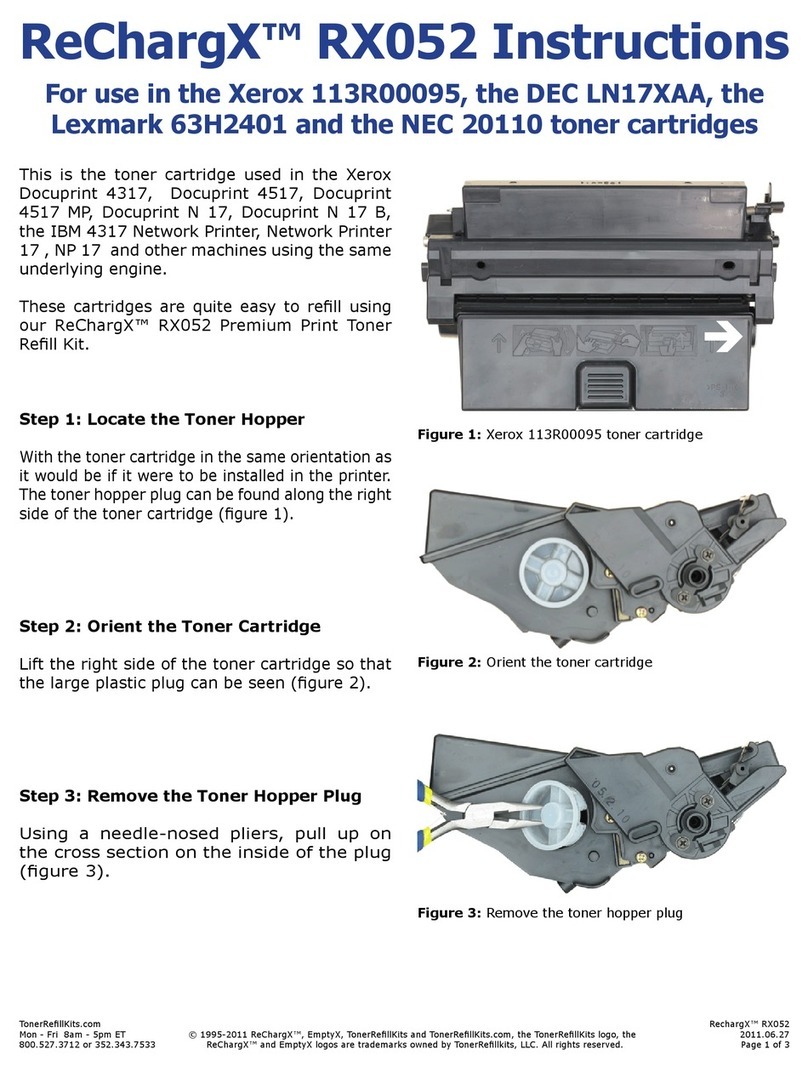
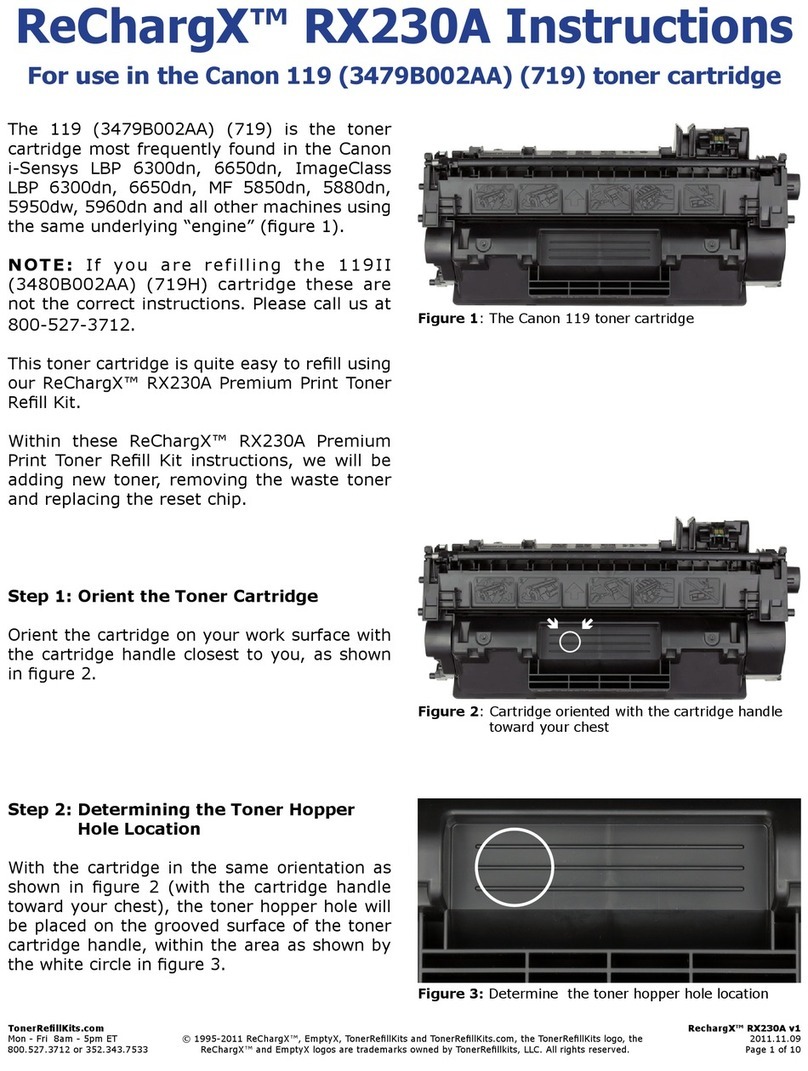
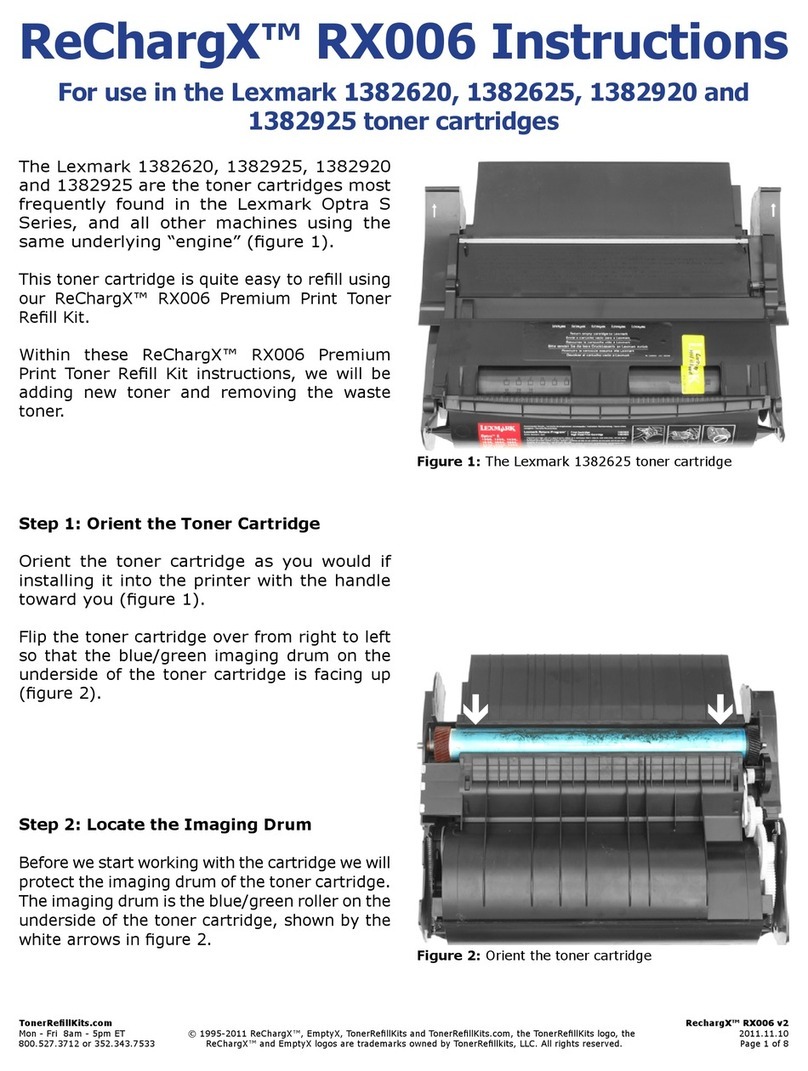
TheCanon116Seriestonercartridgesaremost
frequently found in the Canon imageCLASS
MF8050Cn,MF8030Cn,i-SENSYSLBP-5050,LBP
5050nandallothermachinesusingthesame
“underlying”engine.
These toner cartridges are quite easy to rell
using our ReChargX™ RX211 Premium Print
TonerRellKits.
WithintheseReChargX™RX211PremiumPrint
TonerRellKitinstructionswewillbeaddingnew
toner,emptyingthewastehopperandreplacing
thetonercartridgeresetchip.
Note:WewillbeworkingwiththeCanon116
Black cartridge throughout the instructions.
These instructions apply to all four cartridges
withinthisseries(Black,Cyan,Magenta,Yellow).
Step 1: Orient the Toner Cartridge
Orientthecartridgeonyourworksurfacesothe
cartridgehandle istowardyourchestandthe
resetchipisontheleftside,asshownbythe
redcircleingure1.
Step 2: Cover the Imaging Drum
Rotate the cartridge on your work surface so
thetonercartridgedrumistowardtheceiling;
tapeapieceofpaperalongthefrontedgeofthe
cartridge(gure2a).
Fold the paper over the imaging drum and
tapetheothersidetotheedgeofthetoner
cartridge(gures2band2c).
Figure 1:TheCanon116Blacktonercartridge
Figure 2a:Tapeapieceofpaperalongthefrontedgeof
thetonercartridge
Figure 2b:Foldthepaperovertheimagingdrum
Figure 2c:Tapethepaperovertheimagingdrum
TonerRellKits.com RechargX™RX211
Mon-Fri8am-5pmET©1995-2011ReChargX™,EmptyX,TonerRellKitsandTonerRellKits.com,theTonerRellKitslogo,the 2011.06.14
800.527.3712or352.343.7533ReChargX™andEmptyXlogosaretrademarksownedbyTonerRellkits,LLC.Allrightsreserved. Page2of12
Step 3: Locate the Toner Hopper Area
Orientthecartridgeonyourworksurfacesothe
tonercartridgehandleistowardyourchestand
theresetchiponistheleft.Thetonerhopper
hole will be placed on the far left side of the
cartridgeasshownbytheyellowboxingure3.
Step 4: Removing the Toner Cartridge
Label before Relling (Part 1)
Using a at-head screwdriver, included in the
ReChargX™ToolKit,pryupthelabelofthecar-
tridgeandpeelitbacktoexposeasignicant
amountofcartridgesurface(g.4).
Step 5: Removing the Toner Cartridge
Label before Relling (Part 2)
Removetheexcesspieceoflabelanddiscardit
(gure5).
Figure 3:Thetonerhopperholelocation
Figure 4:RemovetheCartridgeLabel(Part1)
Figure 5:RemovetheCartridgeLabel(Part2)

TonerRellKits.com RechargX™RX211
Mon-Fri8am-5pmET©1995-2011ReChargX™,EmptyX,TonerRellKitsandTonerRellKits.com,theTonerRellKitslogo,the 2011.06.14
800.527.3712or352.343.7533ReChargX™andEmptyXlogosaretrademarksownedbyTonerRellkits,LLC.Allrightsreserved. Page3of12
Step 6: The Toner Hopper Hole Location
Youwillbeplacingthetonerhopperholewithin
theareashownbythewhitecircleingure6a.
Thelocationofthetonerhopperholemustbe
placedonlywithintheareashownandnofurther
asoutlinedingure6b.
Failuretoplacethetonerhopperholewithinthe
designatedareamayresultindamagetoyour
cartridge.
Step 7: Plug in the Hole-Making Tool
Pluginthehole-makingtoolincludedwiththe
ReChargX™ToolKit.
Turnthesandtimeroverandwaitthefullthree
minutes before using the tool so it reaches
properoperatingtemperature;thisensuresthe
toolwilleasilypenetratethecartridgehousing
(gure7).
Step 8: Creating the Toner Hopper Hole
WhileholdingtheReChargX™hole-makingtool
directlyoverthelocationforthetonerhopper
hole,slowlypressthecopperhole-makingbit
against the cartridge until it penetrates the
cartridgehousing.
Since the tool is quite hot, excessive force is
unnecessary(gure8).
Note:Oncethecoppertipofthehole-making
toolpenetratesthetopofthetonercartridge,
immediatelywithdrawthetool,unplugitfrom
thewallandproceedtostep9beforethetoolis
allowedtocooloff.
Figure 6a:Thetonerhopperholelocation
Figure 6b:Thetonerhopperholelocation
Figure 7:Waitforthehole-makingtooltoheatup
Figure 8:Createthetonerhopperhole

TonerRellKits.com RechargX™RX211
Mon-Fri8am-5pmET©1995-2011ReChargX™,EmptyX,TonerRellKitsandTonerRellKits.com,theTonerRellKitslogo,the 2011.06.14
800.527.3712or352.343.7533ReChargX™andEmptyXlogosaretrademarksownedbyTonerRellkits,LLC.Allrightsreserved. Page4of12
Step 9: Remove the Excess Plastic From
the Hole-Making Tool
Use the metal tip of the small at-blade
screwdriver(includedintheReChargX™Tool
Kit) to remove the small, circular piece of
plastic that will normally remain inside the
copperhole-makingbit(gure9).
Note:Thisstepneedstobecompletedbefore
the hole-making tool cools off. If the plastic
doeshardeninsidethecopperbit,pluginthe
toolandremovetheplasticdebrisassoonasit
startstoloosenfromthebit.
Step 10: Empty the Toner Hopper
Now,wewillremovetheresidualtonerfromthe
tonercartridge.
Critical:Yourprintqualitywillsuffersignicantly
iftheremainingtonerisnotrstremoved.This
stepisonlynecessaryontherstrellofeach
cartridge.
Holdingthecartridgeinsidetheplasticzip-top
bag,includedinyourReChargX™RX211Rell
Kit,carefullypouroutallremainingtoner.Ifthe
tonerstopsowing,givethecartridgealighttap
tostarttheowagain
(gure10).
Shaking the toner cartridge up-and-down
isnotrecommendasitnormallycreatesan
unnecessarytonermess.
If the toner stops owing, lift the end of the
cartridgeupandthenre-lowertheholewithin
the bag. Gently tapping along the side of the
cartridgehelpstokeepthetonerowing.
With the majority of the toner removed from
the cartridge, carefully zip the bag closed to
prevent accidental spills while discarding the
bagandtoner.
Figure 9:Removetheexcessplasticpiece
Figure 10:EmptytheTonerHopper

TonerRellKits.com RechargX™RX211
Mon-Fri8am-5pmET©1995-2011ReChargX™,EmptyX,TonerRellKitsandTonerRellKits.com,theTonerRellKitslogo,the 2011.06.14
800.527.3712or352.343.7533ReChargX™andEmptyXlogosaretrademarksownedbyTonerRellkits,LLC.Allrightsreserved. Page5of12
Step 11: Fill the Toner Hopper with
ReChargX™ RX211 Premium
Print Toner
Inthisstepwewillllthetonerhopperwiththe
ReChargX™RX211PremiumPrinttoner.
Toensurethetonerowsfreelyfromthebottle
duringlling,makecertainthecapisscrewed
tightlyonthebottle,thengentlyrock/shakethe
bottletofreeupthetonerthatmayhavesettled
duringshipping.
Next,removetheoriginalcapfromthebottleand
replaceitwiththeplasticdispenserspoutfrom
theReChargX™RX211TonerRellKit.
To make the adding of the toner to the toner
hopperaseasyanddust-freeaspossible,tiltthe
endofthecartridgewiththeholeinitupata
45degreeangleandslowlyanglethedispenser
spoutonthebottleoftonertomeetupwiththe
hole(gure11).
Tiltingthebottleupalittlemorewillstartthe
tonerowingintothetonerhopper.
Note:Ifatanypointthetonerstopsowing,
simply stand the bottle upright to loosen the
tonerandstartthepouringprocessoveragain
(resisttemptationtosqueezethebottleasitwill
makeaspillormessmorelikely).
Fillthehopperuntilitappearstobefulloruntil
itappearstonernolongerowseasilyintothe
hopper(anytonerleftin thebottlecaneasily
beadded in the future afteryou havedone a
considerableamountofprinting).
Figure 11:FilltheCanon116cartridgewiththe
ReChargX™RX211TonerRellKit

TonerRellKits.com RechargX™RX211
Mon-Fri8am-5pmET©1995-2011ReChargX™,EmptyX,TonerRellKitsandTonerRellKits.com,theTonerRellKitslogo,the 2011.06.14
800.527.3712or352.343.7533ReChargX™andEmptyXlogosaretrademarksownedbyTonerRellkits,LLC.Allrightsreserved. Page6of12
Step 12: Clean the Area Around the Toner
Hopper Hole Before Sealing
Unfoldtheorange“tonergrabber”clothfromthe
ReChargX™ RX211 Premium Print Toner Rell
Kitandstretchitalongbothdimensions(itwill
stretchconsiderablyinonedimensionandnot
theother).
Stretching the orange toner grabber cloth
activatesthetoner retainingsubstance that
isembeddedwithinthecloth.
Youwillbeusingthisclothtocleantheoutsideof
thetonerhopperholetoensuretheReChargX™
leak-proofsealwillbeappliedsecurelytothecar-
tridge(gure12).
Note:Onlyusethetonergrabberclothonthe
exteriorofthecartridge.Donotusethecloth
tocleananyoftheinternalcomponents,orthe
imagingdrum.
Step 13: Remove the ReChargX™ Seal
from the Protective Backing
RemovetheReChargX™leak-proofsealfromthe
protectivebacking,includedintheReChargX™
RX211TonerRellKit(gure13).
Step 14: Seal the Toner Hopper Hole
Laytheseal(withouttampingitdown,asyet)
overthetonerhopperhole.
Onceyouaresatisedwithyourplacementof
thesealoverthehole,pressrmlyaroundthe
entireperimeterofthesealtomakecertainthere
isastrongbondbetweenthetopofthecartridge
andtheseal(gure14).
Figure 12:Cleantheareaaroundthehopperhole
Figure 13:RemovetheReChargX™leak-proofseal
fromtheprotectivebacking
Figure 14:Sealthetonerhopperhole

TonerRellKits.com RechargX™RX211
Mon-Fri8am-5pmET©1995-2011ReChargX™,EmptyX,TonerRellKitsandTonerRellKits.com,theTonerRellKitslogo,the 2011.06.14
800.527.3712or352.343.7533ReChargX™andEmptyXlogosaretrademarksownedbyTonerRellkits,LLC.Allrightsreserved. Page7of12
Step 15: Locate the Waste Hopper Area
Orientthecartridgeonyourworksurfacewith
the bottom of the cartridge facing toward the
ceiling(gure16).
In this orientation, the waste hopper will be
locatedontheleftsidewithintheareashown
bythewhitecircle.
Step 16: Plug in the Hole-Making Tool
Pluginthehole-makingtoolincludedwiththe
ReChargX™ToolKit.
Turnthesandtimeroverandwaitthefullthree
minutes before using the tool so it reaches
proper operating temperature (figure 17).
Thisensuresthetoolwilleasilypenetratethe
cartridgehousing.
Step 17: Waste Hopper Hole Location
The waste hopper hole will be placed on the
bottom-leftsideofthecartridge,asshownby
thewhitecircleandarrowsingure18.
Figure 16:Locatethetonerwastehopperarea
Figure 17:Waitforthehole-makingtooltoheatup
Figure 18:Thewastehopperholelocation

TonerRellKits.com RechargX™RX211
Mon-Fri8am-5pmET©1995-2011ReChargX™,EmptyX,TonerRellKitsandTonerRellKits.com,theTonerRellKitslogo,the 2011.06.14
800.527.3712or352.343.7533ReChargX™andEmptyXlogosaretrademarksownedbyTonerRellkits,LLC.Allrightsreserved. Page8of12
Step 18: Create the Waste Hopper Hole
HoldtheReChargX™hole-makingtooldirectly
over the location for the hole and press the
copper hole-making bit against the cartridge
allowingtheheatofthetooltocreatethehole
(there is no need to use excessive force, let
thetooldotheworkwithaminimalamountof
pressure),asshowningure19.
Note:Oncethecoppertipofthehole-making
tool slowly penetrates the top of the toner
cartridge, immediately withdraw the tool and
unplugitfromthewall.
Step 19: Remove the Excess Plastic From
the Hole-Making Tool
Use the metal tip of the small at-blade
screwdriver(includedintheReChargX™Tool
Kit) to remove the small, circular piece of
plastic that will normally remain inside the
copperhole-makingbit(gure20).
Note:Thisstepneedstobecompletedbefore
the hole-making tool cools off. If the plastic
doeshardeninsidethecopperbit,pluginthe
toolandremovetheplasticdebrisassoonasit
startstoloosenfromthebit.
Figure 19:Createthewastehopperhole
Figure 20:Removetheexcessplasticpiece

TonerRellKits.com RechargX™RX211
Mon-Fri8am-5pmET©1995-2011ReChargX™,EmptyX,TonerRellKitsandTonerRellKits.com,theTonerRellKitslogo,the 2011.06.14
800.527.3712or352.343.7533ReChargX™andEmptyXlogosaretrademarksownedbyTonerRellkits,LLC.Allrightsreserved. Page9of12
Step 20: Empty the Waste Hopper
Nowwewillremovethewastetonerfromthe
tonercartridge.
NOTE:Thistonercannotbeusedagainaspa-
per,dust, hair,staplesand othersmallitems
canaccumulateinthewastehopper.
Holdingthecartridgeoverthenewsprintincluded
intheReChargXRX211RellKit,carefullypour
outanywastetoner,asshowningure21.
Ifthewastetonerstopsowing,standthe
cartridge up again and then re-lower the
hole over the paper (gently tapping along
thesideofthecartridgehelpskeepthetoner
owingaswell).
NOTE:Thereisnoneedtoattempttoremove
everylastbitofwastetonerfromthehopper,
justthatwhichcomesouteasily.
Step 21: Clean the Area Around the Toner
Hopper Hole Before Sealing
Unfoldtheorange“tonergrabber”clothfromthe
ReChargX™ RX211 Premium Print Toner Rell
Kitandstretchitalongbothdimensions(itwill
stretchconsiderablyinonedimensionandnot
theother).
Stretching the orange toner grabber cloth
activatesthetoner retainingsubstance that
isembeddedwithinthecloth.
Youwillbeusingthisclothtocleantheoutsideof
thetonerhopperholetoensuretheReChargX™
leak-proofsealwillbeappliedrmlytothecartridge
(gure22).
Note:Onlyusethetonergrabberclothonthe
exteriorofthecartridge.Donotusethecloth
tocleananyoftheinternalcomponentsorthe
imagingdrum.
Figure 21:EmptytheTonerHopper
Figure 22:Cleantheareaaroundthewastehole

TonerRellKits.com RechargX™RX211
Mon-Fri8am-5pmET©1995-2011ReChargX™,EmptyX,TonerRellKitsandTonerRellKits.com,theTonerRellKitslogo,the 2011.06.14
800.527.3712or352.343.7533ReChargX™andEmptyXlogosaretrademarksownedbyTonerRellkits,LLC.Allrightsreserved. Page10of12
Step 22: Remove the ReChargX™ Seal
from the Protective Backing
RemovetheReChargX™leak-proofsealfromthe
protectivebacking,includedintheReChargX™
RX211TonerRellKit(gure23).
Step 23: Apply the Leak-Proof Seal
Press rmly around the entire seal to ensure
thesealsecurelystickstothetonercartridge,
showningure24.
Step 24: Reset Chip Location
Orientthecartridgeasyouwouldifyouwerein-
stallingitintotheprinterwiththehandletoward
you.Theresetchipislocatedontheleftofthe
cartridgeshownbythewhitecircleingure25.
Figure 23:RemovingtheReChargX™leak-proofseal
fromtheprotectivebacking
Figure 24:Sealingthewastehopperhole
Figure 25:Locatethecartridgeresetchip

TonerRellKits.com RechargX™RX211
Mon-Fri8am-5pmET©1995-2011ReChargX™,EmptyX,TonerRellKitsandTonerRellKits.com,theTonerRellKitslogo,the 2011.06.14
800.527.3712or352.343.7533ReChargX™andEmptyXlogosaretrademarksownedbyTonerRellkits,LLC.Allrightsreserved. Page11of12
Step 25: Overview of the Reset Chip
Notethelocationoftheresetchiponthetoner
cartridgeasshowningure26.
Step 26: Remove the Plastic Tabs
Thetoner cartridgereset chipisheld inplace
bytwosmallplastictabs.Thesetabsmustbe
removedbeforethecartridgeresetchipcanbe
removed,asshowningure27.
Gentlypryuponeachofthecartridgeresetchip
tabstobreakthemsothechipcanberemoved
fromthecartridge.
Step 27: Removing the Reset Chip
Afterthetwotabshavebeenremoved,pushthe
chipoutoftheslot,asshowningure28.
Figure 26:Thecartridgeresetchip
Figure 27:Removethecartridgechiptabs
Figure 28:Removethecartridgeresetchip

TonerRellKits.com RechargX™RX211
Mon-Fri8am-5pmET©1995-2011ReChargX™,EmptyX,TonerRellKitsandTonerRellKits.com,theTonerRellKitslogo,the 2011.06.14
800.527.3712or352.343.7533ReChargX™andEmptyXlogosaretrademarksownedbyTonerRellkits,LLC.Allrightsreserved. Page12of12
Step 28: Replacing the Reset Chip
Afterslidingouttheoldchip,slidethenew
RX211-RCchipintotheslot(inthisorien-
tationmakecertainthenotchesarefacing
inward,asshowningure29).
Step 29: Secure the Reset Chip
Ifthechipsitsverylooselyintheslot,atinybit
oftape(includedintheRX211TonerRellKit)
canbeusedonthetopofthechiptoholditin
place,asshowningure30-DO NOT COVER
THE BRASS CONTACTS!
Completion
Congratulations!Youhavesuccessfully relled
yourCanon116seriestonercartridge,emptied
thewastehopperandreplacedtheresetchip.
-Congratulations!You’redone!-
Technical Support
Tofurther helpyour ReChargX™RX211Toner
Rell procedure, we are always ready, willing
andhappytoansweranyofyourquestionsor
commentsviatechnicalsupport.
Please contact us at 352.343.7533 or
800.527.3712M-F8am-5pmET.
Additionally, you may also chat with us using
LiveHelponourwebsite(M-F8am-5pmET)or
submitatechnicalsupportticketatwww.Toner-
RellKits.com/Tech_Support.php
Figure 29:Replacethecartridgeresetchip
Figure 30:Securethecartridgeresetchip
Other ReChargx Printer Accessories manuals

ReChargx
ReChargx RX230X User manual

ReChargx
ReChargx RX207 User manual

ReChargx
ReChargx RX237 User manual

ReChargx
ReChargx RX160 User manual

ReChargx
ReChargx RX006 User manual

ReChargx
ReChargx RX411 User manual

ReChargx
ReChargx RX292 User manual

ReChargx
ReChargx RX052 User manual

ReChargx
ReChargx RX022 User manual

ReChargx
ReChargx RX163 User manual
Popular Printer Accessories manuals by other brands

Star Micronics
Star Micronics TSP800 Series install guide

Citizen
Citizen CBM-202PC Series user manual

Canon
Canon Color imageCLASS MF8170c installation instructions

Codonics
Codonics Virtua 1VCX-LR833 Technical brief

Roland
Roland DU2-64 Supplementary manual

TonerRefillKits
TonerRefillKits ReChargX RX126 instructions