manuals.online logo
Brands
  1. Home
  2. •
  3. Brands
  4. •
  5. ReChargx
  6. •
  7. Printer Accessories
  8. •
  9. ReChargx RX230A User manual

ReChargx RX230A User manual

TonerRellKits.com  RechargX™RX230Av1
Mon - Fri 8am - 5pm ET © 1995-2011 ReChargX™, EmptyX, TonerRellKits and TonerRellKits.com, the TonerRellKits logo, the 2011.11.09
800.527.3712 or 352.343.7533 ReChargX™ and EmptyX logos are trademarks owned by TonerRellkits, LLC. All rights reserved. Page 1 of 10
The 119 (3479B002AA) (719) is the toner
cartridge most frequently found in the Canon
i-Sensys LBP 6300dn, 6650dn, ImageClass
LBP 6300dn, 6650dn, MF 5850dn, 5880dn,
5950dw, 5960dn and all other machines using
the same underlying “engine” (gure 1).
NOTE: If you are refilling the 119II
(3480B002AA) (719H) cartridge these are
not the correct instructions. Please call us at
800-527-3712.
This toner cartridge is quite easy to rell using
our ReChargX™ RX230A Premium Print Toner
Rell Kit.
Within these ReChargX™ RX230A Premium
Print Toner Rell Kit instructions, we will be
adding new toner, removing the waste toner
and replacing the reset chip.
Step1:OrienttheTonerCartridge
Orient the cartridge on your work surface with
the cartridge handle closest to you, as shown
in gure 2.
Step2:DeterminingtheTonerHopper
HoleLocation
With the cartridge in the same orientation as
shown in gure 2 (with the cartridge handle
toward your chest), the toner hopper hole will
be placed on the grooved surface of the toner
cartridge handle, within the area as shown by
the white circle in gure 3.
ReChargX™ RX230A Instructions
For use in the
Canon 119 (3479B002AA) (719)
toner cartridge
Figure1: The Canon 119 toner cartridge


Figure2: Cartridge oriented with the cartridge handle
toward your chest
Figure3:Determine the toner hopper hole location
TonerRellKits.com  RechargX™RX230Av1
Mon - Fri 8am - 5pm ET © 1995-2011 ReChargX™, EmptyX, TonerRellKits and TonerRellKits.com, the TonerRellKits logo, the 2011.11.09
800.527.3712 or 352.343.7533 ReChargX™ and EmptyX logos are trademarks owned by TonerRellkits, LLC. All rights reserved. Page 2 of 10
Step3:PlugintheHole-MakingTool
Plug in the hole-making tool included with the
ReChargX™ Tool Kit.
Turn the sand timer over and wait the full three
minutes before using the tool so it reaches
proper operating temperature; this ensures the
tool will easily penetrate the cartridge housing
(gure 4).
Step4:CreatingtheTonerHopperHole
Hold the ReChargX™ hole-making tool directly
over the location for the hole and press the
copper hole-making bit against the cartridge
allowing the heat of the tool to create the hole
(there is no need to use excessive force, let
the tool do the work with a minimal amount of
pressure), as shown in gure 5.
Note: Once the copper tip of the hole-making tool
slowly penetrates the top of the toner cartridge,
immediately withdraw the tool and unplug it from
the wall.
Step5:RemovetheExcessPlasticFrom
theHole-MakingTool
Using the tip of the at-blade screwdriver,
included in the ReChargX™ Tool Kit, remove
the small piece of plastic from the copper tip
of the hole-making tool, as shown in gure 6.
This small piece of plastic becomes impossible
to remove once it becomes cold and hardens to
the copper tip of the hole-making tool.
Figure4: Waiting for the hole-making tool to heat up
Figure5: Creating the toner hopper hole
Figure6: Removing the excess plastic piece
TonerRellKits.com  RechargX™RX230Av1
Mon - Fri 8am - 5pm ET © 1995-2011 ReChargX™, EmptyX, TonerRellKits and TonerRellKits.com, the TonerRellKits logo, the 2011.11.09
800.527.3712 or 352.343.7533 ReChargX™ and EmptyX logos are trademarks owned by TonerRellkits, LLC. All rights reserved. Page 3 of 10
Step6:AddReChargX™RX230APremium
PrintTonertotheTonerHopper
Now we will ll the toner hopper with the
ReChargX™ RX230A Premium Print toner.
To ensure the toner ows freely from the bottle
during lling, make certain the cap is screwed
tightly on the bottle, then gently rock/shake the
bottle to free up the toner that may have settled
during shipping.
Next, remove the original cap from the bottle
and replace it with the plastic dispenser spout
from the ReChargX™ RX230A Toner Rell Kit.
To make the adding of the toner to the toner
hopper as easy and dust-free as possible, tilt the
end of the cartridge with the hole in it up at a
45 degree angle and slowly angle the dispenser
spout on the bottle of toner to meet up with the
hole, as shown in gure 7.
Tilting the bottle up a little more will start the
toner owing into the toner hopper.
Note: If at any point the toner stops owing,
simply stand the bottle upright to loosen the
toner and start the pouring process over again
(resist temptation to squeeze the bottle as it will
make a spill or mess less likely).
Fill the hopper until it appears to be full or until
it appears toner no longer ows easily into the
hopper (any toner left in the bottle can easily
be added in the future after you have done a
considerable amount of printing).
Figure7: Fill the toner hopper with ReChargX™ RX230A
Premium Print Toner
TonerRellKits.com  RechargX™RX230Av1
Mon - Fri 8am - 5pm ET © 1995-2011 ReChargX™, EmptyX, TonerRellKits and TonerRellKits.com, the TonerRellKits logo, the 2011.11.09
800.527.3712 or 352.343.7533 ReChargX™ and EmptyX logos are trademarks owned by TonerRellkits, LLC. All rights reserved. Page 4 of 10
Step7:CleantheAreaAroundtheToner
HopperHoleBeforeSealing
Unfold the yellow/orange “toner grabber”
cloth from the ReChargX™ RX230A Premium
Print Toner Rell Kit and stretch it along both
dimensions (it will stretch considerably in one
dimension and not the other).
Stretching the yellow/orange toner grabber cloth
activates the toner retaining substance that is
embedded within the cloth.
You will be using this cloth to clean the outside
of the toner hopper hole, as shown in gure 8,
to ensure the ReChargX™ leak-proof seal will be
applied rmly to the cartridge.
(Note: Only use the toner grabber cloth on the
exterior of the toner cartridge around the toner
hopper hole area. Do not use the cloth to clean
any of the internal components or the cartridge
imaging drum.)
Step8:SealtheTonerHopperHolewith
theReChargX™Leak-ProofSeal
Remove the protective backing from the
ReChargX™ leak-proof seal (gure 9a) and
lower the seal around the toner hopper hole.
Press rmly around the entire seal to ensure
the seal securely sticks to the toner cartridge,
as shown in gure 9b.
Figure8: Clean the area around the toner hopper hole
before sealing
Figure9a: Remove the seal from its protective backing
Figure9b:Toner hopper with ReChargX™ leak-proof
seal in place
TonerRellKits.com  RechargX™RX230Av1
Mon - Fri 8am - 5pm ET © 1995-2011 ReChargX™, EmptyX, TonerRellKits and TonerRellKits.com, the TonerRellKits logo, the 2011.11.09
800.527.3712 or 352.343.7533 ReChargX™ and EmptyX logos are trademarks owned by TonerRellkits, LLC. All rights reserved. Page 5 of 10
Step9:LocatetheWasteHopper
Orient the cartridge on your work surface with
the handle of the toner cartridge closest to your
chest.
Next, rotate the cartridge 180 degrees away
from you so the cartridge is upside down with
the handle furthest from your chest.
The white arrows, in gure 10, show the direction
the toner cartridge must be turned to locate the
waste hopper. The white circle in gure 10 shows
where to toner hopper hole will be placed.
Step10:PlugintheHole-MakingTool
Plug in the hole-making tool included with the
ReChargX™ Tool Kit.
Turn the sand timer over and wait the full three
minutes before using the tool so it reaches
proper operating temperature; this ensures the
tool will easily penetrate the cartridge housing
(gure 11).



Figure10: Locate the waste hopper
Figure11: Waiting for the hole-making tool to heat up
TonerRellKits.com  RechargX™RX230Av1
Mon - Fri 8am - 5pm ET © 1995-2011 ReChargX™, EmptyX, TonerRellKits and TonerRellKits.com, the TonerRellKits logo, the 2011.11.09
800.527.3712 or 352.343.7533 ReChargX™ and EmptyX logos are trademarks owned by TonerRellkits, LLC. All rights reserved. Page 6 of 10
Step11:WasteHopperHoleLocation
The waste hopper hole will be placed on the
bottom-right side of the cartridge, as shown by
the white circle in gure 12.
Step12:CreatetheWasteHopperHole
Hold the ReChargX™ hole-making tool directly
over the location for the hole and press the
copper hole-making bit against the cartridge
allowing the heat of the tool to create the hole
(there is no need to use excessive force, let
the tool do the work with a minimal amount of
pressure), as shown in gure 13.
Note: Once the copper tip of the hole-making
tool slowly penetrates the top of the toner
cartridge, immediately withdraw the tool and
unplug it from the wall.
Step13:RemovethePlasticRemnant
fromtheWasteHopperHole
Using the tip of the at-blade screwdriver,
included in the ReChargX™ Tool Kit, remove
the small piece of plastic from the waste
hopper, as shown in gure 14.
NOTE: If you do not see the plastic remnant
in the waste hopper hole, it may be in the hole
making tool’s copper bit.
Figure12: Locate the toner waste hopper
Figure13: The waste hopper hole
Figure14: Remove the plastic remnant
TonerRellKits.com  RechargX™RX230Av1
Mon - Fri 8am - 5pm ET © 1995-2011 ReChargX™, EmptyX, TonerRellKits and TonerRellKits.com, the TonerRellKits logo, the 2011.11.09
800.527.3712 or 352.343.7533 ReChargX™ and EmptyX logos are trademarks owned by TonerRellkits, LLC. All rights reserved. Page 7 of 10
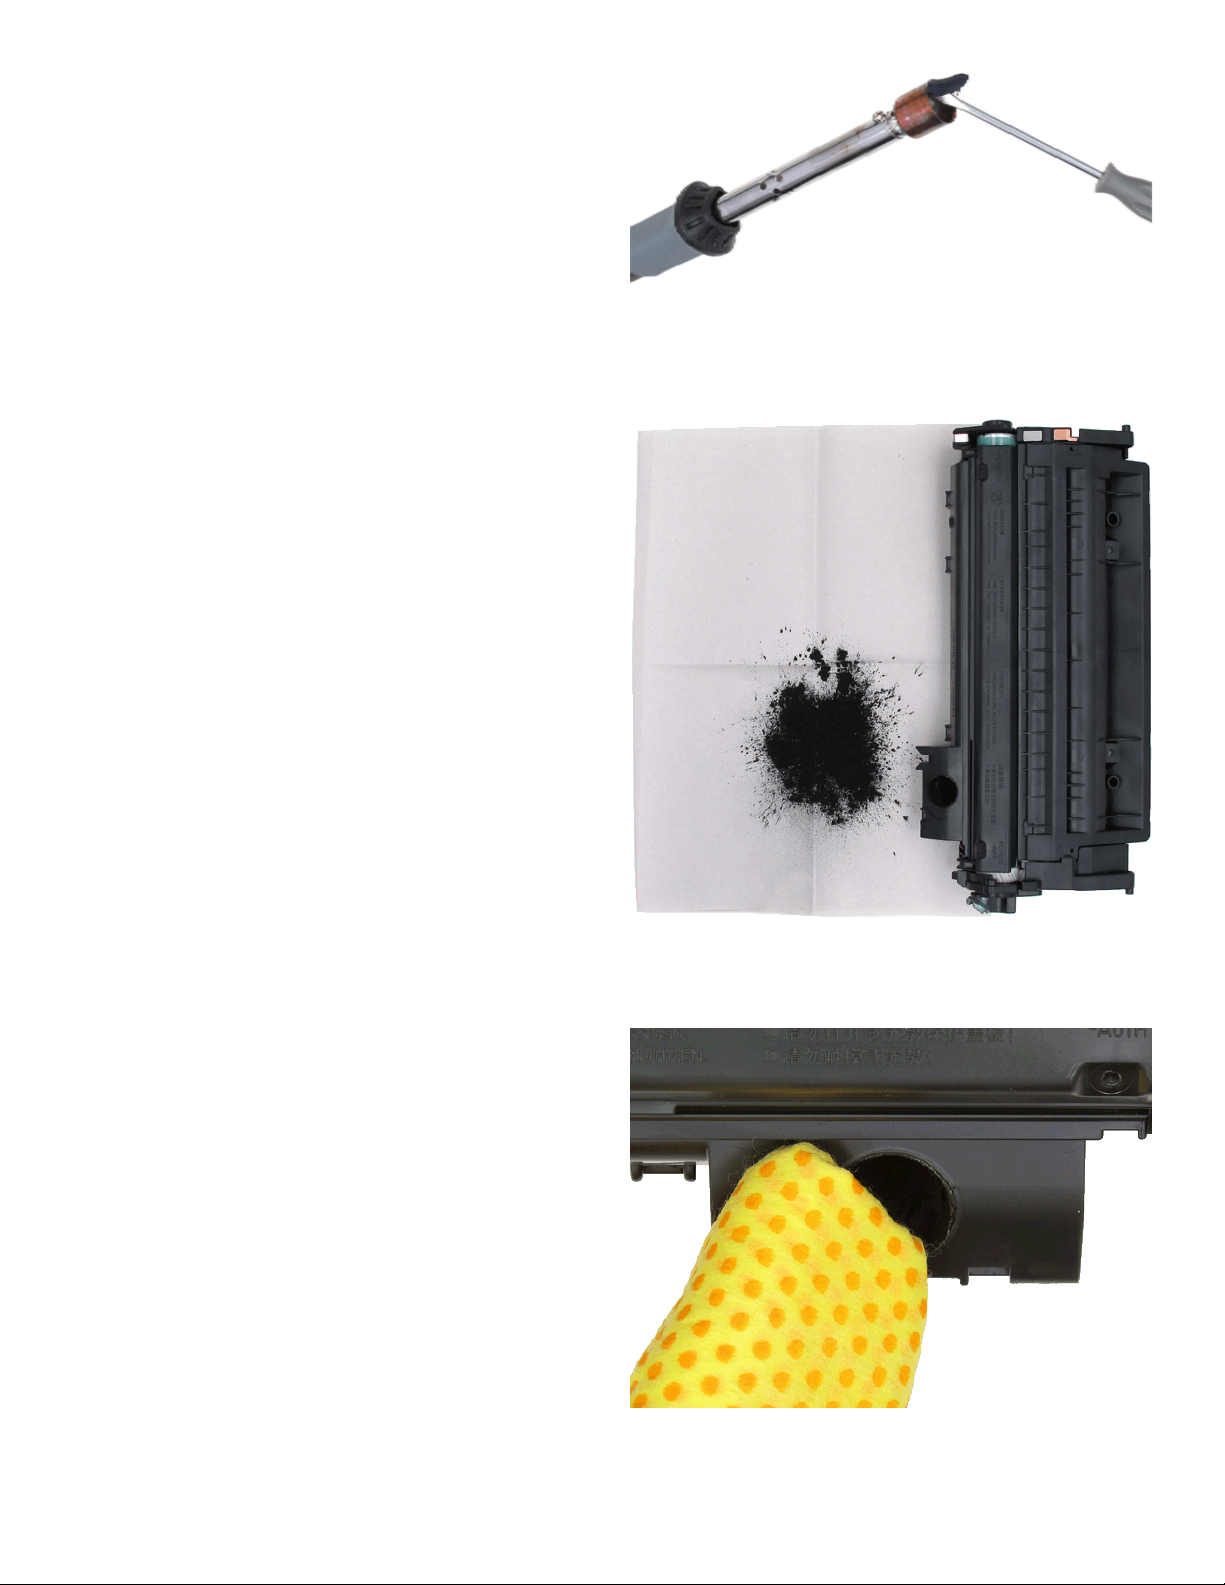
NOTE: If the plastic remnant remains in the
hole-making tool use the tip of the at-blade
screwdriver, included in the ReChargX™ Tool
Kit, remove the small piece of plastic from the
copper tip of the hole-making tool, as shown in
gure 15.
This small piece of plastic becomes impossible
to remove once it becomes cold and hardens to
the copper tip of the hole-making tool.
Step14:EmptytheWasteTonerHopper
Now we will remove the waste toner from the
toner cartridge.
Note: There is no need to attempt to remove
every last bit of waste toner from the hopper,
just that which comes out easily.
Note: This toner cannot be used again as paper
dust, hair, staples and other small items can
accumulate in the waste hopper.
Holding the cartridge over the newsprint, included
in the ReChargX™ Tool Kit, carefully pour out any
waste toner, as shown in gure 16.
If the waste toner stops owing, stand the
cartridge up again and then re-lower the hole
over the paper (gently tapping along the side
of the toner cartridge helps to keep the toner
owing as well).
Step15:CleantheAreaAroundthe
WasteHopperHole
After the waste toner has been removed from
the waste hopper, use the yellow/orange toner
grabber cloth to clean around the waste hopper
hole, as shown in gure 17, so the ReChargX™
leak-proof seal will adhere to the cartridge body
as completely as possible.
Figure15: Removing the excess plastic piece
Figure16: Empty the waste toner
Figure17: Clean the waste hopper hole
TonerRellKits.com  RechargX™RX230Av1
Mon - Fri 8am - 5pm ET © 1995-2011 ReChargX™, EmptyX, TonerRellKits and TonerRellKits.com, the TonerRellKits logo, the 2011.11.09
800.527.3712 or 352.343.7533 ReChargX™ and EmptyX logos are trademarks owned by TonerRellkits, LLC. All rights reserved. Page 8 of 10
Step16:ApplytheLeak-ProofSeal
Remove the protective backing from the
ReChargX™ leak-proof seal (gure 18a) and
lower the seal around the waste hopper hole.
Press rmly around the entire seal to ensure
the seal securely sticks to the toner cartridge,
as shown in gure 18b.
Step17:ResetChipLocation
Orient the toner cartridge so the handle is closest to
your chest and the embossed installation instruction
on the cartridge are facing up.
Notice the location of the reset chip on the top-right
side of the toner cartridge, as shown by the circle
in gure 19.
Figure18a: Remove the seal from its protective backing
Figure18b:Waste hopper hole sealed with the
ReChargX™ proof seal

Figure19: The toner cartridge reset chip
TonerRellKits.com  RechargX™RX230Av1
Mon - Fri 8am - 5pm ET © 1995-2011 ReChargX™, EmptyX, TonerRellKits and TonerRellKits.com, the TonerRellKits logo, the 2011.11.09
800.527.3712 or 352.343.7533 ReChargX™ and EmptyX logos are trademarks owned by TonerRellkits, LLC. All rights reserved. Page 9 of 10
Step18:RemovethePlasticTabs
The toner cartridge reset chip is held in place
by two small plastic tabs. These tabs must be
removed before the cartridge reset chip can be
removed, as shown in gure 20.
Gently pry up on each of the cartridge reset chip
tabs to snap them off so the chip can be removed
from the cartridge.
Step19:RemovingtheResetChip
After the two tabs have been removed, push the
chip out of the slot, as shown in gure 21.
Step20:ReplacingtheResetChip
After sliding out the old chip, slide the new
RX230RC-A chip back into the slot (in this
orientation make certain the notches are
facing inward, as shown in gure 22).
Figure20: Cartridge reset chip tab removal
Figure21: Cartridge reset chip removal

Figure22: Install the new ReChargX™ reset chip
TonerRellKits.com  RechargX™RX230Av1
Mon - Fri 8am - 5pm ET © 1995-2011 ReChargX™, EmptyX, TonerRellKits and TonerRellKits.com, the TonerRellKits logo, the 2011.11.09
800.527.3712 or 352.343.7533 ReChargX™ and EmptyX logos are trademarks owned by TonerRellkits, LLC. All rights reserved. Page 10 of 10
Step21:SecuretheResetChip
If the chip sits very loosely in the slot, a tiny bit
of tape, provided in your RX230A rell kit, can
be used on the top of the chip to hold it in place,
as shown in gure 23 - DONOTCOVERTHE
BRASSCONTACTS!
Congratulations–You’reFinished!
Congratulations! You have successfully relled
your
119 (3479B002AA) (719)
toner cartridge,
emptied the waste hopper and replaced the
cartridge reset chip.
Enjoy your savings. You’ve just saved $82.04
by relling your toner cartridge!
-End of ReChargX™ RX230A Instructions-
CustomerService/TechnicalSupport
To further help your ReChargX™ RX230A Toner
Rell procedure, we are always ready, willing
and happy to answer any of your questions or
comments via technical support.
Please contact us at 352.343.7533 or
800.527.3712 M - F 8am - 5pm ET.
Additionally, you may also chat with us using
Live Help on our website (M - F 8am - 5pm ET)
or submit a technical support ticket at:
www.TonerRellKits.com/Tech_Support.php
Figure23: Cartridge reset chip in place with tape

Other ReChargx Printer Accessories manuals

ReChargx RX211 User manual

ReChargx

ReChargx RX211 User manual

ReChargx RX006 User manual

ReChargx

ReChargx RX006 User manual

ReChargx RX230X User manual

ReChargx

ReChargx RX230X User manual

ReChargx RX022 User manual

ReChargx

ReChargx RX022 User manual

ReChargx RX237 User manual

ReChargx

ReChargx RX237 User manual

ReChargx RX207 User manual

ReChargx

ReChargx RX207 User manual

ReChargx RX163 User manual

ReChargx

ReChargx RX163 User manual

ReChargx RX411 User manual

ReChargx

ReChargx RX411 User manual

ReChargx RX052 User manual

ReChargx

ReChargx RX052 User manual

ReChargx RX292 User manual

ReChargx

ReChargx RX292 User manual

ReChargx RX160 User manual

ReChargx

ReChargx RX160 User manual

ReChargx RX201X User manual

ReChargx

ReChargx RX201X User manual

Popular Printer Accessories manuals by other brands

X-Rite Stylus Pro 7900 Setup and maintenance guide

X-Rite

X-Rite Stylus Pro 7900 Setup and maintenance guide

Canon Color UFRII Printer Kit-L1 Service manual

Canon

Canon Color UFRII Printer Kit-L1 Service manual

TonerRefillKits brother ReChargX RX350 instructions

TonerRefillKits

TonerRefillKits brother ReChargX RX350 instructions

Ricoh 3800C Series installation guide

Ricoh

Ricoh 3800C Series installation guide

Konica Minolta FS-532 quick guide

Konica Minolta

Konica Minolta FS-532 quick guide

HP Color LaserJet CP3520 installation guide

HP

HP Color LaserJet CP3520 installation guide

Sharp AR-S11 Operation manual

Sharp

Sharp AR-S11 Operation manual

Labelmate S-100 user manual

Labelmate

Labelmate S-100 user manual

Xerox PHASER 6130 supplementary guide

Xerox

Xerox PHASER 6130 supplementary guide

Canon imageFORMULA Flatbed Scanner Unit 102 Setup guide

Canon

Canon imageFORMULA Flatbed Scanner Unit 102 Setup guide

HP C4106A - LaserJet Companion Xi user manual

HP

HP C4106A - LaserJet Companion Xi user manual

AT Continuous Ink Supply System Instruction

AT

AT Continuous Ink Supply System Instruction

Roland ZEC-U5032 reference guide

Roland

Roland ZEC-U5032 reference guide

Epson T034520 Material safety data sheet

Epson

Epson T034520 Material safety data sheet

Sharp MX-M260 Software setup guide

Sharp

Sharp MX-M260 Software setup guide

Citizen PMU2300III user manual

Citizen

Citizen PMU2300III user manual

Epson T602C00 Material safety data sheet

Epson

Epson T602C00 Material safety data sheet

Avery Dennison Cutter 2000 Spare parts list

Avery Dennison

Avery Dennison Cutter 2000 Spare parts list

manuals.online logo
manuals.online logoBrands
  • About & Mission
  • Contact us
  • Privacy Policy
  • Terms and Conditions

Copyright 2025 Manuals.Online. All Rights Reserved.