Rotel U605CH1 User manual

Gebrauchsanweisung ○ Mode d’emploi ○ Istruzioni per l’uso ○ Instruction for use
ACCUCLEANERWET'N'DRY605CH1
U605CH1
GEBRAUCHSANWEISUNG
MODE D’EMPLOI
ISTRUZIONI PER L’USO
INSTRUCTION FOR USE

Gebrauchsanweisung ○ Mode d’emploi ○ Istruzioni per l’uso ○ Instruction for use
D / F / I / E
Gerätebeschreib-
ung
Description de
l’appareil
Descrizione
dell’apparecchio
Description of the
appliance
A
Staubbehälter
Compartiment
poussières
Recipiente per la
polvere
Bin
B
Druckknopf zum
öffnen
Bouton d’ouverture
Pulsante di apertura
Button to open
C
Ein/Aus Schalter
Interrupteur
marche/arrêt
Interruttore ON / OFF
On/Off switch
D
Kontrolllampe
Lampe de contrôle
Spia di controllo
Charging light
F
Ladestation mit
Wandhalter
Raccord du chargeur
avec support mural
Stazione di carico con
supporto a parete
Charging station with
wall mount
G
Filter komplett
Filtres complet
Filtri
complete filter set
H
Bürsteneinsatz
Suceur brosse
L’ugello ä pennello
Brush
I
Fugendüse
Suceur plat
L’ugello per fughe
Rigid crevice tool
J
Nass-Saugeinsatz
Suceur spécial
liquides
L’ugello per liquidi
Wet suction nozzle
Ersatzfilter komplett (G) Bestell-Nr: 260.500.0009
Filtre de rechange complet (G) No de commande: 260.500.0009
Filtro di ricambio completo (G) No di ordinazione: 260.500.0009
Complete spare filter set (G) Order no.: 260.500.0009
K

Gebrauchsanweisung ○ Mode d’emploi ○ Istruzioni per l’uso ○ Instruction for use
Deutsch
SICHERHEITSHINWEISE
oLesen Sie erst alle Hinweise, bevor Sie das Gerät in
Betrieb nehmen.
oDieses Gerät kann von Kindern ab einem Alter von
acht (8) Jahren und von Personen mit
eingeschränkten physischen, sensorischen oder
geistigen Fähigkeiten oder einem Mangel an
Erfahrung und/oder Wissen verwendet werden,
wenn sie beaufsichtigt werden oder bezüglich des
sicheren Gebrauchs des Geräts unterwiesen
wurden und die daraus resultierenden Gefahren
verstanden haben. Kinder dürfen nicht mit dem
Gerät spielen. Reinigung und Benutzerwartung
dürfen nicht durch Kinder ohne Beaufsichtigung
durchgeführt werden.
oDas Ladegerät (5a) arbeitet nur mit
Wechselstrom. Überprüfen Sie, ob die
Netzspannung der auf dem Typenschild des
Ladegerätes angegebenen Spannung entspricht.
oVerwenden Sie niemals ein anderes Ladegerät als
das mit dem Gerät mitgelieferte.

Gebrauchsanweisung ○ Mode d’emploi ○ Istruzioni per l’uso ○ Instruction for use
oVerwenden Sie nie ein Verlängerungskabel um das
Gerät zu laden.
oVerwenden Sie das Gerät niemals, wenn das Kabel
oder das Ladegerät eine sichtbare Beschädigung
aufweisen.
oTauchen Sie das Ladegerät und den Sauger
niemals ins Wasser. Verwenden Sie immer nur
einen feuchten Lappen um das Gehäuse des
Gerätes zu reinigen.
oSaugen Sie niemals brennbare Flüssigkeiten,
Chemikalien oder glühende Gegenstände auf.
oVerwenden Sie das Gerät nie ohne den Filter.
oReparaturen von elektrischen Geräten müssen
einer Fachperson überlassen werden. Ein Gerät
selbst zu reparieren kann für den Benutzer
gefährlich sein.
oVersuchen Sie nie einen Akku zu demontieren.
oDen Wandhalter nur an einem geschützten,
trockenen Ort, ausser Reichweite von Kindern,
montieren.

Gebrauchsanweisung ○ Mode d’emploi ○ Istruzioni per l’uso ○ Instruction for use
ANBRINGEN DES WANDHALTERS (F)
oWählen Sie eine geschützte Stelle an einer Wand in der Nähe einer Steckdose.
Bohrlöcher anzeichnen, bohren und den Wandhalter mit den beiliegenden
Schrauben befestigen. Zwei Düsen (H-J) können auf die Wandhalterung geschoben
werden.
INBETRIEBNAHME
oBei neuen Geräten sind die Batteriezellen noch nicht geladen. Aus diesem Grund ist
es notwendig, den Staubsauger vor dem ersten Gebrauch während ca. 10 Stunden
aufzuladen. Nach dieser Zeit hat das Gerät seine volle Leistung erreicht.
oDamit das Gerät jederzeit voll einsetzbar ist, kann es nach jedem Gebrauch sofort
wieder aufgeladen werden.
Achtung: Um die Betriebszeit des Gerätes nicht zu vermindern, empfehlen wir
Ihnen, das Gerät von Zeit und Zeit völlig zu entladen damit der Akku danach
wieder während 10 Stunden aufgeladen werden muss.
LADEVORGANG DES GERÄTES
oStaubsauger in die Ladestation (F) stecken. Dabei wird die Verbindung zum
Netzgerät automatisch hergestellt.
oLadestecker an eine 230 V Steckdose anschliessen. Das Aufleuchten des roten
Signallämpchens (D) zeigt den Ladevorgang an.
oWährend des Ladevorganges kann der Ladestecker warm werden; dies ist eine völlig
normale Erscheinung. Eine Überladung des Akkus ist ausgeschlossen.
TROCKENSAUGEN
oGerät einschalten (C) und Fläche oder Gegenstand reinigen. Zur Entfernung von
Staub aus Ritzen, Fussleisten, Ecken, Schubladen etc., können Sie den flachen
Fugendüsen-Vorsatz (I) verwenden.
NASS-SAUGEN
oDen Staubbehälter leeren und danach das Gerät wie beim Trockensaugen
verwenden, dabei jedoch den Nass-Saugeinsatz (J) aufstecken.
oDer Behälter kann ca. einen Viertel Liter Flüssigkeit aufsaugen.
oDen Behälter leeren bevor die Flüssigkeit die Grenze der Einsaugöffnung erreicht
hat.

Gebrauchsanweisung ○ Mode d’emploi ○ Istruzioni per l’uso ○ Instruction for use
oAus hygienischen Gründen sollten der Staubbehälter (A) und der Filter (G) nach dem
Nasssaugen immer ausgewaschen werden. Vor dem Zusammenbau die Teile gut
trocknen lassen
REINIGUNG
oNur wenn der Filter (G) sauber und trocken ist können Sie die höchste Saugleistung
erzielen. Je häufiger Sie das Gerät verwenden, desto öfter sollten Sie auch diesen
Filter reinigen und pflegen.
Öffnen Sie den Staubbehälter (A) durch drücken des Knopfes (B) (siehe Abb.K).
Entfernen Sie die Filter (G) und reinigen Sie diese wenn nötig mit einem
feuchten Tuch.
Setzten Sie die Filter wieder ein und schliessen Sie den Staubbehälter.
Um eine optimale Saugleistung zu erzielen, empfehlen wir Ihnen den Filter nach
einem Jahr zu ersetzten. Ersatzfilter erhalten Sie beim Fachhändler oder direkt
bei der Fa. Rotel AG (Ersatzteil Nr. 260.500.0009).
ENTSORGUNG
oFür eine sachgerechte Entsorgung ist das Gerät dem Fachhändler, der Servicestelle
oder der Firma Rotel AG zurückzugeben.

Gebrauchsanweisung ○ Mode d’emploi ○ Istruzioni per l’uso ○ Instruction for use
Français
CONSIGNES DE SÉCURITÉ
oLire toutes les instructions avant usage.
oCet appareil peut être utilisé par des enfants de
moins de huit (8) ans et par des personnes aux
capacités physiques, sensorielles ou intellectuelles
limitées ou manquant d’expérience ou de
connaissance si elles sont sous surveillance ou ont
été instruites sur l’utilisation sûre de l’appareil et
si elles ont compris les risques pouvant en
résulter. Les enfants ne doivent pas jouer avec
l’appareil. Le nettoyage ou la maintenance
utilisateur ne doivent pas être réalisés par des
enfants sans surveillance.
oLe chargeur-transformateur (5a) fonctionne sur
courant alternatif seulement. Vérifier que la
tension du réseau corresponde bien à celle
indiquée sur la plaque signalétique du
transformateur.
oNe jamais charger l’appareil avec un autre
chargeur que celui livré avec l’appareil.

Gebrauchsanweisung ○ Mode d’emploi ○ Istruzioni per l’uso ○ Instruction for use
oNe jamais utiliser une rallonge pour charger
l’appareil.
oNe jamais utiliser l’appareil si le cordon ou le
chargeur présent des détériorations visibles.
oNe jamais plonger le chargeur et l’appareil dans
l’eau. Utiliser exclusivement un chiffon humide
pour essuyer le corps de l’appareil.
oNe jamais aspirer des liquides inflammable, des
produits chimiques, des corps incandescents ou
des objets pointus pouvant abîmer le filtre.
oNe jamais utiliser l’appareil sans son filtre
permanent.
oLes réparations d’appareils électriques doivent
être confiées à des spécialistes. Réparer un
appareil soi-même peut constituer un danger
pour l’utilisateur.
oNe jamais essayer de démonter l’accumulateur.
oFixer le support mural dans un endroit sec et hors
de portée des enfants.

Gebrauchsanweisung ○ Mode d’emploi ○ Istruzioni per l’uso ○ Instruction for use
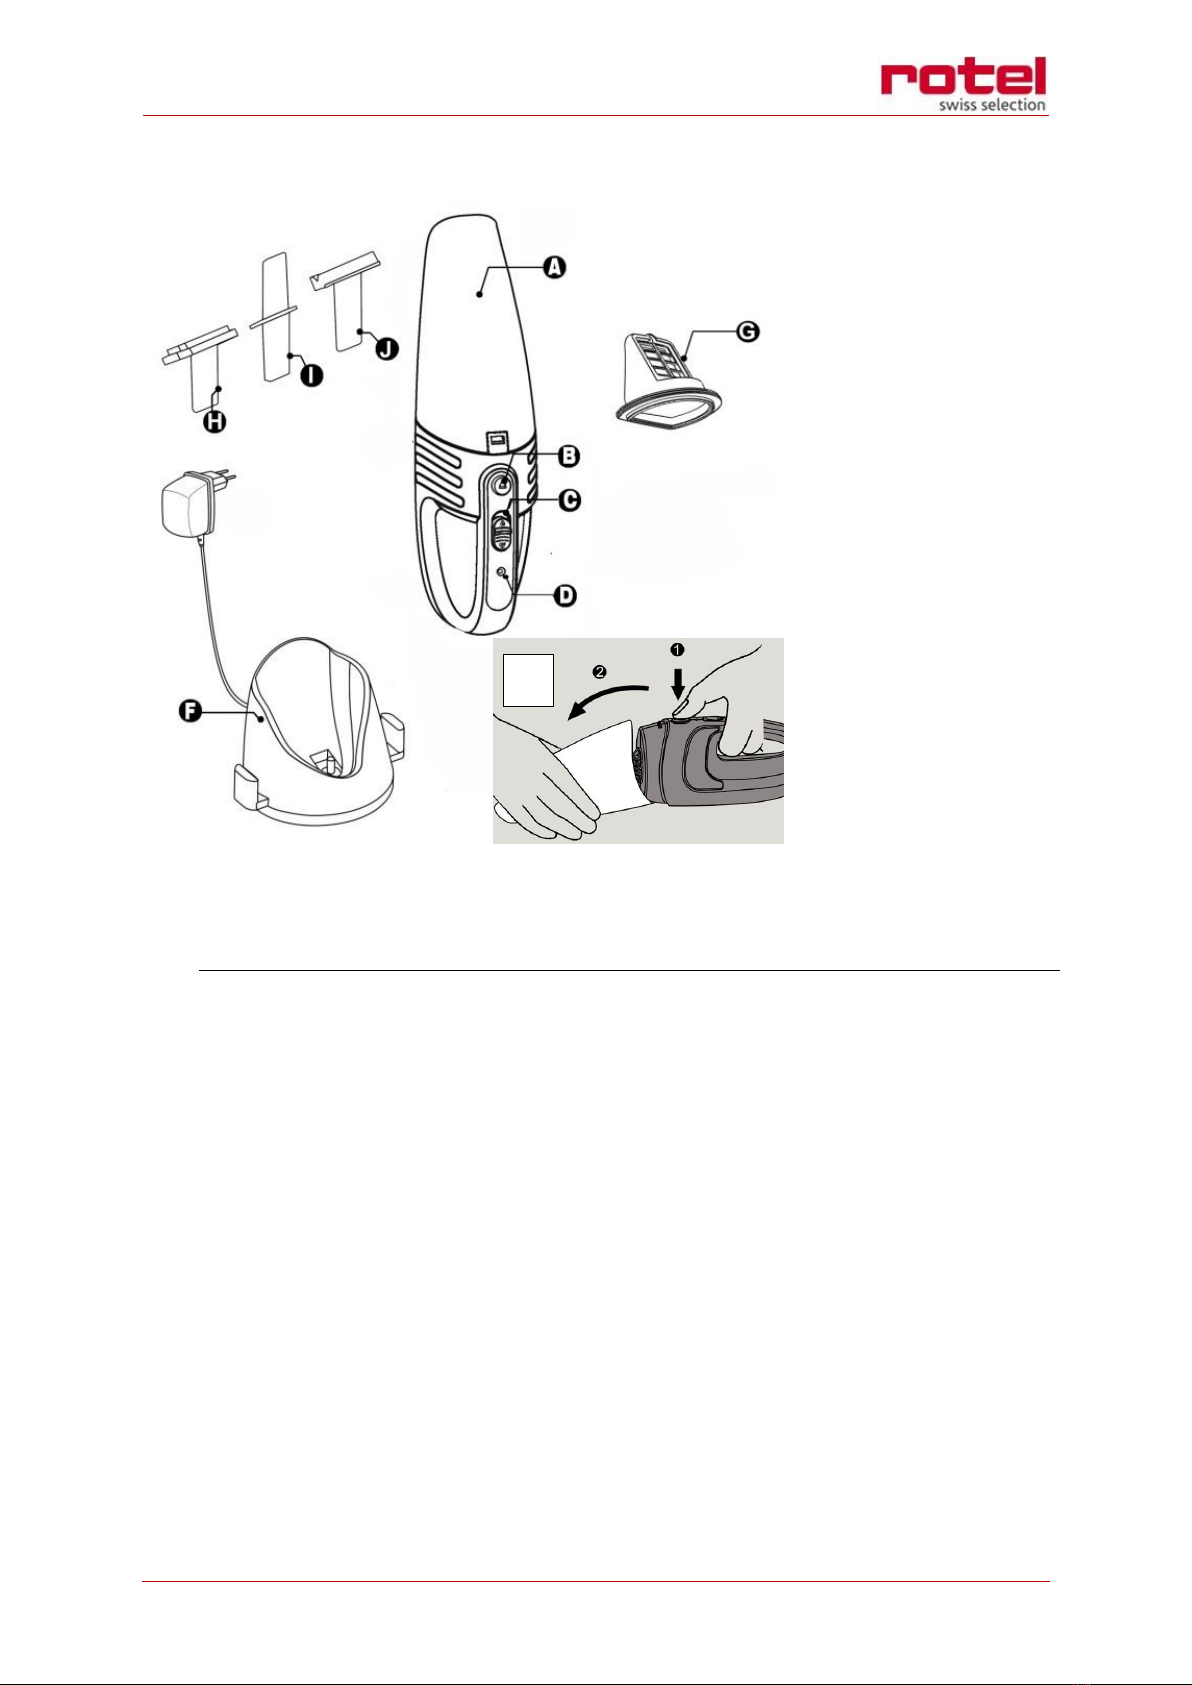
INSTALLATION DU SUPPORT MURAL (F)
oChoisir un endroit à proximité d’une prise de courant pour suspendre l’appareil au
mur. Faire les traces et pointer l’emplacement des vis. Percer et fixer le support
avec les chevilles et vis fournies avec l’appareil. Deux suceurs (H-J) peuvent être
glissés sur le support mural (F).
MISE EN OEUVRE
oL’accu n’est pas préchargé. Pour cette raison, il est nécessaire de respecter un
temps de charge d’environ 10 heures avant la première utilisation de l’appareil.
oAfin que l'appareil soit utilisable en tout temps, il peut être rechargé
immédiatement après chaque usage.
Attention: Afin de ne pas réduire la durée de fonctionnement de l'appareil,
nous vous recommandons de décharger complètement l'appareil de temps en
temps afin de devoir ensuite recharger l'accumulateur pendant 10 heures.
RECHARGEMENT DE L‘APPAREIL
oIntroduire le corps de l’aspirateur dans le support (F) en veillant à ce que la prise de
l’appareil s’enclenche sans difficulté.
oRaccorder le chargeur à la prise standard 230 V. Le témoin lumineux (D) va
s’allumer pour signaler que le chargement s’effectue correctement.
oLe chargeur chauffe légèrement, il s’agit d’un phénomène tout à fait normal. Une
surcharge de l’accumulateur est impossible.
ASPIRATIONS DE DÉCHETS SOLIDES
oPresser l’interrupteur (C) et nettoyer la surface ou l’objet en question. Utiliser le
suceur plat (I) pour aspirer la poussière dans les fentes, les plinthes, les coins, etc.
ASPIRATION DE LIQUIDE
oVider le récipient à poussière de l’appareil et l’utiliser comme pour l’aspiration de
liquides. Pour l’aspiration de liquides, équiper l’appareil du suceur spécial liquide (J).
oL’appareil peut aspirer environ 2.5 dl de liquide.
oPour éviter les débordements, vider le réservoir avant que le niveau de liquide
n’atteigne la limite de l’orifice d’aspiration.

Gebrauchsanweisung ○ Mode d’emploi ○ Istruzioni per l’uso ○ Instruction for use
oPar mesure d’hygiène, nous vous recommandons de rincer le filtre (G) et le
récipient à poussière (A) après chaque usage avec du liquide. Veiller à ce que les
accessoires soient bien séchés avant d’être remontés.
NETTOYAGE
oSeul un filtre (G) permanent propre et sec peut assurer la capacité maximum
d’aspiration. Veillez à nettoyer et entretenir régulièrement ce filtre en fonction de
la fréquence d’utilisation.
Ouvrez le récipient à poussière (A) en pressant sur le bouton (B) (voir figure K).
Enlevez le filtre (G) et nettoyez-la au besoin avec un chiffon humide.
Remettez la cassette filtre en place et fermez le récipient à poussière.
Afin d'obtenir une puissance d'aspiration optimale, nous vous recommandons
de remplacer le filtre après une année. Vous obtenez des filtres de rechange
dans le commerce spécialisé ou directement auprès de la maison Rotel AG (N°
de pièce de rechange 260.500.0009).
ELIMINATION
oA la fin de la phase d’utilisation, la machine doit être remise au détaillant ou à un
point de service après-ventre, ou renvoyées directement à Rotel AG, qui se chargera
de l’éliminination ou du recyclage.

Gebrauchsanweisung ○ Mode d’emploi ○ Istruzioni per l’uso ○ Instruction for use
Italiano
AVVERTENZE DI SICUREZZA
oPrima dell'uso leggere tutte le istruzioni.
oQuesto apparecchio può essere usato da bambini
di età superiore a otto (8) anni e da persone con
ridotte capacità fisiche, sensoriali o mentali, o con
insufficiente esperienza e conoscenza, a
condizione che siano sotto sorveglianza o che
abbiano ricevuto istruzioni sull'uso sicuro
dell'apparecchio e siano consapevoli dei rischi
connessi. I bambini non devono giocare con
l'apparecchio, ne devono svolgere operazioni di
pulizia e manutenzione senza sorveglianza.
oIl caricatore (5a) funziona solo con corrente
alternata. Controllate che la tensione di rete
corrisponda a quella riportata sulla sua targhetta.
oNon usate mai un caricatore diverso da quello in
dotazione all’apparecchio.
oNon usate mai una prolunga per alimentare
l’apparecchio.
oNon usate mai l’apparecchio se il cavo o il
caricatore presentano danni evidenti.

Gebrauchsanweisung ○ Mode d’emploi ○ Istruzioni per l’uso ○ Instruction for use
oNon immergete mai in acqua il caricatore e
l’aspiratore. Usate sempre solo un panno umido
per pulire la scatola dell’apparecchio.
oNon aspirate mai liquidi infiammabili, prodotti
chimici o corpi incandescenti.
oNon usate mai l’apparecchio senza il filtro.
oLe riparazioni di apparecchi elettrici devono
essere affidate a specialisti. Riparare da soli un
apparecchio può essere pericoloso per
l’utilizzatore.
oNon tentate mai di smontare l’accumulatore.
oMontate il supporto a parete in una posizione
protetta e asciutta, fuori della portata dei
bambini.

Gebrauchsanweisung ○ Mode d’emploi ○ Istruzioni per l’uso ○ Instruction for use
APPLICAZIONE DEL SUPPORTO A PARETE (F)
oScegliete una zona protetta della parete, in prossimità di una presa di corrente.
Segnate la posizione dei fori, forate e fissate il supporto a parete con le viti in
dotazione. Due ugelli (H-J) possono essere spinti sul supporto a parete (F).
MESSA IN SERVIZIO
oNegli apparecchi nuovi le batterie non sono ancora cariche. Per questo motivo è
necessario caricare l’aspirapolvere, prima di usarlo la prima volta, per circa 10 ore.
Trascorso questo tempo, l’apparecchio ha raggiunto la sua piena potenza.
oAffinché l’apparecchio sia in ogni momento pienamente utilizzabile, può essere
ricaricato subito dopo ogni uso.
Attenzione: per non ridurre il tempo di funzionamento, raccomandiamo di
scaricare completamente l’apparecchio di tanto in tanto, affinché le batterie
possano essere poi nuovamente ricaricate per 10 ore.
PROCEDURA DI CARICA DELL‘APPARECCHIO
oInserire l’aspirapolvere nella stazione di carico (F). Si stabilisce così
automaticamente il collegamento con l’alimentatore di rete.
oCollegare la spina del caricatore ad una presa di 230 V. L’accensione della spia
luminosa rossa (D) visualizza il processo di carica.
oDurante la carica la spina può riscaldarsi, si tratta di un fenomeno del tutto
normale. È escluso che le batterie vengano sovraccaricate.
ASPIRAZIONE A SECCO
oInserire l’apparecchio (C) e pulire la superficie o l’oggetto. Per togliere la polvere da
fenditure, battiscopa, angoli, cassetti ecc. potete usare la bocchetta piatta (I).
ASPIRAZIONE A UMIDO
oSvuotare il recipiente per la polvere e usare poi l’apparecchio come per
l’aspirazione a secco, ma in questo caso applicare l’aspiratore per liquidi (J).
oIl recipiente può contenere circa un quarto di litro di liquidi.
oSvuotare il recipiente prima che il liquido abbia raggiunto il limite dell’apertura di
aspirazione.
oPer motivi igienici, il recipiente per la polvere (A) e il filtro (G) devono essere sempre
lavati dopo l’aspirazione a umido.

Gebrauchsanweisung ○ Mode d’emploi ○ Istruzioni per l’uso ○ Instruction for use
PULITURA
oSolo quando il filtro (G) è pulito e asciutto potete ottenere la massima potenza di
aspirazione. Quanto più spesso usate l’apparecchio, tanto più spesso dovete anche
pulire e curare questo filtro.
Aprite il recipiente per la polvere (A) premendo il pulsante (B) (vedi fig. K).
Togliete il filtro (G) e pulite quest’ultimo, se necessario, con un panno umido.
Inserite di nuovo la cassetta del filtro e chiudete il recipiente per la polvere.
Per ottenere una potenza aspirante ottimale, vi consigliamo di sostituire il filtro
dopo un anno. Trovate il filtro di ricambio presso un negozio specializzato o
direttamente alla ditta Rotel AG (parte di ricambio 260.500.0009).
SMALTIMENTO
oPer lo smaltimento corretto, la macchina deve essere restituita al rivenditore
specializzato, al servizio di assistenza o alla ditta Rotel AG.

Gebrauchsanweisung ○ Mode d’emploi ○ Istruzioni per l’uso ○ Instruction for use
English
SAFETY INSTRUCTIONS
oRead all instructions before using.
oThis appliance can be used by children aged from
8 years and above and persons with reduced
physical, sensory or mental capabilities or lack of
experience and knowledge if they have been
given supervision or instruction concerning use of
the appliance in a safe way and understand the
hazards involved. Children shall not play with the
appliance. Cleaning and user maintenance shall
not be made by children without supervision.
oCharger (5a) only works on an AC circuit. - Check
whether the mains voltage is the same as the
voltage specified on the appliance's rating label.
oNever use another charger that has not been
supplied with the appliance.
oNever use an extension lead to charge the
appliance.
oNever use the appliance if the cable or the charger
are visibly damaged.

Gebrauchsanweisung ○ Mode d’emploi ○ Istruzioni per l’uso ○ Instruction for use
oNever immerse the charger and the vacuum
cleaner in water. Always use a damp cloth to clean
the exterior of the appliance.
oNever use this appliance to suck up flammable
liquids, chemicals or any hot material.
oNever use the appliance without the filter.
oRepairs may only be carried out by qualified
specialists. Trying to repair the appliance yourself
can be dangerous for the next user.
oNever try to disassemble a battery.
oOnly mount the wall bracket in a sheltered, dry
place, out of reach of children.

Gebrauchsanweisung ○ Mode d’emploi ○ Istruzioni per l’uso ○ Instruction for use
MOUNTING THE WALL BRACKET (F)
oChoose a sheltered spot on a wall near an electric plug socket. Mark out where the
holes are going to go, drill the holes and attach the wall mount with the screws
supplied. The two nozzles (H-J) can fit on the wall mounting, too.
BEFORE STARTING THE VACUUM CLEANER
oThe battery cells in new appliances are not charged yet. That is why you must
charge up the vacuum cleaner for about 10 hours before its first use. After which,
the appliance will have reached its full capacity.
oTo make sure that the vacuum cleaner is ready for use at all times, you can charge it
again immediately after using it.
Caution: To avoid reducing the operating time of the appliance, we recommend
that you discharge the appliance completely from time to time, after which the
battery must be charged again for 10 hours.
CHARGING THE APPLIANCE
oPut the vacuum cleaner in the charging station (F). This automatically connects it to
the power supply.
oConnect the charger plug to a 230 V socket. When the red charging light (D) lights
up, it means that the appliance is being charged.
oWhilst it is charging, the charger plug may become warm, this is completely normal.
It is not possible to overcharge the battery.
DRY VACUUMING
oTurn the appliance on (C) and clean the surface or object. To remove dust from
crevices, skirting boards, corners, drawers, etc., you can use the rigid crevice tool (I).
WET VACUUMING
oEmpty the bin and then use the appliance as you did with the dry vacuuming
process, but insert the wet suction nozzle (J)
oThe container can carry about a quarter of a litre of liquid.
oEmpty the container before the liquid has reached the limit of the intake opening.
oFor hygienic reasons, the bin (A) and the filter (G) should always be washed after
wet vacuuming. Allow to dry thoroughly before assembling the parts.

Gebrauchsanweisung ○ Mode d’emploi ○ Istruzioni per l’uso ○ Instruction for use
CLEANING
oYou can only get the best suction power when the filter (G) is clean and dry. The
more you use the appliance, the more frequently you should clean and maintain the
filter.
Open the bin (A) by pressing the button (B) (see Fig. K).
Remove the filter (G) and clean it, if necessary, with a damp cloth.
Put the filter cartridge back in and close the bin.
To make sure your vacuum cleaner maintains its optimum performance, we
recommend that you replace the filter once a year. You can purchase
replacement filters from your retailer or directly from the company Rotel AG
(spare part no. 260.500.0009).
DISPOSAL
oFor proper disposal, the unit is to return to the dealer, the service agent or the
company Rotel AG.

Gebrauchsanweisung ○ Mode d’emploi ○ Istruzioni per l’uso ○ Instruction for use
D / F / I / E
2 JAHRE GARANTIE
2 ANNÉE DE GARANTIE
2 ANNI DI GARANZIA
2 YEARS WARRANTY
oGarantieverpflichtung
Wir verpflichten uns, dieses Gerät kostenlos wieder instand zu setzen, falls es bei sachgemässer Behandlung innerhalb der
Garantiezeit versagen sollte. Wir beseitigen alle Mängel, die auf Material- oder Fabrikationsfehlern beruhen. Die
Garantieleistung erfolgt durch Instandsetzung oder Austausch mangelhafter Teile nach unserer Wahl. Eine Garantieleistung
entfällt für Schäden an Verschleissteilen, für Schäden und Mängel, die durch unsachgemässe Behandlung oder Wartung
auftreten (insbesondere Verkalkung und gewerblicher Einsatz). Sie wird nur gewährt, wenn entweder die Garantiekarte mit
Kaufdatum, Händlerstempel und Unterschrift versehen oder die Kaufquittung mit dem Gerät an die zutreffende Servicestation
eingesandt wird (siehe Adresse unten). Rücksendungen sollen in der Originalverpackung erfolgen. Transportkosten gehen zu
Lasten des Käufers. Bitte vergessen Sie nicht, der Sendung Ihre Adresse und, falls der Fehler nicht offensichtlich ist, eine
Erklärung beizufügen.
oObligation de garantie
Nous nous engageons à réparer gratuitement cet appareil s'il devait tomber en panne durant la période de garantie, pour
autant que celui-ci ait été utilisé de manière appropriée. Nous éliminons toutes les défectuosités du à des vices de matière ou
de fabrication. La prestation de garantie se fait en effectuant une réparation ou en échangeant les pièces, selon notre choix.
La garantie n'est pas accordée pour les dommages survenant sur les pièces d'usure, pour les dommages et vices dus à une
manipulation ou un entretien inapproprié (en particulier l'entartrage et l'utilisation à des fins professionnelles). Elle n'est
accordée que si la date d'achat, le cachet du revendeur et la signature figurent sur carte de garantie ou si la quittance d'achat
a été retournée avec l'appareil au point de service compétent (voir adresse ci-dessous). Les renvois doivent se faire dans
l'emballage d'origine. Les frais de transport sont à la charge de l'ache-teur. Veuillez ne pas oublier d'indiquer votre adresse et,
si le défaut n'est pas évident, de joindre une explication à votre envoi.
oImpegno di garanzia
Ci impegniamo a riparare gratis questo apparecchio, qualora –malgrado un uso corretto - si fosse gua-stato durante il periodo
di garanzia. Eliminiamo tutti i difetti causati da difetti del materiale o di fabbrica. La prestazione di garanzia avviene con il
ripristino o la sostituzione di pezzi difettosi a nostra discrezione. Una prestazione di garanzia decade nel caso di danni a pezzi
soggetti a usura, di danni e difetti dovuti a trattamento o a manutenzione non corretti (in particolare calcificazione e utilizzo
industriale). Viene concessa solo se la cartolina di garanzia munita della data d’acquisto, del timbro del rivenditore e della
firma o la ricevuta d’acquisto e l’apparecchio vengono inviati al rispettivo servizio di assistenza (vedi indirizzo in basso).
L’invio deve avvenire nell’imballaggio originale. Le spese di trasporto sono a carico dell’acquirente. Non dimenticatevi p.f. di
allegare all’invio il vostro indirizzo e, qualora il difetto non fosse chiaro, anche una spiegazione.
oWarranty commitment
We commit ourselves to repairing this device for free provided it has been handled properly and a failure has occured within
the period of warranty. We repair all defects caused by material or manufacturing faults. The warranty will be performed by
repair or replacement of defective parts at our discretion. A warranty does not cover damage due to parts worn-off and
damage and defects that occur due to improper usage, treatment or maintenance (particularly calcification and commercial
use). A warranty will only be granted if the warranty card showing the date of purchase, dealer's stamp and signature or the
purchase receipt together with the device is sent to the relevant service station (see address below). Returns are to be made
in the original package. Transport costs will be borne by the purchaser. Please do not forget to state your address and, should
the error not be obvious, include an explanation together with your parcel.
Servicestation:
Service après-vente: Rotel AG
Servizio Assistenza: Parkstrasse 43 Telefon 062 787 77 00
Service station: 5012 Schönenwerd E-mail: office@rotel.ch
Table of contents
Languages:
Other Rotel Vacuum Cleaner manuals

Rotel
Rotel U604CH1 User manual

Rotel
Rotel PEGASUS User manual

Rotel
Rotel MICRO PLUS 6712CH User manual

Rotel
Rotel U651CH1 User manual

Rotel
Rotel U606CH3 User manual

Rotel
Rotel RANGER User manual

Rotel
Rotel U606CH1 User manual

Rotel
Rotel NOX U657CH1 User manual

Rotel
Rotel ECO User manual

Rotel
Rotel PALLA User manual

Rotel
Rotel CIAO User manual

Rotel
Rotel FLOORCLEANERWET'N'DRY6090CH User manual

Rotel
Rotel MICRO CYCLONE 6744CH User manual

Rotel
Rotel GRANAT User manual

Rotel
Rotel U690CH2 User manual

Rotel
Rotel SILENT651CH2 User manual

Rotel
Rotel POWERPRO6081CH User manual

Rotel
Rotel SALON 608CH2 User manual

Rotel
Rotel U6082CH User manual

Rotel
Rotel U690CH1 User manual