6
5
4
32
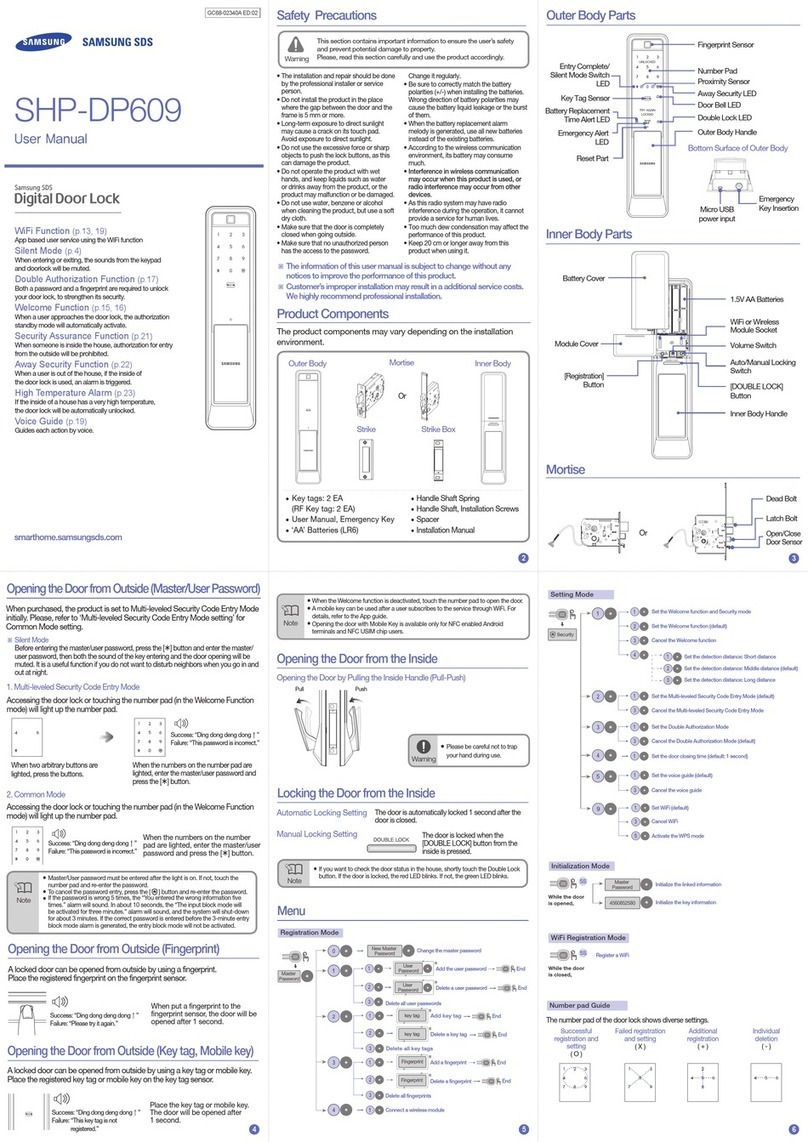
Number Pad Unlighted Number Pad Lighted
Number Pad
Double Lock Light
Reset Switch
Battery Cover
Auto/Manual
Locking Switch
1.5V AA Batteries
Registration
Button
Opening by Pulling the Inner Handle
Safety Cautions Outer Body Parts
Mortise
Product Components
• The user shall not install or repair the
product without authorization.
• Do not install the product in the place
where the gap between the door and the
frame is 5mm or more.
• Make sure that no unauthorized person
has the access to the password.
• Do not operate the product with wet
hands, and keep liquids such as water
or drinks away from the product, or
the product may malfunction or be
damaged.
•
Do not use the excessive force or sharp
objects to push the lockbuttons, as this
can damage the product.
•
Make sure that the door is completely
closed when going outside. The
manufacturer does not assume the
responsibility for any harm caused
by engagement of the lock on an
improperly closed door.
•
Please do not hang on the product or
pull it.
• Be sure to correctly match the poles
(+/-) when installing the batteries. Install
the batteries with the correct poles (+/-).
•
Replace all batteries immediately after
they run out of power, and never mix
new batteries with used ones.
• Do not use water, benzene or alcohol
when cleaning the product, as these
fluids can cause product malfunction.
•
Replace the batteries within 1 week
after the battery replacement alarm
sounds.
Inner Body
KeyTag (For B2C Only)
User Manual, ProductWarranty
‘AA’ Batteries (LR6) (8EA)
Handle Shaft
Spring
Handle Shaft
,
Installation Screws
Installation Manual(For B2C Only)
Strike box
Strike
(For B2C Only)
Inner Body Parts
Deadbolt
Latch bolt
Open-door sensor
Opening the Door from Outside with a Password
Opening the Door from the Inside
● Password must be entered after the light is on, and if does not, touch
[Number Pad] and re-enter.
● To cancel, press [ ] button and re-enter.
● If the password is wrong 5 times, “peep” warning alarm will sound
20 times and the system will shut-down for about 3 minutes. When
malfunction happens, “beep” will sound every 10 seconds, and stop mode
will be turned off automatically after 3 minutes with multiple ‘beeps’.
Note
Success:
DING DONG DENG
Fail:
DING DONG DING
DONG
Enter the password when the number
pad is lighted, and press the [] button.
2. Common Mode
Touching [Number Pad] will light
up the number pad.
When purchased, the product is set to Multi-leveled Security Code Entry
Mode initially. Please refer to “Multi-leveled Security Code Entry Mode
setting” for Common Mode setting.
※ Silent Mode
Before entering the password, press the [] button and enter the
password, then both the sound of the key entering and the door opening
will be suspended. It is a useful function if you do not want to disturb
neighbors when you go in and out at night.
Touching [Number
Pad] will light up
the number pad.
1. Multi-leveled Security Code Entry Mode
When two arbitrary buttons
are lighted, press the buttons
in order.
When the numbers on the
number pad are lighted, enter
the password and press the
[] button.
Success:
DING DONG DENG
Fail:
DING DONG DING
DONG
Closing the Door from the Inside
Automatic
Locking Setting
10 11
987
12
Touch Number Pad
Manual
Locking Setting
The door is automatically locked 1 seconds after the door is
closed.
The door is locked when the
[Close] button is pressed
●
To check if the door is locked from the inside, press the security button
briefly; the red LED will flash if the door is locked and the blue LED will blink if
the door is unlocked.
Note
Card Reader
Proximity Sensor
Away Security
Setup
Emergency Alert
Light
External Power
Contact Part
Battery
Replacement
Time Alert
Entry Complete/
Silent Mode Switch
Button
Sound Control Switch
Built-in Wireless Module
(Optional)
CLOSE Button
●To register multiple cards or key tags, lightly place another card or key tag
to the card reader within 20 seconds after registering the previous card or
key tag.
Warning
Double Authorization Mode Setting
The Double Authorization mode is an enhanced security function with two
factor authentication in which both password and fingerprint are required
when opening the door. To set up the Double Authorization mode, at least one
fingerprint has to have already been registered.
Briefly press the [Register]
button on the inner body.
Press the [] button after pressing the
[4] or [6] button, and the authorization
mode will be set.
[4]Button: Double
authorizationmodeon
[6]Button: Double
authorizationmodeoff
Two-factor Authentication
Mode Operation
Touching
[Number
Pad].
Enter the password when
the number pad is lighted,
and press the [] button.
Touch a registered fingerprint
on the Fingerprint Reading
Panel. After a successful
authentication, the door opens.
Success:
DING DONG DENG
Fail: DINGDONG
DING DONG
Sound Setting and Releasing
The sound that is generated when the number buttons are pressed, when the
door is locked or when the locked door is unlocked, can be set according to
the user’s preference. The product is set to generate all sounds at the factory.
- [0] Button: All sounds except the alarm sound are deactivated.
- [1] and [2] Buttons: All sounds are activated and the sounds get bigger as the
step become higher.
Open the
battery cover
on the inner
body.
Put the [Sound Control]
switch on one of [0],
[1], or [2], and close the
battery cover.
Automatic/Manual Locking Setting
The Automatic Locking mode allows for automatic locking of the door when
it is closed.
- Automatic: The door is automatically locked 1 seconds after being closed.
- Manual: The door does not lock automatically, and [CLOSE] button must be
pressed from the inside, touch [Number Pad] to close the door.
Set the [Automatic/Manual
Locking] toggle switch of
the Inner Body to the ‘A’/‘M’
position.
Open the
battery cover
on the inner
body.
While the door is locked, press
[Security Assurance] button
on the inner body part for 3
seconds.
Pull the inner body
handle to open the door,
and it will deactivate.
DING DONG
DENG
DING DONG
DENG DONG
Security Assurance Mode
Activation Security Assurance Mode
Deactivation
Security Assurance Mode Operation
Rapid beeping
● When the security assurance function is activated, the door cannot be
unlocked from the outside, so please be careful. Be especially careful not
to allow children to set this mode accidently from the inside.
Warning
Or
Setting the Security Function
This is a function to prevent any intrusion while you are out. Should the door
be opened from the inside while the intrusion prevention function is on, the
emergency alert light will flash and the alarm will make “beep beep beep~”
sound.
1. When the door is closed [ ] of the
outside body’s number pad will light up.
2. Press and hold the [ ] button on the
outer body for 3 seconds while the door
is locked.
After touching the Number Pad,
have a registered fingerprint read, or
contact a registered card, or enter the
password and then press the
[] button.
DING DONG
DENG Or
Setting the Security Function Releasing the Security Function
Welcome Function On/Off
The welcome function is a convenient function that automatically activates
the authorization standby mode when a user approaches the door, even
before touching the number pad.
Open the battery
cover and press
[Registration] button
briefly.
[1]+[] button: Welcome function on, the one-
minute alarm function on
[2]+[] button: Welcome function on, the one-
minute alarm function off
[3]+[] button: Welcome function off
DING
DONG
On and Off / Function Description
- Welcome function on: The mode will automatically activate the authorization
standby mode when a user approaches the door lock.
- Welcome function off: The mode will authorize a user when the user enters the
password on the number pad or connects a card to the number pad.
- One-minute alarm function on/ off: When someone remains in front of the door
lock for more than a minute, this mode will sound the tamper prevention alarm.
● The factory defaults are set with the welcome function on and the alarm
function off.
● The working distance of the infrared sensor can differ depending on light
conditions and other environments. When the front door is exposed to sun
light or constant bright lights it is advised to limit the usage of the sensor
as it might sound the alarm.
Caution
Door Lock Time Setup Function
Intrusion Detection Function
This function generates the alarm sound when an attempt is made to
forcefully open the door from the inside or the outside.
(This is a basic function of the lock, and cannot be separately set or released.)
If the door is forcefully opened while locked, the door opening sensor detects
it and generates the alarm sound.
Replacing the Batteries
If the melody of “Blues for Elise” sounds when opening the door with the
password or fingerprint or a card (key tag), it is time to replace the batteries.
(The low battery indicator is lighted when the melody sounds.)
Battery Replacement Alarm Generation
Replace all 8 batteries within a 1 week of the first alarm sound.
- The unit will stop operating suddenly if the batteries are not replaced.
Replacing the Battery
● Depending on battery manufacturer, date of manufacture and the user
environment, the duration of use may vary.
(In the case of average use, given as 10 times a day, 8 AA alkaline
1.5Vbatteries can last for 12 months.)
● If the poles of the batteries are not placed properly, the lock will not operate
normally.
● Liquid leaks from batteries can damage the product. Check the batteries
regularly (every 6 months).
● After the battery replacement alarm has sounded, password/fingerprint/card
information cannot be registered, changed, deleted, initialized or configured
until the batteries are replaced.
Warning
Alarm Sound (Prank Prevention Function)
This function generates an alarm sound and deactivates lock operation when
it is improperly handled from the outside.
Product Specifications
This function generates the alarm sound when fire is detected so that the
residence can quickly respond. The built-in fire detection function is a basic
function of the lock, and cannot be released by the user.
Fire detection function is operational at about 75 ℃± 10 ℃; this can vary
depending on the installation environment.
When fire occurs, the temperature sensor detects it and flashes the
[Close] button while generating the alarm sound.
The door is automatically opened after the alarm sound has stopped.
(The lock resumes normal operation if the inside temperature returns to
a normal level.)
The built-in fire detection function is activated when the temperature rises
around 60°C, which may differ depending on the installation environment.
Item Specications
Voltage AA Alkaline 1.5 Batteries (LR6) 4EA or 8EA (6V)
Emergency
Power
Source
9V Battery (6LF22) (Separately sold)
Operation
Method
Electronic Control Method (Password entry or fingerprint
or card or key tag reading)
Weight 3.9 kg (including both inner and outer bodies)
Product
Dimensions
Outer Body
(including the
handle)
85mm(W) × 387mm(H) × 61mm(D)
Inner Body
(including the
handle)
86mm(W) × 354.8mm(H) × 63 mm(D)
Built-in Fire Detection Function
●
The contents of this user guide are subject to change without prior
notice to the user in order to enhance performance of the product.
Security Assurance Mode Activation/Deactivation
At-home security mode is to prevent opening of the door from outside while
someone is inside.
Press [51] ~ [59] button,
and then press [] button.
Using the Emergency Battery
If the batteries are not replaced after their replacement time comes, they will
be completely discharged and the lock will not operate.
While connecting a 9V battery to the External Power (Emergency
Battery) Contact Part on the outer body, have a registered fingerprint
read or enter the password.
Purchase an emergency battery (9V) at the nearest store.
- As the alkaline batteries offer longer life, they are recommended
over the manganese batteries or rechargeable ones.
Opening the Door Using an Emergency Battery
3. Entering a New Password
(from the outside)
4. Entering a New Password (from
the outside)
DING DING DING DONG
DENG
Enter the new password (4 to 12
digits) and press the [] button. Enter the new password again
to check if the new password is
accurately configured, and then press
the [] button.
To make sure the password has been properly registered, check the new
password and close the door.
5. Checking New Password Operation (from the outside)
● Manage your password with care so that unauthorized people will not have
access to it. Regularly changing your password can reduce the risk of it
being leaked.
Warning
Place the card or key tag to be registered
on the card reader of the outer body. You
will know the card or key tag has been
registered when “DING DONG DENG”
sounds.
Place the registered card or key
tag to the card reader on the outer
body.
3. Placing the Card or Key Tag
on the Card Reader (from the
outside)
DING DONG
DENG
4. Confirming Card or Key Tag
Registration (from the outside)
DING
DONG
DING DONG
DENG
DING
DONG
DING DONG
DENG
Open the battery cover
of the inner body
and briefly press the
[Register] button.
DING
DONG
This alarm will sound if an attempt is made to open the door with an invalid card, or
if a wrong password is entered five times in a row.
The alarm sound is generated, and the lock is deactivated for 3 minutes. While the
door is in this inactive mode, a single “DING” sound is generated every 10 seconds
and seven consecutive “DINGS” will sound after 3 minutes. Following this, the lock
is released from inactive mode.)
Press the [Register] button.
Outside Get a registered fingerprint or a registered card authorized or
enter the password and then press the [] button.
Inside
Releasing the Alarm
Success:
DING DONG DENG
Fail: DINGDONG
DING DONG
Opening the Door from the Outside with
a Fingerprint
Fingerprint, Card and Key Tag Registration
Open the battery cover of
the inner body and briefly
press the [Register] button.
DINGDONG
1. Pressing the [Register]
Button (from the inside)
Enter the current password (‘1234’ after
initialization) when the number pad is
lighted, and press the [] button.
2. Entering the Current Password
(from the outside)
DING DONG
DENG, DING
DING
You can register and use up to 100 fingerprints.
Up to 20 cards, including the key tag, can be registered.
(Only ISO14443 A Type is available.)
[Card and Key Tag Registration]
Deleting Registered Fingerprints & Cards
You can delete individual or all registered fingerprints and cards.
1. Pressing the [Register]
Button (from the inside)
Press the [Registration]
button for 3 seconds.
Enter the current password (‘1234’ after
initialization) when the number pad is
lighted, and press the [] button.
2. Entering the Current Password
(from the outside)
DING DONG
DENG, DING
DING
3. Reading the Fingerprint to Be Registered
When LED light on the Fingerprint Reading Panel is on,
touch the panel with the fingerprint to be registered.
When a “ding” sound is heard and LED light goes off,
then remove the finger. (Must do it 3 times)
4. Exiting Fingerprint
Registration Mode
To end the registration,
please press the
[Registration] button on the
inner body.
DING
DONG
DENG
[Fingerprint Registration]
3. Reading the Fingerprint to Be Deleted
When LED light on the Fingerprint Reading Panel is on,
touch the panel with the fingerprint to be deleted.
4. Exiting Fingerprint
Deletion Mode
To end the deletion of
registered fingerprints, please
press the [Registration] button.
[Deleting Fingerprints]
[Deleting Cards]
3. Entering the Card Deletion Codes
When the light on the Number Pad is
on, press ‘88’ and then the [] button.
DING DONG
DENG
Initialization (Password, Card, Key Tag)
All registered data (password, card, key tag) are deleted. After initialization,
the password is set to ‘1234’, and the registered card, key tag data are
erased. Please register a new password after initialization.
Press the [Open Fingerprint
Cover] button on the outer
body to open the lid of the
Fingerprint Reading Panel
and touch the panel with the
registered fingerprint.
5. Registration Confirmation
