manuals.online logo
Brands
  1. Home
  2. •
  3. Brands
  4. •
  5. Sauder
  6. •
  7. Indoor Furnishing
  8. •
  9. Sauder 427350 User manual

Sauder 427350 User manual

sauder.com
NOTE: THIS INSTRUCTION
BOOKLET CONTAINS IMPORTANT
SAFETY INFORMATION.
PLEASE READ AND KEEP FOR
FUTURE REFERENCE.
sauder.com
CONTACT US FIRST
BEFORE MAKING ANY RETURNS TO THE STORE.
sauder.com
CONTACT US FIRST
BEFORE MAKING ANY RETURNS TO THE RETAILER.
Visit sauder.com/service to order replacement parts, view video assembly tips, or chat with a live rep.
Prefer the phone? Give us a ring at 1-800-445-1527.
Customer Service is available Monday-Friday - 9 a.m. to 5:30 p.m. EST (except holidays)
Sauder.com
Share your journey!
English pg 1-20
Français pg 21-24
Español pg 25-28
Lot # 552557 08/26/20
Purchased: __________________
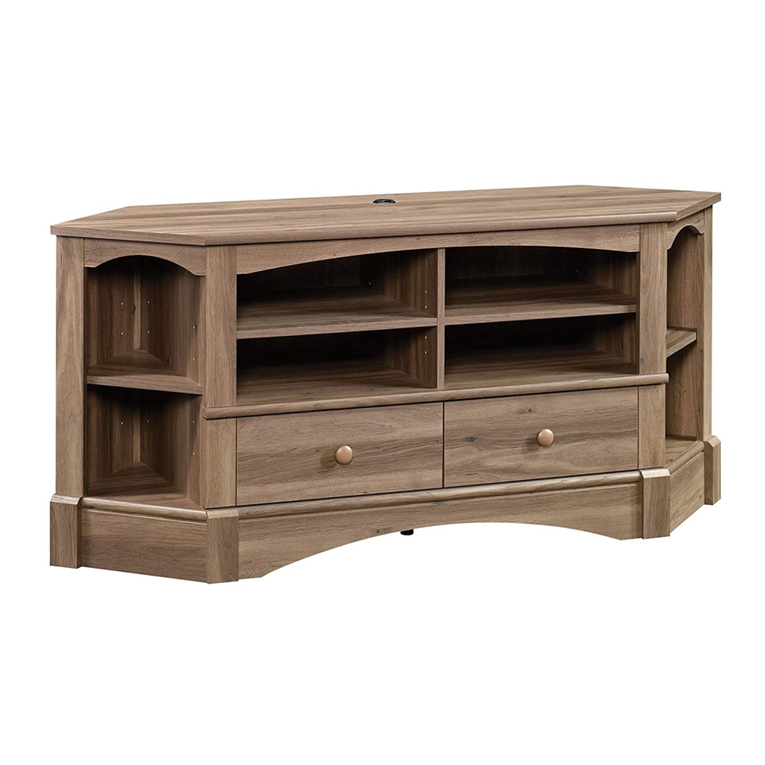
TV Stand
Boulevard Cafe Collection | Model 427350
Your holder for all
things awesome.
Part Identification
Hardware Identification
Hardware Usage Guide
Assembly Steps
Français
Español
Safety
Warranty
No. 2 Phillips Screwdriver
Tip Shown Actual Size
WARNING
!
Table of Contents Assembly Tools Required
3
4
5
6-20
21-24
25-28
29-30
31
Use of a TV that is too heavy or large is hazardous. A TV that is too heavy will create a risk of a tip-over that can cause severe injury or
death. A TV that is too large for the available space might be accidentally pushed or bumped o the furniture, or subject to tip-over.
• Check the size and weight of your TV. Compare it to the diagram below – before you begin assembly!
• This Sauder unit is designed for use with flat panel televisions weighing less than 50 pounds. Never use with a TV that weighs
more.
• The size of the television, front-to-back and side-to-side, must fit within the space defined in the diagram.
• Never place the front edge of the TV past the front edge of the TV support shelf (or stop molding – if equipped)
• Never allow the sides of the TV to extend past the side edges of the TV support surface.
• Be sure to apply the warning label as instructed later in the assembly. The label provides important safety related information.
50 lbs.50 lbs.
47-1/2"47-1/2"
15-3/4"15-3/4"
Page 2 www.sauder.com/service 427350
Part Identification
åWhile not all parts are labeled, some of the parts will have a label or an inked letter on the edge
to help distinguish similar parts from each other. Use this part identification to help identify similar parts.
Now you know
our ABCs.
A TOP (1)
B SHELF (1)
C BOTTOM (1)
D LEFT END (1)
E RIGHT END (1)
F ADJUSTABLE SHELF (2)
G UPRIGHT (1)
H BACK (1)
J RIGHT DOOR (1)
K LEFT DOOR (1)
L REAR LEG (1)
M BRACE (2)
N FRONT LEG (1)
O SMALL UPRIGHT (1)
A
B
C
D
E
F
O
F
G
H
J
K
L
M
M
N
Page 3www.sauder.com/service427350
Hardware Identification
åScrews are shown actual size. You may receive extra hardware with your unit.
HIDDEN CAM - 18
1CAM SCREW- 18
2SMALL WOOD
DOWEL - 4
4
LARGE WOOD
DOWEL - 14
3
L-WRENCH - 1
8
APPLIQUE CARD - 3
6 7 BUMPER CARD - 1
SHELF PIN - 8
5
BLACK 9/16" FLAT HEAD SCREW - 4
17
1- 3/4" HEX HEAD SCREW - 4
13 14 1 - 3/4" FLAT HEAD SCREW - 4
1/2" HEX HEAD SCREW - 4
16
5/8" PAN HEAD SCREW - 8
15
HINGE - 4
10 GROMMET - 2
11
PULL - 2
9
(Refer to the last step for proper
location and application)
WARNING LABEL - 1
12
522,68 22,68
Page 4 www.sauder.com/service 427350
SILVER 9/16" FLAT HEAD SCREW - 24
18
Hardware Usage Guide
HOW TO USE A HIDDEN CAM & CAM SCREW OR CAM DOWEL
NOTE: Various CAM SCREWS or a CAM DOWEL may be used.
Cam Screws Cam Dowel
Turn the CAM SCREW or
gently tap the CAM DOWEL
until the shoulder is against
the surface of the part.
1.
Hidden CamHidden Cam
Arrow
Push a HIDDEN CAM into
the part. The arrow in the
HIDDEN CAM must point
toward the hole in the
edge of the board.
Hole
2.
3.
1
2
Insert the CAM SCREW or CAM DOWEL into the
HIDDEN CAM. Tighten the HIDDEN CAM.
Page 5www.sauder.com/service427350
Step 1
å Assemble your unit on a carpeted floor or on the empty
carton to avoid scratching your unit or the floor.
å Push six HIDDEN CAMS (1) into the UPRIGHT (G) and
BACK (H).
Look for this icon. It means a video assembly tip is
available at www.sauder.com/service/tips
Find the numbered video or scan the QR code.
G
H
1
Arrow
1
1
Arrow
Page 6 www.sauder.com/service 427350
å Fasten the BACK (H) to the UPRIGHT (G). Use two 1-3/4"
FLAT HEAD SCREWS (14).
Step 2
G
H
Surface with
HIDDEN CAMS
Surface without
HIDDEN CAMS
The large
hole must
be here.
The large
hole must
be here.
1-3/4" FLAT HEAD SCREW
(2 used in this step)
14
Page 7www.sauder.com/service427350
å Turn four CAM SCREWS (2) into the SHELF (B).
å Push four HIDDEN CAMS (1) into the SHELF (B).
Step 3
B
B
F
L
I
P
O
V
E
R
2
Arrow
1
1
Page 8 www.sauder.com/service 427350
1
Arrow
å Insert two LARGE WOOD DOWELS (3) into the SHELF (B).
å Fasten the SHELF (B) to the UPRIGHT (G). Tighten two
HIDDEN CAMS.
å NOTE: Be sure the WOOD DOWELS in the SHELF insert
into the UPRIGHT.
å Push two GROMMETS (11) into the large holes in
the BACK (H).
Step 4
3
Surface with
HIDDEN CAMS
G
B
11
Finished edge
Finished edge
1
Page 9www.sauder.com/service427350
å Push four HIDDEN CAMS (1) into the
SMALL UPRIGHT (O).
å Insert a LARGE WOOD DOWEL (3) into the SMALL
UPRIGHT (O). Fasten the SMALL UPRIGHT (O) to the
SHELF (B). Tighten two HIDDEN CAMS.
å NOTE: Be sure the WOOD DOWEL in the SMALL
UPRIGHT inserts into the SHELF.
Step 5
B
Arrow
1
1
Arrow
O
O
Surface with
HIDDEN CAMS
3
Finished edge
1
Page 10 www.sauder.com/service 427350
Step 6
D
E
å Push four HIDDEN CAMS (1) into the ENDS (D and E).
å Turn eight CAM SCREWS (2) into ENDS (D and E).
1
Arrow
2
1
Page 11www.sauder.com/service427350
å Insert four LARGE WOOD DOWELS (3) and four SMALL
WOOD DOWELS (4) into the ENDS (D and E).
å Fasten the ENDS (D and E) to the SHELF (B) and
BACK (H). Tighten eight HIDDEN CAMS.
å NOTE: Be sure the WOOD DOWELS in the ENDS inserts
into the SHELF and BACK.
Step 7
D
E
B
H
3
3
4
4
1
Page 12 www.sauder.com/service 427350
å Turn six CAM SCREWS (2) into TOP (A).
å Insert five LARGE WOOD DOWELS (3) into the TOP (A).
å Fasten the TOP (A) to the ENDS (D and E) and SMALL UPRIGHT (O). Tighten six HIDDEN CAMS.
å NOTE: Be sure the WOOD DOWELS in the TOP inserts into the ENDS and SMALL UPRIGHT.
Step 8
D
E
A
3
1
O
Page 13www.sauder.com/service427350
A
2
Step 9
å Fasten the BRACES (M) to the LEGS (L and N).
Tighten four 1/2" HEX HEAD SCREWS (16) using the
L-WRENCH (8).
å NOTE: You should start each SCREW a few turns
before completely tightening any of them.
81/2" HEX HEAD SCREW
(4 used in this step)
16
L
M
M
N
Page 14 www.sauder.com/service 427350
å Fasten the BOTTOM (C) to the LEGS (L, M, and N). Use
eight 5/8" PAN HEAD SCREWS (15).
Step 10
LM
M
NC
5/8" PAN HEAD SCREW
(8 used in this step)
15
Page 15www.sauder.com/service427350
Step 11
å Insert two LARGE WOOD DOWELS (3) into the UPRIGHT (G).
å Fasten the BRACES (M) to the ENDS (D and E). Turn four
1-3/4" HEX HEAD SCREWS (13) using the L-WRENCH (8).
å Fasten the BOTTOM (C) to the UPRIGHT (G). Use two
1-3/4" FLAT HEAD SCREWS (14).
å NOTE: Be sure the WOOD DOWELS in the UPRIGHT
insert into the BOTTOM
3
G
C
M
M
1-3/4" FLAT HEAD SCREW
(2 used in this step)
14
1-3/4" HEX HEAD SCREW
(4 used in this step)
13
13
D
E
Page 16 www.sauder.com/service 427350
8
å Fasten four HINGES (10) to the DOORS (J and K). Use
eight SILVER 9/16" FLAT HEAD SCREWS (18).
Step 12
J
K
10
Page 17www.sauder.com/service427350
SILVER 9/16" FLAT HEAD SCREW
(8 used in this step)
18
Step 13
BLACK 9/16" FLAT HEAD SCREW
(4 used in this step)
17
9
9
å Carefully stand your unit upright. Fasten a PULL (9) to each DOOR (J and K).
Use four BLACK 9/16" FLAT HEAD SCREWS (16).
å Fasten the RIGHT DOOR (J) to the RIGHT END (E) . Use eight SILVER 9/16"
FLAT HEAD SCREWS (18).
å Fasten the LEFT DOOR (K) to the LEFT END (D) . Use eight SILVER 9/16"
FLAT HEAD SCREWS (18).
17
Page 18 www.sauder.com/service 427350
D
E
J
K
SILVER 9/16" FLAT HEAD SCREW
(16 used in this step)
18
Step 14
(vertical adjustment)
4 screws
Adjusting screw (horizontal)
Mounting screw (depth)
17
å Refer to the enlarged diagram to identify the parts on
the HINGES.
å The DOORS may need some adjustments. Follow the text
below to make needed adjustments.
å DOOR ADJUSTMENTS:
To adjust the DOORS from side to side (horizontal), turn the
adjusting screw in or out.
å To adjust the DOORS up and down (vertical), remove the round
hole screws and loosen the slotted hole screws. Move the DOORS
up or down to the desired location. Tighten the slotted hole screws
first. Then turn the round holes screws into their holes.
å To adjust the DOORS in or out (depth), loosen the mounting
screw one turn and move the DOORS in or out, as needed.
Tighten the mounting screw after making adjustments
å Insert the SHELF PINS (5) into the hole locations of your
choice in the ENDS (D and E) and UPRIGHT (G). Set the
ADJUSTABLE SHELVES (F) onto the SHELF PINS.
(8 used)
5
Notch
F
F
Page 19www.sauder.com/service427350
D
E
G
å Peel the APPLIQUES from the APPLIQUE CARD (6) and stick them onto each visible HIDDEN CAM.
å Peel the BUMPERS from the BUMPER CARD (7) and stick them on the front edges of the SHELVES (F) as shown.
å Apply the WARNING LABEL (12) to the TOP (A). You should be able to read the label when the TV is removed
from the unit. When the TV is in place, it should hide the label. Peel o the backing and apply the label as shown
in the diagram.
å NOTE: This is a permanent label intended to last for the life of the product. Once applied, do not try to remove it.
å NOTE: Please read the back pages of the instruction booklet for important safety information.
å This completes assembly. Clean with a damp cloth. Wipe dry.
Step 15
7
522,68 22,68
522,68 22,68
And to celebrate, why not share your success story at sauder.com or
Page 20 www.sauder.com/service 427350
12
A
F
F
50 lbs. total
50 lbs.
25 lbs. 25 lbs.
35 lbs.
(3 used)
6

Other Sauder Indoor Furnishing manuals

Sauder 412091 User manual

Sauder

Sauder 412091 User manual

Sauder OfficeWorks AFFIRM 427428 User manual

Sauder

Sauder OfficeWorks AFFIRM 427428 User manual

Sauder Office Works Affirm 431916 User manual

Sauder

Sauder Office Works Affirm 431916 User manual

Sauder Beginnings 414291 User manual

Sauder

Sauder Beginnings 414291 User manual

Sauder Palladia 411835 User manual

Sauder

Sauder Palladia 411835 User manual

Sauder HomePlus Collection 411967 User manual

Sauder

Sauder HomePlus Collection 411967 User manual

Sauder Boulevard Cafe 422420 User manual

Sauder

Sauder Boulevard Cafe 422420 User manual

Sauder 413072 User manual

Sauder

Sauder 413072 User manual

Sauder Avenue Eight 416513 User manual

Sauder

Sauder Avenue Eight 416513 User manual

Sauder STEADFAST 402932 User manual

Sauder

Sauder STEADFAST 402932 User manual

Sauder 412267 User manual

Sauder

Sauder 412267 User manual

Sauder Orchard Hills Series User manual

Sauder

Sauder Orchard Hills Series User manual

Sauder 430237 User manual

Sauder

Sauder 430237 User manual

Sauder Harbor View 400742 User manual

Sauder

Sauder Harbor View 400742 User manual

Sauder Barrister Lane 414724 User manual

Sauder

Sauder Barrister Lane 414724 User manual

Sauder Registry Row Series User manual

Sauder

Sauder Registry Row Series User manual

Sauder 423392 User manual

Sauder

Sauder 423392 User manual

Sauder Shoal Creek 411201 User manual

Sauder

Sauder Shoal Creek 411201 User manual

Sauder 420406 User manual

Sauder

Sauder 420406 User manual

Sauder Orchard Hills 401292 User manual

Sauder

Sauder Orchard Hills 401292 User manual

Sauder Carson Forge 412921 User manual

Sauder

Sauder Carson Forge 412921 User manual

Sauder 411802 User manual

Sauder

Sauder 411802 User manual

Sauder Shoal Creek 418662 User manual

Sauder

Sauder Shoal Creek 418662 User manual

Sauder Center City 425653 User manual

Sauder

Sauder Center City 425653 User manual

Popular Indoor Furnishing manuals by other brands

Rauch M9979 Assembly instructions

Rauch

Rauch M9979 Assembly instructions

Martin Svensson Orleans 91050 Assembly instructions

Martin Svensson

Martin Svensson Orleans 91050 Assembly instructions

Office Star Products EM20600 operating instructions

Office Star Products

Office Star Products EM20600 operating instructions

LHFD C2010001 Assembly instructions

LHFD

LHFD C2010001 Assembly instructions

Dorel Asia WM3451 Instruction booklet

Dorel Asia

Dorel Asia WM3451 Instruction booklet

Enigma Care ENB-301 Series manual

Enigma Care

Enigma Care ENB-301 Series manual

LV Furniture BOOM 319 Assembly instruction

LV Furniture

LV Furniture BOOM 319 Assembly instruction

Little Folks Furniture Fargo HSP001 manual

Little Folks Furniture

Little Folks Furniture Fargo HSP001 manual

meubar ATELIER V6 Assembly instruction

meubar

meubar ATELIER V6 Assembly instruction

Winners Only T1-VG4296 Assembly instructions

Winners Only

Winners Only T1-VG4296 Assembly instructions

BALATIN INTERIORS Lucia 4'6 Bed Assembly instructions

BALATIN INTERIORS

BALATIN INTERIORS Lucia 4'6 Bed Assembly instructions

Whittier Wood 1507RGB Assembly instructions

Whittier Wood

Whittier Wood 1507RGB Assembly instructions

Furniture of America CM7124-C Assembly instructions

Furniture of America

Furniture of America CM7124-C Assembly instructions

BePureHome ORGANIZE STORAGE CABINET 44CM manual

BePureHome

BePureHome ORGANIZE STORAGE CABINET 44CM manual

IKEA SVÄVANDE manual

IKEA

IKEA SVÄVANDE manual

Gima 45260 manual

Gima

Gima 45260 manual

Forte CHRBS891 Assembling Instruction

Forte

Forte CHRBS891 Assembling Instruction

Randalsa STARK Assembly instructions

Randalsa

Randalsa STARK Assembly instructions

manuals.online logo
manuals.online logoBrands
  • About & Mission
  • Contact us
  • Privacy Policy
  • Terms and Conditions

Copyright 2025 Manuals.Online. All Rights Reserved.