REBOUNDER®MOUNTING INSTRUCTIONS
A/C 78-79 Air Planters
SCHAFFERT MFG. CO., INC. 308-364-2607 OR 800-382-2607
71495 rd. 397 ∙ indianola, ne 69034 ∙ 308-364-2607 or 800-382-2607 ∙ fax: 308-364-2410 ∙ sales@schaffert.com ∙ www.schaffert.com ∙ 6 apr 2017
Rebounder covered by one or more of the following U.S. patents: 5,640,915; 5,918,557; 6,082,275; 6,283,050; 6,453,832; 6,763,773 and 7,121,216.
Before working on your planter or drill
DANGER:
When storing or working on the planter always install cylinder stops or place the planter on stands to prevent personal injury or damage to the attachments.
PLEASE:
Read instructions completely and verify all package contents before beginning installation
71495 rd. 397 - indianola, ne 69034 - phone: 800-382-2607 - fax: 308-364-2410 - info@schaffert.com - www.schaffert.com - Sept 18, 2009
Rebounder covered by one or more of the following U.S. patents: 5,640,915; 5,918,557; 6,082,275; 6,283,050; 6,453,832, 6,763,773 and 7,121,216.
SCHAFFERT MFG. CO. INC. - phone: 800-382-2607 - fax: 308-364-2410
REBOUNDERTM MOUNTING INSTRUCTIONS
A/C 78-79 Air Planters
(Read Instructions Completely before Beginning Installation)
Before working on your planter or drill
DANGER:when storing or working on the planter always install cylinder stops or place the planter on stands to prevent personal injury or
damage to the Rebounder. WARNING:do not roll back or back up the planter in or on the ground as this can result in damage to the
Rebounder.
Mounting Instructions
Before you begin, verify all items listed in the “package contents” table.
Step #1: take the seed boot extension off and remove the rubber flap, then re-
attach the boot. Bolt the Rebounder bracket in place with the two bolts
(fig. (a)).
Step #2: now attach the Rebounder with the bolt, fender washer and nut.
Step #3: set planter on a flat surface, the tail of the Rebounder should be about
3/8” off the floor or flat surface. Tighten the nut on the Rebounder.
Optional fittings are available for fertilizer/chemical applications. Options
include: Y-Not Split-It, or Hose Holder each available for an additional charge.
Rebounder Package Contents
(per single row)
Item Quantity
Rebounder..................1
5/16x1”bolt...............1
5/16”locknut ..............1
fenderwasher...............1
InstructionSheet.............1
Bracket Package Contents
(per single row)
Item Quantity
Bracket....................1
5/16”bolts.................2
5/16”Nuts.................2
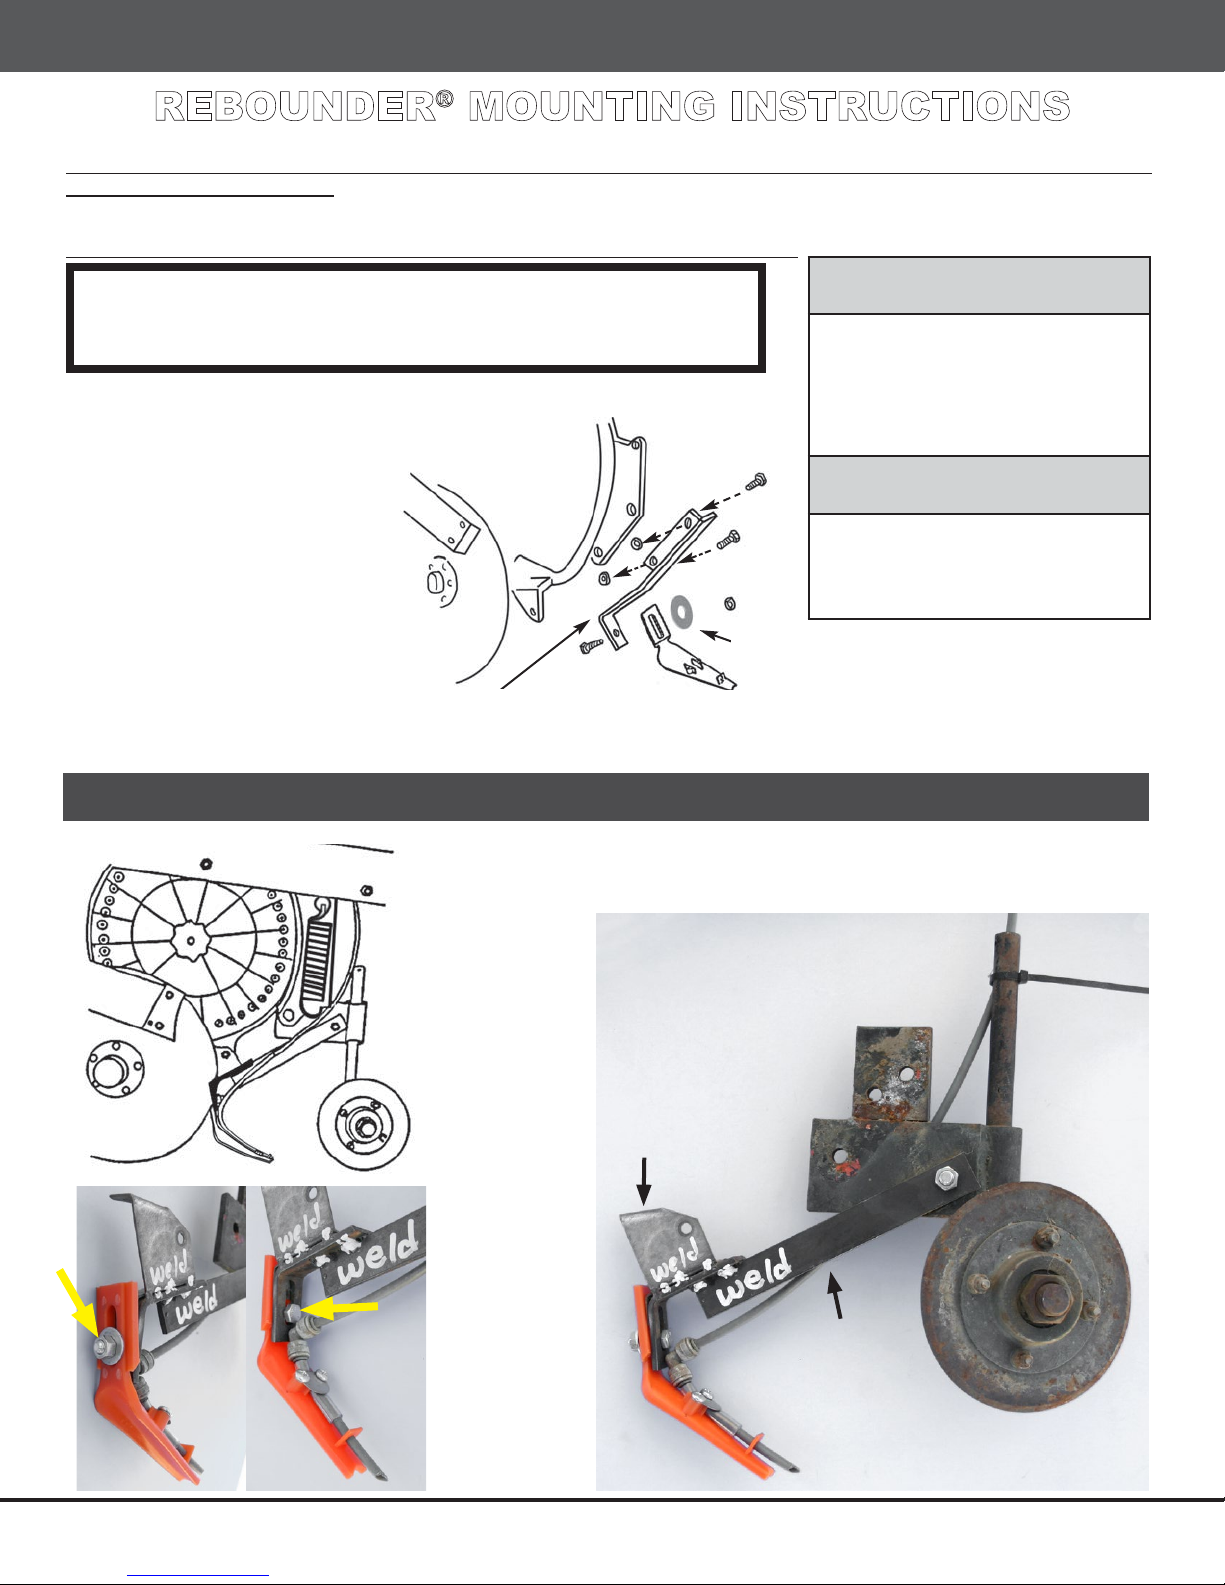
Rebounder
A/C 78 & 79 Air Planter w/ Rebounder
and Furrow V Closer (see FVC mounting
instructions for this planter type)
fig. (a)
fender washer
bracket
71495 rd. 397 - indianola, ne 69034 - phone: 800-382-2607 - fax: 308-364-2410 - info@schaffert.com - www.schaffert.com - Sept 18, 2009
Rebounder covered by one or more of the following U.S. patents: 5,640,915; 5,918,557; 6,082,275; 6,283,050; 6,453,832, 6,763,773 and 7,121,216.
SCHAFFERT MFG. CO. INC. - phone: 800-382-2607 - fax: 308-364-2410
REBOUNDERTM MOUNTING INSTRUCTIONS
A/C 78-79 Air Planters
(Read Instructions Completely before Beginning Installation)
Before working on your planter or drill
DANGER:when storing or working on the planter always install cylinder stops or place the planter on stands to prevent personal injury or
damage to the Rebounder. WARNING:do not roll back or back up the planter in or on the ground as this can result in damage to the
Rebounder.
Mounting Instructions
Before you begin, verify all items listed in the “package contents” table.
Step #1: take the seed boot extension off and remove the rubber flap, then re-
attach the boot. Bolt the Rebounder bracket in place with the two bolts
(fig. (a)).
Step #2: now attach the Rebounder with the bolt, fender washer and nut.
Step #3: set planter on a flat surface, the tail of the Rebounder should be about
3/8” off the floor or flat surface. Tighten the nut on the Rebounder.
Optional fittings are available for fertilizer/chemical applications. Options
include: Y-Not Split-It, or Hose Holder each available for an additional charge.
Rebounder Package Contents
(per single row)
Item Quantity
Rebounder..................1
5/16x1”bolt...............1
5/16”locknut ..............1
fenderwasher...............1
InstructionSheet.............1
Bracket Package Contents
(per single row)
Item Quantity
Bracket....................1
5/16”bolts.................2
5/16”Nuts.................2
Rebounder
A/C 78 & 79 Air Planter w/ Rebounder
and Furrow V Closer (see FVC mounting
instructions for this planter type)
fig. (a)
fender washer
bracket
Slide
Rebounder all
the way up so
the bolt is at
the bottom of
the slot. The
bolt should be
at the bottom
of the slot on
the bracket as
well.
A/C 78 & 79 Air Planter with
Rebounder & Furrow V Closer
part of
planter Furrow V
Closer
bracket’s
narrow
side up
REBOUNDER WITH FURROW V CLOSER
NOTE:
If applying liquids in furrow with the Rebounder, attach either Y-Not Split It, Hose Holder,
or Straight Shot kit by following kit directions.
INSTALL KIT BEFORE INSTALLING REBOUNDER TO PLANTER UNIT
.See kit instructions.
Take the seed boot extension off and remove
the rubber ap, then re-attach the boot. Bolt the
Rebounder bracket in place with the two bolts.
Attach the Rebounder with the bolt, fender
washer and nut.
Set the planter on a at surface. The tail of the
Rebounder should be about 3/8" off the oor or
at surface. Tighten the nut on the Rebounder.
STEP #1:
STEP #2:
STEP #3:
71495 rd. 397 - indianola, ne 69034 - phone: 800-382-2607 - fax: 308-364-2410 - info@schaffert.com - www.schaffert.com - Sept 18, 2009
Rebounder covered by one or more of the following U.S. patents: 5,640,915; 5,918,557; 6,082,275; 6,283,050; 6,453,832, 6,763,773 and 7,121,216.
SCHAFFERT MFG. CO. INC. - phone: 800-382-2607 - fax: 308-364-2410
REBOUNDERTM MOUNTING INSTRUCTIONS
A/C 78-79 Air Planters
(Read Instructions Completely before Beginning Installation)
Before working on your planter or drill
DANGER:when storing or working on the planter always install cylinder stops or place the planter on stands to prevent personal injury or
damage to the Rebounder. WARNING:do not roll back or back up the planter in or on the ground as this can result in damage to the
Rebounder.
Mounting Instructions
Before you begin, verify all items listed in the “package contents” table.
Step #1: take the seed boot extension off and remove the rubber flap, then re-
attach the boot. Bolt the Rebounder bracket in place with the two bolts
(fig. (a)).
Step #2: now attach the Rebounder with the bolt, fender washer and nut.
Step #3: set planter on a flat surface, the tail of the Rebounder should be about
3/8” off the floor or flat surface. Tighten the nut on the Rebounder.
Optional fittings are available for fertilizer/chemical applications. Options
include: Y-Not Split-It, or Hose Holder each available for an additional charge.
Rebounder Package Contents
(per single row)
Item Quantity
Rebounder..................1
5/16x1”bolt...............1
5/16”locknut ..............1
fenderwasher...............1
InstructionSheet.............1
Bracket Package Contents
(per single row)
Item Quantity
Bracket....................1
5/16”bolts.................2
5/16”Nuts.................2
Rebounder
A/C 78 & 79 Air Planter w/ Rebounder
and Furrow V Closer (see FVC mounting
instructions for this planter type)
fig. (a)
fender washer
bracket
bracket Rebounder
fender
washer


