I
N
A
U
S
T
R
A
L
I
A
P
R
O
U
D
L
Y
B
U
I
L
T
2
INSTRUCTIONS - ELECTRICINEMA 235 PROJECTION SCREEN
CONTROL EQUIPMENT
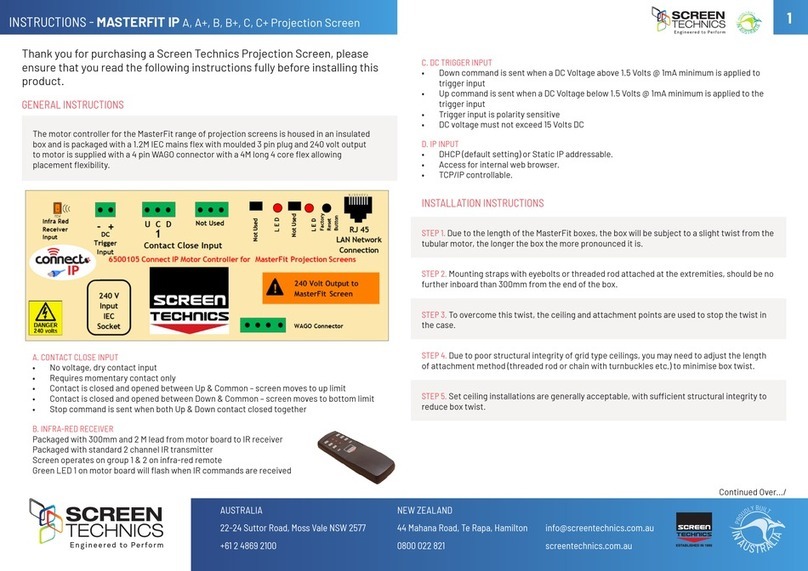
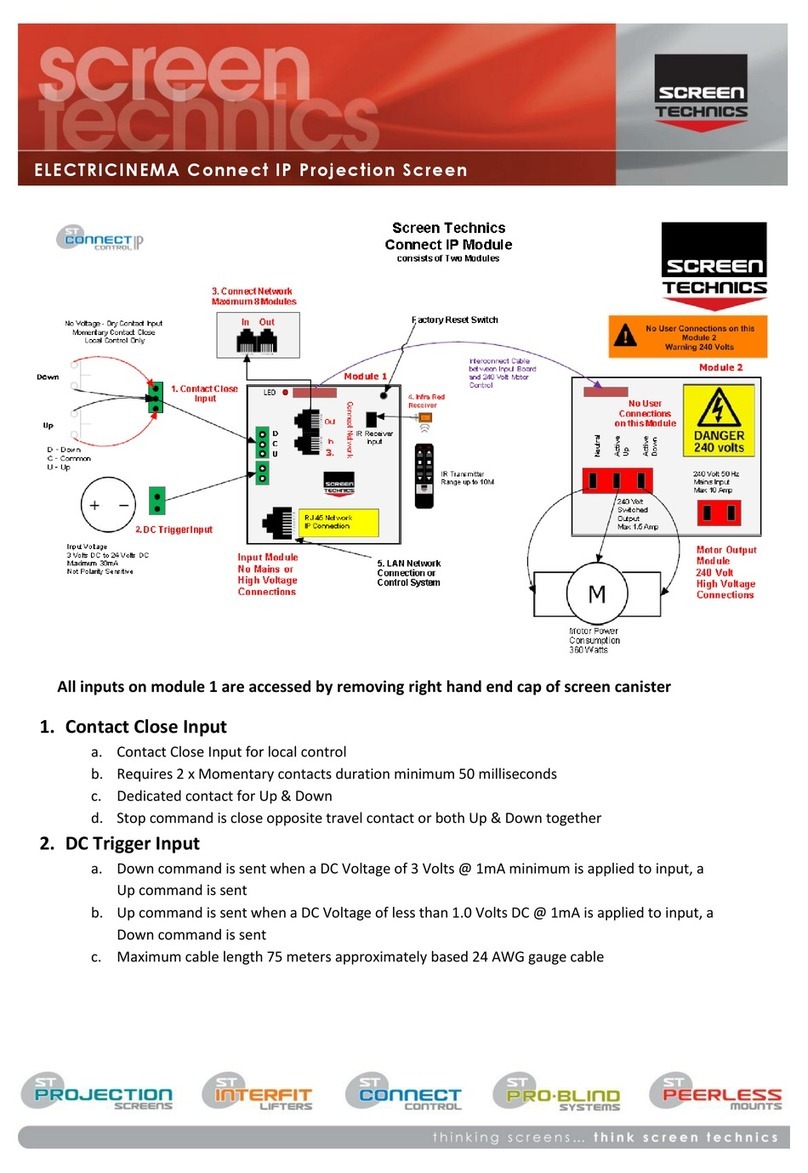
The Electricinema 235 utilises three iConnect Motor
Controllers that have been specically programmed
to work in unison. They are all controlled by IR, with a
300mm and 2000mm long lead and sensor supplied in
the kit, along with a two channel hand held transmitter.
The three power leads exiting the screen box left
hand side have been labelled to suit the individual
iConnect controllers. Please ensure the correct leads
are plugged into the motor controllers, as each unit
performs a different function.
The 3 x iConnect Motor Controllers are labelled as
follows:
1. Screen – which is designed to control the screen
surface – IR Channel One
2. Masking – which is designed to control the masking
up & down – IR Channel Two
3. Motor – which is designed to work in a delayed
action with the masking motor – Channel Two
Channel One – Controls the main projection screen up and down.
Channel Two – Controls the masking up and down, and then the masking moves to lay against
screen surface, on a delayed action.
The use of momentary contacts for control is possible, with a separate pair of momentary
contacts for the main screen surface (replicating IR Channel One) and another pair of momentary
contacts, parallel wired into the two masking motor controllers (replicating IR Channel Two).
NB: iConnect motor controllers 2 and 3 must be controlled together or damage to the screen
surface may result.
MASKING TRACKING ADJUSTMENT:
Due to temperature and humidity the masking material may expand or contract a small amount
whilst the projection and masking material acclimatise to the installation location.
This may cause the masking to marginally track in a left or right direction when the masking is
moving up or down.
To x the tracking issue:
1. Roll Main projection surface down.
2. Roll masking down
3. Note which direction the masking is tracking (Left or Right).
4. Open the door covering the mechanism
5. Using a small piece of masking tape, (10mm – 15mm piece) and place the tape on the back
of the masking roller opposite to the direction of the masking movement
6. Roll masking back up and conrm that masking is straight.
7. You may have to add tape or remove depending on how much the masking is moving
LIMIT ADJUSTMENT
The following instructions are for the adjustment of
the limit switches that alter the upper and lower stop
positions on ElectriCinema 235 Projection Screen only
WHERE ARE THE LIMIT SWITCHES?
Left hand side of the screen box, accessed through the 2 bottom doors, look up and you will see
3 sets of limit adjustment Allen Key type switches.
Do not adjust the limit at the front of the box, this being the black steel tube that has wire cable
wrapped around it. It is not adjustable and to do so will cause damage to the unit and void any
warranty.
WHICH SWITCH IS FOR WHAT?
Inspect the switches and identify the lower motor that controls the screen surface, now look
above this to the motor that controls the masking up & down. These are the two sets of limits
you may need to adjust, again do not adjust the limit at the front of the box, this being the black
steel tube that has wire cable wrapped around it. It is not adjustable and to do so will cause
damage to the unit and void any warranty.
WHAT TOOLS DO I NEED?
Either the limit setting tool (supplied), a narrow tip screw driver (less than 4mm) or a 4mm Allen
Key
WHICH WAY DO I TURN THE SWITCH?
Either Clockwise always increases the amount of rotation (travel) of the motor.
Anti-clockwise always reduces the amount of rotation (travel) of the motor.
So pick the switch responsible for the limit position, up or down. Clockwise turning of the
switch will always let the motor travel further in that direction. Anti-clockwise turning of the
switch will lessen the amount of travel in that direction.
Now remove the tape on the brown paper that wraps the main screen and carefully motor the screen down
(please refer to Control Equipment notes below to achieve this) while applying downward pressure to the brown
paper, assisting its removal as the screen descends. Once the paper is removed you should be looking at both
screen and masking being free to travel independently.
Control Equipment
The Electricinema 235 utilises three iConnect Motor Controllers that have
been specifically programmed to work in unison. They are all controlled by
IR, with a 300mm and 2000mm long lead and sensor supplied in the kit, along
with a two channel hand held transmitter.
The three power leads exiting the screen box left hand side have been
labelled to suit the individual iConnect controllers. Please ensure the correct
leads are plugged into the motor controllers, as each unit performs a
different function.
The 3 x iConnect Motor Controllers are labelled as follows:
1. Screen – which is designed to control the screen surface – IR
Channel One
2. Masking – which is designed to control the masking up & down – IR
Channel Two
3. Motor – which is designed to work in a delayed action with the
masking motor – Channel Two
Channel One – Controls the main projection screen up and down.
Channel Two – Controls the masking up and down, and then the masking
moves to lay against screen surface, on a delayed action.
The use of momentary contacts for control is possible, with a separate pair of
momentary contacts for the main screen surface (replicating IR Channel
One) and another pair of momentary contacts, parallel wired into the two
masking motor controllers (replicating IR Channel Two).
NB: iConnect motor controllers 2 and 3 must be controlled together or damage to the screen surface may result.
Masking Tracking Adjustment:
Due to temperature and humidity the masking material may expand or contract a small amount whilst the
projection and masking material acclimatise to the installation location.
This may cause the masking to marginally track in a left or right direction when the masking is moving up or
down.
To fix the tracking issue,
1. Roll Main projection surface down.
2. Roll masking down
3. Note which direction the masking is tracking (Left or Right).
4. Open the door covering the mechanism
5. Using a small piece of masking tape, (10mm – 15mm piece) and place the tape on the back of the
masking roller opposite to the direction of the masking movement
6. Roll masking back up and confirm that masking is straight.
7. You may have to add tape or remove depending on how much the masking is moving
Continued Over.../
Limit Adjustment
The following instructions are for the adjustment of the limit switches that alter
the upper and lower stop positions on ElectriCinema 235 Projection Screen
only
Where are The Limit Switches?
Left hand side of the screen box, accessed through the 2 bottom doors, look
up and you will see 3 sets of limit adjustment Allen Key type switches.
Do not adjust the limit at the front of the box, this being the black steel tube
that has wire cable wrapped around it. It is not adjustable and to do so will
cause damage to the unit and void any warranty.
Which Switch is for What?
Inspect the switches and identify the lower motor that controls the screen surface, now look above this to the
motor that controls the masking up & down. These are the two sets of limits you may need to adjust, again do
not adjust the limit at the front of the box, this being the black steel tube that has wire cable wrapped around it.
It is not adjustable and to do so will cause damage to the unit and void any warranty.
What Tools do I Need?
Either the limit setting tool (supplied), a narrow tip screw driver (less than 4mm) or a 4mm Allen Key
Which Way do I Turn the Switch?
Clockwise always increases the amount of rotation (travel) of the motor.
Anti-clockwise always reduces the amount of rotation (travel) of the motor.
So pick the switch responsible for the limit position, up or down. Clockwise turning of the switch will always let the
motor travel further in that direction. Anti-clockwise turning of the switch will lessen the amount of travel in that
direction.
Can I adjust the switch while the screen is sitting on the limit - i.e. fully up or down?
Clockwise adjustment? – YES. But it is better to back the screen away from the limit and then adjust
Anti-clockwise adjustment? - NO you will damage the micro switch if you turn it anti-clockwise while the screen is
sitting on the limit. Never attempt this. You must back the screen away from the limit
before adjustment. After adjustment you will need to run the screen up and down to pick up the new limit
Will I void the product warranty if I damage the screen whilst making these adjustments?
Yes.
BEWARE
Rollers screens have a finite amount of leader, the standard being 300mm.
If you order a custom leader length then that becomes the finite amount.
DO NOT ADJUST THE BOTTOM LIMIT SO AS TO EXPOSE MORE THAN THIS FINITE AMOUNT
If you do you will:
Experience poor layflat of the surface which may bring complaints from your customer.
Weaken the hold of the surface on the roller and, one day, the surface will be on the floor.
THIS IS NOT COVERED UNDER WARRANTY
Should you have any questions regarding the installation of our products
Please call our sales desk on +61 2 4869 2100 for assistance
