SDC ZA7200 Series User manual

SECURI TY DO O R CO NTRO LS
3580 Willow Lane, Westlake Village, CA 91361-4921 • (805) 494-0622 • Fax: (805) 494-8861
www.sdcsecurity.com • E-mail: service@sdcsecurity.com
ZA7200 SERIES HITOWER CYLINDRICAL LOCK
INSTALLATION INSTRUCTIONS
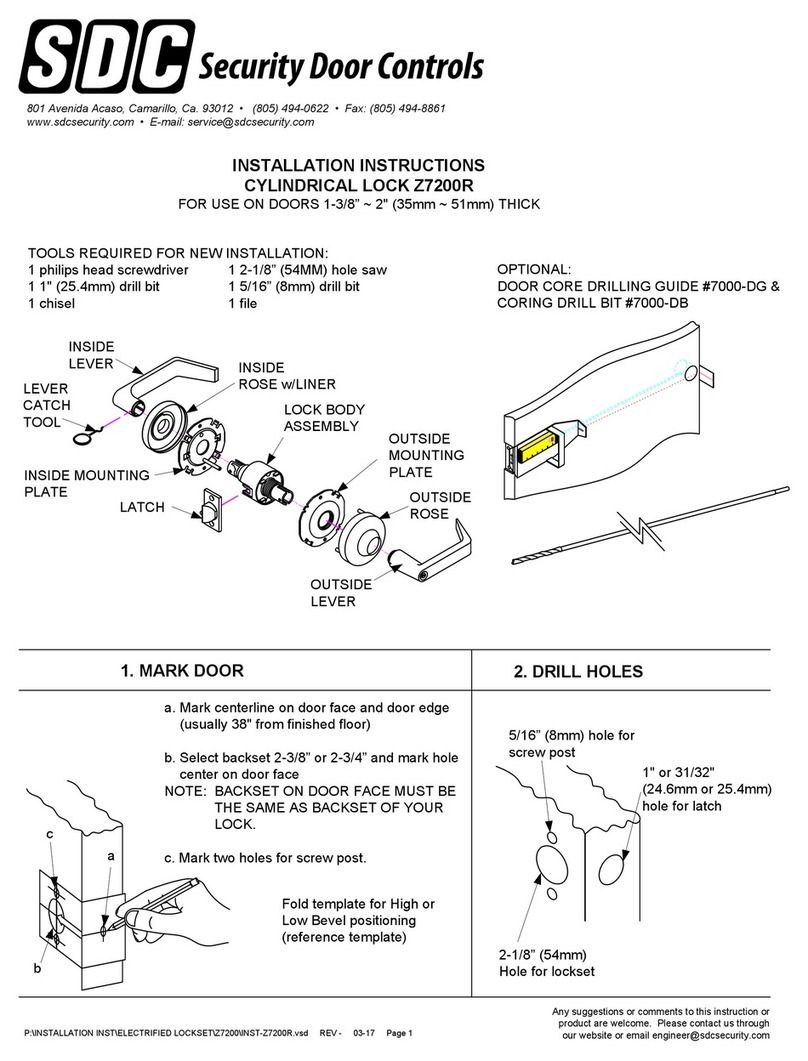
STEP 1 MARK DOOR
Fold template on line indicated.
Place on HIGH EDGE of door bevel.
Position centerline of template on heightline
(suggested height is 38” (965mm) from floor.)
A. Locate and mark center for 2-1/8” (54mm) hole.
B. Locate and mark positions for notches.
Caution: Notches must be horizontal.
C. Locate and mark center for two (2) 5/16” (8mm)
thru-bolt holes.
D. Locate and mark center for 1” (25mm) latch bolt hole
in door edge.
Note: If steel frames are used, the latch centerline must
be in line with the center of the strike preparation.
Hint: For retrofitting of existing 2-1/8” (54mm) holes, fold template in half to locate position for the two (2) 5/16” (8mm) holes.
IMPORTANT: THIS LOCK IS NON-HANDED. LOCK IS
FACTORY PACKED PREADJUSTED FOR 1-3/4” (45MM)
THICK DOORS. TO ADJUST LOCK FOR OTHER DOOR
THICKNESS, SEE STEPS 8, 9 & 10. SPACERS MUST
BE USED FOR DOORS THINNER THAN 1-3/4” (45MM)
THICK.
M:\INS\INST-ZA7200 0200 Page 1

STEP 2 BORE HOLES - INSTALL LATCH
When drilling through door, be careful not to damage door finish.
A. Bore a 2-1/8” (54mm) hole and two (2) 5/16” (8mm) holes from both sides
of door to avoid splintering wood.
B. Bore a 1” (25mm) hole into door edge. Using latch faceplate as pattern,
trace outline and mortise door edge so latch is flush with door. If 3/4
projection latch is to be installed, see Step 20.
NOTE: For wood jambs, close door and using a strike locating tool or other
pointed object, mark position of hole in jamb. Open door and drill 1” (25mm) hole
in jamb minimum 3/4” (19mm) deep.
C. File two (2) 5/32” (4mm) x 5/32” (4mm) x 1/8” (3mm) deep notches into both
sides of door.
D. Insert latch unit in door, making certain that latch bolt bevel faces direction
of closing door. Attach with two #8 combination screws provided.
NOTE: We recommend using a drill guide to ensure straight and level holes.
IF USING THE SECURITY DOOR CONTROLS OPTIONAL DRILL GUIDE
Install drill guide (030736-000-70) into door. Make certain correct backset
locators are even with door edge. Drill two (2) 5/16” (8mm) holes from both
sides to center.
NOTE: Drill guide replacement is recommended after 10 door preparations.
STEP 3 INSTALL CHASSIS AND OUTER TRIM ASSEMBLY
NOTE: For ease of installation, lock should be in the unlocked position.
Slide chassis assembly into door from outside making sure that lock housing
engages latch prongs. Retractor must also engage latch tail.
IMPORTANT: Chassis assembly must be positioned in center of door for proper
operation.
STEP 4 INSTALL INNER MOUNTING PLATE
A. Place inner mounting plate onto chassis assembly making sure that plate
tabs engage horizontal notches in door.
B. Position flanged nut over chassis assembly and tighten securely with black
hex wrench provided.
M:INS/INST-ZA7200 0200 Page 2

STEP 5 INSTALL INNER TRIM ASSEMBLY
Slide inner trim assembly over chassis spindle. Thru-posts will engage inner trim
assembly on 1-3/4” (45mm) thick doors. Secure to door with two (2) #10-32 x 1”
machine screws provided.
STEP 6 INSTALL INNER LEVER
A. Position rose over inner trim assembly making sure rose detent engages
groove in spindle assembly.
B. Install lever handle and tighten set screw with hex key provided.
Stop! Test operation to be sure latch bolt moves freely. Do not force. If lockset
does not operate properly, remove lockset from door and check door preparation
and door thickness adjustment. See Step 4 to re-install chassis.
STEP 7 LOCATE AND INSTALL STRIKE
A. For wood jambs center strike latch opening over 1” (25mm) hole in jamb.
Trace outline around the strike on door jamb.
B. Mortise door jamb to accommodate strike box and strike.
C. Insert strike box if required and fasten strike to jamb with combination
screws provided.
CAUTION: Deadlocking plunger of latch bolt must not enter opening in
strike plate.
Note: When strike box is not used, recess in jamb must be a minimum of 9/16”
(14mm) deep to allow latch bolt to extend to its full projection.
STEP 8 INSTRUCTIONS FOR REMOVING OUTSIDE TRIM
A. Remove the outside trim retaining screw (A).
B. Slide the outside trim (B) from the chassis assembly.
C. See Step 9 for chassis adjustment procedure, or Step 10 for spacer
installation.
D. Slide the outside trim (B) onto the chassis.
E. Replace the outside trim retaining screw (A).
M:INS/INST-ZA7200 0200 Page 3

M:INS/INST-ZA7200 0200 Page 4
STEP 9 ADJUST LOCK FOR DOOR THICKNESS
Lock is factory packed preadjusted for 1-34” (45mm) doors
unless ordered special.
A. Place template provided against retractor housing to find
marking for door thickness.
B. If adjustment is necessary, use black hex wrench provided
and rotate flanged nut counterclockwise to adjust. Again, use
template markings to measure adjustment before installing
lock on door.
HINT: Three full turns of nut equals (=) 1/8” (3mm) adjustment.
C. Pinch button mount legs together and move cap to desired
position.
STEP 10 INSTALLING SPACERS FOR DOORS
THINNER THAN 1-3/4” (45mm)
A. Remove flanged nut with black hex wrench provided along
with outer mounting plate.
B. Place one spacer over outer chassis spindle as shown.
C. Re-install outer mounting plate and flanged nut. Using
adjusting gauge provided, adjust flanged nut for proper door
thickness as shown.
D. See Step 4 for chassis installation.
E. Place second spacer over inner chassis spindle before
installing inner mounting plate and flanged nut. Continue at
Step 5.
STEP 11 TO REMOVE ALL LEVERS WITH INTERCHANGEABLE CORE CYLINDERS
A. Insert control key into core and rotate 15 degrees clockwise.
Pull key to remove core.
B. Insert screwdriver into Figure 8 core hole and into lever
retainer.
C. Depress retainer and slide lever off spindle.
TO RE-INSTALL LEVER
D. Slide lever over spindle and push on over retainer.
E. Pull on lever to be sure retainer engaged lever.
F. Re-install core with tailpiece pushed into core.
STEP 12 IC CORE AND TAILPIECE
Be certain to use correct tailpiece with core. Six pin cores should
only use the “6P” tailpiece and seven pin cores should only use the
“7P” tailpiece.

M:INS/INST-ZA7200 0200 Page 5
STEP 13 TO REMOVE ALL CYLINDER LEVERS
(Except Interchangeable Core)
A. Insert key and rotate clockwise approximately 60 degrees.
B. Depress lever retainer with tool provided.
C. Slide lever off spindle.
TO RE-INSTALL LEVER
D. Insert cylinder into spindle.
E. Slide lever onto spindle.
F. Insert key into cylinder and rotate clockwise approximately 60
degrees and push lever over retainer.
G. Pull on lever to be sure retainer engaged lever.
STEP 14 TAILPIECE INSTALLATION
For proper function of the lock, the tailpiece must be installed
correctly. All T-Series tailpieces should be installed VERTICALLY
in the cylinder.
STEP 15 DOUBLE DUMMY TRIM, T18
A. Using template described in Step 1, locate and
mark center for two (2) 5/616” (8mm) Thru-Bolt
Holes.
B. Bore two (2) 5/16” (8mm) holes from both sides
of door to avoid splintering wood.
C. Holding outer trim against door, position inner
spindle assembly over thru-posts and secure to
door with two (2) #10-32 x 1” machine screws
provided.
D. See Step 6 for lever installation.
STEP 16 SINGLE DUMMY TRIM, T12
A. Using template described in Step 1, locate and mark center
for two (2) mounting holes.
B. For Wood Door - Drill two (2) pilot holes 5/32” (4mm) x 7/8”
(22mm) deep for #12 wood screws.
For Metal Door - Drill and tap two (2) holes for #12-24
machine screws.
C. Position spindle assembly over mounting holes and secure to
door with screws provided.
D. See Step 6 for lever installation.

STEP 17 TIMING INSTRUCTIONS FOR STANDARD CYLINDER LOCKS
A. If the cylinder and handle are installed, refer to Step 13 for lever
removal instructions.
B. Using a thin flat screwdriver, turn the action bar slot clockwise (cw)
until it stops at about 2:00.
C. Then turn the action bar counterclockwise (ccw) to the 9:00
position.
NOTE: No physical stop is at this location.
D. With the key out, install standard cylinder into the spindle.
E. Refer to Step 13 for lever installation instructions.
F. Operate key to test for proper operation.
STEP 18 TIMING INSTRUCTION FOR IC CORE LOCKS
A. If the core is installed, refer to Step 11 for IC core removal
instructions.
B. Using a thin flat screwdriver, turn the action bar slot clockwise (cw)
until it stops at about 11:00.
C. Then turn the action bar counterclockwise (ccw) to the 7:00
position.
NOTE: No physical stop is at this location.
D. Using the control key, insert IC core into the lever and spindle.
E. Remove control key.
F. Operate key to test for proper operation.
STEP 19 TAILPIECE INSTALLATION INSTRUCTIONS FOR T381 FUNCTION
SEE STEP 14 FOR STD
CYLINDER TAILPIECE
INSTALLATION
SEE STEP 12 FOR IC
CORE TAILPIECE
INSTALLATION
STEP 20 INSTALLATION INSTRUCTIONS FOR OPTIONAL 3/4 PROJECTION LATCH
A. Determine the hand of the door.
B. On the side closest to the door stop, remove shaded area as
shown. Use a standard rotary file 3/8 diameter maximum.
C. Try latch for fit and function.
D. Secure latch with two (2) #8-32 machine screws provided.
M:INS/INST-ZA7200 0200 Page 6

M:INS/INST-ZA7200 0200 Page 7
WIRING DIAGRAM
MODEL #ZA7250 FUNCTION:
#ZU7350 Fail-Safe power to lock. Locked outside, free
egress from inside. Lock is unlocked by access
control, remote switch, or means of outside key
or by rotating inside lever.
MODEL #ZA7260 FUNCTION:
#ZU7360 Fail-Secure power to unlock. Locked outside,
free egress from inside. Lock is unlocked by
access control, a remote switch, applying
momentary power, or by a key from outside, or
by rotating the inside lever.
ELECTRICAL SPECIFICATIONS
FAIL SAFE/FAIL SECURE
.185 AMP @ 24VDC ±2V

DISTANCE IN FEET FROM POWER SOURCE TO FARTHEST LOCKING DEVICE
AMPS
0.25
0.50
0.75
1.00
1.50
2.00
2.50
3.00
3.50
AMPS
0.25
0.50
0.75
1.00
1.50
2.00
2.50
3.00
3.50
25 50 75 100 150 200 250 300 400 500 1000
18 18 18 18 18 16 16 14 14 12
18 18 18 16 16 14 12
18 18 16 14 12 12
18 16 14 14 12
18 14 12 12
16 14 12
16 12
14 12
14
25 50 75 100 150 200 250 300 400 500 1000
18 18 18 18 18 18 18 18 16 16 16
18 18 18 18 18 16 16 14 14 12
18 18 18 18 16 14 14 12 12
18 18 16 16 14 14 12 12
18 18 16 14 14 12
18 16 14 14 12
18 16 14 12
18 14 12 12
18 14 12
Minimum Wire
Gauge for 24 Volts
AC or DC
Minimum Wire
Gauge for 12 Volts
AC or DC
AWG WIRE CHART
To determine the correct wire gauge to use on “one circuit” the following information is required:
1. The quantity, voltage, and current draw of all lock(s) to be used.
2. The distance in feet from the power supply to the furthest lock.
Add together the current draw (amps) of all locks on the same circuit. Cross reference the total amps with the distance between the
power source and the furthest lock to determine the wire gauge required.
“One circuit” implies that from the power supply two wires are being run to one or more locks in parallel. The last lock on that pair of
wires from the power supply is not to exceed the maximum distance number as shown on the chart for that gauge of wire, quantity
and type of lock. If the gauge size or maximum distance is inadequate for your application, divide the quantity of locks in that circuit
to create two or more separate circuits and use the chart to figure each new circuit independently even though the same power
supply is being used. This will increase the total number of wires being run but it will allow for a smaller gauge of wire and increase
the maximum distance from the power supply to the furthest lock in that circuit. The chart shows the maximum distance allowable for
a 5% voltage drop from the power supply to the furthest lock on one circuit.
All wiring must be installed in accordance with all state and local codes.
M:INS/INST-ZA7200 0200 Page 8

IMPORTANT: THIS LOCK IS NON-HANDED. LOCK IS
FACTORY PACKED PREADJUSTED FOR 1-3/4” (45MM)
THICK DOORS. TO ADJUST LOCK FOR OTHER DOOR
THICKNESS, SEE STEPS 8, 9 & 10. SPACERS MUST
BE USED FOR DOORS THINNER THAN 1-3/4” (45MM)
THICK.
STEP 1 EXAMINE DOOR PREPARATION AND HANDING
These instructions are applicable to the two most common
door preparations −Yale Mono Lock and Corbin Russwin
Unilock −as shown in the illustration on the right. If your
door preparation is different, STOP! You need to contact
the factory for instructions specifically for your door
preparation.
STOP! Ensure that the lock handing matches the door
handing and bevel. If it does not match, refer to Step 9
before continuing.
SECURI TY DO O R CO NTRO LS
3580 Willow Lane, Westlake Village, CA 91361-4921 • (805) 494-0622 • Fax: (805) 494-8861
www.sdcsecurity.com • E-mail: service@sdcsecurity.com
ZU7300 SERIES HITOWER UNIT LOCK
INSTALLATION INSTRUCTIONS
M:INS/INST-ZU7300 0200 Page 1

M:INS/INST-ZU7300 0200 Page 2
STEP 2 MARK DOOR
Fold template on lines indicated.
Place on HIGH EDGE of door bevel.
A. Place template on high edge of door bevel. Center the template to the slot
opening and mark 2-1/8” diameter on surface of door. Repeat same for low
edge of door.
B. Locate and verify clearance for two (2) 5/16” (8mm) thru-bolt holes.
STEP 3 BORE HOLE
When drilling through door, be careful not to damage the door finish.
A. For wood doors: Using a standard commercial boring jig, bore the 2-1/8”
(54mm) hole. Drill from both sides of door to avoid splintering wood.
B. For steel doors: Grind off the marked area to provide clearance for the
chassis housing.
NOTE: In most cases the chassis mounting posts will fit through the
existing holes in the door.
STEP 4 INSTALL TRIM AND CHASSIS ASSEMBLY
Slide trim and chassis assembly into door from outside.
IMPORTANT: Chassis assembly must be positioned in center of door for proper operation.
STEP 5 INSTALL INNER MOUNTING PLATE
A. Place inner mounting plate onto chassis assembly making sure that
mounting plate slot and latch adapter tab are fully engaged.
B. Secure mounting plate to latch adapter with the two (2) #8-32 x 1/2” flat head
screws supplied.
C. Position flanged nut over chassis assembly and tighten securely with black
hex wrench provided.
D. Optional: Secure mounting plate to door with two (2) #8 x 3/4” Phillips Pan
head self-drilling sheet metal screws or equivalent (not supplied).

STEP 6 INSTALL INNER TRIM ASSEMBLY
Position inner trim assembly with arrow towards door edge and slide onto
chassis spindle. Thru-posts will engage inner trim assembly. Secure to door with
the two (2) #10-32 x 1” screws provided.
STEP 7 INSTALL INNER LEVER
A. Position rose over inner trim assembly.
B. Install lever handle and tighten set screw with hex key provided.
Stop! Test operation to be sure latch bolt moves freely. Do not
force. If lockset does not operate properly, remove lockset from door
and check door preparation. See Step 4 to re-install chassis.
STEP 8 LOCATE AND INSTALL STRIKE
A. Remove old strike and install new strike and dust box.
B. Close door and check for proper operation.
CAUTION: Deadlocking plunger of latch bolt must not enter
opening in strike plate.
B. If latch operates improperly, or is excessively loose, contact
factory for different strike configurations.
NOTE: It may be necessary to rework the door jamb for the dust
box to fit properly.
M:INS/INST-ZU7300 0200 Page 3

STEP 9 INSTRUCTIONS FOR REHANDING LOCK FOR DOOR BEVEL
A. Temporarily, re-install latch assembly mounting screws (A) on
the inside without the inside mounting plate (this is to hold the
support plates in place during rehanding).
B. Remove the outside trim retaining screw (B).
C. Slide the outside trim (C) from the chassis assembly.
D. Remove two (2) latch assembly mounting screws (D).
IMPORTANT: DO NOT remove or adjust hex nut.
E. Slide the latch assembly from the chassis. Replace the latch
assembly mounting screws (D) finger tight.
F. Reverse the latch assembly and remove the latch assembly
screws (A), then place it on the chassis. Make sure that
chassis housing engages the latch assembly. Retractor must
also engage the latch tail.
G. Replace the two (2) latch assembly mounting screws (A)
making sure to align the tab of the latch assembly with the
slot of the mounting plate and screw holes of the support
plates.
H. Slide the outside trim (C) onto the chassis.
I. Replace the outside trim retaining screw (B).
J. Remove latch assembly mounting screws (D).
DO NOT DISCARD!
K. See Step 4 to continue.
STEP 10 TO REMOVE INTERCHANGEABLE CORE CYLINDER LEVERS
A. Insert control key into core and rotate 15 degrees clockwise.
Pull key to remove core.
B. Insert screwdriver into Figure 8 core hole and into lever
retainer.
C. Depress retainer and slide lever off spindle.
TO RE-INSTALL LEVER
D. Slide lever over spindle and push on over retainer.
E. Give a pull on lever to be sure retainer engaged lever.
F. Re-install core with tailpiece pushed into core.
STEP 11 INTERCHANGEABLE CORE CYLINDER TAILPIECE INSTALLATION
For proper function of the lock the right tailpiece must be used. Six
pin cores should only use the “6P” tailpiece and seven pin cores
should only use the “7P” tailpiece.
M:INS/INST-ZU7300 0200 Page 4

M:INS/INST-ZU7300 0200 Page 5
STEP 12 TO REMOVE STANDARD CYLINDER LEVERS
A. Insert key and rotate clockwise approximately 60 degrees.
B. Depress lever retainer with tool provided.
C. Slide lever off spindle.
TO RE-INSTALL LEVER
D. Insert cylinder into spindle.
E. Slide lever onto spindle.
F. Insert key into cylinder and rotate clockwise approximately 60
degrees and push lever over retainer.
G. Pull on lever to be sure retainer engaged lever.
STEP 13 STANDARD CYLINDER TAILPIECE INSTALLATION
For proper function of the lock, the right tailpiece must be used
and must be installed correctly. All ZU7300 Series locks with
standard cylinders must have the tailpiece installed vertically on
the cylinder as shown.
The cap must be properly adjusted. If too loose, excessive plug
end play will prevent the key from being withdrawn. If too tight,
the plug will drag and be difficult to rotate with the key.
STEP 14 TIMING INSTRUCTIONS FOR STANDARD CYLINDER LOCKS
A. If the cylinder and handle are installed, refer to Step 12 for
lever removal instructions.
B. Using a thin flat screwdriver, turn the action bar slot clockwise
(cw) until it stops at about 2:00.
C. Then turn the action bar counterclockwise (ccw) to the 9:00
position. There is no physical stop at this location.
D. With the key out, install standard cylinder into the spindle.
E. Refer to Step 12 for lever installation instructions.
F. Operate key to test for proper operation.

STEP 15 TIMING INSTRUCTION FOR IC CYLINDER LOCKS
A. If the core is installed, refer to Step 10 for IC core removal
instructions.
B. Using a thin flat screwdriver, turn the action bar slot clockwise (cw)
until it stops at about 11:00.
C. Then turn the action bar counterclockwise (ccw) to the 7:00
position. There is no physical stop is at this location.
D. Using the control key, insert IC core into the lever and spindle.
E. Remove control key.
F. Operate key to test for proper operation.
STEP 16 TAILPIECE INSTALLATION INSTRUCTIONS FOR RU381 FUNCTION
SEE STEP 13 FOR STANDARD
CYLINDER TAILPIECE
INSTALLATION
SEE STEP 11 FOR
INTERCHANGEABLE
CORE TAILPIECE
INSTALLATION
M:INS/INST-ZU7300 0200 Page 6

M:INS/INST-ZU7300 0200 Page 7
WIRING DIAGRAM
MODEL #ZA7250 FUNCTION:
#ZU7350 Fail-Safe power to lock. Locked outside, free
egress from inside. Lock is unlocked by access
control, remote switch, or means of outside key
or by rotating inside lever.
MODEL #ZA7260 FUNCTION:
#ZU7360 Fail-Secure power to unlock. Locked outside,
free egress from inside. Lock is unlocked by
access control, a remote switch, applying
momentary power, or by a key from outside, or
by rotating the inside lever.
ELECTRICAL SPECIFICATIONS
FAIL SAFE/FAIL SECURE
.185 AMP @ 24VDC ±2V

DISTANCE IN FEET FROM POWER SOURCE TO FARTHEST LOCKING DEVICE
AMPS
0.25
0.50
0.75
1.00
1.50
2.00
2.50
3.00
3.50
AMPS
0.25
0.50
0.75
1.00
1.50
2.00
2.50
3.00
3.50
25 50 75 100 150 200 250 300 400 500 1000
18 18 18 18 18 16 16 14 14 12
18 18 18 16 16 14 12
18 18 16 14 12 12
18 16 14 14 12
18 14 12 12
16 14 12
16 12
14 12
14
25 50 75 100 150 200 250 300 400 500 1000
18 18 18 18 18 18 18 18 16 16 16
18 18 18 18 18 16 16 14 14 12
18 18 18 18 16 14 14 12 12
18 18 16 16 14 14 12 12
18 18 16 14 14 12
18 16 14 14 12
18 16 14 12
18 14 12 12
18 14 12
Minimum Wire
Gauge for 24 Volts
AC or DC
Minimum Wire
Gauge for 12 Volts
AC or DC
AWG WIRE CHART
To determine the correct wire gauge to use on “one circuit” the following information is required:
1. The quantity, voltage, and current draw of all lock(s) to be used.
2. The distance in feet from the power supply to the furthest lock.
Add together the current draw (amps) of all locks on the same circuit. Cross reference the total amps with the distance between the
power source and the furthest lock to determine the wire gauge required.
“One circuit” implies that from the power supply two wires are being run to one or more locks in parallel. The last lock on that pair of
wires from the power supply is not to exceed the maximum distance number as shown on the chart for that gauge of wire, quantity
and type of lock. If the gauge size or maximum distance is inadequate for your application, divide the quantity of locks in that circuit
to create two or more separate circuits and use the chart to figure each new circuit independently even though the same power
supply is being used. This will increase the total number of wires being run but it will allow for a smaller gauge of wire and increase
the maximum distance from the power supply to the furthest lock in that circuit. The chart shows the maximum distance allowable for
a 5% voltage drop from the power supply to the furthest lock on one circuit.
All wiring must be installed in accordance with all state and local codes.
M:INS/INST-ZU7300 0200 Page 8

ZU7300 SERIES ORDER DETAIL FORM
SECURITY DOOR CONTROLS
3580 Willow Lane, Westlake Village, CA 91361-4921 • (805) 494-0622 • Fax: (805) 494-8861
www.sdcsecurity.com • E-mail: service@sdcsecurity.com
M:\INS\INST-ZU7300 Ordering 0502 Page 1
ZU7350 D Q LR ZUST1 STD REX/PTH-4
MODEL LEVER TRIM FINISH HAND STRIKE LATCH THROW OPTIONS
When evaluating the retrofit requirements for the ZU7300 Series Unit Lock, the following questions need to
be addressed:
1. Which manufacturer’s unit lock is currently installed?
__Russwin __Corbin __Corbin Russwin __Yale __Falcon
2. What is the existing latch height? To determine latch height measure existing latch height as shown here:
Latch height currently identified and the manufacturer:
a. 1 3/4” Most Corbin & Russwin sold 1949 thru current; Yale 6200
b. 2 1/16” Corbin, Falcon
c. 2 5/8” Some Corbin (0)2400 Series sold 1913-1953
d. 2 11/16” Russwin 2100 & 2800 Series sold 1904-1968
3. What is the existing strike?
031473-000
Yale Mono
Pair of Doors
031471-000
Early Corbin Russwin
Single Door
Strike, Door & Lock same
Center Line
031471-001
Early Corbin Russwin
Single Door
Strike Center Line NOT
same as Door & Lock
0005164-000
031472-000
Early Corbin Russwin
Pair of Doors
031477-000
Early Russwin
Unit Lock
031474-000
Early Corbin

M:\INS\INST-ZU7300 Ordering 0502 Page 2
4. What is the existing door thickness?
Standard locks are for 1 3/4” thick doors only, 1/8” in 2” bevel with 2 3/4” backset. Also available for 2” and 2
1/4” thick doors. Please specify.
5. Specify cylinder requirements.
Note: Locks furnished with SDC 6-pin standard Schlage C keyway cylinder or prepared for SDC
interchangeable core unless otherwise specified.
With Cylinder
SDC Standard
__ 6-pin Schlage C (standard)
__ 7-pin Schlage C
SDC IC
__ 6-pin Schlage C (standard)
__ 7-pin Schlage C
Competitor’s Keyways
6-pin Standard Cylinder*
__ Arrow - 0 Bitted, KD, KA4
__ Corbin - 60, 0 Bitted, KD
__ Russwin - D1, 0 bitted, KD
__ Sargent - LA, 0 Bitted, KD
(Also accepts LB, LC keys)
__ Schlage - C, 0 Bitted, KD, KA4
__ Schlage - E, 0 Bitted
__ Yale - 8 (Para), 0 Bitted, KD
__ Yale - GA, 0 Bitted
Less Cylinder - Prepared to Accept**
SDC Standard
__ 6-pin Schlage C (standard)
__ 7-pin Schlage C
__ SDC IC
Unit/Mono Lock Cylinders
__ Falcon 6-pin
__ Corbin Russwin Unit Lock
(2000-052) - Master Ring not available
__ Medeco Unit Lock Retrofit Cylinder
(20W5005) - Corbin Russwin Unit Lock
__ Medeco Unit Lock Retrofit Cylinder
(20W0500) - Yale 6200 Mono Lock
__ Yale Mono Lock (1801) and Later
Competitor’s Standard Cylinders
__ Arrow (600C) 6-pin
__ Assa (65611 or 65661) 6-pin
__ Corbin Russwin (2000-034/CL3400) 6-pin -
Master Ring not available
__ Lori (1539FAT) - tailpiece supplied by Lori
__ Medeco (20W200V3) 6-pin - tailpiece supplied by
Medeco; Falcon/Schlage style
__ Peaks (Kaba) 6-pin
__ Primus (Schlage) 6-pin
__ Sargent (6, 7 & 10 Line) 6-pin - Keso not available
__ Schlage 6-pin
__ Yale (1801) 6-pin Bicentric not available
Competitor’s IC
__ Arrow 6, 7-pin
__ Assa (70600IC & V70600IC) 6-pin
__ Best 6, 7-pin
__ Corbin Russwin (8000) 6-pin
__ Corbin Russwin (8000-7) 7-pin
__ Instakey
__ Medeco 31 Series 6-pin
__ Medeco 32 Series 6-pin
__ Medeco Keymark 6, 7-pin
__ Peaks (Kaba) 6, 7-pin
__ Primus (Schlage) 6-pin
__ Sargent (6300) 6-pin
__ Schlage 6-pin
__ Yale (1210) 6-pin - (1220) 7-pin consult factory
* Generic replacement cylinders with competitor’s keyways
** Proper tailpiece supplied unless otherwise noted.
This manual suits for next models
4
Table of contents
Other SDC Door Lock manuals

SDC
SDC E72 EntryCheck Troubleshooting guide

SDC
SDC PD2090A User manual

SDC
SDC FS23M Series User manual

SDC
SDC 1190A Series User manual
SDC
SDC 1511S User manual

SDC
SDC E72 EntryCheck User manual

SDC
SDC Z7600 Series User manual

SDC
SDC Z7200 User manual

SDC
SDC E75 Series Operating instructions

SDC
SDC S6100 Series User manual