4. ASSEMBLY
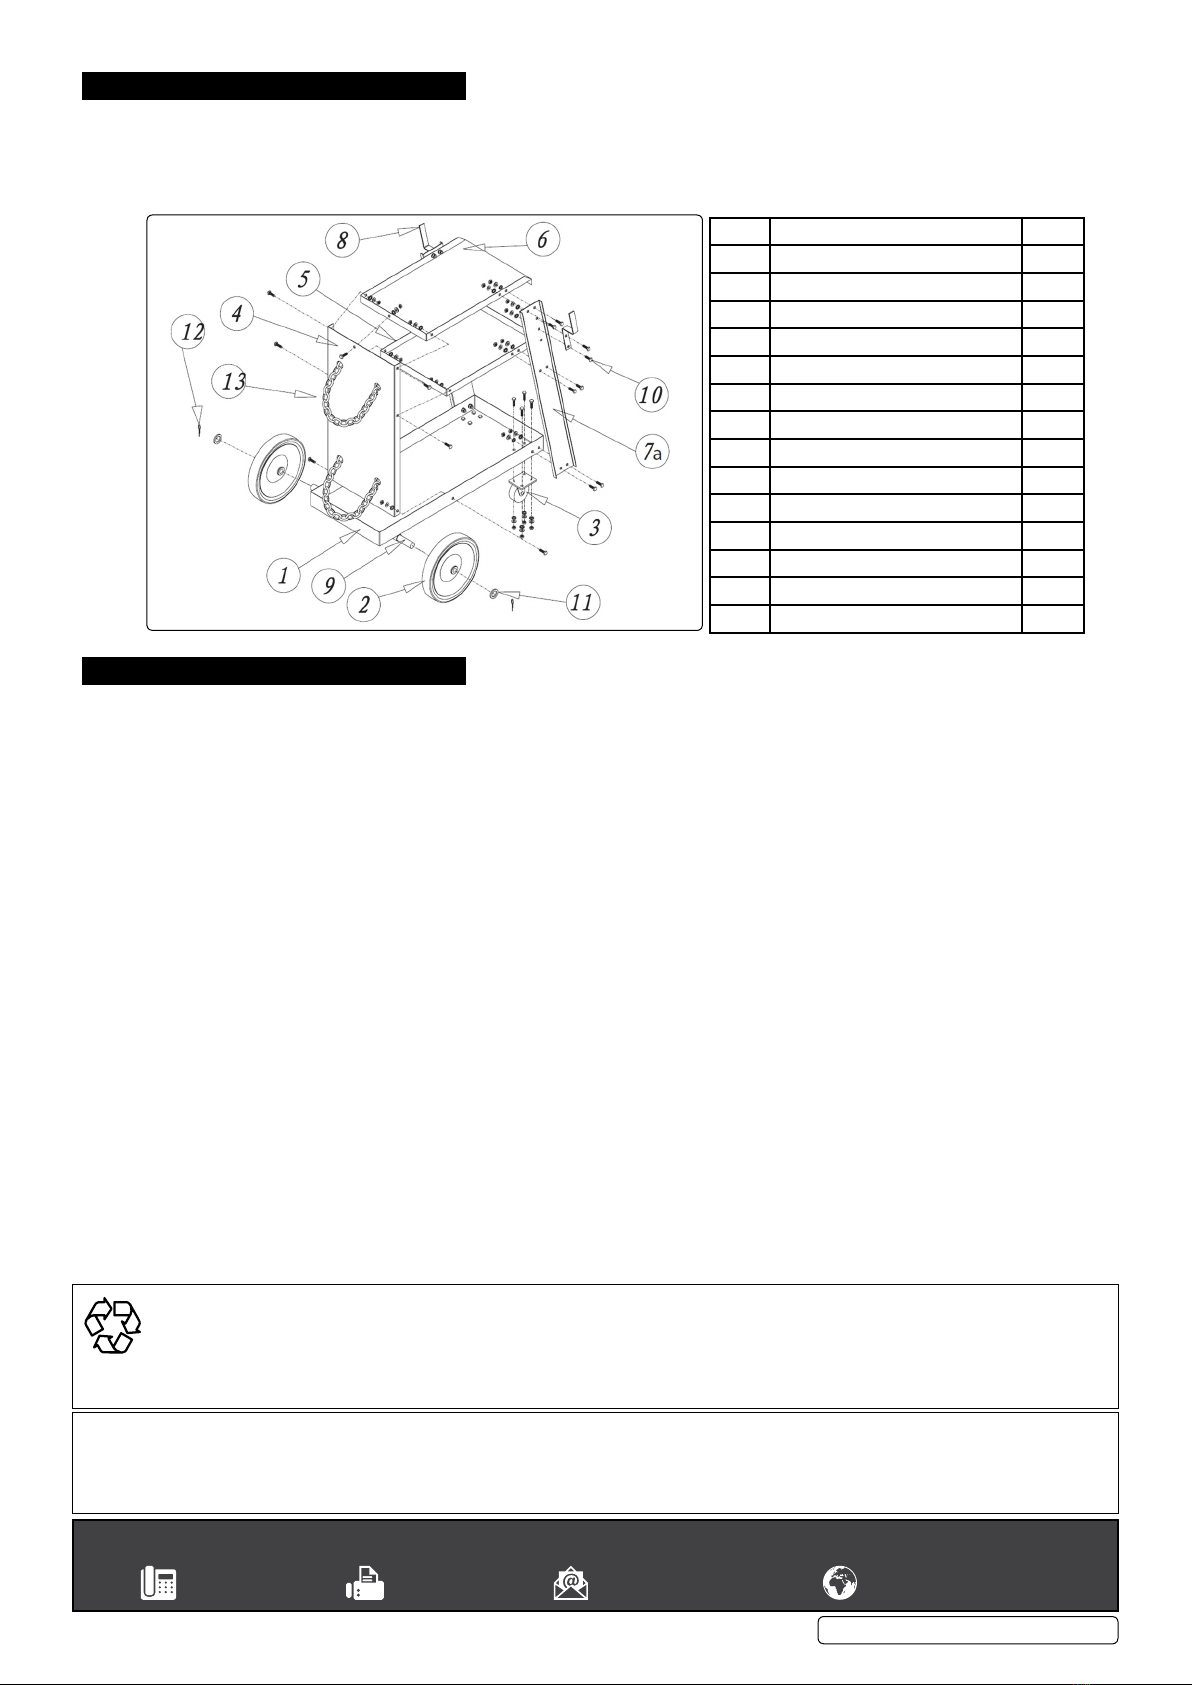
4.1. Using the diagram below as a guide; loosely assemble the trolley.
4.2. Slidetheaxlesupports(9)throughtheslotsinthebase(1)sotheaxlemaybeinsertedintothesupports.
4.3. Whenthewheels(2and3),backpanel(4),shelves(1,5and6),uprightsupports(7aand7b)andthehooks(8)areinplace,
tightenallxings.
NOTE! Whenattachingthebackpanel(4)ensuretheslotsforthechainsarefacingdownwards.
5. OPERATION
5.1. LOADING A GAS BOTTLE
5.1.1. Thetrolleycanbeloadedwithasuitablegasbottleuptoasizeof93cminheight.Tallerbottlesshouldnotbeloadedontothe
trolleyasitmaybecomeunstableintransit.Themaximumweightofbottleshouldnotexceed50kg.Thetrolleyisdesignedto
accommodate one bottle only.
5.1.2. Positionthetrolleyasnearaspossibletotheweldingbottle.Themaximumsizebottlewillrequiretwopeopletoloadit.Whenthe
bottle is in place it should be held steady by one person whilst the other secures the chains around the bottle. The chains must be
astightaspossibletoensurestabilityofthetrolley.Makesurethattheendsofthechainsarefullyengagedintheslotsintheback
oftheverticalbackpanel.
5.2. LOADING A WELDER
5.2.1. ThetrolleyisprimarilyintendedforMIGweldersthatusegasbutcouldequallyaccommodateanarcwelderaslongasitdoesnot
exceedthemaximumfootprintdimensionsof300mmwideand480mmlong.
5.2.2. Placethewelderontothetopshelfandensurethatitisretainedbythelippedsides.Anytallfeetorwheelsonthewelderthat
prevent it sitting down properly into the tray should be removed.
5.3. MOVING A FULLY LOADED TROLLEY
5.3.1. For transit purposes the welding cables can either be coiled and placed in the lower trays or hung on the cable brackets on either
sideofthesupportrails.
5.3.2. Beforemovingthetrolleyensurethatthebottleretainingchainsaretightlyfastenedandthattherearenodanglingcablesthat
could become caught in the wheels.
5.3.3. Movethetrolleybytakingholdofthedownturnedlipatthefrontofthetopshelf.DO NOT try to move the trolley by pushing or
pulling on the welder or gas bottle.
5.3.4. Thetrolleyshouldonlybemovedoversmoothandlevelsurfaces.
5.4. WELDING WITH THE TROLLEY
5.4.1. Attheweldingsiteensurethatthetrolleyisconvenientlyplacedwithinreachofboththepowersocketandtheitemtobewelded
without any cables being over-streched.
8DO NOT switch the welder on whilst the cables are still stowed on the trolley.
WARNING!Neverattachthewelder’searthclampdirectlytothetrolleyframeasthiswilldamagethepaintnishandcouldresult
inaccidentalarcingfromthetorch.
8DO NOT attempt to move the trolley by pulling on the earth or torch cable.
No. Description Qty.
1BottomShelfAss 1
2Wheel 2
3Swivel Caster 2
4BackPanel 1
5 MiddleShelf 1
6TopShelf 1
7a LeftSupport 1
7b Right Support (not shown) 1
8Hook 2
9 Axle 1
10 Bolt,Washer,Nut(set)M6x12 33
11 FlatWasher 2
12 Cotter pin 2
13 Chain 2
Sealey Group, Kempson Way, Suffolk Business Park, Bury St Edmunds, Suffolk. IP32 7AR
01284 757500 01284 703534 sales@sealey.co.uk www.sealey.co.uk
ENVIRONMENT PROTECTION
Recycleunwantedmaterialsinsteadofdisposingofthemaswaste.Alltools,accessoriesandpackagingshouldbesorted,takento
arecyclingcentreanddisposedofinamannerwhichiscompatiblewiththeenvironment.Whentheproductbecomescompletely
unserviceableandrequiresdisposal,drainanyfluids(ifapplicable)intoapprovedcontainersanddisposeoftheproductandfluids
according to local regulations.
Note:Itisourpolicytocontinuallyimproveproductsandassuchwereservetherighttoalterdata,specificationsandcomponentpartswithoutprior
notice.
Important:NoLiabilityisacceptedforincorrectuseofthisproduct.
Warranty:Guaranteeis12monthsfrompurchasedate,proofofwhichisrequiredforanyclaim.
BTR4.V3Issue127/11/18
Original Language Version
© Jack Sealey Limited


