SEH INU-100 User manual

USB Deviceserver
INU-100
Quick Installation Guide
MHAB-QI-INU100
Version: 1.2 | 2018-11

Overview
This 'Quick Installation Guide' provides a description of the
initial setup of the INU-100. The hardware installation is
described in the 'Hardware Installation Guide'.
Table of contents 1.
Do you need assistance? Contact us!
Überblick
Dieser 'Quick Installation Guide' beschreibt die
Inbetriebnahme des INU-100. Die Hardware-Installation wird
im 'Hardware Installation Guide' erklärt.
Inhaltsverzeichnis 11.
Benötigen Sie Hilfe? Kontaktieren Sie uns!
Monday to Thursday
Friday 8:00 a.m. to 4:45 p.m. and
8:00 a.m. to 3:15 p.m. (CET)
+49 (0)521 94226-44
suppor[email protected]
www.seh-technology.com
Montag–Donnerstag
Freitag 8:00–16:45 Uhr
8:00–15:15Uhr
+49 (0)521 94226-44
suppor[email protected]
www.seh.de

Quick Installation Guide [en] 1
Table of Contents
Purpose . . . . . . . . . . . . . . . . . . . . . . . . . . . . . . . . . . . . . . . . . . . . . 2
Software Installation . . . . . . . . . . . . . . . . . . . . . . . . . . . . . . . . . 3
Getting Started: SEH UTN Manager . . . . . . . . . . . . . . . . . . . . 5
Starting the SEH UTN Manager ...................................................6
Assigning an IP Address to the INU Server..............................7
Adding the INU Server to the Selection List ...........................8
Connecting the USB Device to the Client................................9
Configuring the INU Server . . . . . . . . . . . . . . . . . . . . . . . . . . 10

2 [en] Quick Installation Guide
Purpose
The USB Deviceserver 'INU-100' allows you to access non-
network-ready USB devices (e.g. hard disks, etc.) in the
network. For this purpose, the USB devices will be connected
to the USB ports of the INU-100. The software tool 'SEH UTN
Manager' handles the access of the USB devices. In addition,
you can connect a load via relay.
The SEH UTN Manager is installed on all clients that are
intended to access a USB device in the network. The SEH UTN
Manager shows the availability of all INU servers in the
network and establishes a connection between the client and
the USB port including the connected USB device.
The administration of the INU-100 is done via the 'INU Control
Center'.

Quick Installation Guide [en] 3
Software Installation
The software tool 'SEH UTN Manager' organizes the access of
the USB devices. The SEH UTN Manager is available in two
versions:
• Complete version
• Minimal version (only command-line interface)
The complete version has a graphical user interface and offers
additional features. A detailed description can be found in the
INU User Manual.
The SEH UTN Manager is installed on all clients that are
intended to access a USB device in the network. Different
installation files are available, depending on the operating
system.
First, you have to download the installation file for the SEH
UTN Manager from the homepage of SEH Computertechnik
GmbH:
http://www.seh-technology.com/services/downloads/
industrial/inu-100.html
Important:
Make sure that the hardware has been installed
before you begin with the software installation!
The hardware installation is described in the
enclosed document 'Hardware Installation
Guide'.

4 [en] Quick Installation Guide
System requirements
– Windows 7 or later except for Windows Server 20081;
OS X respectively macOS 10.9 or later
– The installation can only be carried out by users with ad-
ministrative rights.
1. Start the installation file.
2. Install the complete version of the SEH UTN Manager (in-
cluding graphical user interface). Follow the installation
routine.
The SEH UTN Manager is installed on your client.
1. Windows 7 and Windows Server 2008 R2: KB3033929 (https://tech-
net.microsoft.com/en-us/library/security/3033929) must be in-
stalled.
Important:
The SEH UTN Manager is also available for
selected Linux systems. All information necessary
for installing and using the SEH UTN Manager in
Linux environments can be found in the INU User
Manual Linux. The documentation is available via
the link on page 3.

Quick Installation Guide [en] 5
Getting Started: SEH UTN Manager
After the SEH UTN Manager is started, the network will be
scanned for connected INU servers. The network range to be
scanned is freely definable.
All INU servers found will be shown in the 'network list'
together with the connected USB devices. The required INU
servers will be selected and added to the 'selection list'. The
INU servers listed in the selection list and the connected USB
devices can then be used by the user.
This chapter describes the first steps with the program.
• ’Starting the SEH UTN Manager’ 6
• ’Assigning an IP Address to the INU Server’ 7
• ’Adding the INU Server to the Selection List’ 8
• ’Connecting the USB Device to the Client’ 9
Detailed information on how to use the SEH UTN Manager
can be found in the Online Help. To start the Online Help,
select Help – Online Help from the menu bar.

6 [en] Quick Installation Guide
Starting the SEH UTN Manager
Windows
Start the SEH UTN Manager on your client via the Windows
start menu.
(Start All apps SEH Computertechnik GmbH SEH
UTN Manager)
Mac
To start the program, double-click the 'SEH UTN Manager.app'
file.
(Applications SEH UTN Manager.app)
Important:
Client and INU server communicate via the UTN
port 9200. This port must not be blocked by a
security software (firewall). If required, you can
change the port number. A detailed description
can be found in the INU User Manual.
Important:
During the initial configuration, client and INU
server must be assigned to the same local
network segment.

Quick Installation Guide [en] 7
Assigning an IP Address to the INU Server
Once the INU server is connected to the network, it checks
whether an IP address can be obtained from the boot
protocols BOOTP or DHCP. If this is not the case, the INU
server assigns itself an IP address via Zeroconf from the
address range (169.254.0.0/16) which is reserved for Zeroconf.
The INU servers found by the program will be displayed in the
network list. You can change the TCP/IP parameters of the INU
server.
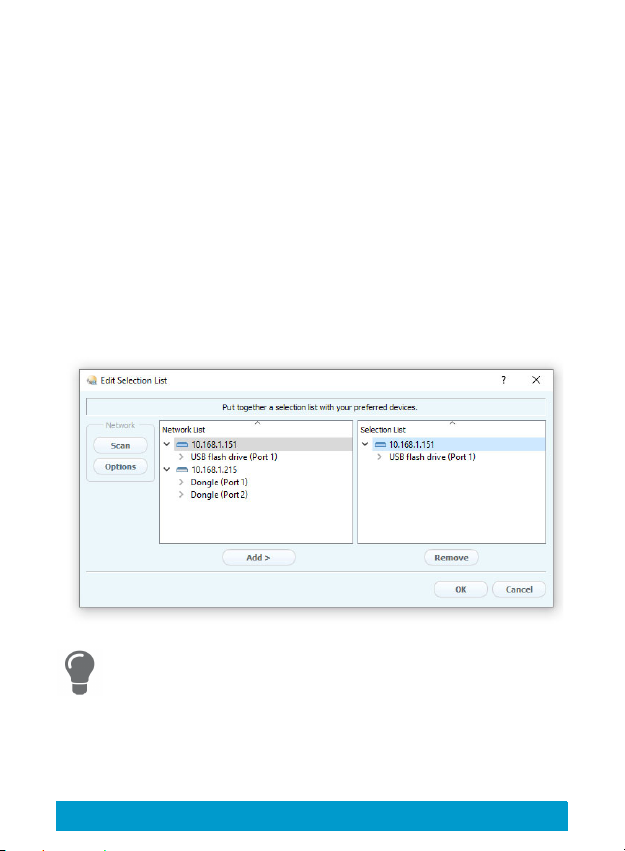
1. Confirm the note dialog 'Your Selection List seems to be
empty' by clicking Yes.
If no note dialog is available and the main dialog appears, select Selec-
tion List – Edit from the menu bar.
The Edit Selection List dialog appears.
2. Select the INU server from the network list.
3. Select Set IP Address from the shortcut menu.
The Set IP Address dialog appears.
4. Enter the relevant TCP/IP parameters.
5. Click OK.
The settings will be saved.

8 [en] Quick Installation Guide
Adding the INU Server to the Selection List
The selection list displays the INU servers and the USB devices
connected to their USB ports.
Define the devices you want to use. To do this, you must add
the INU server (and the connected USB devices) shown in the
network list to the selection list.
1. Select Selection List – Edit from the menu bar.
The Edit Selection List dialog appears.
2. Select the INU server from the network list.
3. Click Add.
4. (Repeat steps 2 and 3, if necessary.)
5. Click OK.
The INU servers are shown in the selection list.
You can extend the search for INU servers to any network
range. To do this, change the search parameters for the
network scan.
Windows: via the Options dialog in the Program menu.
Mac: via the Preferences dialog in the SEH UTN Manager
menu.

Quick Installation Guide [en] 9
Connecting the USB Device to the Client
To use a USB device, a connection is established between the
client and the USB port of the INU server to which the USB
device is connected.
All provisions (driver installation, etc.) necessary to oper-
ate the USB device locally (i.e. connected directly to the
client) have been met on the client. Ideally, the USB device
has been connected and operated on the client locally ac-
cording to the instructions of the manufacturer.
The USB port is not connected to another client. A USB de-
vice that was made available by the INU server can only be
used by one network participant at a time.
1. Select the port from the selection list.
2. Select Port – Activate from the menu bar.
The connection will be established.
Important:
Close the connection to the USB port when you
no longer need the attached USB device. To do
this, select Port – Deactivate from the menu bar.

10 [en] Quick Installation Guide
Configuring the INU Server
The INU server has a user interface, the INU Control Center,
which can be opened in an Internet browser (Internet
Explorer, Mozilla Firefox, Safari).
The INU server can be configured and monitored via the ‘INU
Control Center‘.
1. Open your browser.
2. Enter the IP address of the INU server as the URL.
The INU Control Center is displayed in the browser.
If the INU Control Center is not displayed, check the proxy settings of
your browser.
Detailed information about the configuration of the INU
server can be found in the Online Help of the myUTN Con-
trol Center.
To start the Online Help, click the '?' icon.

Quick Installation Guide [de] 11
Inhaltsverzeichnis
Verwendungszweck . . . . . . . . . . . . . . . . . . . . . . . . . . . . . . . . . 12
Software-Installation . . . . . . . . . . . . . . . . . . . . . . . . . . . . . . . . 13
Erste Schritte mit dem SEH UTN Manager . . . . . . . . . . . . . 15
SEH UTN Manager starten...........................................................16
INU-Server eine IP-Adresse zuweisen......................................17
INU-Server der Auswahlliste hinzufügen...............................18
USB-Gerät mit Client verbinden................................................19
INU-Server konfigurieren . . . . . . . . . . . . . . . . . . . . . . . . . . . . 20

12 [de] Quick Installation Guide
Verwendungszweck
Der USB Deviceserver 'INU-100' erlaubt das Bereitstellen von
nicht-netzwerkfähigen USB-Geräten (z.B. Festplatten usw.) für
mehrere Netzwerkteilnehmer. Dazu werden die USB-Geräte
an die USB-Ports des INU-100 angeschlossen. Die
Zugriffsverteilung der USB-Geräte erfolgt über das Software-
Tool 'SEH UTN Manager'. Zudem lässt sich ein Verbraucher via
Relais anschließen.
Der SEH UTN Manager wird auf allen Clients installiert, die auf
ein im Netzwerk bereitgestelltes USB-Gerät zugreifen sollen.
Der SEH UTN Manager zeigt die Verfügbarkeit aller im
Netzwerk eingebundenen INU-Server an und stellt die
Verbindung zwischen Client und USB-Port inklusive dem
daran angeschlossenen USB-Gerät her.
Die Verwaltung des INU-100 erfolgt über das 'INU Control
Center'.

Quick Installation Guide [de] 13
Software-Installation
Die Zugriffsverteilung der USB-Geräte wird über das
Software-Tool SEH UTN Manager organisiert. Der SEH UTN
Manager ist in zwei Varianten verfügbar:
• Vollständige Variante
• Minimal-Variante (reine Kommandozeilen-Version)
Die vollständige Variante verfügt über eine grafische
Bedienoberfläche und bietet zusätzliche Funktionen.
Detaillierte Beschreibungen finden Sie in der INU-
Benutzerdokumentation.
Der SEH UTN Manager wird auf allen Clients installiert, die auf
ein im Netzwerk bereitgestelltes USB-Gerät zugreifen sollen.
Je nach Betriebssystem sind verschiedene Installations-
dateien verfügbar.
Bitte laden Sie zuerst die Installationsdatei für den SEH UTN
Manager von der SEH Computertechnik GmbH-Homepage:
http://www.seh-technology.com/de/
service/downloads/industrial/inu-100.html
Wichtig:
Stellen Sie sicher, dass die Hardware-Installation
ausgeführt wurde bevor Sie mit der Software-
Installation beginnen!
Die Hardware-Installation wird im beiliegenden
Dokument 'Hardware Installation Guide'
beschrieben.

14 [de] Quick Installation Guide
Systemvoraussetzungen
– Windows 7 oder höher außer Windows Server 20081;
OS X bzw. macOS 10.9 oder höher
– Die Installation kann ausschließlich durch Benutzer mit
administrativen Rechten durchgeführt werden.
1. Starten Sie die Installationsdatei.
2. Installieren Sie die vollständige Version des SEH UTN Ma-
nagers (inkl. grafischer Benutzeroberfläche). Folgen Sie
hierzu der Installationsroutine.
Der SEH UTN Manager ist auf Ihrem Client installiert.
1. Windows 7 und Windows Server 2008 R2: KB3033929 (https://tech-
net.microsoft.com/en-us/library/security/3033929) muss installiert
sein.
Wichtig:
Der SEH UTN Manager ist auch für ausgewählte
Linux-Systeme verfügbar. Alle Informationen für
die Installation und den Einsatz in Linux-
Umgebungen finden Sie in der INU-Benutzer-
dokumentation Linux. Die Dokumentation finden
Sie unter dem Link auf Seite 13.

Quick Installation Guide [de] 15
Erste Schritte mit dem SEH UTN Manager
Nach dem Start des SEH UTN Managers wird das Netzwerk
nach angeschlossenen INU-Servern gescannt. Der zu
scannende Netzwerkbereich ist frei definierbar.
Nach dem Scannen des Netzwerks werden alle gefundenen
INU-Server und deren angeschlossene USB-Geräte in der
'Netzwerkliste' angezeigt. Die benötigten INU-Server werden
ausgewählt und der 'Auswahlliste' hinzugefügt. Die in der
Auswahlliste aufgeführten INU-Server und die daran
angeschlossenen USB-Geräte können dann vom Benutzer
verwendet werden.
Dieses Kapitel informiert über die ersten Handlungsschritte
mit dem Programm.
•’SEHUTNManagerstarten’16
• ’INU-Server eine IP-Adresse zuweisen’ 17
• ’INU-Server der Auswahlliste hinzufügen’ 18
• ’USB-Gerät mit Client verbinden’ 19
Detaillierte Informationen zur Bedienung des SEH UTN
Managers entnehmen Sie der Online Hilfe. Um die Online
Hilfe zu starten, wählen Sie im Menü Hilfe den Befehl
Online Hilfe.

16 [de] Quick Installation Guide
SEH UTN Manager starten
Windows
Starten Sie auf Ihrem Client den SEH UTN Manager über das
Windows-Startmenü.
(Start Alle Apps SEH Computertechnik GmbH SEH
UTN Manager)
Mac
Zum Starten des Programms doppelklicken Sie auf die Datei
'SEH UTN Manager.app'.
(Programme SEH UTN Manager.app)
Wichtig:
Der Client und INU-Server kommunizieren über
den UTN-Port 9200. Dieser Port darf nicht durch
eine Sicherheitssoftware (Firewall) blockiert
werden. Bei Bedarf kann die Portnummer
geändert werden. Detaillierte Beschreibungen
finden Sie in der INU-Benutzerdokumentation.
Wichtig:
Während der Erstkonfiguration müssen Client
und INU-Server demselben lokalen
Netzwerksegment zugeordnet sein.

Quick Installation Guide [de] 17
INU-Server eine IP-Adresse zuweisen
Nachdem der INU-Server an das Netzwerk angeschlossen ist,
überprüft der INU-Server, ob er eine IP-Adresse über die
Bootprotokolle BOOTP oder DHCP erhält. Ist das nicht der Fall,
gibt sich der INU-Server über Zeroconf selbst eine IP-Adresse
aus dem für Zeroconf reservierten Adressbereich
(169.254.0.0/16).
Die vom Programm gefundenen INU-Server werden in der
Netzwerkliste angezeigt. Sie haben die Möglichkeit, die TCP/
IP-Parameter am INU-Server zu ändern.
1. Bestätigen Sie den Hinweisdialog 'Auswahlliste ist leer'
mit Ja.
Falls kein Hinweisdialog vorhanden ist und der Hauptdialog angezeigt
wird, wählen Sie im Menü Auswahlliste den Befehl Bearbeiten.
Der Dialog Auswahlliste bearbeiten erscheint.
2. Markieren Sie den INU-Server in der Netzwerkliste.
3. Wählen Sie IP-Adresse definieren im Kontextmenü.
Der Dialog IP-Adresse definieren erscheint.
4. Geben Sie die entsprechenden TCP/IP-Parameter ein.
5. Wählen Sie die Schaltfläche OK an.
Die Einstellungen werden gespeichert.

18 [de] Quick Installation Guide
INU-Server der Auswahlliste hinzufügen
Die Auswahlliste zeigt die INU-Server und die an ihre USB-
Ports angeschlossenen USB-Geräte an.
Definieren Sie die Geräte, die Sie nutzen möchten. Fügen Sie
hierzu den in der Netzwerkliste angezeigten INU-Server
mitsamt seinen angeschlossenen USB-Geräten der
Auswahlliste hinzu.
1. Wählen Sie im Menü Auswahlliste den Befehl Bearbeiten.
Der Dialog Auswahlliste bearbeiten erscheint.
2. Markieren Sie den INU-Server in der Netzwerkliste.
3. Wählen Sie die Schaltfläche Hinzufügen an.
4. (Wiederholen Sie die Schritte 2–3 nach Bedarf.)
5. Wählen Sie die Schaltfläche OK an.
Die INU-Server werden in der Auswahlliste angezeigt.
Die Suche nach INU-Servern kann auf beliebige Netzwerk-
bereiche erweitert werden. Ändern Sie hierzu die Suchpa-
rameter für den Netzwerkscan.
Windows: Im Menü Programm über den Dialog Optionen.
Mac: Im Menü SEH UTN Manager über den Dialog Ein-
stellungen.
Other manuals for INU-100
2
Table of contents
Languages:
Other SEH Server manuals