Senco SKSXP L User manual

Medium/Heavy Wire 1½” Stapler
The new SENCO® SKSXP is available for use in a wide variety
of wood-working applications. It is oered in a series of
models that drive 2 dierent gauges and 3 dierent crown
widths in lengths from 7/8” – 1-1/2”. It is dependable,
virtually maintenance free stapler you can depend on for the
professional craftsmanship job you demand.
SKSXP
Safety First. The only way to work.
Safety First. The only way to work. |800-543-4596 |www.senco.com|©2012 Senco Brands, Inc.
LIMITED
WARRANTY
Applications
Major: drawer assembly, countertop buildup, cabinets, corner
and glue block fastening, and spring clip attachment in
furniture assembly. Widely used in assembly of doors and
window casings, trim, and moldings. On-site construction uses
for aluminum and vinyl siding, underlayment, and attachment
of roong sheathing and decking materials.
Other: light crating, agricultural boxes, fencing, and all types
of wood crafts
Features and Benefits
Specifications
Item#
1/4"
3/8"
7/16"
7/811/411/2
1
7/8
11/411/2
1
11/8
7/8
3/4
3/4
3/4
11/411/21
11/8
13/8
SKSXP L
SKSXP M
SKSXP N
Fastener Specifications
Finish. . . . . . . . . . . . . . . . . . . . . . . . . . Galvanized & Stainless
Collation. . . . . . . . . . . . . . . . . . . . . . . Glued and/or taped strip

SKSXP
Safety First. The only way to work.
Safety First. The only way to work. |800-543-4596 |www.senco.com|©2012 Senco Brands, Inc.
SENCO®
Carton
Cabinets,casebacks, drawers, upholstery, sots,
underlayment, lattice & insulative sheathing
Choose the right actuation model!
Stial Actuation Trigger also known as restrictive trigger or
trigger reoperates in the following seence - depress the safety
element at the nose of tool against the work surface then pull the
trigger. After each fastener is driven, release the trigger and lift the tool
o the work surface before starting the seence again. This trigger is
recommended and acceptable for most applications.
Contact Actuation Trigger also known as dual action, bounce or
bottom reoperates in the following seence- pull the trigger rst
and keep the trigger pulled while moving the tool along the work
surface with a bouncing motion, depressing the safety element at the
nose of the tool against the work surface where the fastener is to be
driven. This trigger is recommended for use by trained professionals
only in high production or volume applications.
For additional information on how SENCO will save you time, reduce
www.senco.com
Bright Basic
118
78
78
118
118
SKSXP M
SENCO®
Carton
78
Cabinets,casebacks, drawers, upholstery, sots,
underlayment, lattice and sheathing
SKSXP N
SENCO®
Carton
Bright Basic
118
138
138
78
78
118
118
138
Cabinets, casebacks, drawers, upholstery, sots,
underlayment, lattice and sheathing
Note:

NFD830 Issued January 8, 2007
© 2007 by Senco Products, Inc.
Operating Instructions
Instrucciones de Operacion
Mode d’Emploi
Questions? Comments?
call SENCO’S toll-free Action-line: 1-800-543-4596
or e-mail: toolprof@senco.com www.senco.com
Warnings for the safe use of this tool are included in this manual.
Los avisos para el uso seguro de esta herramienta están incluidos
en este manual.
Les consignes pour l’utilisation en toute sécurité de cet outil se
trouvent dans ce manuel.
SKSXP
Senco Products Inc.
8485 Broadwell Road
Cincinnati, Ohio 45244

TABLE OF
CONTENTS
Tool Use 2
Maintenance 5
Troubleshooting 6
Specications 7
Accessories 7
Options 9
2
English Español Français
Tool Use Uso de la Herramienta
Utilisation de l’Outil
TABLA DE
MATERIAS
Uso de la
Herramienta 2
Mantenimiento 5
Identicación
de Fallas 6
Especicaciones 7
Accesorios 7
Opciones 9
TABLE DES
MATIERÈS
Utilisation de l’outil 2
Entretien 5
Dépannage 6
Spécications 7
Accessoires 7
Options 9
EMPLOYER’S
RESPONSIBILITIES
Employer must enforce
compliance with the
safety warnings and
all other instructions
which accompany this
tool as shipped from the
manufacturer.
Keep this manual avail-
able for use by all people
assigned to the use of this
tool.
For personal safety and
proper operation of this
tool, read and understand
all of these instructions
carefully.
RESPONSABILIDADES DEL
EMPLEADOR
El empleador debe hacer
cumplir las advertencias de
seguridad y todas las otras
instrucciones que acompañan
a esta herramienta como se la
despacha desde el fabricante.
Mantenga este manual dispo-
nible para que lo usen todas
las personas destinadas a ha-
cer uso de esta herramienta.
Por razones de seguridad per-
sonal y la adecuada operación
de esta herramienta, lea y
comprenda todas estas in-
strucciones cuidadosamente.
RESPONSABILITÉS DE
L’EMPLOYEUR
L’employeur doit faire ap-
pliquer les consignes de
sécurité et toutes les autres
instructions qui accompag-
nent cet outil tel qu’il est
livré par son constructeur.
Ayez ce manuel à la dispo-
sition de toutes les
personnes chargées
d’utiliser cet outil.
Pour assurer la sécu-
rité personnelle et le bon
emploi de cet outil, lisez et
assimilez soigneusement
toutes ces instructions.
lRead and understand “SAFETY
INSTRUCTIONS” manual
shipped with this tool before
using tool.
lAntes de usar la herramienta lea
y comprenda el manual “INS-
TRUCCIONES DE SEGURI-
DAD” despachado con ella.
lLisez et assimilez le manuel
“INSTRUCTIONS DE SÉCU-
RITÉ” livré avec cet outil avant
de l’utiliser.

3
English Español Français
Tool Use Uso de la Herramienta
Utilisation de l’Outil
l Keep tool pointed away from
yourself and others and connect
air to tool.
Tools shall be operated at the
lowest pressure needed for the
application. This will reduce
noise levels, part wear, and
energy use.
l Las herramientas deberán ser
operadasalamenorpresión
que se necesite para su aplica-
ción.Estoreduciráelnivelde
ruido, el desgaste de las partes,
y el uso de energía.
l Maintenez l’outil pointé à l’écart
de vous-même et des autres
personnes et raccordez l’outil à
l’air comprimé.
Les outils doivent être utilisés
à la pression la plus faible
requise pour le travail à faire.
Cela réduira le niveau de bruit,
l’usure de l’outil et la demande
en énergie.
l To Load:
Pull feeder shoe back into
“locked” postion.
l Para cargar:
Tire del alimentador hacia atrás
hastalaposición“cerrada”
(“locked”).
l Lay strip of staples onto rail. Use
only genuine SENCO fasteners
(seeTechnicalSpecications).
Do not load with workpiece con-
tact (safety element) or trigger
depressed.
l Ponga la tira sobre la guía. Use
solamente grapas SENCO
auténticos(vealasEspecica-
ciones Técnicas). No cargue con
el disparo o
la seguridad oprimidos.
l Mettez une série d’agrafes dans
le chargeur. N’utilisez que de
véritable agrafes SENCO (voir
lesSpécicationsTechniques).
N’appuyez pas sur le palpeur
de sécurité ou la détente pen-
dant le rechargement.
l Release feeder shoe and slide
it forward.
l Suelte el alimentador y deslice
hacia adelante.
l Relâcher le pousse agrafes et le
faire glisser vers l’avant.
l With a “Contact-Actuation” (Dual-
Action) trigger, nails can be
driven two ways:
a) Position workpiece contact
(safety element) against work
surface and pull trigger...“Trigger
Fire.”
b) To drive a nail, pull trigger and
push workpiece contact (safety
element) against work surface.
Each time the workpiece contact
is pushed against the work
surface a nail will be driven. This
“bottom-re”modeofoperation
is preferred when high produc-
tion, rapid fastener placement is
desired.
l Las herramientas con gatillo de
accion doble pueden ser dispa-
radas de dos maneras:
a)Oprima el seguro contra la
superciedetrabajoyaprieteel
gatillo...Disparo de gatillo.
b)Para impulsar un clavo, oprima
el disparador y deprima el
elemento de seguridad contra
lasuperciedetrabajo.Cada
vez que deprima el elemento de
seguridadcontralasupercie
detrabajo,impulsaráunclavo.
Estemododeoperaciónde
“disparo inferior” o “por rebote”
es el preferido cuando se desea
alta productividad y rápida colo-
cacióndelclavo.
l Les appareils équipés de
déclenchement “au touché / par
gâchette” peuvent être utilisés
de 2 façons différentes :
a)Déclenchement par “gâchette”:
Appliquer le palpeur de sécurité
de l’appareil à l’endroit désiré et
activer la gâchette.
b)Pour planter un clou, tirez sur
la détente et poussez l’élément
de sécurité contre la surface
de travail. Chaque fois que
l’élément de sécurité est poussé
contre la surface de travail un
clou est planté. Le mode de
fonctionnement en “tir continu”
est préférable si vous désirez
placer des attaches rapidement
avec forte productivité.
l Pour charger :
Tirez le poussoir en arrière
dans la position “verrouillée”
(“locked”).
1
2
1
2

4
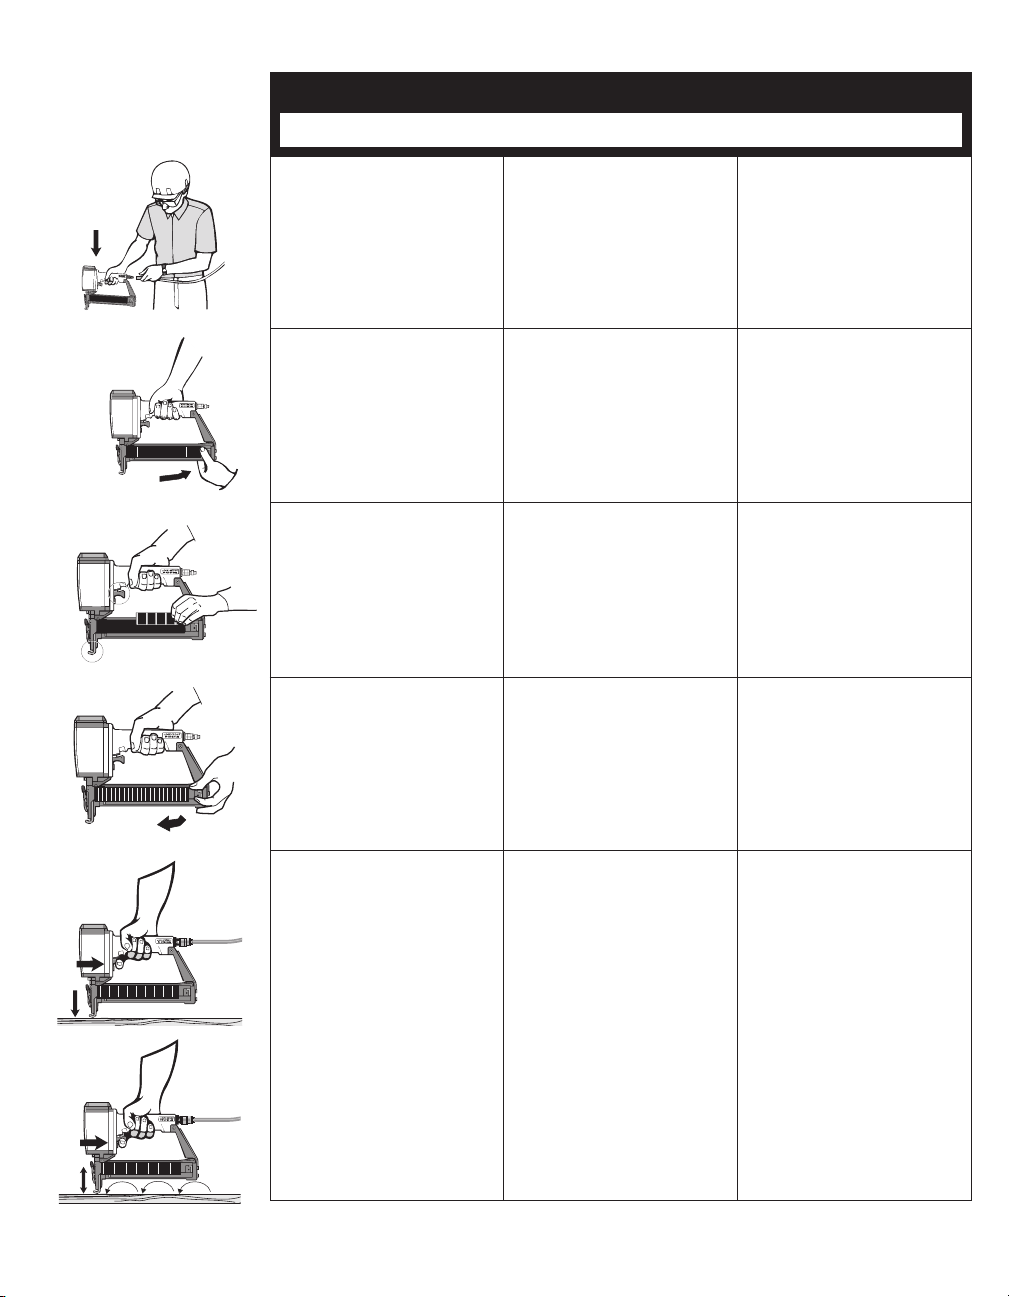
l Connect air supply and replace
fasteners. Release feeder shoe
and slide it forward.
l Conecte el suplemento de aire
y reemplace las grapas. Suelte
el alimentador y deslice hacia
adelante.
l Reconnecter l’appareil à la
source d’air comprimé et repla-
cer les agrafes.
English Español Français
Tool Use Uso de la Herramienta
Utilisation de l’Outil
3
1
2
lLas herramientas con “Ga-
tillo Restringido” solamente se
pueden disparar con el gatillo.
Primero apriete el elemento de
seguridadcontralasuperciede
trabajoydespuéstiredelgatillo.
Ésta característica es útil cuando
serequiereprecisiónenlacolo-
cacióndelossujetadores.
lLea el “Recordatorio de Seguri-
dadySatisfaccióndelCliente”
(CSSR)enlascajasdesujetado-
res y de las herramientas para in-
formaciónsobreseguridaddelos
GatillosRestringidoydeAcción
Dual.Bajociertascondiciones,el
Gatillo Restringido puede reducir
la posibilidad de heridas a su
personaoaotrosquetrabajen
con usted.
lWith a “Sequential” (Restric-
tive) trigger, nails can only be
driven one way. First depress
workpiece contact (safety ele-
ment) against work surface then
pull trigger.This feature is helpful
when precise fastener place-
ment is required.
lRead the “Customer Satisfaction
and Safety Reminder” (CSSR)
in the tool and fastener boxes
for safety information regarding
the Contact-Actuation and Se-
quential triggers. Under certain
conditions, the Sequential trigger
may reduce the possibility of
injurytoyouortoothersworking
with you.
lAvec une gachette “restrictive”,
les clous ne peuvent être tirés
que dans une seule direction.
Appuyer d’abord le palpeur de
sécurité sur la surface de travail,
puis tirer sur la gachette. Cette
fonction est utile pour un place-
mentprécisdeprojectiles.
lLire le “Rappel de Sécurité et
Satisfaction du Client” (CSSR)
danslesboitesàoutilsetxa-
tions pour les informations de
sécurité concernant les Détentes
à Double Action et à Restriction.
Dans certaines circonstances, la
Détente à Restriction peut rédu-
ire la possibilité de se blesser ou
de blesser d’autres personnes.
l This tool is equipped with a
depth control safety element.To
adjustthedepthofthestaple
being driven, loosen the screw
and slide the lower safety
element up or down and lock in
place by tightening the screw. Be
sure the safety element moves
freelyafteradjustment.
l Esta herramienta está equipada
con un dispositivo de seguridad
para el control de la profundidad.
Paraajustarlaprofundidaddela
grapaaclavar,aojeeltornilloy
deslice el dispositivo de seguri-
dad inferior hacia arriba o hacia
abajoyasegúreloapretandoel
tornillo. Asegúrese de que el dis-
positivo de seguridad se mueva
librementedespuésdelajuste.
l Cet appareil est équipé d’un ré-
glage en profondeur d’agrafage.
Pour régler la pénétration de
l’agrafe, désserrez la vis et faites
glisser vers le haut ou le bas la
partie inférieure du palpeur de
sécurité. Bloquez-le en position
par l’intermédiaire de la vis.
Assurez-vous que le palpeur de
sécurité bouge librement, une
fois le réglage fait.
l Shouldanailjamoccur,discon-
nect air supply.
l Si se produce un altascamiento
de un clavo, desconecte el
suministro de aire.
l Si un enrayage se produit, cou-
pez l’arrivée d’air.
l Pull feeder shoe back into
“locked” position and remove
staples.
l Tire del alimentador hacia atrás
alaposición“cerrada”yretire
las grapas.
l Tirez en arrière le sabot du
chargeur dans la position de
“verrouillage” et enlevez les
projectiles.
l Release E-Z Clear latch and
open door.
Removejammedfastener.Close
door and latch.
l Suelte el pestillo de alivio fácil
(E-Z) y abra la puerta. Retire la
grapa atascado. Cierre la puerta
con pestillo.
l Relâchez le loquet “E-Z” et
ouvrez le volet de front.
Enlevezleprojectilecoincé.
Fermez le volet de front et le
loquet.
1
2

5
English Español Français
Maintenance Maintenimiento
Entretien
l All screws should be kept tight.
Loose screws result in unsafe
operation and parts breakage.
l Todos los tornillos tienen que
mantenerse apretados. Los
tornillos sueltos pueden producir
unaoperaciónnoseguray
quebraduras de partes.
l Toutes les vis doivent être main-
tenues serrées à fond. Les vis
desserrées entraînent un man-
que de sûreté du fonctionnement
et la rupture de pièces.
l With tool disconnected, make
daily inspection to assure free
movement of workpiece contact
(safety element) and trigger. Do
not use tool if workpiece contact
or trigger sticks or binds.
l Con la herramienta desconec-
tada,hagalainspeccióndiaria
para asegurarse de la libertad
de movimiento del dispositivo de
seguridad y del gatillo. No use
la herramienta si el dispositivo
de seguridad o el gatillo se
atascan o endurecen.
l L’outil étant déconnecté de l’ar-
rivée d’air comprimé, effectuez
uneinspectionjournalièrepour
vous assurer du libre mouve-
ment du palpeur de sécurité
et de la détente. N’utilisez pas
l’outil si le palpeur de sécurité
ou si la détente sont coincés ou
grippés.
l Routine lubrication is not neces-
sary. Do not oil.
l Lalubricaciónderutinanoes
necesaria. No aceite.
l Lalubricationderoutinen’est
pas nécessaire. N’huilez pas.
R
l Wipe tool clean daily and inspect
forwear.Usenon-ammable
cleaning solutions only if neces-
sary–DO NOT SOAK.
Caution: Such solutions may
damage O-rings and other tool
parts.
l Use soluciones de limpieza no
amablés
solamente si es necesario-
NO LA REMOJE.
Precaución: Tales soluciones
pueden dañar
los empaques y otras partes de
la herramienta.
l Nettoyezl’outilchaquejourà
l’aide d’un chiffon et inspectez-
le pour déceler une éventuelle
usure. Utilisez uniquement des
solvantsnoninammablesen
cas de nécessité-NE LE FAITES
PAS TREMPER !
Attention : De tels produits
peuventendommagerlesjoints
et autres pièces de l’appareil.
l Read and understand “SAFETY
INSTRUCTIONS” manual
shipped with this tool before
using tool.
l Antes de usar la herramienta lea
y comprenda el manual “INS-
TRUCCIONES DE SEGURI-
DAD” despachado con ella.
l Lisez et assimilez le manuel
“INSTRUCTIONS DE SÉCU-
RITÉ” livré avec cet outil avant
de l’utiliser.

6
A
A
A = Kit #YK0376
WARNING
Repairs other than those described
here should be performed only by
trained,qualiedpersonnel.Contact
SENCO for information at
1-800-543-4596.
ALERTA
Las reparaciones, fuera de aquellas
descritas aquí, deben de ser lleva-
das a cabo solamente por personal
entrenadoycalicado.Póngase
en contacto con SENCO para
información
1-800-543-4596.
AVERTISSEMENT
Les réparations autres que celles
décrites ici doivent être réalisées
uniquement par du personnel
qualiéayantreçulaformation
appropriée. Pour toute information,
prenez contact avec SENCO par
téléphone en appelant Le Distribu-
teur agréé.
English Español Français
Troubleshooting
Identicación de Fallas
Dépannage
SYMPTÔME
Fuite d’air près du sommet
de l’outil / fonctionnement lent.
SOLUTION
Serrezlesvisàfond/vériez
l’alimentation en air ou rem-
placez les pièces portant la
lettre“A”(YK0376).
SYMPTÔME
Fuite d’air près de la base
de l’outil / retour inadéquat.
SOLUTION
Serrez les vis à fond / nettoyez l’outil
ou remplacez les pièces portant la
lettre“A”(YK0376).
SYMPTÔME
Autres problèmes.
SOLUTION
Prenez contact avec SENCO.
SYMPTOM
Air leak near top of tool /
Sluggish operation
SOLUTION
Verify air supply / tighten screws or
installPartsKitYK0376.
SYMPTOM
Air leak near bottom of tool /
Poor return.
SOLUTION
Clean tool / tighten screws or
installPartsKitYK0376.
SYMPTOM
SOLUTION
Contact SENCO.
Other problems.
SÍNTOMA
El aire se escapa cerca de la parte su-
periordelaherramienta/Operación
lenta.
SOLUCIÓN
Aprietelostornillos/Veriqueel
suministro de aire o instale el
JuegodePartesA(YK0376).
SÍNTOMA
SOLUCIÓN
El aire se fuga cerca de la parte
inferior de la herramienta / Mal
retorno.
Apriete los tornillos / Limpié la
herramienta o instale el Juego de
PartesB(YK0376).
SÍNTOMA
SOLUCIÓN
Otros problemas.
PóngaseencontactoconSENCO.
l Read and understand “SAFETY
INSTRUCTIONS” manual
shipped with this tool before
using tool.
l Antes de usar la herramienta lea
y comprenda el manual “INS-
TRUCCIONES DE SEGURI-
DAD” despachado con ella.
l Lisez et assimilez le manuel
“INSTRUCTIONS DE SÉCU-
RITÉ” livré avec cet outil avant
de l’utiliser.

7
English Español Français
Specications Especicaciones Specications
Minimum to maximum operating pressure
Air Consumption (60 cycles per minute)
Air Inlet
Maximum Speed (cycles per second)
Weight
Fastener Capacity
Tool size: Height
Tool size: Length
Tool size: Width: Main Body
TECHNICAL SPECIFICATIONS
4.8–8.3 bar
61.2 liter
1/4in. NPT
5
1.9 kg
145+
238 mm
314 mm
76mm
70–120psi
2.16 scfm
1/4in.NPT
5
4.2 lbs
145+
9 1/4in.
12 3/8in.
3 in.
SENCO offers a full line of accesso-
ries for your SENCO tools, including:
l Air Compressors
l Hose
l Couplers
l Fittings
l Safety Glasses
l Pressure Gauges
l Lubricants
l Regulators
l Filters
For more information or a complete
illustrated catalogue of SENCO
accessories, ask your representative
for #MK336.
SENCO ofrece una línea completa
de Accesorios para sus herramien-
tas SENCO, incluyendo:
l Compresores de Aire
l Manguera
l Conectores Rapidos
l Conectores
l AnteojosDeSeguridad
l Manometros
l Lubricantes
l Reguladores
l Filtros
Paramasinformacionóunpour
recevoir un catalogo completo ilus-
trado de los Accesorios SENCO,
pregunte a su representante pour
el numero MK336
SENCO offre une gamme étendue
d’accessoires pour vos outils
SENCO y compris :
l Compresseurs
l Tuyauterieexible
l Raccords
l Lunettes de sécurité
l Manomètres
l Lubriants
l Régulateurs
l Filtres
Pour plus d’informations ou pour
recevoir un catalogue détaillé des
accessoires proposés par SENCO,
prenez contact avec votre
représentant SENCO (référence
catalogue : #MK336).
English Español Français
Accessories Accesorios Accessoires
Presióndeoperaciónmínimaymáxima
Consumo de aire (60 ciclos por minuto)
Entrada de aire
Velocidad máxima (ciclos por segundo)
Peso
Capacidad de grapas por cargador
Tamaño de la herramienta: Altura
Tamaño de la herramienta: Longitud
Tamaño de la herramienta: Ancho (Cuerpo)
ESPECIFICACIONES TECNICAS
Pression de travail min. et max.
Consommation d’air (60 cycles par minute)
Prise d’air
Vitesse maximum (cycles par seconde)
Poids
Capacitédeprojectilesparmagasin
Dimensions de l’outil: hauteur
Dimensions de l’outil: longueur
Dimensions de l’outil: largeur: corps de l’appareil
SPECIFICATIONS TECHNIQUES
4.8–8.3 bar
61.2 liter
1/4in. NPT
5
1.9 kg
145+
238 mm
314 mm
76mm
70–120psi
2.16 scfm
1/4in.NPT
5
4.2 lbs
145+
9 1/4in.
12 3/8in.
3 in.
4.8–8.3 bar
61.2 liter
1/4in. NPT
5
1.9 kg
145+
238 mm
314 mm
76mm
70–120psi
2.16 scfm
1/4in.NPT
5
4.2 lbs
145+
9 1/4in.
12 3/8in.
3 in.

8
English Español Français
Specications Especicaciones Specications
Tool: 300004 (L11-L15), 300120 (L12-L17)
A
mm
19
22
25
29
32
38
inches
3⁄4
7⁄8
1
1 1⁄8
1 1⁄4
11⁄2
Code
L11
L12
L13
L14
L15
L17
A
Tool: 300152 (M12-M17)
mm
22
25
32
38
inches
7/8
1
1 1/4
11/2
Code
M12
M13
M15
M17
Tool: 300184 (N12-N17)
A
mm
22
25
29
32
35
38
inches
7⁄8
1
1 1⁄8
1 1⁄4
1 3⁄8
1 1⁄2
Code
N12
N13
N14
N15
N16
N17
*Staple Guide must be removed to drive staples longer than 1” in length.
*La guia de grapa tiene que ser removida para penetrar grapas de medida mayor de 1 pulgada de largo.
*La guida porta-graffe deve essere rimossa per sparare graffe di lunghezza superiore a 25 mm (1 pollice).
6,4 mm
.050
1,27 mm
.044"
1,12 mm
A
1/4”
11,1 mm
.062
1,57 mm
.055"
1,40 mm
A
7/16”
9,5 mm
.050
1,27 mm
.044"
1,12 mm
A
3/8”

9
English Español Français
Options Opciones Options
lRESTRICTIVE
TRIGGER— This feature
is helpful when precise
fastener placement is
required.
lGATILLO RESTRIN-
GIDO– Esta característica
sirve de ayuda cuando se
requiereunacolocación
delsujetadorprecisa.
lDECLÉNCHEMENT PAR
GACHETTE– Cette car-
actéristique s’avère utile
quand un placement de
projectilespréciss’impose.

Limited Warranty
SENCO® Pneumatic, DuraSpin®, Cordless Tools
& Compressors
Senco Products, Inc. (“SENCO”) designs and constructs its products using the highest standards of material and workmanship. SENCO war-
rants to the original retail purchaser that the following products will be free from defects in material or workmanship for the warranty period
speciedbelow:
SENCO® XP Series SENCO PRO Series SENCO Compressors
Five years One year One year
SENCO DuraSpin® SENCO Cordless SENCO Reconditioned Products
One year Two years One Year
During the warranty period (which begins on the purchase date), SENCO will repair or replace, at SENCO’s option and expense, any product or part that is defective in
materialsorworkmanshipafterexaminationbyaSENCOAuthorizedWarrantyServiceCenter,subjecttotheexceptions,exclusionsandlimitationsdescribedbelow.Any
replacement product or part will carry a warranty for the balance of the warranty period applicable to the replaced product or part. A DATED SALES RECEIPT OR PROOF
OF PURCHASE FROM THE ORIGINAL RETAIL PURCHASER IS REQUIRED TO MAKE A WARRANTY CLAIM. Warranty registration also is required and can be accom-
plished through on-line Product Registration at www.senco.com or by completing and returning the postage paid warranty registration form included with your Operator’s
manual/parts chart information, found inside the product carton. To make a warranty claim, you must return the product, with proper receipt/proof of purchase and return
transportation charges prepaid, to a SENCO Authorized Warranty Service Center. A list of SENCO Authorized Warranty Service Centers can be found at www.senco.com
or by calling 1-800-543-4596 toll free. SENCO will perform its obligations under this warranty, within a reasonable time after approval of the warranty claim.
Wheelbarrow Compressors:
1. Subjecttotheexceptions,exclusionsandlimitationsdescribedbelow,SENCOwarrantsthatthecompressorpumpwillbefreefromdefectsinmate-
rials and workmanship for two years after the purchase date.
2. Defectivepartsofthecompressorpumpnotsubjecttonormalwearandtearwillberepairedorreplaced,atSENCO’soption,duringthetwoyear
warranty period. If SENCO determines that repair or replacement is not feasible, SENCO will refund the purchase price less reasonable deprecia-
tion based on actual use.
SENCO Cordless:
1. Subjecttotheexceptions,exclusionsandlimitationsdescribedbelow,SENCOwarrantsthattheSENCOCordlesstoolwillbefreefromdefectsin
materials and workmanship for two years after the purchase date.
2. SENCO warrants that the batteries and chargers used with SENCO Cordless tools will be free from defects in material and workmanship for one
year after the purchase date.
WARRANTY EXCLUSIONS
The following warranty exclusions apply:
1. Normalwearpartsarenotcoveredunderthiswarranty.Normalwearpartsinclude,forexample,isolators,drivebelts,airlters,rubbero-rings,
seals, driver blades, piston stops, and piston/driver assembly.
2. This warranty does not cover parts damaged due to normal wear, misapplication, misuse, accidents, operation at other than recommended speeds
or voltage (electric units only), improper storage, or damage resulting during shipping.
3. Productsusedinproduction/industrialapplicationsasdenedbySENCOareexcludedfromthiswarranty.
4. Labor charges or loss or damage resulting from improper operation, maintenance or repairs are not covered by this warranty.
5. SENCO does not warrant the Wheelbarrow Compressor Engine/Motor, but the Compressor Engine/Motor may be covered under a warranty offered
by its manufacturer.
GENERAL WARRANTY CONDITIONS
This warranty will be honored, only if:
A. Clean, dry, regulated compressed air has been used, at air pressure not exceeding the maximum indicated on the tool casting;
B. Noevidenceofabuse,abnormalconditions,accident,neglect,misuseorimpropermodicationsorstorageoftheproduct;and
C. NoDeviationfromoperatinginstructions,specications,andmaintenanceschedulesexists(readOperatorManualforuse,specications,and
maintenance instructions).
THIS WARRANTY IS THE ONLY WARRANTY ON THE PRODUCT, AND SENCO DISCLAIMS ALL OTHER WARRANTIES. ANY IMPLIED WARRANTIES WILL BE LIM-
ITED IN DURATION TO THE APPLICABLE WARRANTY PERIOD SPECIFIED ABOVE. SOME STATES DO NOT ALLOW LIMITATIONS ON HOW LONG AN IMPLIED
WARRANTY LASTS, SO THE ABOVE LIMITATION MAY NOT APPLY TO YOU. YOUR REMEDIES ARE SOLELY AND EXCLUSIVELY AS STATED ABOVE. SENCO
SHALL IN NO EVENT BE LIABLE FOR INCIDENTAL, CONSEQUENTIAL, INDIRECT, OR SPECIAL DAMAGES. SOME STATES DO NOT ALLOW THE EXCLUSION OR
LIMITATION OF INCIDENTAL OR CONSEQUENTIAL DAMAGES, SO THE ABOVE LIMITATION OR EXCLUSION MAY NOT APPLY TO YOU. IN NO EVENT, WHETHER
AS A RESULT OF A BREACH OF CONTRACT, WARRANTY, TORT (INCLUDING NEGLIGENCE) OR OTHERWISE, SHALL SENCO’S LIABILITY EXCEED THE PRICE
OF THE PRODUCT WHICH HAS GIVEN RISE TO THE CLAIM OR LIABILITY. ANY LIABILITY CONNECTED WITH THE USE OF THIS PRODUCT SHALL TERMINATE
UPON THE EXPIRATION OF THE WARRANTY PERIOD SPECIFIED ABOVE.NO EMPLOYEE OR REPRESENTATIVE OF SENCO OR ANY DISTRIBUTOR OR DEALER
IS AUTHORIZED TO MAKE ANY CHANGE OR MODIFICATION TO THIS WARRANTY.
Thiswarrantygivesyouspeciclegalrights,andyoumayalsohaveotherrightswhichvaryfromstatetostate.
REPLACEMENT OF TOOL DUE TO NATURAL DISASTER
SENCOwillreplaceanytooldestroyedbyanActofGodsuchasood,earthquake,hurricaneorotherdisasterresultingonlyfromtheforcesofnature.Sucha
claim will be honored provided that such original retail purchaser had previously submitted a completed warranty registration card for the tool, and then submits
proofofownershipandanacceptablestatementdescribingsuchActofGoddocumentedbyaninsurancecarrier,policedepartment,orotherofcialgovernmental
source.Toobtaininstructionsforlingaclaimcall1-800-543-4596.
CUSTOMER SATISFACTION
One hundred percent customer satisfaction is our #1 goal.If for any reason the product does not perform to the original purchaser’s satisfaction, it can be returned
to the place of purchase within thirty days with dated sales receipt for a full refund of the purchase price.
© 2006 by SENCO PRODUCTS, INC.
CINCINNATI, OHIO 45244-1611 USA
www.senco.com
070101
This manual suits for next models
9
Table of contents
Other Senco Power Tools manuals

Senco
Senco SLS15 User manual

Senco
Senco SCN55S User manual

Senco
Senco PalletPro 57F User manual

Senco
Senco SN901XP User manual

Senco
Senco SHFS200 User manual

Senco
Senco LS61H1P User manual

Senco
Senco WC150XP User manual

Senco
Senco DuraSpin DS202-14V User manual

Senco
Senco S45CNR User manual

Senco
Senco SLS25 User manual

Senco
Senco GT40i-M User manual

Senco
Senco SNS44XP User manual

Senco
Senco FinishPro 23SXP User manual

Senco
Senco SLS150Mg User manual

Senco
Senco XtremePro Series User manual

Senco
Senco SAP40XP User manual

Senco
Senco SFT10XPC User manual

Senco
Senco FinishPro33Mg User manual

Senco
Senco DuraSpin DS275-18V User manual

Senco
Senco PalletPro 57FXP User manual