Sharp SL-6000L User manual

SL-6000L/SL-6000N

In the U.S.A.
Declaration of Conformity
Personal Mobile Tool: SL-6000L/SL-6000N
This device complies with Part 15 of the FCC Rules. Operation is subject to the following two
conditions: (1) This device may not cause harmful interference, and (2) this device must
accept any interference received, including interference that may cause undesired operation.
Responsible Party:
SHARP ELECTRONICS CORPORATION
Sharp Plaza, Mahwah, New Jersey 07430-1163
TEL: 1-800-BE-SHARP
Tested To Comply With FCC Standards
FOR HOME OR OFFICE USE
WARNING - FCC Regulations state that any unauthorized changes or modifications to this
equipment not expressly approved by the manufacturer could void the user’s authority to
operate this equipment.
Note: This equipment has been tested and found to comply with the limits for a Class B digital
device, pursuant to Part 15 of the FCC Rules.
These limits are designed to provide reasonable protection against harmful interference in a
residential installation. This equipment generates, uses, and can radiate radio frequency
energy and, if not installed and used in accordance with the instructions, may cause harmful
interference to radio communications.
However, there is no guarantee that interference will not occur in a particular installation. If
this equipment does cause harmful interference to radio or television reception, which can
be determined by turning the equipment off and on, the user is encouraged to try to correct
the interference by one or more of the following measures:
—Reorient or relocate the receiving antenna.
—Increase the separation between the equipment and receiver.
—Connect the equipment into an outlet on a circuit different from that to which the receiver
is connected.
—Consult the dealer or an experienced radio/TV technician for help.
Note: A shielded interface cable is required to ensure compliance with FCC regulations for
Class B certification.
FOR YOUR RECORDS...
For your assistance in reporting this product in case of loss or theft,
please record the model number and serial number (located on the
bottom of the unit) below.
Please retain this information.
Model Number
Serial Number
Date of Purchase
Place of Purchase

1
SAR
The available scientific evidence does not show that any health problems are
associated with using low power wireless devices. There is no proof, however, that
these low power wireless devices are absolutely safe. Low power Wireless devices
emit low levels of radio frequency energy (RF) in the microwave range while being
used. Whereas high levels of RF can produce health effects (by heating tissue),
exposure to low level RF that does not produce heating effects causes no known
adverse health effects. Many studies of low level RF exposures have not found any
biological effects. Some studies have suggested that some biological effects might
occur, but such findings have not been confirmed by additional research. The SL-
6000L has been tested and found to comply with the Federal Communications
Commission (FCC) guidelines on radio frequency energy (RF) exposures. The
maximum SAR levels tested for the SL-6000L has been shown to be 0.195 W/kg at
Body.
FCC WARNING
Changes or modifications not expressly approved by the party responsible for
compliance could void the user's authority to operate the equipment.

2Introduction
Introduction
Congratulations and thank you for purchasing the Personal Mobile Tool.
Read this Start-up Guide first. Then, refer to the Operation Manual on the CD-ROM
for more details.
NOTICE:
• SHARP strongly recommends that you keep separate permanent written records
of all important data. Data may be lost or altered in virtually any electronic memory
product under certain circumstances. Therefore, SHARP assumes no
responsibility for data lost or otherwise rendered unusable, whether as a result of
improper use, repairs, defects, battery replacement or any other cause.
• SHARP assumes no responsibility, directly or indirectly, for financial losses or
claims from third parties resulting from the use of this product and any of its
functions, such as stolen credit card numbers, the loss or alteration of stored data,
etc.
• Built with very high precision technology, the Liquid Crystal Display (LCD) panel
has 99.99% or more effective pixels, with 0.01% or fewer pixels failing to light or
remaining lit at all times.
• Some of the accessories described in the Zaurus manuals may not be available at
the time you purchase this product.
• The screens on the Zaurus may differ from the screens in the manuals. If you would
like to change the screen appearance on the Zaurus, please use the “Appearance”
application (See the “Setting the Appearance (Appearance)” section in the
Operation Manual on the CD-ROM).
• The information and screen shots provided in the manuals are subject to change
without notice.
• All company and/or product names are trademarks and/or registered trademarks
of their respective holders.
Copyright
It is the intent of SHARP that this product be used in full compliance with the
applicable copyright laws and that prior permission be obtained from copyright
owners whenever necessary.

Introduction 3
Conditions for using SHARP original software
SHARP CORPORATION (hereafter referred to as “SHARP”), under the following
conditions, grants to the customer a non-exclusive license to use the SHARP
original software for PCs, that accompanies this product. Use of the software by the
customer indicates agreement to the following conditions:
1. SHARP will make no compensation for damages to the customer caused by the
use of this software, except for compensation required by law.
2. SHARP may change the specifications of this software at any time without
advance notice.
•CompactFlash is a trademark of SanDisk Corporation.
•SD logo is a trademark.
•Java, PersonalJava and J2ME are trademarks of Sun Microsystems, Inc.
•Metrowerks and OpenPDA are trademarks of Metrowerks Corporation.
•Linux is a registered trademark owned by Linus Torvalds.
•Trolltech™, Qt™, Qtopia™ and the Trolltech logo are registered trademarks of
Trolltech.
•Opera™ is a trademark of Opera Software ASA.
•Hancom™ is a trademark of HancomLinux, Inc.
•Microsoft, PowerPoint, Outlook, and Windows are either registered trademarks
or trademarks of Microsoft Corporation in the United States and/or other
countries.
•Intel is a trademark or registered trademark of Intel Corporation.
•This product includes software developed by the University of California,
Berkeley and its contributors.
•Licensed under one or more of U.S. Pat. 4,972,484; 5,214,678; 5,323,396;
5,530,655; 5,539,829; 5,544,247; 5,606,618; 5,610,985; 5,740,317; 5,777,992;
5,878,080; 5,960,037.

4Contents
Contents
Introduction..........................................................................2
Contents ...............................................................................4
Organization of the Operation Manuals ............................................... 5
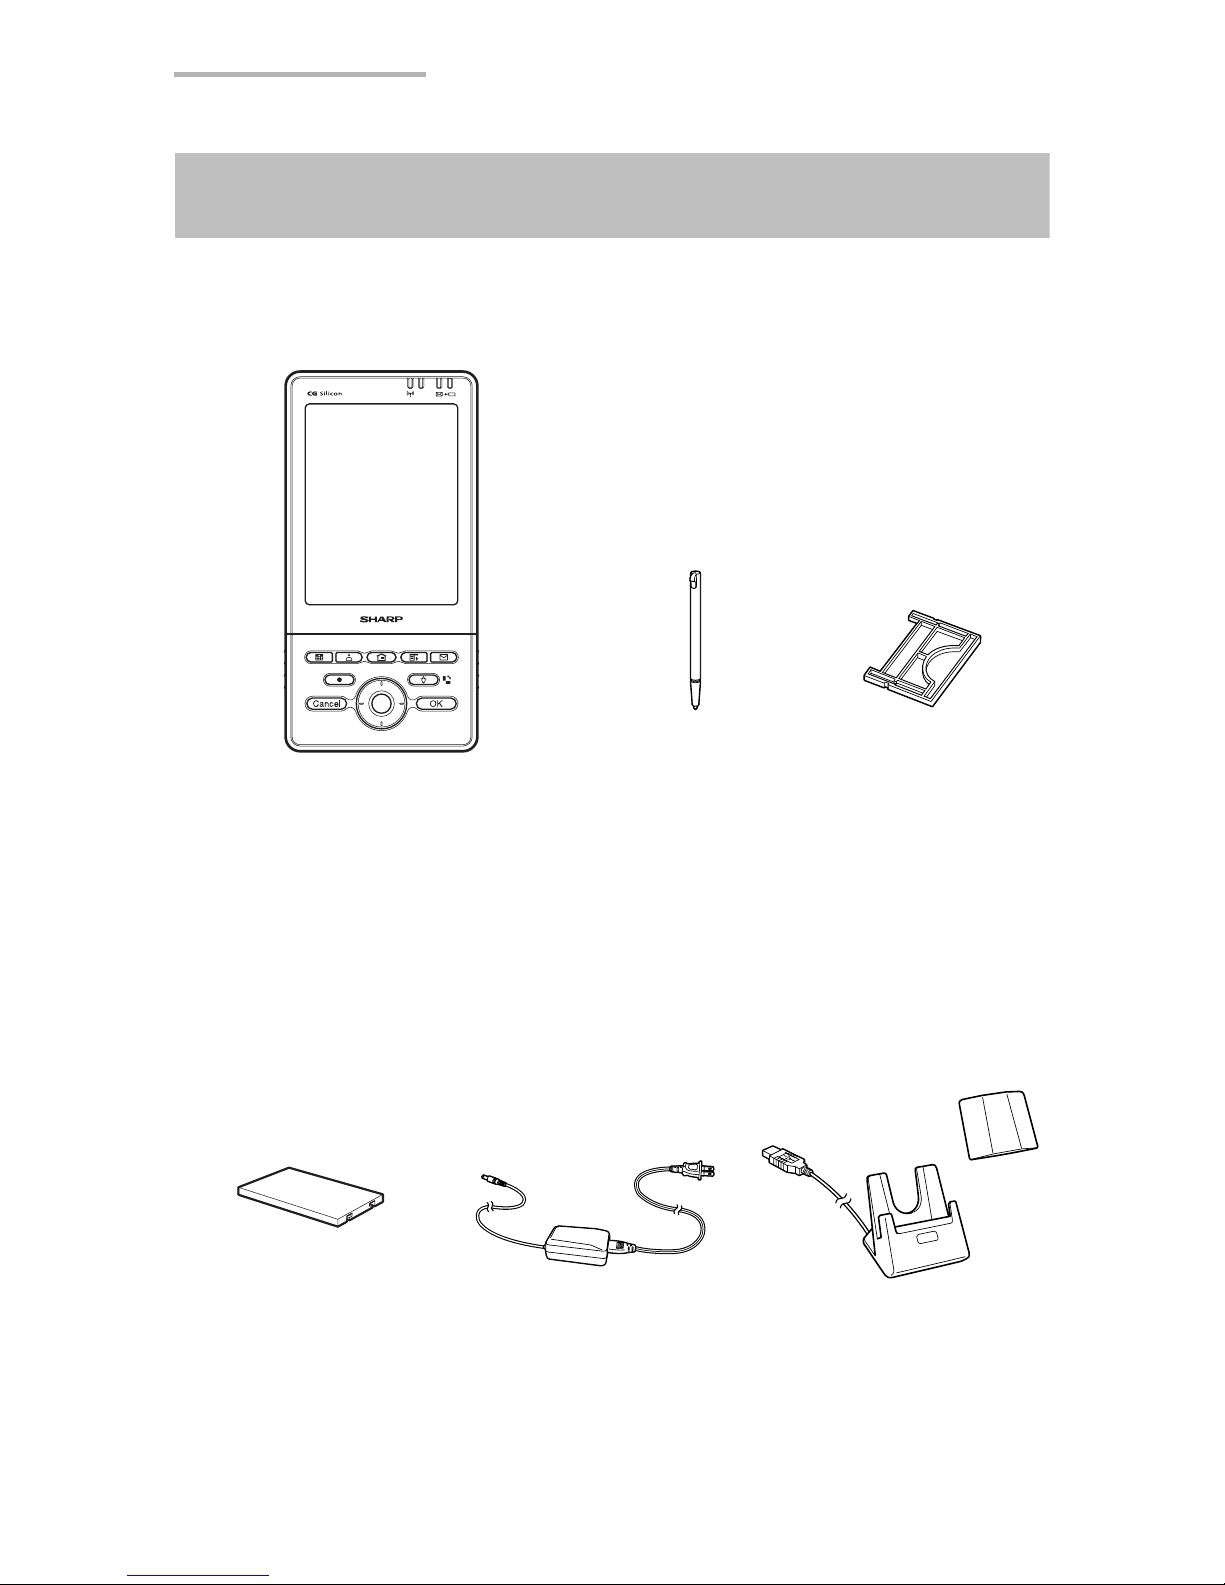
Cheking the contents ..........................................................6
Getting Started.....................................................................8
Step 1: Inserting and charging the battery ........................................... 8
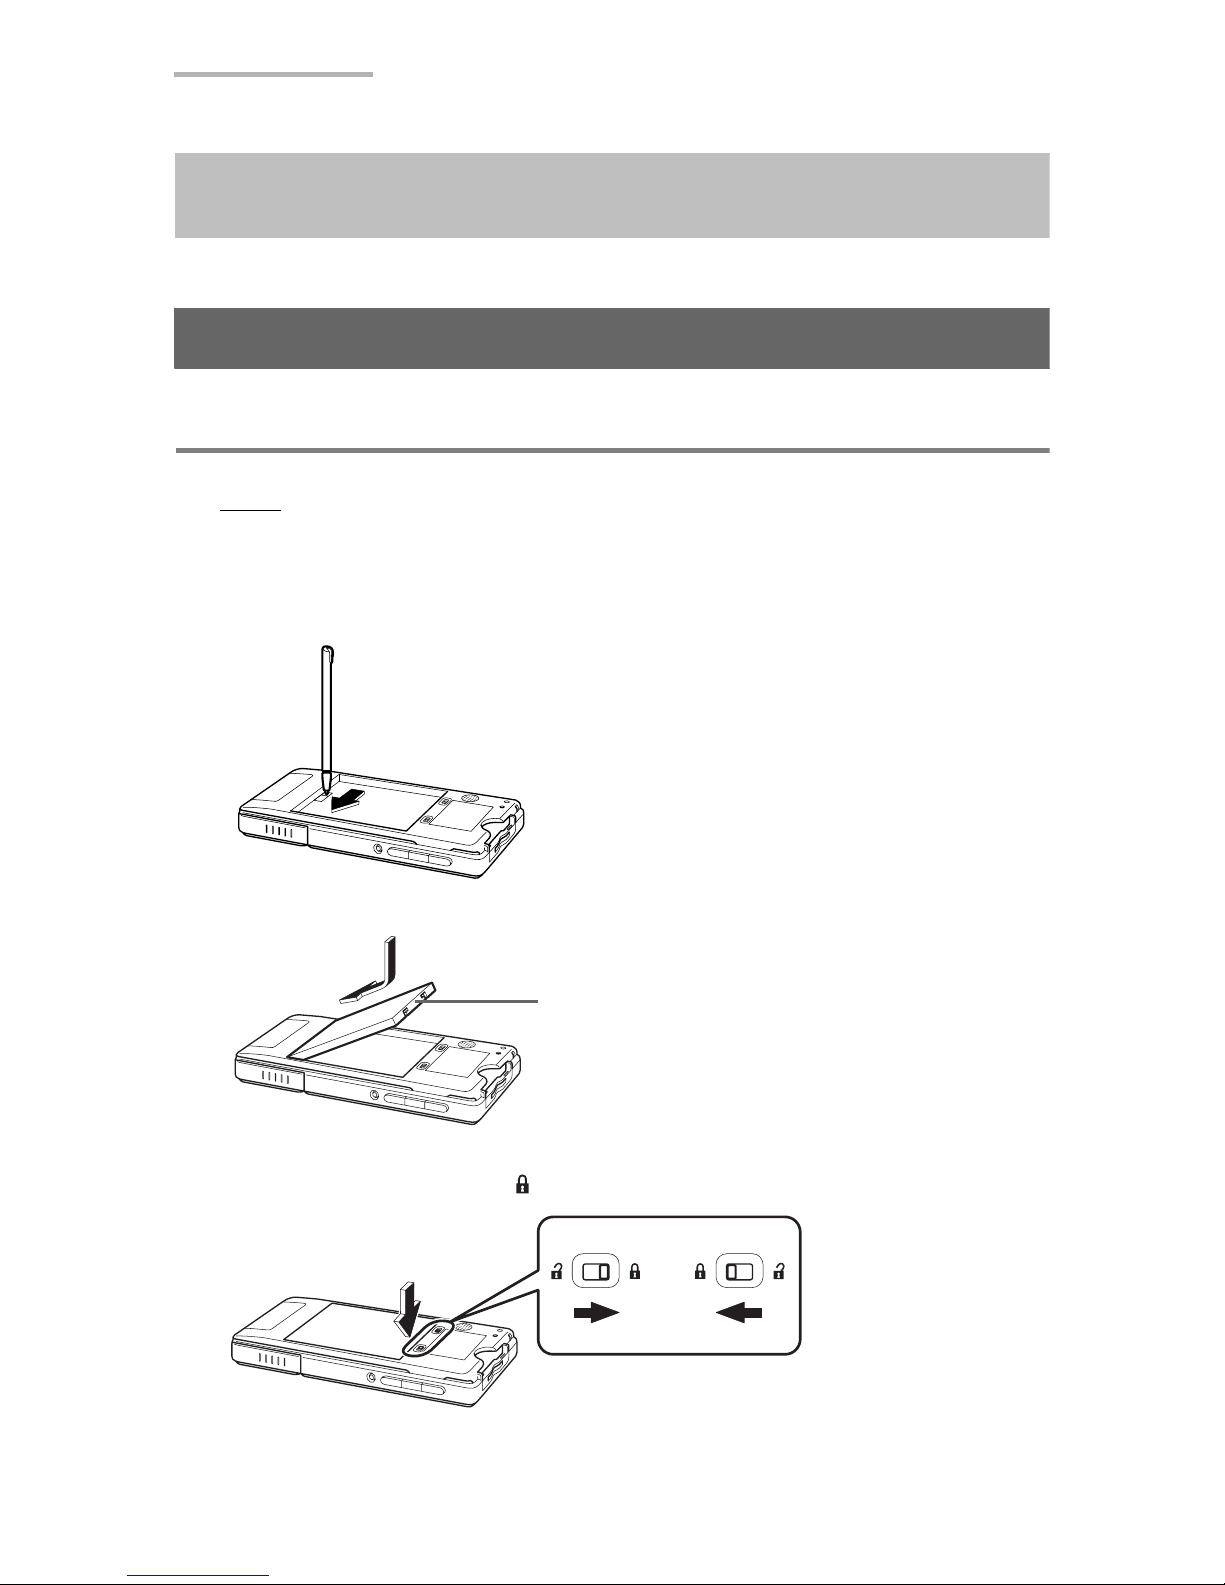
Step 2: Pulling out the stylus.............................................................. 10
Step 3: Initial settings......................................................................... 11
Step 4: Installing the Software on Your PC........................................ 15
Adding or Removing PC Software ..................................................... 20
About Your Zaurus ............................................................21
Useful Functions and Services of the SL-6000L/SL-6000N............... 21
Part names and functions .................................................................. 25
Display protection cover..................................................................... 29
Removing/Attaching the Display protection cover.............................. 29
Opening or closing the keyboard ....................................................... 30
Charging/Using the Docking Station .................................................. 30
Connecting the Zaurus to your PC..................................................... 32
Basic Operations ...............................................................33
Turning the unit on and off ................................................................. 33
Operating methods ............................................................................ 34
Home Screen ..................................................................................... 35
Files Home Screen ............................................................................ 37
Reorganizing Your Files..................................................................... 39
Basics of Using Applications.............................................................. 45
Entering Characters ........................................................................... 62
Adjusting the Volume ......................................................................... 74
Checking the battery level.................................................................. 75
Using memory expansion .................................................................. 76
Using Help ......................................................................................... 78
How to Install Applications on Your Zaurus ...................80
Step 1: Copying the Software to the Zaurus ...................................... 80
Step 2: Installing the Software for Use on the Zaurus ....................... 82
Appendix.............................................................................84
What to do if a problem occurs .......................................................... 84
Maintaining Your System ................................................................... 87
Replacing the Battery......................................................................... 90
Conditions of Use............................................................................... 91
Troubleshooting ................................................................................. 95
Specifications..................................................................................... 99
Product Support ............................................................................... 101

Contents 5
Organization of the Operation Manuals
This operation manual describes both the SL-6000L and SL-6000N. The SL-6000L
is equipped with an internal wireless LAN module. The SL-6000N does not come
equipped with an internal wireless LAN module. “Zaurus” is used when describing
both models, otherwise the model name is used.
The Zaurus operation manuals are organized as follows:
Please refer to the appropriate manual as required.
Quick Start Guide.........................Zaurus setup for experienced users of PCs or
handheld PDAs.
Start-up Guide (this manual).....Detailed explanations including setup,
software installation and basic operations of
the Zaurus.
Operation Manual.........................Detailed information about the Zaurus. This
online manual is stored in PDF format on the
accompanying CD-ROM.
Online Manuals.............................The following manuals are stored in PDF
format on the accompanying CD-ROM.
Zaurus File Transfer Application Operation Manual
Backup/Restore Application Operation Manual
Intellisync for Zaurus Operation Manual
Qtopia Desktop for Zaurus Operation Manual
HancomMobileOffice Operation Manual
Digital Camera Manual (for add-on software)
Terminal Manual (for add-on software)
File Manager Manual (for add-on software)
Troubleshooting Guide
How to View Online Manuals
The online manuals are stored on the accompanying CD-ROM. When that CD-ROM
is inserted into the CD drive of your PC, a menu screen will be displayed. On that
screen, click “Online Manuals.”
The online manuals are also installed when the software is installed on your PC. You
can view them on your PC after the software has been installed.
In order to read the online manuals, Adobe Acrobat Reader Version 5 or higher must
be installed on the PC you are using. If Adobe Acrobat Reader is not installed on
your PC, click on the “Install AdobeAcrobatReader™” from the menu screen.
Copyright © 2003 Adobe Systems Incorporated. All rights reserved.

6Cheking the contents
Cheking the contents
Personal Mobile Tool
with Display protection cover
Stylus (inserted
in the unit)
CF Slot Protection
Card (inserted in the
unit)
Rechargeable
Lithium-Ion Battery
(EA-BL09)
AC Adapter (EA-70) and
AC Power Cord
(Specified Charger)
Docking Station
(CE-ST10)

Cheking the contents 7
Note: The AC power cord plug may differ in some countries.
Start-up Guide (this book)
CD-ROM
(Software and Online
Manuals, etc.)

8Getting Started
Getting Started
Step 1:
Inserting and charging the battery
Inserting the battery
Note: Only use the “EA-BL09” rechargeable battery (supplied).
1. Attach the battery on the back of the unit.
Make sure to slide the switch on the back of the unit to the “ON” position by using the
stylus pen before inserting the battery.
Insert the battery.
2. Push and hold the battery in the direction of the arrow while sliding the battery
replacement switch to the “ ” position.
Terminal

Getting Started 9
Charging the battery using the AC adapter
Note: Only use the “EA-70” AC adapter (supplied).
1. Connect the AC power
cord to the AC adapter.
2. Plug the AC adapter
connector into the
unit with the battery
inserted.
3. Plug the AC power cord into an AC outlet.
4. Make sure the Zaurus
is off. Press the reset
switch with the supplied
stylus pen while holding
the Rec and POWER
keys.
The charge light lit and
starts charging.
Standard charging time
is approximately 4
hours (depending on
the temperature and
usage conditions).
5. When charging has been completed, the charge light will turn off. Unplug the
AC power cord from the AC outlet, then unplug the AC adapter connector from
the unit.
AC adapter
AC power
cord
AC adapter jack
AC adapter
connector AC adapter
AC power
cord
To AC
outlet
Reset switch
Rec key key

10 Getting Started
Note:
• Charge the battery to its full capacity until the charge light turns off.
• Be sure to slide the battery replacement switch to the “ ” position before
charging.
• If a charging error occurs, the charge light will blink. Make sure that the AC
power cord and the AC adapter are connected correctly, remove and reinsert
the battery, then perform steps 1 to 3 above again. If the error persists, there
is something wrong with the battery, Zaurus, etc. Contact your local SHARP
dealer for repair.
• The AC power cord plug may differ in some countries.
Step 2:
Pulling out the stylus
This unit comes equipped with a stylus to
select items and enter various kinds of
information, etc.
Pull out the stylus as shown. To replace it,
insert it so that the protruding part of the
stylus locks into place.
Touch the button displayed on the screen
one time to open, select an item, etc.

Getting Started 11
Step 3:
Initial settings
Open the Display protection cover (see page 29) and carry out the initial setup of the
Zaurus after completing the battery charge.
Turning the unit on
1. Press to turn the power on.
The Welcome screen will appear after a few minutes.
Then, follow the next steps to complete the initial settings.
Note:
• If the power will not turn on after charging the battery, disconnect the AC
adapter and remove the battery. After approximately 10 seconds, replace the
battery, perform the reset operation and then recharge the battery again (See
page 85 and 90).
• If the Welcome screen does not appear, try to Format the Zaurus (See page
89).
Also make sure that the battery replacement switch is set to “ ” and the
battery is inserted correctly.
• During the initial settings, if you do not operate the Zaurus, the power will
automatically turn off after 8 hours (with AC adapter connected) or 10 minutes
(without AC adapter). Turn the power on, then proceed to the next step.
• If the battery level is low, the power will not turn on even if you attach the AC
adapter. Charge the battery to its full capacity.
Adjusting the touch panel
1. On the Welcome screen, tap anywhere on the screen.
The Calibration screen will appear.
2. Tap the cross hairs firmly one by one.
When you have completed adjustment of the touch panel, the Set System Time
screen will appear.
Then, follow the next step.

12 Getting Started
Setting the date and time
For the time-critical functions to work properly, the built-in clock must be set to the
current date and time.
Note: For detailed information on how to enter characters, see page 62,
“Entering Characters”.
1. Tap the Time Zone drop-down list button.
Six city names will be displayed by default.
2. Select your time zone.
Note: If your time zone is not listed, go to step 3. You can change the time zone
later using the Date/Time application (For details, see the Operation
Manual on the CD-ROM).
3. Tap the Time format drop-down list button and select the 12 hour or 24 hour
option.
4. Tap the up and down arrows on the Hour and Minute spinboxes to set the
correct time.
5. If you select the 12-hour format in step 3, select AM or PM by tapping the drop-
down list.
6. Tap the Date button and then tap your current date on the mini-calendar that
appears.
• Tap the up and down arrows of the year spinbox to set the current year.
• Tap the month drop-down list button and select the current month.
• Tap or to change the setting month by month.
• Tap or to select the first month (January) or the last month
(December).
Hour and Minute
spinboxes
Time Zone drop-down list button
City Time button
Date button
Time format drop-down list button
Weeks start on drop-down list button
Date format drop-down list button

Getting Started 13
7. Tap the Weeks start on drop-down list button and then select Sunday or
Monday to begin the week.
8. Tap the Date format drop-down list button and then tap the desired format.
The selected format applies to the Date column displayed on the Index screen
of the application, etc.
M/D/Y (example, 12/26/04)
D.M.Y (example, 26.12.04)
Y-M-D (example, 04-12-26)
D/M/Y (example, 26/12/04)
Note: These Date formats and long date formats (for example, December 26,
2004) will not be applied to some applications.
9. Tap “Next” or to save the setting.
The display will turn to the Edit Owner Information screen.
Follow the next step.
Registering your personal information
To skip entering your information now, tap “Next” or . You can enter it later
using the Address Book application.
1. Enter your information on the Edit Owner Information screen and then tap “Next”
or to save it.
Tapping “Back” will return the screen to the previous Set System Time screen.

14 Getting Started
Note: You will not be able to select or enter the category name on this screen.
Follow the next procedure.
Setting your passcode
By setting your own passcode in the Zaurus, you can protect your Zaurus from
unauthorized use. Once you set the passcode enables the Require passcode at
power-on setting. You will be required to enter it every time you turn the Zaurus on.
To skip setting the passcode now, tap “Finish” or . You can enter it later using
the Security application (See the Operation Manual on the CD-ROM).
Caution: Use this function with care. If you forget your passcode, you will need
to carry out the “Format” in the Maintenance menu. You will lose all
data created and saved as well as any add-on software installed on
the Zaurus.
1. Tap the “Set passcode” button.
2. Enter your passcode and then tap “OK”.
Note: You can enter passcode using number keys on the screen or alphabets
using the keyboard. Alphabets are distinguished between upper case
and lower case.
3. Enter the same passcode again and then tap “OK”.
To make the Zaurus ask for the passcode at start-up every time you turn it on,
tap the “Require passcode at power-on” checkbox to turn it on.
4. Tap “Finish” or to complete the initial settings.
Once the initial settings are completed, the Home screen will be displayed.
• If you turned on the “Require passcode at power-on” option in step 3, the
passcode entry screen will appear asking for your passcode. Entering the
correct passcode will display the Home screen.
Next, install the software for your PC and the Zaurus from the CD-ROM.

Getting Started 15
Step 4:
Installing the Software on Your PC
Checking the Operating Environment
Minimum System Requirements
•100% IBMCompatible PC
•MicrosoftWindows98/98SE/2000 Professional/Me/XP
•Pentium200MHz or higher for Microsoft Windows 98/98SE/2000 Professional/
Me, Pentium/Celeron300MHz or higher for Microsoft Windows XP
•80MB Available Hard Disk Space for installation
•64MB RAM (Recommend 128MB RAM) for Microsoft Windows 98/98SE/2000
Professional/Me, 128MB RAM (Recommend 192MB RAM) for Microsoft
Windows XP
•CD-ROM Drive
•1 Available USB Port or Serial Port with Optional Serial Cable CE-170TS
•Mouse or Compatible Pointing Device
•800 ×600 or Higher Resolution Monitor
Note:
Proper operation cannot be guaranteed on the following types of PCs:
• Self-built PCs
• PCs upgraded from Windows 95
• When the customer has installed USB ports on a PC did not include USB
ports in the original configuration from the PC manufacturer.
* This software is not guaranteed to operate on all PCs that have the
recommended environment.

16 Getting Started
About USB Ports
•Activating the power saving mode (such as suspend, resume, or sleep function)
of some PCs may result in the USB port not functioning properly. In this case,
disable the power saving mode.
•The software may not operate properly when using a commercially available USB
card installed in a PCI slot.
•If the USB port on your PC or the USB hub connected to the Zaurus does not
operate properly, perform the following steps.
- When your PC comes equipped with several USB ports, connect the Zaurus to
another USB port.
- When other USB devices are connected to your PC and used simultaneously,
disconnect them from your PC.
•If the USB driver does not operate properly when you connect the Zaurus to your
PC via the USB hub, connect it directly to the USB port on your PC. Using the
USB extension cable may result in the USB driver not operating properly.
•Do not remove and connect the USB cable from/to the PC in a short time.
Limitations When Using with Windows XP and Windows 2000
Windows XP
•Log on using an account on the PC that has administrator privileges. The software
cannot be installed when logged onto a restricted account. When using the
software, log on as an administrator. To do this, click [Start], then [Log Off], select
an administrator account for the PC from the displayed screen, and log on.
Windows 2000
•Log on as the Administrator when installing the software. Also log on as the
Administrator when using the software. When using a PC in a company or similar
place, contact the administrator of the PC about an Administrator account.

Getting Started 17
Installing the PC Software and the USB Driver onto your PC
Using the accompanying CD-ROM, “Intellisync for Zaurus,” “Backup/Restore
application” etc. can all be installed at one time.
Preparation for Installation
1. When installing this software in Windows XP/2000, check the limitations on the
previous page.
2. Close all applications on your PC.
3. Insert the accompanied CD-ROM into your CD-ROM drive.
A menu screen will be displayed automatically.
If the CD-ROM does not launch automatically, open D: setup.exe (use your
CD-ROM drive letter),
Caution: Do not connect the USB cable between the Zaurus and the PC until
instructed to do so by the software.
Installing the PC software
4. Click “Install PC Software”, then confirm the displayed contents and click “OK”.
Installation of the software will begin.
Note:
• You can confirm the installation procedures by clicking “Installation Notes”
under “Install PC Software”.
• If the PC Software has already been installed, additional installation or
uninstallation screens will be displayed (See page 20).

18 Getting Started
• If the software for the former SL-models has been installed, a confirmation
dialog box for uninstallation of the software will be displayed.
Confirm the message to uninstall the software. After uninstallation, repeat the
procedure from step 3.
5. Follow the on-screen instructions and complete the installation.
Note:
• To install the add-on software or data onto the Zaurus at a later time (See
page 80), be sure to install the “Zaurus File Transfer” beforehand.
• Other software files can be installed later (See page 20).
• Continue the installation even if you receive warning dialog boxes which state
“Software Installation” and “Digital Signature Not Found” if you are using
Windows XP/2000. These are standard error messages which are received
when attaching or unattaching a USB device using Windows XP/2000.
6. When the installation is completed, reboot your PC.
Next, connect the Zaurus to your PC.
7. Connect the AC adapter to the Docking Station, and plug the AC power cord into
an AC outlet.
8. Remove the SHARP I/O PORT cover of the Zaurus, and slide the Zaurus into
the Docking Station.
Note: As for steps 7 and 8, see steps 1 to 4 on page 30 and 31 (“Charging/
Using the Docking Station”).
9. Turn on the Zaurus.
10.
Eject the CD-ROM from your PC and plug the USB connector of the Docking
Station into the USB port of your PC. (Prior to plugging in the USB connector,
turn your PC power on.)
USB connector
PC
USB port
Other manuals for SL-6000L
1
This manual suits for next models
1
Table of contents
Other Sharp Cell Phone manuals

Sharp
Sharp AQUOS K Service manual

Sharp
Sharp sh906i Guide

Sharp
Sharp 550SH User manual

Sharp
Sharp TQ-CX1 User manual

Sharp
Sharp GC40K User manual

Sharp
Sharp Aquos Xx2 User manual

Sharp
Sharp NTT docomo Aquos si User manual

Sharp
Sharp GX25C User manual

Sharp
Sharp AQUOS Crystal User manual

Sharp
Sharp YO-520 User manual

Sharp
Sharp AQUOS Crystal User manual

Sharp
Sharp GX30 User manual

Sharp
Sharp Au Aquos R3 SHV44 Setup guide

Sharp
Sharp WX-T92 User manual

Sharp
Sharp 802 User manual

Sharp
Sharp SHV40 Installation guide

Sharp
Sharp AQUOS R5G User manual

Sharp
Sharp SHV43 Quick start guide

Sharp
Sharp Vodafone 802SH User manual

Sharp
Sharp WX-T923 User manual