manuals.online logo
Brands
  1. Home
  2. •
  3. Brands
  4. •
  5. ShelterLogic
  6. •
  7. Shelter
  8. •
  9. ShelterLogic 23530 User manual

ShelterLogic 23530 User manual

Description Qty. Part #
3-Way Frame Connectors 613101
4-Way Frame Connectors 13102
All-Weather Cover 110072
Side Walls 212082
Feet Plates
This canopy must be anchored!!!
810075
Bungee Cords 74 10066
DDOONNOOTT
RREETTUURRNN
PPRROODDUUCCTTTTOO
SSTTOORREE
FOORRMISSSSINNGOORR
RREEPPLACCEEMEENNTT
PPARRTTSS
PPLEEASSEECCOONNTTACCTT
CCUUSSTTOOMEERR
SSEERRVVICCEE::
11..880000..552244..99997700
orPlease read instructions completely bef e assembly
6
05-23530-0B 08/24/06
Model #23530
3 in 1 PREMIUM 10x20 CANOPY
Page 1
Ropes 10' 10437
10432
6
Rope Clamps 10436
6
Anchors 10447
6
Ropes 40' 2
Anchors 10431
8
810462
Clamp
Wing Nut 70008
Bolts 1/4" x 1 1/2" 30258
"S" Hook
Tetherball
Ropes 3'
4 10464
4 10465
104634
813104
13105
13107
40.7" Swedged Tube
39" Straight Tube with extra hole
39.5" Straight Cross Tube
8
9
25 13103
24.4" Rafter Tube
Tent Pole 610458
Tent Pole Swedged 610459 150 Callender Road
Watertown, CT 06795
1.
FRAME ASSEMBLY
2. CONNECT PIPES
4. ATTACHINGLEGS Insert both middle legs on
one side of the frame,swedged
end up, then the end legs on that
same side. Repeat for the other side. Now you can secure the legs
to the side bend connectors and secure the cover with bungee cords.
3. PLACE COVER
Place cover over frame so that the
grommetted portion is face down,
this allows the valance to wrap
around and cover the frame eaves.
5. SECURING COVER
Page 2
13103
13107
13103
13104
13101
13102
13101
NOTE:
SWEDGED TUBES FIT
INTO END OF PLAIN
TUBE WHERE CRIMP
MARKS ARE.
NOTE:
SWEDGED TUBES FIT
INTO END OF PLAIN
TUBE WHERE CRIMP
MARKS ARE.
Working from the inside of the cover, you can
hide the bungee balls from the outside, giving
the canopy a cleaner look.
Combine all the parts listed below to form
the frame, starting with the center peak,
and then assemble each side.
17 - #13103 (40.7" Swedged Tubes)
8 - #13104 (24.4" Rafter Tubes)
9 - #13107
(39.5" Straight Cross)
6 - #13101
(3-Way Frame Connector)
6 - #13102
(4-Way Frame Connector)
#13105 to leg
Straight tube
#13103
Top leg
of tube
Swedged tube
Connect one each of part
# 13105 and # 13103 then
set them aside for now.
#13105
#13103
6. ATTACHING WALLS
8. BASE FEET AND ANCHOR
Page 3
CAUTION!!!
Bungee Cords are under extreme tension. Use
Caution when installing. The use of safety glasses
is recommended to prevent injury.
7. ATTACHING CLAMP
Fig. A
Fig. B
At the (4) corners of the canopy release the tension
on the corner ropes and remove them from the leg
poles, so the side valence is loose. Secure the loose
rope and "S" Hook to a bungee cord inside the roof
of the canopy.
Following figures A & B attach the ropes and "S" Hooks
provided in the kit to the ends of the canopy's main cover
using the clamps, bolts and nuts. The clamp should be
mounted approximately 6" to 10" up from the corner. Ins-
ert the "S" Hook into the corner upright and twist to tens-
ion the main cover.
NOTE: Be sure the clamp holds the rope inside the
pocket on the cover end.
Cover
Twist this
way !
Cover
6" 10"
Rope in
Pocket
clamp
10462
(2) (2) (2) (1)
+ + +
1) Tie rope to loop on 3-way frame connectors.
2) Come down leg pole to the point where the cover stops, loop the rope around the
leg. By doing this, you will prevent the anchor rope from pulling up the valance of the
cover, when you install the anchors (#10431).
Rope
Walls attach to unit by Bungee Cords.Thread
bungee cord through grommetts in wall and
wrap around pole. If using more than one
wall, attach all the walls at the top first, than
work your way around the unit wrapping the
bungee cords through both corners of the
walls and legs.
Page 4
CARE & CLEANING INFORMATION
DO NOT expose top or walls to open fire or flame. DO NOT use barbeque grills or smokers underneath canopy.
DO NOT use harsh abrasives, bleach or cleansers. Cover and walls can be easily cleaned with mild soap and water. Periodically check stakes or anchors to ensure stability of unit, especially
following exposure to high winds or heavy rain. NOT meant to hold snow load, brush snow off top with a broom or mop.
IMPORTANT:PLEASE READ CAREFULLY: ShelterLogic has no control over the elements such as wind, snow or heavy rain, we cannot be respon-
sible for damage caused by the canopy or to the canopy. We suggest you contact your insurance carrier for information just as you would for any other outside structure.
This is a Temporary Structure and is not recommended as a permanent structure. Safety glasses must be worm when securing bunges.
Improper Anchoring, Strong Winds, Snow or Ice:
CAUTION! WARNING!
ShelterLogic does not guarantee these canopies in snow or ice under any
circumstances. Canopies are designed to offer protection from damage caused by sun, light rain, tree sap, birds, and are not designed to hold the loads that accompany snow or ice. Any
Bungee cords are under extreme tension. Please use caution when applying as they may snap out of your hand and cause injury. The use of safety goggles may help to prevent injury.
canopy that is not anchored securely or properly will fly away. We will not be responsible for any canopy that blows away. proper anchoring is your responsibility. We offer several anchoring kits,
call customer service for more information or to place an order. Your canopy's cover can be quickly removed if needed when you know that a strong or severe weather front is approaching.
The anchors included in this kit are for the Party Tent Conversion Only ! The 10x20 Main Structure should always be anchored!
Please call 800 - 524 - 9970 or see your Retailer to purchase Anchoring Options !
Fig. D
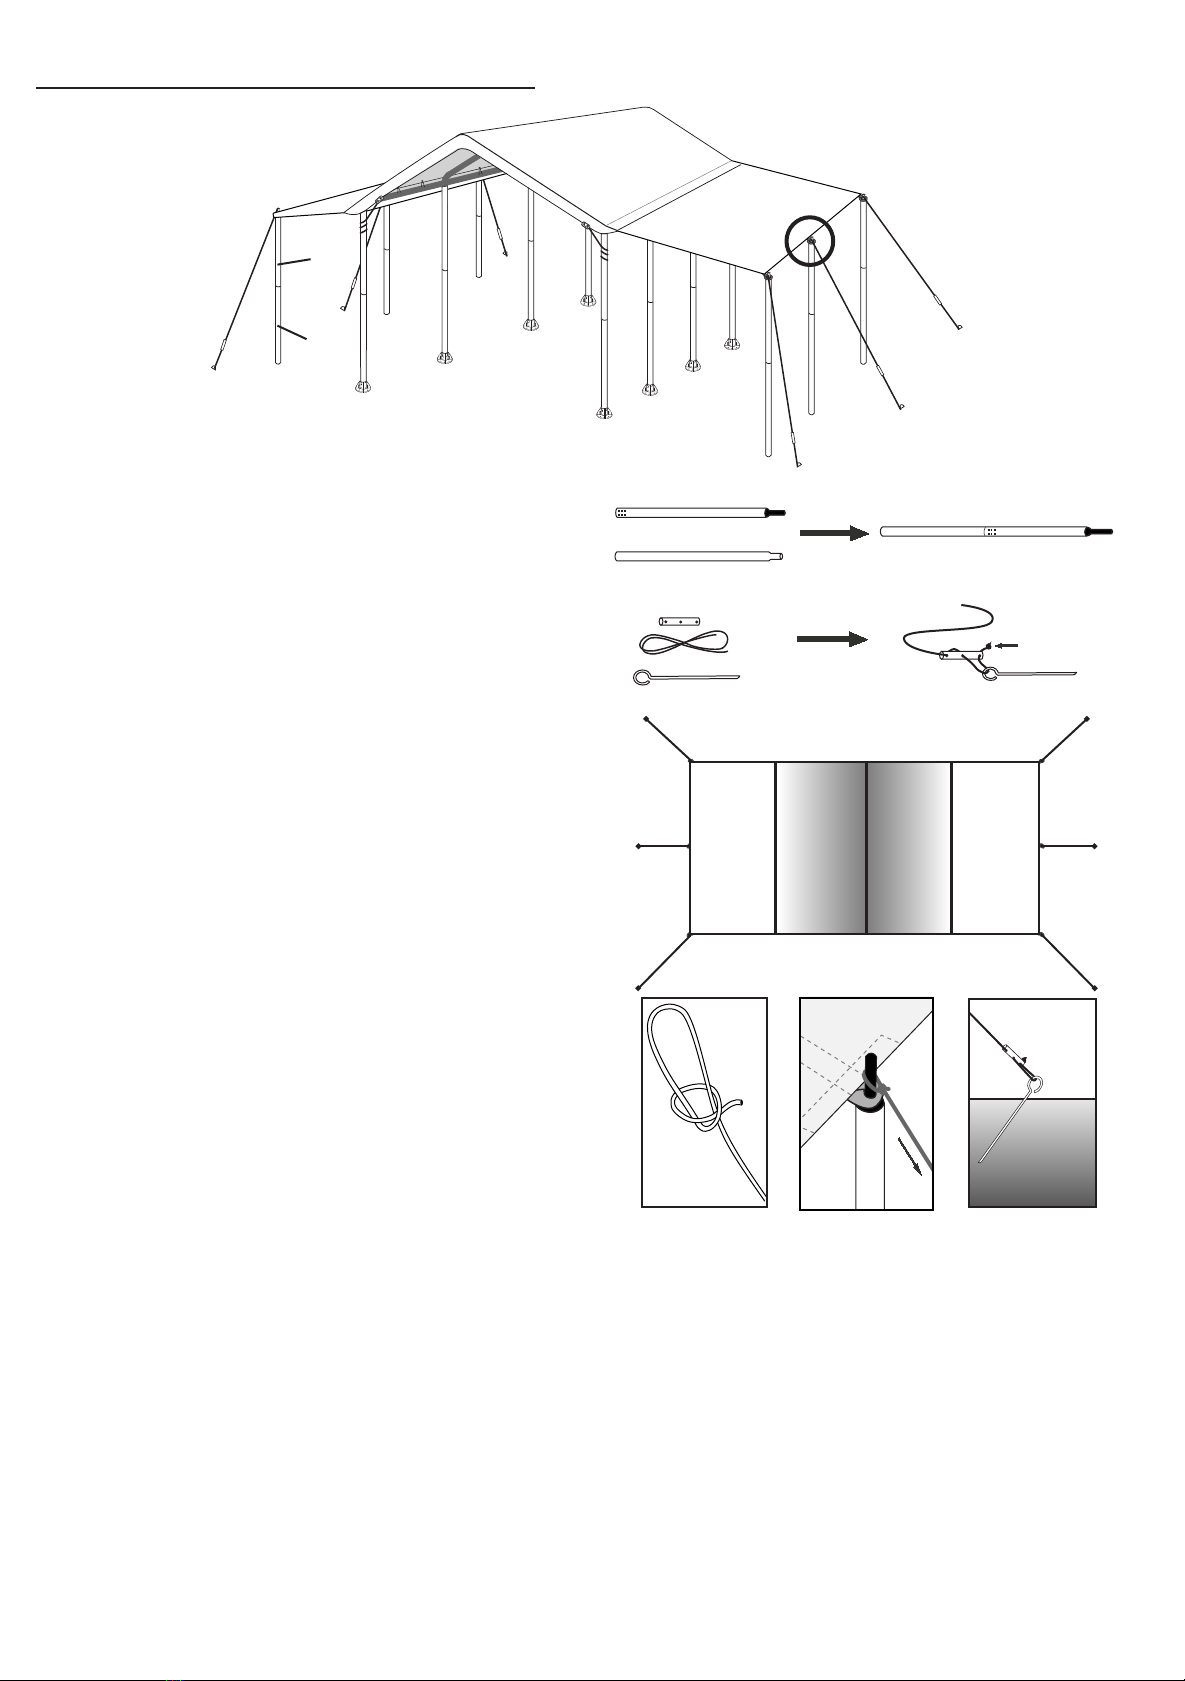
While lifting one wing out and up at the middle
insert an extension pole into the tab at the middle
of the wing. Make a knot in the end of one of the
ropes and place it over the tab and pole end as
shown in Figures C & D. Place the anchor
securely in the ground about 3' from the
extension pole.
Slide the rope clamp up the rope to tighten the wing.
Proceed to each of the two corners of the wing and
secure the anchors approximately 3' diagonally
from the corner. (see anchoring top view)
Repeat for the opposite side wing.
Fig. C Fig. E
TOP VIEW OF ANCHORING WING KIT
Wing Wing
3'
3'
3'
3'
3'
3'
# 10459
# 10458
Fig. D
10436
Tie a knot in the end of each rope and thread it thru
the rope clamp and anchor. These anchor assemb-
lies will be used later.
Knot
# 10458
# 10459
Assemble the six tent poles as shown to the right. Lay
these off to the side for later.
9. PARTY TENT CONVERSION

Other ShelterLogic Shelter manuals

ShelterLogic Shed-in-a-Box User manual

ShelterLogic

ShelterLogic Shed-in-a-Box User manual

ShelterLogic GROW IT User manual

ShelterLogic

ShelterLogic GROW IT User manual

ShelterLogic 62656 User manual

ShelterLogic

ShelterLogic 62656 User manual

ShelterLogic 58542 User manual

ShelterLogic

ShelterLogic 58542 User manual

ShelterLogic Super Max 26773AC User manual

ShelterLogic

ShelterLogic Super Max 26773AC User manual

ShelterLogic Shed-in-a-Box 70401 User manual

ShelterLogic

ShelterLogic Shed-in-a-Box 70401 User manual

ShelterLogic 60180 User manual

ShelterLogic

ShelterLogic 60180 User manual

ShelterLogic Run-in Shed 51341 Owner's manual

ShelterLogic

ShelterLogic Run-in Shed 51341 Owner's manual

ShelterLogic 86063EU User manual

ShelterLogic

ShelterLogic 86063EU User manual

ShelterLogic Shed-In-a-Box E Series User manual

ShelterLogic

ShelterLogic Shed-In-a-Box E Series User manual

ShelterLogic ShelterCoat 12'W x 8'H Peak User manual

ShelterLogic

ShelterLogic ShelterCoat 12'W x 8'H Peak User manual

ShelterLogic Power-Up 90101 User manual

ShelterLogic

ShelterLogic Power-Up 90101 User manual

ShelterLogic 51351 User manual

ShelterLogic

ShelterLogic 51351 User manual

ShelterLogic Super Max 26780 User manual

ShelterLogic

ShelterLogic Super Max 26780 User manual

Popular Shelter manuals by other brands

FARM FORESTRY Eclipse instructions

FARM FORESTRY

FARM FORESTRY Eclipse instructions

TMG TMG-CRS1040 product manual

TMG

TMG TMG-CRS1040 product manual

Lambrecht 8141.62 user manual

Lambrecht

Lambrecht 8141.62 user manual

Arrow SL122007 Owner's manual & assembly guide

Arrow

Arrow SL122007 Owner's manual & assembly guide

Kiwi Camping KC074-818 Pitching instructions

Kiwi Camping

Kiwi Camping KC074-818 Pitching instructions

Project Source 05535027 manual

Project Source

Project Source 05535027 manual

Harnois PLUS 16 manual

Harnois

Harnois PLUS 16 manual

No Butts Bin SR1561-F Assembly instructions

No Butts Bin

No Butts Bin SR1561-F Assembly instructions

Storage Canopy C4040S Assembly manual

Storage Canopy

Storage Canopy C4040S Assembly manual

Coleman 2000010701 Setup instructions

Coleman

Coleman 2000010701 Setup instructions

No Butts Bin SR1601 Assembly instructions

No Butts Bin

No Butts Bin SR1601 Assembly instructions

Haws 9035 Installation, operation & maintenance instructions

Haws

Haws 9035 Installation, operation & maintenance instructions

SHELTER GS4070 Assembly manual

SHELTER

SHELTER GS4070 Assembly manual

No Butts Bin SR1584-F Assembly instructions

No Butts Bin

No Butts Bin SR1584-F Assembly instructions

NBB SR8304-F Assembly instructions

NBB

NBB SR8304-F Assembly instructions

Storage Canopy W33 x L40 x H12 ft Assembly manual

Storage Canopy

Storage Canopy W33 x L40 x H12 ft Assembly manual

Luoman Lillevilla 490 Assembly and Maintenance

Luoman

Luoman Lillevilla 490 Assembly and Maintenance

KWIK GOAL 9B9301 Assembly instructions

KWIK GOAL

KWIK GOAL 9B9301 Assembly instructions

manuals.online logo
manuals.online logoBrands
  • About & Mission
  • Contact us
  • Privacy Policy
  • Terms and Conditions

Copyright 2025 Manuals.Online. All Rights Reserved.