Simu T3.5 HZ.02 User manual

Lire attentivement cette notice
avant toute utilisation.
FR T3.5 Hz.02 - T5 Hz.02 - T6 Hz.02
Moteurs tubulaires avec radio intégrée
pour stores & volets roulants
S.A.S. au capital de 5 000 000 !- Z.I. Les Giranaux - BP71 - 70103 Arc-Les-Gray CEDEX - RCS GRAY B 425 650 090 - SIRET 425 650 090 00011 - n° T.V.A CEE FR 87 425 650 090
5122379A
Installation
1
Ø min.
AØBC DL1L2
06.32 • 08.17 • 10.17 • 15.17
15.32
20.17 • 25.17 • 35.17 • 50.12
37
37
448
483
4.285.5
471
506
485
520
585
65547
659
598
668
672
621
691
695
526 4.2
60.12 • 80.12 • 100.12 • 120.12
60 716 5368729 758
230V 50Hz230V 50Hz230V 50Hz
4.16
3.30 • 9.16 • 13.10
mm
AA
C
D
ØB
ØB
L2
L1
29
Ø382
96
64 L2
L1
745
L1
L2
4
228
55
48
T5 Hz.02 T3.5 Hz.02T6 Hz.02
- Préconisations :
- Respecter une distance minimum de 0,2 m entre deux moteurs Hz.02.
- Respecter une distance minimum de 0,3 m entre un moteur Hz.02 et un émetteur Hz.
- Le raccordement du câble au moteur doit être réalisé par du personnel qualié.
- Le connecteur doit être monté sans endommager les contacts - La continuité de terre doit être assurée.
- L’utilisation d’un appareil radio utilisant la même fréquence (433,42MHz) peut dégrader les performances de ce produit (ex.: casque radio Hi-Fi).
- Montage :
- Perçage du tube :
1/4

2/4
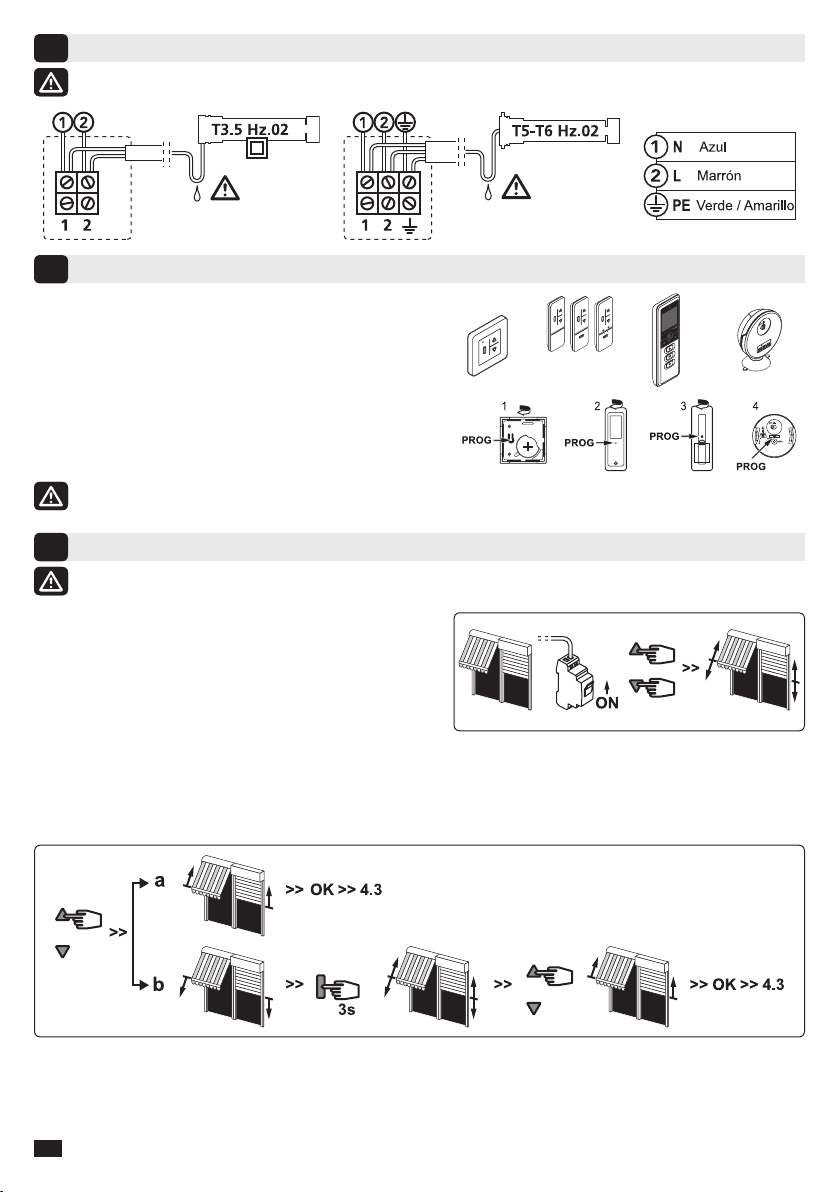
1 : Emetteur Hz COLOR+ mural
2 : Emetteur Hz COLOR+ mobile 1 / 5 canaux
3 : Emetteur Hz Color Multi / Timer Easy / Timer Multi
4 : Capteur Hz soleil
Portée des émetteurs Hz :
1,2 & 3 : 20 m à travers 2 murs de béton armé.
4 : 6 m à travers 2 murs de béton armé.
12 émetteurs max. par moteur.
Emplacement de la touche PROG sur les émetteurs Hz :
1 2 3 4
Emetteurs compatibles
3
4
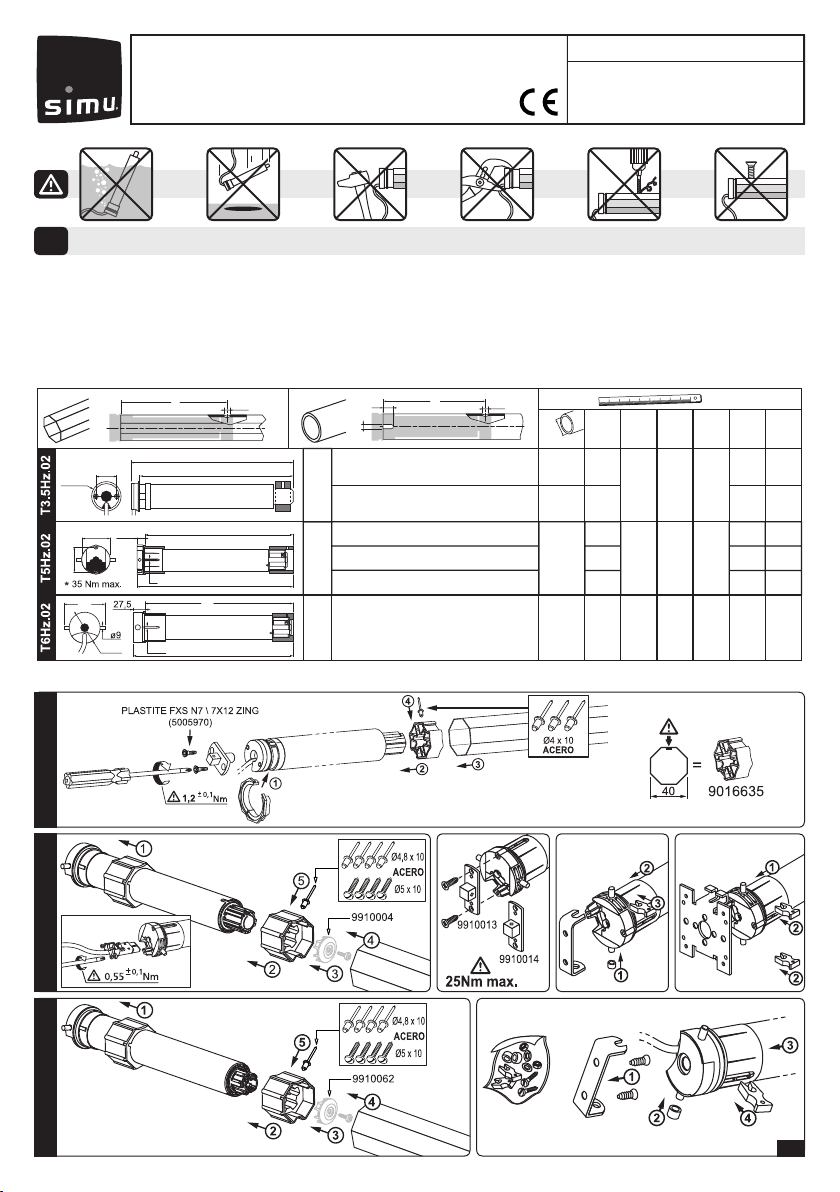
4.1- Mode apprentissage
- Mettre le moteur sous tension.
- Appuyer simultanément sur les touches montée et descente d’un émet-
teur Hz. Le moteur effectue une rotation de 0,5 seconde dans un sens
puis dans l’autre. Cet émetteur commande maintenant le moteur en
mode instable. Passer à l’étape 4.2.
Appuyer sur la touche montée de l’émetteur :
a- Si l’axe tourne dans le sens montée, passer à l’étape 4.3.
b- Si l’axe tourne dans le sens descente, inverser le sens de rotation en appuyant sur la touche stop pendant au moins 3 secondes. Le
moteur conrme la modication par une rotation de 0,5 seconde dans un sens puis dans l’autre. Passer à l’étape 4.3.
- Mémorisation en premier du point d’arrêt bas (a) et ensuite du point d’arrêt haut (b).
- Mémorisation en premier du point d’arrêt haut (b) et ensuite du point d’arrêt bas (a).
Câblage
2
Il est recommandé de pouvoir couper individuellement l’alimentation de chaque moteur.
230V - 50 Hz

3/4
- Appuyer environ 1 seconde sur la touche PROG de l’émetteur.
Le moteur effectue une rotation de 0,5 seconde dans un sens
puis dans l’autre. Votre émetteur est maintenant programmé
et commande le moteur en mode stable.
programmer :
- Appuyer environ 1 seconde sur la touche PROG du nouvel
émetteur. Le moteur effectue une rotation de 0,5 seconde
dans un sens puis dans l’autre.
6.1- Ouvrir la mémoire du moteur depuis l’émetteur de
commande individuelle :
- Appuyer environ 3 secondes sur la touche PROG de
l’émetteur de commande individuelle. Le moteur effectue une
rotation de 0,5 seconde dans un sens puis dans l’autre.
4- Après avoir mémorisé les points d’arrêt bas (a) et haut (b), procéder à la validation des réglages :
- Appuyer 2s sur la touche stop. Le moteur effectue une rotation de 0,5 s dans un sens puis dans
l’autre. Passer à l’étape suivante
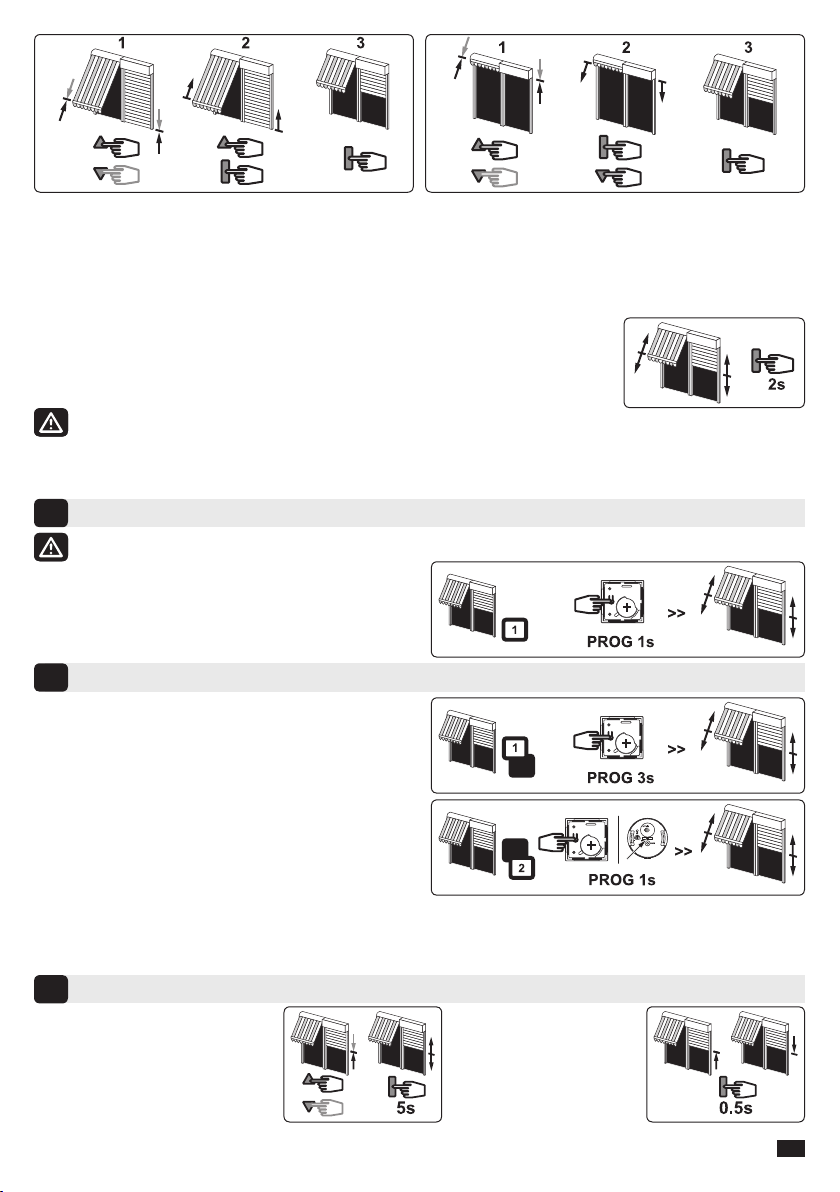
Programmation du premier point de commande individuelle
5
Programmation d’un nouveau point de commande (individuelle, groupe ou générale)
6
Enregistrement / commande / suppression de la position intermédiaire
7
Enregistrement :
- Positionner le moteur sur la position
intermédiaire désirée.
- Appuyer 5s sur la touche stop. Le
moteur effectue une rotation de 0,5 s
dans un sens puis dans l’autre.
Suppression : Positionner le moteur sur la position intermédiaire. Appuyer 5s sur la touche stop. la position
intermédiaire est supprimée.
Commande :
- Appuyer sur la touche stop
pendant 0,5s. Le moteur
rejoint la position intermé-
diaire.
- Si votre nouveau point de commande est une commande de groupe : répéter les opérations 6.1 et 6.2 pour chaque moteur du groupe.
- Si votre nouveau point de commande est une commande générale : répéter les opérations 6.1 et 6.2 pour chaque moteur de l’installation.
- Pour supprimer un émetteur de la mémoire du moteur : Effectuer les opérations 6.1 depuis l’émetteur de commande individuelle et
l’opération 6.2 depuis l’émetteur à supprimer.
- couper l’alimentation du moteur (2 secondes minimum).
- reprendre l’opération 4.1* avec un nouvel émetteur avant de passer au chapitre §5.
* A la mise sous tension le moteur effectue une courte rotation dans un sens puis dans l’autre, ce qui indique que les ns de
courses sont déjà réglés.
1- Positionner le moteur sur le point d’arrêt bas souhaité
à l’aide des touches descente et montée.
2- Appuyer simultanément sur les touches stop et montée
pour mémoriser le point d’arrêt bas. Le moteur se met
automatiquement en rotation en montée.
3- Appuyer sur stop pour immobiliser le moteur.
1- Positionner le moteur sur le point d’arrêt haut souhaité
à l’aide des touches montée et descente.
2- Appuyer simultanément sur les touches stop et des-
cente pour mémoriser le point d’arrêt haut. Le moteur
se met automatiquement en rotation en descente.
3- Appuyer sur stop pour immobiliser le moteur.
a b

4/4
Par la présente SIMU déclare que l’appareil "T3.5 Hz.02 / T5 Hz.02 / T6 Hz.02" est conforme aux exigences essentielles
et autres dispositions pertinentes de la directive 2006/42/CE. Une déclaration de conformité est mise à votre disposition à
l’adresse internet : www.simu.fr . Utilisable en UE, CH
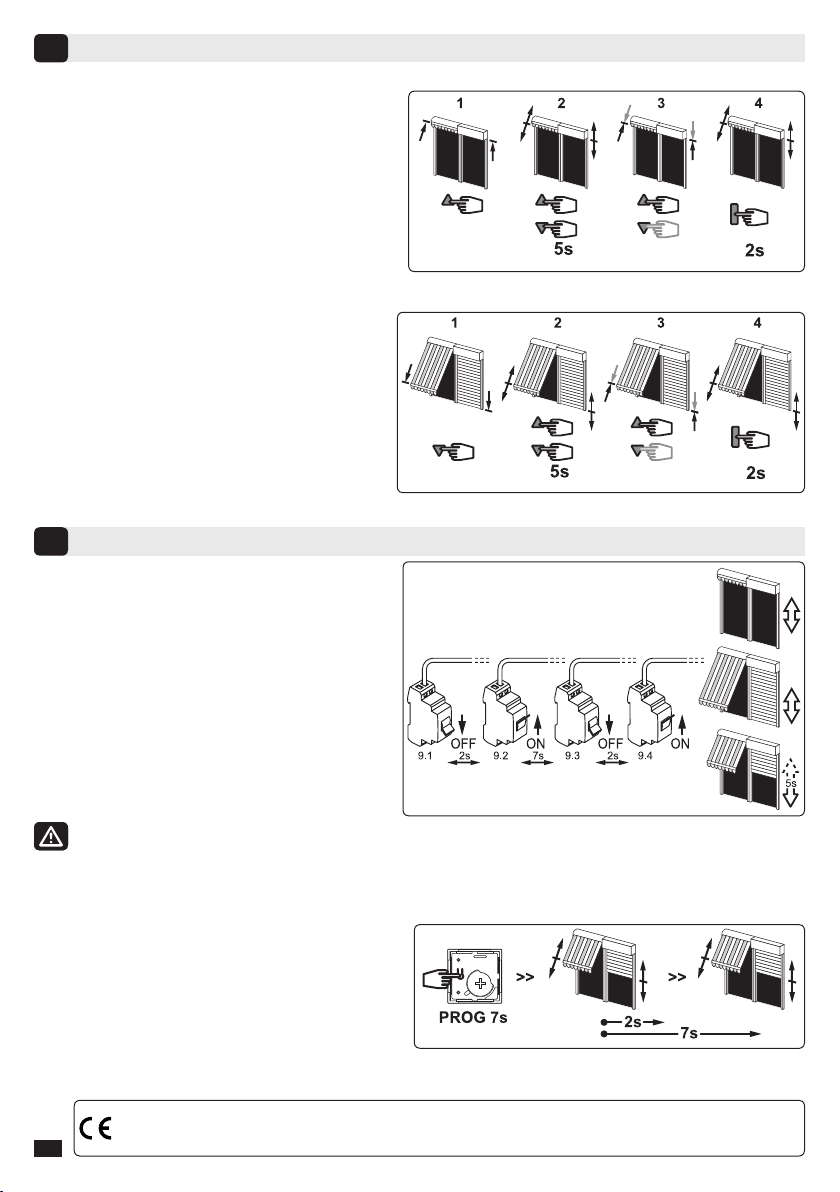
1- Positionner le moteur sur le point d’arrêt bas réglé en §4.3a à
l’aide de la touche descente.
2- Appuyer simultanément sur les touches montée et descente
pendant 5 secondes. Le moteur effectue une rotation de 0,5
seconde dans un sens puis dans l’autre.
3- Afner le réglage à l’aide des touches descente et montée
pour obtenir la position de n de course souhaitée.
4- Appuyer 2 secondes sur la touche stop. Le moteur effectue
une rotation de 0,5 seconde dans un sens puis dans l’autre, la
nouvelle position de n de course est mémorisée.
9.1- Couper l’alimentation du moteur pendant 2 secondes.
9.2- Rétablir l’alimentation du moteur pendant 7 secondes.
9.3- Couper l’alimentation du moteur pendant 2 secondes.
9.4- Rétablir l’alimentation du moteur.
- Si le moteur se trouve en position de n de course (haut ou
bas), il effectue une brève rotation dans les deux sens. Si le
moteur se trouve dans une autre position, il effectue une rota-
tion de 5 secondes dans un sens quelconque. Le moteur est
maintenant en mode "annulation de la programmation".
- Appuyer plus de 7 secondes sur la touche PROG de l’émet-
teur. Maintenir l’appui jusqu’à ce que le moteur effectue une
première rotation de 0,5 seconde dans un sens puis dans
l’autre, puis quelques seconde plus tard une seconde rotation de
0,5 seconde dans les deux sens.
9
9.5- Ensuite valider l’annulation de la programmation du moteur concerné depuis l’émetteur de commande individuelle :
1- Positionner le moteur sur le point d’arrêt haut réglé en §4.3b à
l’aide de la touche montée.
2- Appuyer simultanément sur les touches montée et descente
pendant 5 secondes. Le moteur effectue une rotation de 0,5
seconde dans un sens puis dans l’autre.
3- Afner le réglage à l’aide des touches descente et montée
pour obtenir la position de n de course souhaitée.
4- Appuyer 2 secondes sur la touche stop. Le moteur effectue
une rotation de 0,5 seconde dans un sens puis dans l’autre, la
nouvelle position de n de course est mémorisée.
8
Si vous intervenez sur l’alimentation de plusieurs moteurs, ils seront tous dans ce mode. Il convient donc
de commande d’un émetteur programmé.

Read carefully these instructions
before any use.
GB T3.5 Hz.02 - T5 Hz.02 - T6 Hz.02
Tubular operators with integrated radio
for blinds & roller shutters
S.A.S. au capital de 5 000 000 !- Z.I. Les Giranaux - BP71 - 70103 Arc-Les-Gray CEDEX - RCS GRAY B 425 650 090 - SIRET 425 650 090 00011 - n° T.V.A CEE FR 87 425 650 090
Installation
1
Ø min.
AØBC DL1L2
06.32 • 08.17 • 10.17 • 15.17
15.32
20.17 • 25.17 • 35.17 • 50.12
37
37
448
483
4.285.5
471
506
485
520
585
65547
659
598
668
672
621
691
695
526 4.2
60.12 • 80.12 • 100.12 • 120.12
60 716 5368729 758
230V 50Hz230V 50Hz230V 50Hz
4.16
3.30 • 9.16 • 13.10
mm
AA
C
D
ØB
ØB
L2
L1
29
Ø382
96
64 L2
L1
745
L1
L2
4
228
55
48
T5 Hz.02 T3.5 Hz.02T6 Hz.02
- Recommendations:
- Keep a minimum distance of 20 cm between two Hz.02 motors.
- Keep a minimum distance of 30 cm between Hz.02 motors and Hz transmitters.
- The cable may only be connected to the motor by qualied personnel.
- The connector is to be assembled without damaging the contacts - The continuity of the earth connection must be ensured.
- A radio appliance using the same frequency (433,42MHz) may deteriorate our product’s performance (ex. : hi- radio headphones).
1/4
5122379A

2/4
1 : COLOR+ Wall Hz transmitter
2 : COLOR+ 1/5 channels Hz transmitter
3 : Color Multi 16 / Timer Easy / Timer Multi transmitters
4 : Sun sensor Hz
Transmitters range:
1, 2 & 3: 20 m through 2 concrete walls.
4: 6 m through 2 concrete walls.
1 2 3 4
Compatible transmitters
3
End limit adjustment
4
4.1- Learning mode:
- Switch the motor ON.
- Simultaneously press the UP and DOWN keys of a Hz transmitter. The
motor will run for 0,5 second in one direction, then in the other. The
transmitter now controls the motor in unstable mode, move to
stage 4.2.
Press the UP key of the transmitter:
a- If the motorized tube runs in the UP direction, move to next stage (4.3).
b- If the motorized tube runs in the DOWN direction, reverse the rotation direction by pressing the Stop key for at least 3 seconds. The motor
will conrm the reversal of the rotation direction by running for 0,5 second in one direction, then in the other direction. Move to the stage 4.3.
- First you can memorize the DOWN position (a) and then the UP position (b).
- First you can memorize the UP position (b) and then the DOWN position (a).
Wiring
2
Do not position the transmitter near metal in order to avoid range losses.
230V - 50 Hz

3/4
- Press the transmitter PROG Key for approximately 1 second. The
motor will run for 0,5 second in one direction and then in the other.
Your transmitter is now programmed to control the motor in
stable mode.
want to program:
- Press the PROG key of the transmitter for about 1 second. The
motor will run for 0,5 second in one direction, then in the other.
transmitter:
- Press the PROG key of the transmitter for about 3 seconds.
The motor will run for 0,5 second in one direction, then in the
other.
4- After the adjustment of the DOWN (a) and the UP (b) end limits, conrm the settings:
- Press 2s on the Stop key to validate the settings. The motor will stop and will run for 0,5 second in
one direction and then in the other. Go to next step.
5
Programming a new (individual, group or main) control point:
6
Recording / controling / deleting intermediate position
7
Recording:
- Position the motor on the wanted
position.
- Press 5 seconds on the Stop key.
The motor will run for 0,5 second in
one direction and then in the other.
Deleting : Position the motor on the intermediate position. Press 5 seconds on the Stop key, the intermediate
position is deleted.
Controling:
- Press on the Stop key for
0.5 s. the motor goes to the
intermediate position.
- For group controls, repeat operations 6.1 and 6.2 for each motor in the group.
- For main controls, repeat operations 6.1 and 6.2 for each motor in the installation.
- To delete an transmitter from the memory of a motor, perform operations 6.1 with a programmed transmitter, then
perform the operation 6.2 with the transmitter to be deleted.
- cut the power supply (2 seconds minimum).
- repeat the opération 4.1* with a new transmitter and then go to step §5.
* In this case, the motor will run for 0,5 second in both directions, that means the limits setting is already done.
1- Position the motor on the DOWN end limit using the DOWN and UP
keys.
2- To memorize the DOWN end limit position, press simultaneously
the STOP and UP keys. The motor will run automatically in the UP
direction.
3- Before the motor reaches the UP end limit, press the Stop key.
1- Position the motor on the UP end limit using the UP and DOWN
keys.
2- To memorize the UP end limit position, press simultaneously the
STOP and DOWN keys. The motor will run automatically in the
DOWN direction.
3- Before the motor reaches the DOWN end limit, press the Stop key.
a b

4/4
Hereby, SIMU, declares that this equipment "T3.5Hz.02 / T5Hz.02 / T6Hz.02" is in compliance with the essential require-
ments and other relevant provision of Directive 2006/42/EC. A declaration of Conformity is available at the web address:
www.simu.com. Usable in EU, CH
1- Position the motor on the DOWN end limit previously set
in §4.3a with the DOWN key.
2- Press simultaneously for 5 secondes the UP and DOWN
keys, The motor will run for 0,5 second in one direction
and then in the other direction.
3- Adjust the new position with the UP and DOWN keys.
4- Validate the new position by pressing 2 seconds the
Stop key. The motor will run for 0,5 second in one direc-
tion and then in the other direction. The new end limits
setting is memorized.
9.1- Switch off the power supply to the motor for 2 seconds.
9.2- Switch the power to the motor back on for 7 seconds.
9.3- Switch off the power supply to the motor for 2 seconds.
9.4- Switch the power to the motor back on.
- If the motor is on the end limit position (up or down), the
motor will run briey on one direction and then in the
other, otherwise, the motor runs for 5 seconds in random
direction. The motor is now in the "cancelling" mode.
Cancelling programming and settings
9
1- Position the motor on the UP end limit previously set in
§4.3b with the UP key.
2- Press simultaneously for 5 seconds the UP and DOWN
keys, The motor will run for 0,5 second in one direction
and then in the other direction.
3- Adjust the new position with the UP and DOWN keys.
4- Validate the new position by pressing 2 seconds the Stop
key. The motor will run for 0,5 second in one direction and
then in the other direction. The new end limits setting is
memorized.
8
-
- Press the PROG key of the transmitter more than 7
seconds. Maintain the pressure until the motor will rst
run for 0,5 second in one direction and then the other, and
a few second later, it will run again in both direction.

Bitte gründlich vor dem Einbau
lesen.
DE T3.5 Hz.02 - T5 Hz.02 - T6 Hz.02
Rohrmotor mit integrierter Funksteuerung
für Rolläden und Markisen.
S.A.S. au capital de 5 000 000 !- Z.I. Les Giranaux - BP71 - 70103 Arc-Les-Gray CEDEX - RCS GRAY B 425 650 090 - SIRET 425 650 090 00011 - n° T.V.A CEE FR 87 425 650 090
Installation
1
Ø min.
AØBC DL1L2
06.32 • 08.17 • 10.17 • 15.17
15.32
20.17 • 25.17 • 35.17 • 50.12
37
37
448
483
4.285.5
471
506
485
520
585
65547
659
598
668
672
621
691
695
526 4.2
60.12 • 80.12 • 100.12 • 120.12
60 716 5368729 758
230V 50Hz230V 50Hz230V 50Hz
4.16
3.30 • 9.16 • 13.10
mm
Schalldruckpegel : LpA ≤ 70 dB(A)
L2
L1
29
Ø38,2
96
ø64
ø9
L2
27,5 L1
7,45
L1
L2
4
22,8
55
AA
ØB
ØB
T5 Hz.02 T3.5 Hz.02T6 Hz.02
- Halten Sie eine Mindestdistanz von 20 cm zwischen zwei Hz.02 Motoren ein.
- Halten Sie eine Mindestdistanz von 30 cm zwischen Hz.02 Motoren und Hz- Funksendern ein.
- Das Kabel muss vom qualizerten Personal an den Motor angeschlossen werden.
- Bei der Steckermontage dürfen die Kontakte nicht beschädigt werden - Die Durchgängigkeit des Schutzleiters muss sichergestellt sein.
- Ein Radiogerät, das die gleiche Frequenz nutzt (433,42 MHz), könnte die Leistung des Produkts stören (z.B. Hi-Fi Radio-Kopfhörer).
- Montage :
- Bohrungen im Rollladenwelle:
1/4
5122379A

2/4
1 : Hz Wandsender COLOR+
2 : Hz 1 und 5 Kanal-Sender COLOR+
3 : Color Multi / Timer Easy / Timer Multi
4 : Hz- Sonnensensor
Senderreichweiten:
1, 2 & 3: 20 m durch 2 Stahlbetonwände.
4: 6 m durch 2 Stahlbetonwände.
Maximal 12 Sender pro Motor.
Anordnung der PROG Taste am Hz-Sender:
1 2 3 4
Kompatible Sender
3
Einstellung Endbegrenzung
4
4.1- Programmiermodus:
- Schalten Sie den Motor EIN.
- Drücken Sie gleichzeitig die AUF- und AB-Taste eines Senders. Der
Motor läuft eine halbe Sekunde in die eine, dann in die andere Rich-
tung. Der Sender steuert nun den Motor im Totmannbetrieb. Siehe
Schritt 4.2.
Drücken Sie die Taste NACH OBEN am Sender:
a- Wenn sich das Rollladenelement mit Motor nach oben bewegt, wechseln Sie zum nächsten Schritt (4.3).
b- Wenn sich das Rollladenelement mit Motor nach unten bewegt, ändern Sie die Richtung, indem Sie die Stop-Taste mindestens 3 Sekunden lang gedrückt
halten. Der Empfänger bestätigt den Richtungswechsel und dreht eine halbe Sekunde lang in die eine, dann in die andere Richtung. Weiter mit Schritt 4.3
4.3- Einstellung der Endbegrenzung:
Es gibt zwei Möglichkeiten, die Endbegrenzung zu speichern:
- Sie können zuerst die ABWÄRTS (a)- und dann die AUFWÄRTS (b)-Position speichern.
- Sie können zuerst die AUFWÄRTS (b)- und dann die ABWÄRTS (a)-Position speichern.
Schaltplan
2
230V - 50 Hz

3/4
- Halten Sie die Taste PROG ca. 1 Sekunde lang gedrückt.
Der Motor läuft eine halbe Sekunde in die eine, dann in die
andere Richtung. Ihr Sender ist nun so programmiert,
programmierenden Sender:
- Halten Sie die Taste PROG des Senders ca. 1 Sekunde
lang gedrückt. Der Motor läuft eine halbe Sekunde in die
eine, dann in die andere Richtung.
bereits gespeicherten Steuersender:
- Halten Sie die Taste PROG des Senders ca. 3 Sekunden
lang gedrückt. Der Motor läuft eine halbe Sekunde in die
eine, dann in die andere Richtung.
4- Nach Einstellen der unteren (a) und oberen (b) Endlage müssen die Einstellungen noch bestätigt
werden:
- Halten Sie die Taste STOPP des Senders ca. 2 Sekunden lang gedrückt. Der Motor läuft eine halbe
Sekunde in die eine, dann in die andere Richtung. Gehen Sie zum nächten Punkt.
5
6
7
Speichern:
- Fahren Sie den Motor in die gewünschte
Position.
- Halten Sie 5 Sekunden die STOPP-
Taste gedrückt. Der Motor fährt 0,5
Sekunde in die eine, dann in die andere
Richtung.
Den Motor in die zu löschende Zwischenposition fahren. Drücken Sie die
STOPP-Taste 5 Sekunden lang, die Zwischenposition ist gelöscht.
Kontrolle:
- Halten Sie 0,5 Sekunde die
STOPP-Taste gedrückt. Der
Motor fährt an die gespei-
cherte Zwischenposition.
- Für Gruppensteuerungen wiederholen Sie die Schritte 6.1 und 6.2 für jeden Empfänger der Gruppe.
- Für die Hauptsteuerung wiederholen Sie die Schritte 6.1 und 6.2 für jeden Empfänger der Installation.
- Um einen Sender aus dem Speicher des Empfängers zu löschen, wiederholen Sie Schritt 6.1 mit einem programmierten Sender und dann
Schritt 6.2 mit dem zu löschenden Sender.
Wenn Sie diesen Sender nicht als Einzelbedienung benutzen wollen:
- Unterbrechen Sie die Stromversorgung des Motors (Min. 2 Sekunden).
- Wiederholen Sie Schritt 4.1* mit einem neuen Sender und gehen Sie direkt zu §5.
* In diesem Fall fährt der Motor je eine halbe Sekunde in beide Richtungen. Das bedeutet, dass die Endlagen
bereits gespeichert sind.
1- Positionieren Sie den Motor mit den AUF- oder AB Taste an die
untere Endbegrenzung.
2- Zur Speicherung der unteren Endbegrenzung drücken Sie
gleichzeitig die Tasten STOPP & AUF. Der Motor läuft automa-
tisch aufwärts.
3- Wenn der Motor die obere Endbegrenzung erreicht, drücken
Sie die Taste STOPP.
1. Positionieren Sie den Motor mit den AUF- oder AB Taste an die
obere Endbegrenzung.
2. Zur Speicherung der oberen Endbegrenzung drücken Sie
gleichzeitig die Tasten STOPP & AB. Der Motor läuft automa-
tisch abwärts.
3. Wenn der Motor die untere Endbegrenzung erreicht, drücken
Sie die Taste STOPP.
a b

4/44/4
Hiermit erklärt SIMU, dass sich dieses Produkt "T3.5 Hz.02 / T5Hz.02 / T6Hz.02" in Übereinstimmung mit den
grundlegenden Anforderungen und den anderen relevanten Vorschriften der Richtlinie 2006/42/EG bendet. Eine
Erklärung der Konformität kann au der WEB-Site : www.simu.com abgerufen werden. Verwendbar in EU, CH
1- Fahren Sie den Motor in die untere Endlage.
2- Halten Sie die AUF und AB Tasten 5 Sekunden lang
gleichzeitig gedrückt. Der Motor läuft eine 0,5 Sekunde
lang in die eine, dann in die andere Richtung.
3- Stellen Sie die neue Position mit den AUF oder AB
Tasten ein.
4- Bestätigen Sie die neue Position, indem Sie die STOPP-
Taste zwei Sekunden lang gedrückt halten. Der Motor
läuft eine halbe Sekunde lang in die eine, dann in die
andere Richtung.
9.1 - Schalten sie die Stromversorgung des Motors ab.
9.2 - Schalten sie die Stromversorgung des Motors ein.
9.3 - Schalten sie die Stromversorgung des Motors ab.
9.4 - Schalten sie den Motor wieder ein.
- Bendet sich der Motor bei einer Endlage (oben oder unten),
dreht er zuerst in die eine, danach in die andere Richtung.
Anderenfall dreht der Motor für 5 Sekunden in eine beliebige
Richtung.
9
1- Fahren Sie den Motor in die obere Endlage.
2- Halten Sie die AUF und AB Tasten 5 Sekunden lang
gleichzeitig gedrückt. Der Motor läuft eine halbe Sekunde
lang in die eine, dann in die andere Richtung.
3- Stellen Sie die neue Position mit den AUF oder AB Tasten
ein.
4- Bestätigen Sie die neue Position, indem Sie die STOPP-
Taste zwei Sekunden lang gedrückt halten. Der Motor läuft
eine halbe Sekunde lang in die eine, dann in die andere
Richtung.
8
- Halten Sie die Taste PROG des Senders mindestens 7
lang gedrückt. Der Motor läuft zuerst eine halbe
Sekunde lang in eine Richtung. Einige Sekunden später wird
er wieder in beide Richtungen laufen.
Speicher programmiert.

Deze handleiding aandachtig doorle-
zen alvorens het systeem te gebruiken.
NL T3.5 Hz.02 - T5 Hz.02 - T6 Hz.02
Buismotoren met geïntegreerde radio
voor rolluiken
S.A.S. au capital de 5 000 000 !- Z.I. Les Giranaux - BP71 - 70103 Arc-Les-Gray CEDEX - RCS GRAY B 425 650 090 - SIRET 425 650 090 00011 - n° T.V.A CEE FR 87 425 650 090
Installatie
1
Ø min.
AØBC DL1L2
06.32 • 08.17 • 10.17 • 15.17
15.32
20.17 • 25.17 • 35.17 • 50.12
37
37
448
483
4.285.5
471
506
485
520
585
65547
659
598
668
672
621
691
695
526 4.2
60.12 • 80.12 • 100.12 • 120.12
60 716 5368729 758
230V 50Hz230V 50Hz230V 50Hz
4.16
3.30 • 9.16 • 13.10
mm
AA
C
D
ØB
ØB
L2
L1
29
Ø382
96
64 L2
L1
745
L1
L2
4
228
55
48
T5 Hz.02 T3.5 Hz.02T6 Hz.02
Adviezen:
- Bewaar een minimum afstand van 20 cm tussen twee motor Hz.02.
- Bewaar een minimum afstand van 30 cm tussen een motor Hz.02 en een zender Hz.
- De aansluiting van de kabel van de motor moet worden uitgevoerd door gekwaliceerd personeel.
- De connector moet worden gemonteerd zonder de contactpunten te beschadigen - De aardaansluiting moet worden verzekerd.
- Een radiotoepassing (bij. hi- hoofdtelefoon) die gebruikt maakt van dezelfde frequencie (433,42MHz). kan de performance van onze producten nadelig beïnvloeden.
- Installatie:
- Het Boren van de gaten:
1/4
5122379A

2/4
1 : Hz Wandzender COLOR+
2 : Zender Hz 1 en 5 kanalen COLOR+
3 : Color Multi / Timer Easy / Timer Multi
4 : Zonsensor Hz
1, 2 & 3: 20 m door 2 muren van gewapend beton.
4: 6 m door 2 muren van gewapend beton.
Max. 12 zenders per motor.
Plaats van de toets PROG op de zenders Hz:
1 2 3 4
Compatibele zenders
3
Instelling van de stop van de motor
4
4.1- Leermodus:
- Zet de motor onder spanning.
- Druk vervolgens tegelijkertijd, op de toetsen omhoog en omlaag van
een zender, de motor draait een 0,5 seconde in een richting en ver-
volgens in een andere richting. Deze zender bedient nu de motor in
onstabiele mode. Ga naar 4.2.
4.2- Controle van de draairichting van de motor:
Druk op de OP knop van de zender :
a - Als het luik omhoog gaat, gaat u verder naar de volgende stap.
b - Als het luik daalt, verander dan de draairichting door tenminste 3 seconden op de toets Stop te drukken. Ga naar 4.3.
4.3- Instelling van de stop van de motor:
- Eerst slaat u de onderste positie (a) op in het geheugen en dan de bovenste positie (b).
- Eerst slaat u de bovenste positie (b) op in het geheugen en dan de onderste positie (a).
2
Als de installatie uit meerdere motoren bestaat, mag alleen de te programmeren motor aan de voedingsspan-
230V - 50 Hz

3/4
- Druk ongeveer seconde op de toets PROG van de zender. De
motor draait 0,5 seconde in een richting en vervolgens in de
andere richting.
motor in de stabiele mode te besturen.
6.2- Valideer de operatie vanuit de andere te programmeren
zender:
- Druk ongeveer 1 seconde op de toets PROG van de nieuwe
zender. De motor draait een seconde in een richting en vervol-
gens in de andere richting.
6.1- Open het geheugen van de ontvanger vanuit de indivi-
duele bedieningszender:
- Druk ongeveer 3 seconden op de toets PROG van de indivi-
duele bedieningszender. De motor draait 0,5 seconde in een
richting en vervolgens in de andere richting.
4- Na het instellen van de onderste (a) en de bovenste (b) endpositie moeten deze bevestigt woorden:
- Druk 2 seconden op de toets Stop van de individuele bedieningszender. De motor draait 0,5 seconde
in een richting en vervolgens in de andere richting. Ga naar de volgende stap
Programmering als individueel bedieningspunt
5
6
Programmeren, oproepen en verwijderen van de tussenpositie
7
Programeren:
- De motor op de gewenste positie
instellen.
- Druk 5
sec.
op de toets Stop. De
motor draait 0,5
sec.
in een richting
en vervolgens in de andere richting.
Tussenpositie verwijderen: De motor op de tussenpositie te gaan. Druk op de Stop toets tenminste 5 seconden,
de tussenpositie is nu gewist.
Oproepen:
- Druk 0,5
sec.
op de toets
Stop. De motor loopt naar
de ingestelde tussenpositie.
- Voor een gegroepeerde bediening met de andere zender: voer de operaties 6.1 en 6.2 uit voor iedere ontvanger van de betreffende groep.
- Voor een algemene bediening met de andere zender: voer de operaties 6.1 en 6.2 uit voor iedere ontvanger van de installatie.
- Om een zender uit het geheugen van een ontvanger te wissen, volg procedure 6.1 met een geprogrammeerde zender, Volg daarna procedure
6.2 met de zender die gewist moet worden.
- Verbreek de voedingsspanning (minimaal 2 sec.).
- Herhaal stap 4.1* met een nieuwe handzender en ga dan direkt naar stap §5.
* n dit geval zal de motor een halve seconde in beide richtingen draaien ten teken dat de eindafstelling reeds
geprogrameerd zijn.
1- Positioneer de motor in de onderste eindpositie met de knoppen
OP en NEER.
2- Om de onderste positie op te slaan in het geheugen, druk tege-
lijkertijd de knoppen STOP & OP. De motor zal dan automatisch
naar boven gaan lopen.
3- Als de motor aankomt bij de bovenste positie druk Stop.
1- Positioneer de motor in de bovenste eindpositie met de knoppen
OP en NEER.
2- Om de bovenste positie op te slaan in het geheugen, druk tegelij-
kertijd de knoppen STOP & NEER. De motor zal dan automatisch
naar beneden gaan lopen.
3- Als de motor bij de onderste eindpositie aankomt, druk op Stop.
a b
4/4
Hierbij verklaart SIMU dat het toestel "T3.5 Hz.02 / T5 Hz.02 / T6 Hz.02" overeenstemming is met de essentiële eisen
en de andere relevante bepalingen van richtlijn 2006/42/EC. Een conformiteitsverklaring staat ter beschikking op het
internetadres : www.simu.com. Bruikbaar in UE, CH
1- Positioneer de motor in de onderste (reeds ingestelde
eindpositie.
2- Druk de knoppen OP en NEER gedurende 5 sec. tegelijker-
tijd in. De motor zal in beide richtingen een halve seconde
draaien.
3- Beweeg de motor naar de gewenste nieuwe positie met de
OP en NEER knoppen.
4- Bevestig de nieuwe positie door 2 sec. Op STOP te druk-
ken. De motor zal in beide richtingen een halve seconde
draaien.
9.1 - Schakel gedurende 2 seconden de voeding van de
motor uit.
9.2 - Schakel gedurende 7 seconden de voeding van de
motor weer in.
9.3 - Schakel gedurende 2 seconden de voeding van de
motor uit.
9.4 - Schakel de voeding van de motor weer in.
- Indien de motor in zijn eindpositie staat zal de motor alleen
een kort op-neer doen. In het andere geval draait de motor 5
seconden in een of andere richting. De motor bevindt zich
nu in de status van "annulatie van de programmering"
Het wissen van de programmering en alle instellingen
9
1- Positioneer de motor in de bovenste (reeds ingestelde)
eindpositie.
2- Druk de knoppen OP en NEER gedurende 5 sec. tegelijker-
tijd in. De motor zal in beide richtingen een halve seconde
draaien.
3- Beweeg de motor naar de gewenste nieuwe positie met de
OP en NEER knoppen.
4- Bevestig de nieuwe positie door 2 sec. Op STOP te drukken.
De motor zal in beide richtingen een halve seconde draaien.
Her- instellen van de eindeloopposities
8
- Druk meer dan 7 seconden op de toets PROG van de
individuele bedieningszender. Houdt deze toets ingedrukt
totdat de motor drait 0,5 sec. in een richting en vervolgens
in de andere richting en enkele seconden later in beide
richtingen.
leer atentamente este folleto antes
de cualquier utilización.
ES T3.5 Hz.02 - T5 Hz.02 - T6 Hz.02
Motores tubulares con radio incorporada
para toldos y persianas
S.A.S. au capital de 5 000 000 !- Z.I. Les Giranaux - BP71 - 70103 Arc-Les-Gray CEDEX - RCS GRAY B 425 650 090 - SIRET 425 650 090 00011 - n° T.V.A CEE FR 87 425 650 090
Instalación
1
Ø min.
AØBC DL1L2
06.32 • 08.17 • 10.17 • 15.17
15.32
20.17 • 25.17 • 35.17 • 50.12
37
37
448
483
4.285.5
471
506
485
520
585
65547
659
598
668
672
621
691
695
526 4.2
60.12 • 80.12 • 100.12 • 120.12
60 716 5368729 758
230V 50Hz230V 50Hz230V 50Hz
4.16
3.30 • 9.16 • 13.10
mm
AA
C
D
ØB
ØB
L2
L1
29
Ø382
96
64 L2
L1
745
L1
L2
4
228
55
48
T5 Hz.02 T3.5 Hz.02T6 Hz.02
- Consejos :
- Respetar una distancia mínima de 20 cm entre dos motores Hz.02.
- Respetar una distancia mínima de 30 cm entre un motor Hz.02 y un emisor Hz.
- Sólo personal calicado podrá efectuar la conexión del cable al motor.
- El conector deberá montarse sin dañar los contactos - Se deberá garantizar la continuidad de tierra.
- La utilización de un aparato de radio con las mismas frecuencias (433,42MHz) puede degradar las prestaciones de nuestro equipo.(ej: casco de radio hi-)
- Montaje :
1/4
5122379A
2/4
1 : Emisor Hz mural COLOR+
2 : Emisores Hz 1 y 5 canales COLOR+
3 : Emisores Color Multi / Timer Easy / Timer Multi
4 : Sensor Sol Hz
Alcance de los emisores :
1, 2 & 3 : 20 mts a través 2 paredes de hormigón armado
4 : 6 mts a través 2 paredes de hormigón armado
12 Emisores Máximo por motor.
Emplazamiento de la tecla PROG en los emisores Hz :
1 2 3 4
Emisores compatibles
3
4
4.1- Modo de programación
- Encender el motor.
- Pulsar simultáneamente en las teclas subida y descenso de un emisor
Hz. El motor efectúa una rotación de 0,5 segundo en un sentido y
luego en el otro. Este emisor acciona ahora el motor en modo
depulsación momentánea. Pasar a la etapa 4.2.
Pulsar en la tecla subida del emisor :
a- Si el eje gira en el sentido subida, pasar a la etapa 4.3.
b- Si el eje gira en el sentido descenso, invertir el sentido de rotación pulsando en la tecla Stop durante al menos 3 segundos. El motor
conrma la modicación mediante una rotación de 0,5 segundo en un sentido y luego en el otro. Pasar a la etapa 4.3.
- Memorización inicial del punto de parada inferior (a) y luego del punto de parada superior (b)
- Memorización inicial del punto de parada superior (b) y luego del punto de parada inferior (a).
Cableado
2
Se recomienda poder cortar individualmente la alimentación de cada motor.
Si la instalación consta de varios motores, sólo un motor debe estar alimentado durante las operaciones
-
namiento (pérdida de alcance).
230V - 50 Hz
3/4
- Pulsar aproximadamente 1 segundo en la tecla PROG, girando
entonces el motor 0,5 segundo en un sentido y luego en otro.
pulsación permanente.
6.2- Validar la operación desde el nuevo emisor a programar :
- Pulsar 1 segundo aproximadamente en la tecla PROG del nuevo
emisor. El motor gira 0,5 segundo en un sentido y luego en otro.
6.1- Abrir la memoria del motor desde el emisor de acciona-
miento individual :
- Pulsar aproximadamente 3 segundos en la tecla PROG del emisor
de accionamiento individual. El motor gira 0,5 segundo en un
sentido y luego en otro.
4- Despues del ajuste de la bajada (a) y de la subida (b) de los nales de carrera, conrmar la
programación :
- Pulsar 2 segundos en la tecla Stop, girando entonces el motor 0,5 segundo en un sentido y luego
en otro. Ir al siguiente paso
Programación del primer punto de mando individual
5
Programación de un nuevo punto de mando (individual, grupo o general)
6
7
Memorizar :
- Maniobarar el motor hasta la posi-
ción deseada.
- Pulsar en la tecla Stop durante 5s.
El motor gira 0,5s en un sentido
luego y en el otro.
Supresión de una posición intermedia: Maniobra el motor hasta la posición intermedia. Pulsar mas de 5 segundos
en la tecla STOP, la posición intermedia quedará suprimida.
Programar :
- Pulsar en la tecla Stop
durante 0,5s. El motor gira
y se colocar a la posición
intermedia memorizada.
- Si el nuevo punto de mando es un emisor de grupo: repetir las operaciones 6.1 y 6.2. para cada motor del grupo.
- Si el nuevo punto de mando es un emisor general: repetir las operaciones 6.1 y 6.2 para cada motor de la instalación.
- Para suprimir un emisor de la memoria del motor: efectuar las operaciones 6.1 desde el emisor de mando individual y la operación 6.2
desde el emisor a suprimir.
Si no quiere usar este emisor como control de maniobra individual :
- Cortar la corriente minimente 2 segundos.
- Repetir la operación 4.1* con un nuevo emisor y despues pasar directamente a §5.
* En este caso el motor functionara durante medio segundo en cada sentido, esto querra decir que la programación de los
nales de carrera esta realizada.
1- Colocar el motor en el punto de parada inferior deseado con las teclas
descenso y subida.
2- Pulsar simultáneamente en las teclas Stop y subida para memorizar el
punto de parada inferior. El motor se pone automáticamente en rotación
en subida.
3- Cuando el motor llega al punto de parada superior deseado, pulsar en stop.
1- Colocar el motor en el punto de parada superior deseado por medio de las
teclas subida y descenso.
2- Pulsar simultáneamente en las teclas Stop y descenso para memorizar el
punto de parada superior. El motor se pone automáticamente en rotación
en descenso.
3- Cuando el motor llega al punto de parada inferior deseado, pulsar stop.
a b

4/4
SIMU declara que este producto
"T3.5 Hz.02 / T5 Hz.02 / T6 Hz.02"
está conforme con los requisitos esenciales
y otras disposiciones de la directiva 2006/42/EC. Una declaración de conformidad se encuentra disponíble en
internet : www.simu.com. Utilisación EU, CH
1- Posicionar el motor en el punto de parada regulado de bajada
en §4.3a con la ayuda de la tecla bajada.
2- Pulsar simultáneamente en las teclas subida y descenso
durante 5 segundos. El motor efectúa una rotación de 0,5
segundo en un sentido y luego en el otro.
3- Anar el ajuste por medio de las teclas descenso y subida
para obtener la posición de n de recorrido deseada.
4- Pulsar 2 segundos en la tecla stop. El motor efectúa una
rotación de 0,5 segundo en un sentido y luego en el otro; la
nueva posición de n de recorrido queda memorizada.
9.1 - Cortar la alimentación del motor durante 2 segundos.
9.2 - Restablecer la alimentación del motor durante 7 segundos.
9.3 - Cortar la alimentación del motor durante 2 segundos.
9.4 - Restablecer la alimentación del motor.
- Si el motor esta en posición de funales de carrera (subida o
bajada), ej motor efectuara un corto y seguido movimiento
de subida y bajada. Si no, el motor efectuara una rotación
de 5 segundos en cualquiera de los sentidos. El motor se
encuentra ahora en modo anulación de la programación.
Pulsar más de 7 segundos en la tecla PROG del emisor de
mando individual. Mantener pulsado hasta que el motor efectúe
una primera rotación de 0,5 segundo en un sentido y luego en
el otro, y luego unos segundos más tarde una segunda rotación
de 0,5 segundo en ambos sentidos.
9
9.5- Validar la anulación del motor involucrado desde el emisor de accionamiento individual :
1- Posicionar el motor en el punto de parada de subida regulado
en §4.3b con la ayuda de la tecla subida.
2- Pulsar simultáneamente en las teclas subida y descenso
durante 5 segundos. El motor efectúa una rotación de 0,5
segundo en un sentido y luego en el otro.
3- Anar el ajuste por medio de las teclas descenso y subida para
obtener la posición de n de recorrido deseada.
4- Pulsar 2 segundos en la tecla stop. El motor efectúa una rota-
ción de 0,5 segundo en un sentido y luego en el otro; la nueva
posición de n de recorrido queda memorizada.
8
Si se interviene en la alimentación de varios motores, estarán todos en este modo de anulación. Es conveniente enton-
mando individual.
Other manuals for T3.5 HZ.02
1
This manual suits for next models
2
Table of contents
Languages:
Other Simu Engine manuals


Popular Engine manuals by other brands


Bosch
Bosch Rexroth A6VM series 71 manual

ACM
ACM UNISAFETY installation manual

Perkins
Perkins 1106D Troubleshooting

MOTO GUZZI
MOTO GUZZI V750 IE Service station manual

Baumuller
Baumuller DA 100 Commissioning and Maintenance Instructions

Denison Hydraulics
Denison Hydraulics Goldcup Series Installation & Overhaul Instructions