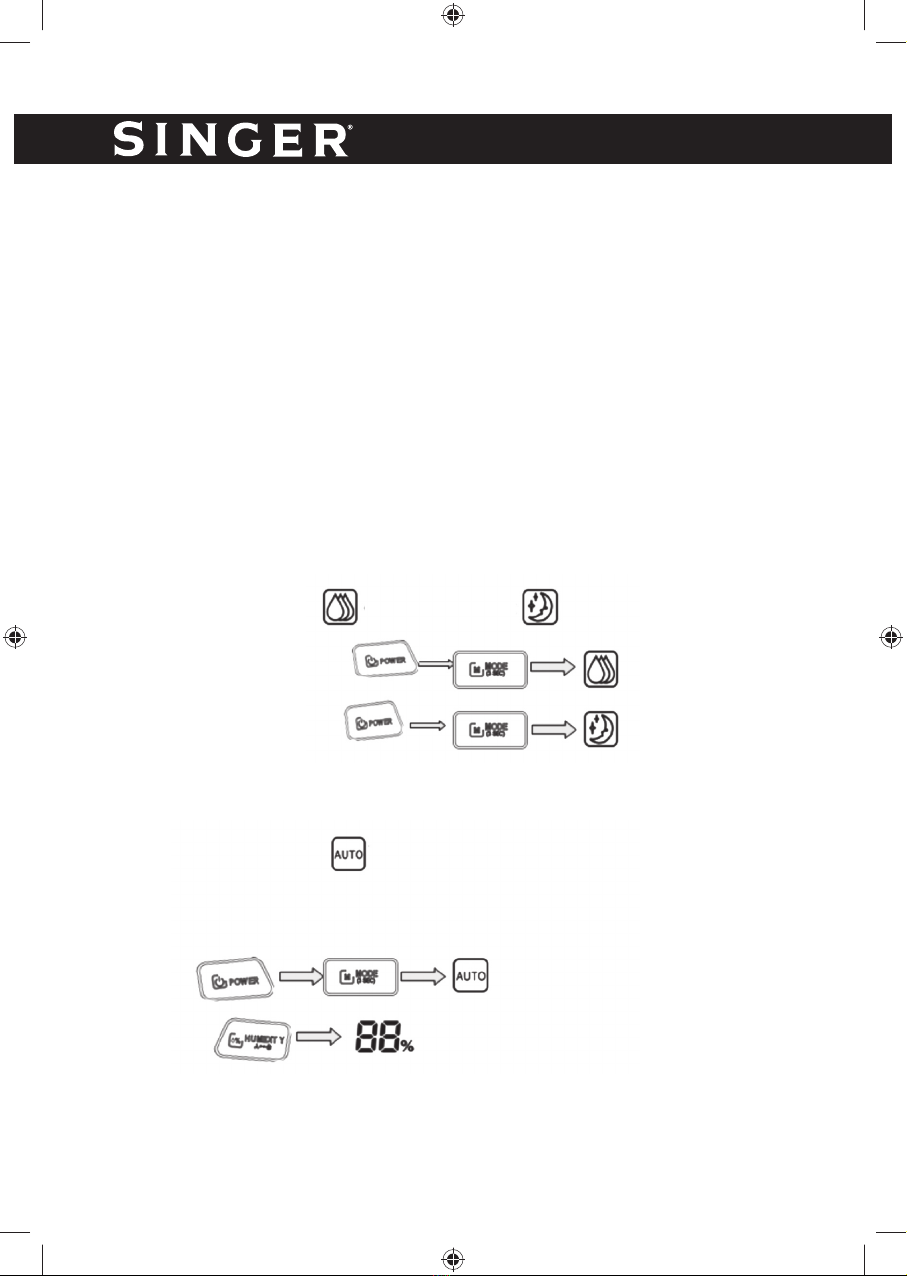
Singer Dry Up SDHM-20DI User manual


GB
ENGLISH......................................................... 3
GR
EΛΛΗΝΙΚΑ .................................................... 16
BG
БЪЛГАРСКИ................................................. 32

3
ENGLISH
INTRODUCTION
• Before using your new Dehumidifier, please
carefully read through the following instruc-
tions. Keep this booklet in a safe place for fu-
ture reference.
• After removing the packaging, make sure that
the appliance is in good condition.
• Do not allow children to play with the packaging
materials as there is risk of suffocation.
IMPORTANT SAFETY INFORMATION
• Avoid installation behind a door.
• Use only with the supply voltage specified on the
rating plate of the Dehumidifier.
• Do not place appliance close to a radiant heat
source.
• Do not immerse in liquid or allow liquid to run into
the interior of the appliance, as this could create an
electrical shock hazard.
• Do not use this appliance on a wet surface, or where
it can fall or be pushed into water.
• Do not reach for an appliance that has fallen into
water. Switch off at supply and unplug immediately.
• Do not operate any appliance with a damaged cord,
plug or after the appliance malfunctions or has been

4
ENGLISH
dropped or damaged in any manner. Refer appli-
ance to a qualified electrical person for examina-
tion, electrical or mechanical adjustment, service or
repair before further use.
• Do not operate appliance with wet hands.
• This appliance is intended for indoor household use
only and not for commercial or industrial use.
• Use this appliance only as described in this manu-
al. Any other use is not recommended by the manu-
facturer and may cause fire, electric shock or injury.
• Do not use this appliance in a window as rain may
cause electric shock.
• Do not use abrasive cleaning products on this ap-
pliance. Wipe with a soft cloth to clean the exterior.
Always remove plug from the mains supply before
cleaning.
• Switch off the appliance before changing its posi-
tion.
• Do not remove the power plug from the socket by
pulling the cord – grip the plug instead.
• Always unplug appliance when not in use.
• Do not run cord under carpeting, throw rugs or run-
ners etc. Arrange cord away from areas where it is
likely to be tripped over.
• This appliance is not intended for use by persons

5
ENGLISH
(including children) with reduced physical, sensory
or mental capabilities, or lack of experience and
knowledge, unless they have been given supervi-
sion or instruction concerning use of the appliance
by a person responsible for their safety.
• Young children should be supervised to ensure they
do not play with the appliance.
• If the supply cord is damaged, it must be replaced
by a qualified electrical person in order to avoid a
hazard.
• Do not spray pesticides or flammable gas near the
unit.
• Do not scrape the unit using sharp objects.
• Do not splash any oil or water into the unit.
• Install the unit on a flat, horizontal surface to avoid
vibration and noise.
• Do not put heavy objects on the appliance.
• Empty the water tank before moving the unit to
avoid water spilling.
• Do not tilt the unit to prevent water from spilling and
damaging the machine.
• Do not insert or allow slim rods or other foreign ob-
jects to enter any opening, as this may cause an
electric shock, fire or damage to the appliance.
• If any abnormal situations occur, immediately turn
off the power supply.

6
ENGLISH
SERVICE & REPAIR
1. For service or repair under warranty, please contact the authorized service company that is
mentioned on the guarantee card that accompanies the product.
2. Do not operate any product with a damaged cord or plug. If the supply cord is damaged, re-
turn the appliance to a SINGER service center for examination repair or adjustment. Do not
attempt to dismantle any part of the appliance. This should only be done at an authorized
SINGER service centre.
3. The partial or total non-respect of the safety instructions in the present instruction manual
will automatically release Singer of any type of responsibility in case of malfunction of the
machine or injuries to persons or animals.
4. In case of manipulation, repairing or any modification of the machine made by unqualified
persons or in case of improper use, the guarantee will be automatically cancelled.
QUICK REFERENCE
To choose Dehumidifying mode without setting the exact humidity:
Choose High dehumidifying or Low dehumidifying
High dehumidifying mode
Low dehumidifying mode
To set the exact humidity:
Choose Auto dehumidifying , the humidity range can be set from 40% to 70%.
When the unit is plugged in for the first time, it runs in Auto mode with humidity set to 50% as
default. If you want to reset the humidity, please follow the operation as below:
First step:
Second step:

7
ENGLISH
OVERVIEW
Front View
Rear View
Air Outlet
Control Panel
Float
Water Tank Cover
Water Tank
Visible Window of Water Tank
Handle
Air Inlet
Washable Filter

8
ENGLISH
BEFORE FIRST USE
Install the unit in a convenient position as per the diagram shown below.
Notes:
• Before moving the unit, remove any water from the water tank.
• To save energy, keep windows and door closed when unit is running.
• Please install the unit on a flat horizontal surface.
CONTROL PANEL
POWER button:
Press the POWER button to turn on or turn off the unit.
LOCK button:
• Press and hold LOCK button for more than 2sec to lock all the control panel buttons.
• Press and hold LOCK button again for more than 2sec to unlock all the control panel buttons.
minimum 20cm
minimum 20cm
minimum 20cm
minimum 20cm
minimum 20cm

9
ENGLISH
MODE button:
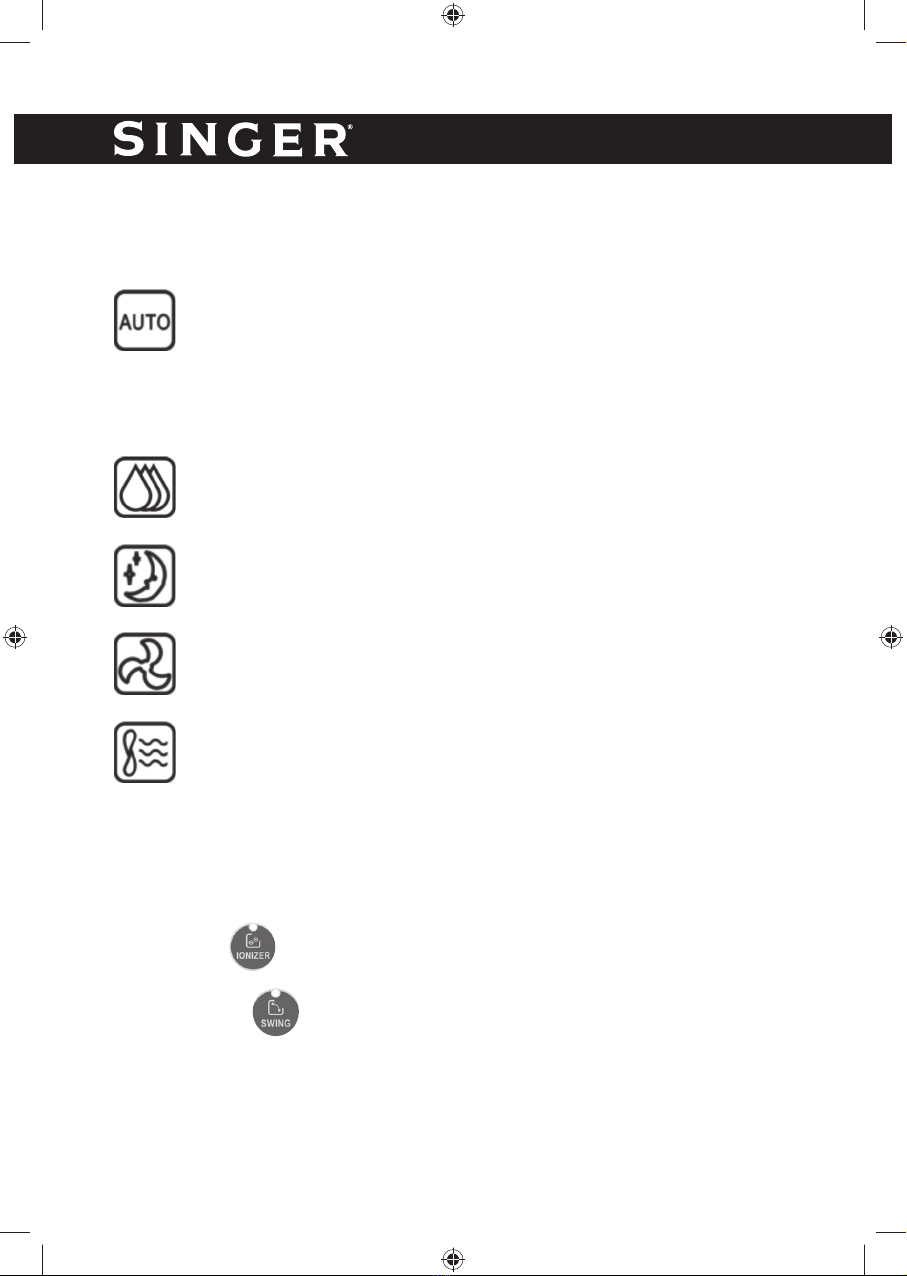
Press the MODE button to select the mode of operation. Five different modes are possible:
AUTO mode: This is the default mode selected when the Power Button is turned
on. In this mode, the default humidity is set to 50%. This can be changed using the
Humidity button.
When the room humidity > set humidity + 5%, the unit works with HIGH SPEED fan.
When the room humidity = set humidity +/- 5%, the unit works with LOW SPEED fan.
When the room humidity < set humidity – 5%, the dehumidifying function is OFF and
the fan is also OFF.
HIGH DEHUMIDIFYING mode: Press the MODE button once to select this mode.
Here, the unit always works with high fan speed for any room humidity.
LOW DEHUMIDIFYING mode (ECONOMY mode): Press the MODE button twice
to select this mode. Here, the unit always works with low fan speed for any room
humidity.
FAN ONLY mode: Press the MODE button three times to select this mode. Here, only
the fan operates. The default fan speed is high. You can switch to low fan speed using
the Humidity button.
DRYING mode: Press and hold the MODE button for more than 2sec to select this
mode. Use this mode to dry the unit when it will not be used again for a long period.
This dries the inner body of the unit and prevents mildew. For effective drying, run the
unit in this mode for an hour.
Note: To cancel Drying mode, press and hold the Mode button for 2sec. The unit
returns to the previous mode. To stop Drying mode, press the Power button.
Need to use ionizer function (optional) to make the fresh air?
First step press key to turn on the ionizer function, the green indicator lamp will light.
Second step press key to adjust the position of air outlet grill as you want.
Note: Ionizer has many functions to the good for human. It generates negative ions that disinfect
and sterilize the air while creating a healthy environment. The ionizer gathers dust, pollen and
other small particles that are responsible for allergies. It can make the air fresher and clear up
the dust in your environment.

10
ENGLISH
SWING key: press the key one time to have the swing function or adjust the position
of air outlet grill, press the key again to stop the grill at the position you want.
IONIZER key: press the key to turn on the ionizer function, press again to turn it off.
Ionizer function without dehumidification
If you want to use the product only as ionizer you press the Power button, then you choose the
Fan only function from the Mode button and then you press the Ionizer button.
Setting of timed shutdown
Under the operation status of the machine, press the [Timer] key to adjust the time from 1 hour
to 24 hours. Each press will increase the set time by one hour and after 24 hours, the figure
will return to 1 for another circulation. User could also long press the [Timer] key and the time
increases in rotation. When the set time is due, the machine will be shut down automatically.
After the setting, if there’s no action on the [Timer] key within 5 seconds, it means the timing has
been confirmed. Under the timed shutdown status, the key light above the [Timer] is on.
Setting of the timed startup
Under the standby status of the machine, the way to adjust the time is the same as that of the
timed shutdown. After the setting, if there’s no action on the [Timer] key within 5 seconds, it
means the timing has been confirmed. Under the timed startup status, the key light above the
[Timer] is on and the control screen displays the set time.
HUMIDITY button:
This button has two functions:
1. In AUTO mode, press this button to set the room humidity (from 40% to 70%). The humidity
can be set in 5% increments from 40, 45,…, 70. 65,…, 40.
2. In FAN ONLY mode, press this button to change the fan speed to low. Press it again to return
to high fan speed.
LED DISPLAY

11
ENGLISH
Auto Dehumidifying mode
High Dehumidifying mode
Low Dehumidifying (Economy) mode
Fan Only mode
Water Tank full/ Water Tank not placed correctly
Drying mode
Room Humidity. In Auto mode, when the Humidity button is pressed, the Set Humidity
is displayed.
Swing function
Ionizer function
OPERATING INSTRUCTIONS
Caution: Make sure that the water tank is properly placed in the unit before turning on the unit.
Note: The Air Outlet does not open automatically when the unit is turned on. It needs to be
adjusted manually.
1. Plug in the unit to an electrical outlet that matches the voltage and frequency on the rating label.
2. Turn on the unit using the Power Button.
3. Manually open and adjust the Air Outlet to the desired angle for comfort.
4. The unit starts working in Auto Dehumidifying mode with humidity set to 50% (default value).
5. Use the Mode button to change to other modes (High Dehumidifying, Low Dehumidifying or
Fan Only).

12
ENGLISH
6. Use the Humidity button to change set humidity in Auto Mode.
7. Use the Timer button to set Unit turn-off time. (Or Turn-on time if the unit is off).
8. Use the Mode button to select Drying mode if the unit will not be used for a long time.
9. Once the desired setting is chosen, you may use the Lock Button to lock the keypad.
Note: The unit will not work if the water tank is full. Read the following Drainage Section for
information on how to empty the tank.
DRAINAGE
The unit has a 5,3L water tank attached that must be emptied when it is full. When the water tank
is full, the unit stops automatically. The water tank icon flashes and a beep sound is produced
(15 times) as an alarm.
• Put one hand on the concave part on the
bottom of water tank to carefully remove the
water tank from the unit. Then remove the
water tank cover and empty the water.
• Replace the water tank cover and insert the
water tank into the unit gently until it reaches
the correct position. Then, you can restart the
unit.
Warning: Empty the water only when the water tank is full. Make sure that the assembly of the
water tank cover and the water tank are correct.
CONTINUOUS DRAINAGE
You can also connect a drainage pipe (inner diameter 12 mm) for continuous drainage to avoid
emptying the tank.
Note: A 2m drainage pipe is provided with the unit.

13
ENGLISH
Finf the continuous
drainage port in the
rear panel
Connect the drainage
pipe of correct length
to the port
Please check carefully
before using to avoid
water leakage
Cut the drainage stopper
and take it out from the unit
CLEANING AND MAINTENANCE
The unit must be regularly cleaned to prolong its life and keep it functioning properly.
Warning: Before performing any cleaning, turn off the unit and unplug it to avoid electrical
shocks.
Do not use hot water or chemical solvents for cleaning.
1. Regularly, clean the Water Tank and its cover with cold or warm water and dry with a soft
cloth to avoid any mildew.
2. Clean the surface of the unit using a moist cloth. Do not use detergents or abrasive sponges
that can cause damage to the plastic surface.
3. Clean the Washable Air Filter as described in the following section.
4. When the unit will not be used for a long time, use the Drying Function to dry the interior to
prevent mildew.

14
ENGLISH
CLEANING THE WASHABLE AIR FILTER
There is a Washable Air Filter on the rear of the unit (see Overview diagram) that must be
removed and cleaned regularly.
Caution: Do not use hot water or chemical solvents for cleaning.
• If there is only a little dust, you may use a soft cloth or a vacuum cleaner to remove the dust.
• If the air filter is really dirty, you can wash it in warm water (temperature < 40°C).
• To avoid deformation, let the filter air dry, away from any heated surfaces.
Active Carbon Filter
There is also an Active Carbon Filter together with the unit that can be used together with the
Washable Air Filter. This Active Carbon Filter CANNOT be cleaned. When the Filter gets very
dirty, replace it with the new filter.
Note: Removing the Active Carbon Filter reduces the air-filtering ability of the unit, but does not
affect any other functionality. The unit is fully functional without the Active Carbon Filter.
TROUBLESHOOTING
This section summarises a few common problems you might encounter when using the
Dehumidifier. Please read the relevant sections in the manual for more detailed instructions.
Problem Possible Cause Solution
Hot air comes out N/A The dehumidifier does not
have a cooling function, so
the air that comes out from
the condenser will be warm.
The unit doesn’t operate Has the power cord been
disconnected?
Plug the power cord into the
outlet.
Is the Water Tank Full icon
flashing? This means that
the tank is full or positioned
incorrectly.
Empty the Water Tank and
then reposition it correctly.
The dehumidifying function
doesn't work
Is the temperature of the
room less than 2°C?
The unit will stop working if
temperature of the room less
than 2°C.
Is the humidity of the room
too low?
In dry weather, moisture
removal will be reduced.
Is the Air Inlet or Air Outlet
obstructed?
Remove the obstruction from
the Air Inlet or Air Outlet.

15
ENGLISH
Disposal of old Electrical & Electronic Equipment (Applicable in the European Union and other Eu-
ropean countries with separate collection systems).
This symbol on the product or on its packaging indicates that this product shall not be treated
as household waste. Instead it shall be handed over to the applicable collection point for the
recycling of electrical and electronic equipment. By ensuring this productis disposed of cor-
rectly, you will help prevent potential negative consequences for the environment and human
health, which could otherwise be caused by inappropriate waste handling of this product. The
recycling of materials will help to conserve natural resources. For more detailed information
about recycling of this product, please contact your local city office, your household waste
disposal service or the shop where you purchased the product.
No air is coming out Is the unit running under dry-
ing mode?
The fan stops after 30
minutes in drying mode. But
it takes an hour for complete
drying.
Is the Washable Air Filter
clogged?
Clean Washable Air Filter
(see section “CLEANING
THE WASHABLE AIR FIL-
TER” for details).
The unit is noisy during
operation
Is the unit tilted or unsteady? Move the unit to a stable,
sturdy location.
Is the Washable Air Filter
clogged?
Clean Washable Air Filter
(see section “CLEANING
THE WASHABLE AIR FIL-
TER” for details).

16
ΕΛΛΗΝΙΚΑ
ΕΙΣΑΓΩΓΗ
• Πριν χρησιμοποιήσετε τον αφυγραντήρα σας,
παρακαλούμε διαβάστε προσεκτικά τις ακόλου-
θες οδηγίες. Φυλάξτε αυτό το εγχειρίδιο σε
ασφαλές μέρος για μελλοντική αναφορά.
• Αφού αφαιρέσετε τη συσκευασία, βεβαιωθείτε
ότι ησυσκευή είναι σε καλή κατάσταση.
• Μην επιτρέπετε στα παιδιά να παίζουν με τα
υλικά συσκευασίας, καθώς υπάρχει κίνδυνος
ασφυξίας.
ΣΗΜΑΝΤΙΚΕΣ ΟΔΗΓΙΕΣ ΑΣΦΑΛΕΙΑΣ
• Μην τοποθετείτε το προϊόν πίσω από πόρτα.
• Ελέγξτε εάν ητάση που αναφέρεται στο καρτε-
λάκι προδιαγραφών της συσκευής ανταποκρί-
νεται στην τοπική τάση πριν την συνδέσετε στο
ρεύμα.
• Μην τοποθετείτε τη συσκευή κοντά σε πηγή
θερμότητας.
• Μη βυθίζετε τη συσκευή σε υγρό ήεπιτρέπετε
σε υγρό να τρέξει στο εσωτερικό της συσκευ-
ής, καθώς αυτό θα μπορούσε να δημιουργήσει
κίνδυνο ηλεκτροπληξίας.
• Μην χρησιμοποιείτε αυτή τη συσκευή πάνω σε
υγρή επιφάνεια, ήόπου μπορεί να πέσει ήνα

17
ΕΛΛΗΝΙΚΑ
σπρωχθεί σε νερό.
• Μην αγγίζετε συσκευή που έχει πέσει μέσα σε
νερό. Κλείστε την παροχή ρεύματος και απο-
συνδέστε από την πρίζα αμέσως.
• Μη χρησιμοποιείτε τη συσκευή εάν το καλώδιο
ήτο φις είναι χαλασμένα ήεάν έχει πέσει κάτω
ήέχει υποστεί βλάβη. Επισκεφτείτε ένα εξουσι-
οδοτημένο κατάστημα σέρβις της SINGER για
έλεγχο, συντήρηση ήεπισκευή της συσκευής
πριν την χρησιμοποιήσετε.
• Μην χρησιμοποιείτε τη συσκευή με βρεγμένα
χέρια.
• Ησυσκευή αυτή προορίζεται για οικιακή χρήση
σε εσωτερικούς χώρους και όχι για επαγγελμα-
τική ήβιομηχανική χρήση.
• Χρησιμοποιείστε τη μόνο σύμφωνα με τις οδη-
γίες που περιγράφονται σε αυτό το εγχειρίδιο.
Οποιαδήποτε άλλη χρήση δεν συνιστάται από
τον κατασκευαστή και μπορεί να προκαλέσει
πυρκαγιά, ηλεκτροπληξία ήτραυματισμό.
• Μην χρησιμοποιείτε αυτή τη συσκευή κοντά σε
παράθυρο διότι ηβροχή μπορεί να προκαλέσει
ηλεκτροπληξία.
• Μη χρησιμοποιείτε στιλβωτικά καθαριστικά
προϊόντα σε αυτή τη συσκευή. Σκουπίστε με

18
ΕΛΛΗΝΙΚΑ
ένα μαλακό πανί για να καθαρίσετε το εξωτε-
ρικό. Να αφαιρείτε πάντα το φις από την πρίζα
πριν από τον καθαρισμό.
• Απενεργοποιήστε τη συσκευή εάν θέλετε να
την μετακινήσετε.
• Μην αφαιρείτε το βύσμα από την πρίζα τραβώ-
ντας το καλώδιο - Τραβήξτε το φις από την πρί-
ζα.
• Αποσυνδέετε πάντα τη συσκευή από το ρεύμα
όταν δεν την χρησιμοποιείτε.
• Μην περνάτε το καλώδιο κάτω από χαλιά, κιλί-
μια ήδιαδρόμους, κλπ. Τακτοποιήστε το καλώ-
διο μακριά από περιοχές όπου είναι πιθανό να
σκοντάψετε πάνω.
• Ησυσκευή μπορεί να χρησιμοποιηθεί από παι-
διά και από άτομα με μειωμένες σωματικές, αι-
σθητήριες ήδιανοητικές ικανότητες ήέλλειψη
εμπειρίας και / ήγνώσεων, ΜΟΝΟ όταν επιτη-
ρούνται ήέχουν ενημερωθεί σχετικά με την
ασφαλή χρήση της συσκευής και έχουν κατα-
νοήσει τους υπάρχοντες κατά τη χρήση κινδύ-
νους.
• Τα παιδιά πρέπει να επιβλέπονται για να εξα-
σφαλιστεί ότι δεν παίζουν με τη συσκευή.
• Εάν το καλώδιο τροφοδοσίας έχει υποστεί ζη-
μιά, πρέπει να αντικατασταθεί από έναν εξουσι-

19
ΕΛΛΗΝΙΚΑ
οδοτημένο ηλεκτρολόγο, προκειμένου να απο-
φευχθεί οκίνδυνος.
• Μην ψεκάζετε με φυτοφάρμακα ήεύφλεκτα
αέρια κοντά στη συσκευή.
• Μην ρίχνετε λάδι ήνερό μέσα στη συσκευή.
• Τοποθετήστε τη συσκευή σε μια σταθερή και
επίπεδη επιφάνεια για να αποφύγετε κραδα-
σμούς και θόρυβο.
• Μην τοποθετείτε βαριά αντικείμενα πάνω στη
συσκευή.
• Αδειάστε το δοχείο νερού πριν μεταφέρετε τη
συσκευή για να μην τρέξουν νερά.
• Μην γέρνετε τη συσκευή για να μην τρέξει νερό
από το δοχείο συσσώρευσης νερού και υποστεί
ζημιά ησυσκευή.
• Μην εισάγετε ήεπιτρέπετε την εισαγωγή σε
λεπτούς ράβδους ήάλλα ξένα αντικείμενα στα
ανοίγματα της συσκευής, καθώς αυτό μπορεί
να προκαλέσει ηλεκτροπληξία, πυρκαγιά ήβλά-
βη στη συσκευή.
• Εάν προκύψει οποιοδήποτε πρόβλημα, απενερ-
γοποιήστε αμέσως την παροχή ρεύματος.

20
ΕΛΛΗΝΙΚΑ
ΣΥΝΤΗΡΗΣΗ & ΕΠΙΣΚΕΥΗ
1. Για συντήρηση ήεπισκευή εντός εγγύησης, παρακαλούμε επικοινωνήστε με τα
στοιχεία της εταιρίας service που αναφέρονται στο φύλλο εγγύησης που συνοδεύει
το προϊόν.
2. Μην λειτουργείτε τη συσκευή με φθαρμένο καλώδιο ήπρίζα, εάν το προϊόν δυσλει-
τουργεί ήέχει πέσει ήέχει υποστεί βλάβη με οποιονδήποτε τρόπο. Θα πρέπει να
απευθυνθείτε σε ένα Εξουσιοδοτημένο Κατάστημα Σέρβις της SINGER ήνα επικοι-
νωνήσετε με το Κέντρο Εξυπηρέτησης Πελατών της SINGER. Μην επιχειρήσετε να
αποσυναρμολογήσετε οποιοδήποτε εξάρτημα της συσκευής. Αυτό μπορεί να γίνει
μόνο από ένα Εξουσιοδοτημένο Κατάστημα Σέρβις της SINGER.
3. Ημη τήρηση αυτών των κανονισμών και υποδείξεων που περιγράφονται στο παρόν
εγχειρίδιο απαλλάσσει τη Singer από κάθε ευθύνη σε περίπτωση κακής λειτουργίας
ήπρόκλησης βλάβης σε άτομα, ζώα, κλπ.
4. Ηκακή χρήση ήπαρέμβαση από το χρήστη που δεν επιτρέπονται, ακυρώνουν αυτο-
μάτως την εγγύηση του προϊόντος.
ΣΥΝΤΟΜΟΣ ΟΔΗΓΟΣ ΧΡΗΣΗΣ
Για να επιλέξετε τη λειτουργία αφύγρανσης χωρίς να ορίσετε ακριβώς το επίπεδο υγρα-
σίας:
Επιλέξτε Υψηλή αφύγρανση ήΧαμηλή αφύγρανση
Λειτουργία Υψηλής αφύγρανσης
Λειτουργία Χαμηλής αφύγρανσης
Για να ορίσετε το ακριβές επίπεδο υγρασίας:
Επιλέξτε Αυτόματη αφύγρανση ,το επίπεδο υγρασίας μπορεί να οριστεί από 40%
έως 70%
Όταν θέτετε τη συσκευή σε λειτουργία για πρώτη φορά, ξεκινάει αυτόματα στη λειτουρ-
γία Auto με την υγρασία ορισμένη στο 50%. Εάν θέλετε να ορίσετε την υγρασία σε άλλο
επίπεδο, ακολουθήστε την παρακάτω διαδικασία:
Πρώτο βήμα:
Δεύτερο βήμα:
Table of contents
Languages:
Other Singer Dehumidifier manuals

Singer
Singer SDHM -10M User manual

Singer
Singer SDHM-16L PURE DRY ION User manual

Singer
Singer SDHM-10DI User manual

Singer
Singer Supreme Dry SDHM-12L User manual

Singer
Singer SDHM-10L SMART OUT User manual

Singer
Singer Smart Out SDHM-10-18DI User manual

Singer
Singer SDHM-10L SMART ION User manual

Singer
Singer Mega Dry SDHM-25L-50DI User manual

Singer
Singer SDHM-16L-55DIA User manual

Singer
Singer VAPOR OUT SDHM-16L User manual