SOLAC AS3252 User manual

1
MOD.
AS3252
AS3252_aspirador.indd 1 11/7/16 16:26
ΗΛΕΚΤΡΙΚΗ ΣΚΟΥΠΑ
ΟΔΗΓΙΕΣ ΧΡΗΣΗΣ
VACUUM CLEANER
INSTRUCTIONS FOR USE
Solac is a registered Trade Mark
Η Μάρκα Solac αποτελεί σήμα κατατεθέν

2
7
17
16
16
14
8
2
5
6
3
13
20
21
24
27
11 14
25
9
28
18
26
22
15
23
12
10
19
AS3252_aspirador.indd 2 11/7/16 16:26

3
Fig. 1
Fig. 3
Fig. 4 Fig. 5
Fig. 2
AS3252_aspirador.indd 3 11/7/16 16:26

4
Fig. 6
Fig. 9 Fig. 10
Fig. 7
Fig. 8
AS3252_aspirador.indd 4 11/7/16 16:26

5
ENGLISH EN
DESCRIPTION
A Spray button
B Steam blast button
&6WHDPÀRZFRQWURO
D Auto-cleaning button
E Temperature regulator
F Pilot light
G Filling spout
H Spray nozzle
I Soleplate
•
Read these instructions carefully before
VZLWFKLQJRQWKHDSSOLDQFHDQGNHHSWKHPIRU
IXWXUHUHIHUHQFH)DLOXUHWRIROORZDQGREVHUYH
these instructions may result in an accident.
86($1'&$5(
•
)XOO\XQUROOWKHDSSOLDQFH¶VSRZHUFDEOHEHIRUH
each use.
•
Do not use the appliance if the accessories at-
tached to it are defective. Replace them imme-
diately. Do not use the appliance on any part of
the body of a person or animal.
•
Do not use the appliance on pets or animals.
•
Do not use the appliance to dry garments of
any kind.
•
Turning the thermostat control to the minimum
(MIN) setting does not guarantee that the iron
LVVZLWFKHGRIIFRPSOHWHO\
INSTRUCTIONS FOR USE
%()25(86(
•
3HHORIIDSSOLDQFH¶VSURWHFWLYH¿OP
•
Make sure that all the product’s packaging has
been removed.
•
Some parts of the appliance have been lightly
greased, consequently, the appliance may give
RIIDOLJKWVPRNHWKH¿UVWWLPHLWLVXVHG$IWHUD
VKRUWWLPHWKLVVPRNHZLOOGLVDSSHDU
•
Prepare the appliance according to the func-
WLRQ\RXZLVKWRXVH
),//,1*:,7+:$7(5
•
,WLVHVVHQWLDOWRKDYH¿OOHGWKHWDQNZLWKZDWHU
WREHDEOHWRZRUNZLWKVWHDP
•
2SHQWKHOLGRQWKH¿OOLQJVSRXW
•
Fill the tank, taking care to respect the MAX
level (Fig. 1).
•
&ORVHWKH¿OOLQJVSRXWOLG
86(
•
Unroll the cable completely before plugging it
in.
•
Connect the appliance to the mains.
•
Turn the thermostat control to the desired tem-
perature position.
•
Do not use temperatures higher than those in-
dicated on the garments to be ironed.
Ɣ 7HPSHUDWXUHIRUV\QWKHWLF¿EUHV
(Polyester, Nylon…).
ƔƔ7HPSHUDWXUHIRUVLONZRRO0LQLPXP
WHPSHUDWXUHIRULURQLQJZLWKVWHDP
ƔƔƔ 7HPSHUDWXUHIRUFRWWRQ
Max Temperature for linen.
•
,I JDUPHQW KDV YDULRXV NLQGV RI ¿EUHV VHOHFW
WKHWHPSHUDWXUHIRUWKH¿EUHWKDWUHTXLUHVWKH
ORZHVW WHPSHUDWXUH )RU H[DPSOH VHOHFW WKH
temperature for polyester for a fabric made out
of 60% polyester and 40% cotton).
•
Wait until the pilot light (F) has gone out, indi-
cating that the appliance has reached an ade-
quate temperature.
•
'XULQJXVHWKHSLORWOLJKW)ZLOODXWRPDWLFDOO\
ÀDVKRQDQGRIILQGLFDWLQJWKDWWKHKHDWLQJHO-
ements are operating in order to maintain the
desired temperature.
'5<,521,1*
•
7KH DSSOLDQFH KDV D VWHDP ÀRZ UHJXODWRU
ZKLFKZKHQVHWWRDOORZVGU\LURQLQJZLWK-
out steam).
67($0,521,1*
•
,WLVSRVVLEOHWRLURQZLWKVWHDPZKHQHYHUWKH
WDQNKDVZDWHUDQGWKHDGHTXDWHWHPSHUDWXUH
is selected.
67($0)/2:&21752/
•
The appliance has a (C) control knob for ad-
MXVWLQJWKHVWHDPÀRZ
635$<
•
The spray can be used in both steam and dry
ironing.
•
Press the spray button ( A ) to use this oper-
ation.
•
The spray button has to be pressed repeatedly
WRUHOHDVHWKH¿UVWVSUD\
67($0%/$67
•
This function provides extra steam for remov-
ing creases.
ΕΛΛΗΝΙΚΑ GR
• Διαβάστε προσεκτικά αυτές τις οδηγίες πριν
από τη χρήση.
• Αυτό το εγχειρίδιο αποτελεί αναπόσπαστο
μέρος του προϊόντος.
• Φυλάξτε το σε ασφαλές μέρος για μελλοντική
αναφορά.
ΠΡΟΣΟΧΗ
Λάβετε υπόψη τις προειδοποιήσεις που περι-
γράφονται παρακάτω, η μη τήρηση αυτών των
προειδοποιήσεων μπορεί να προκαλέσει ατυχή-
ματα με αποτέλεσμα τραυματισμό ή ζημιά.
ΓΕΝΙΚΕΣ ΟΔΗΓΙΕΣ
ΑΣΦΑΛΕΙΑΣ
• Αυτή η συσκευή μπορεί να
χρησιμοποιηθεί από παιδιά
ηλικίας από 8 ετών και άνω και
άτομα με μειωμένη σωματική,
αισθητηριακή ή ψυχική ή έλλει-
ψη εμπειρίας και γνώσης εάν
έχουν εποπτεία ή τους έχουν
δοθεί οδηγίες σχετικά με την
ασφαλή χρήση της συσκευής
ώστε να κατανοήσουν τους
κινδύνους που ενέχονται.
• Αυτή η συσκευή δεν είναι παι-
χνίδι. Τα παιδιά πρέπει να επι-
βλέπονται για να βεβαιωθείτε
ότι δεν παίζουν με τη συσκευή.
• Καθαρισμός και συντήρηση
συσκευής δεν γίνεται από παι-
διά χωρίς επίβλεψη.
• Αποσυνδέετε πάντα τη συ-
σκευή από την πρίζα μετά τη
χρήση και πριν τη συναρμολό-
γηση ή αφαίρεση εξαρτημάτων
και την εκτέλεση οποιασδή-
ποτε συντήρησης ή εργασίας
καθαρισμού. Η συσκευή πρέ-
πει να είναι απενεργοποιημένη
πριν τη σύνδεση στο ρεύμα.
• Εάν το καλώδιο τροφοδοσίας
είναι κατεστραμμένο πρέπει να
αντικατασταθεί από τον κατα-
σκευαστή ή από κατάστημα με
εξειδικευμένο προσωπικό για
την πρόληψη πιθανών κινδύ-
νων.
• Αυτή η ηλεκτρική σκούπα διαθέτει εξάρτημα
ειδικά σχεδιασμένο για τον καθαρισμό χαλιών
και ξύλινων πατωμάτων.
• Αυτή η ηλεκτρική σκούπα έχει σχεδιαστεί για
να συλλέξετε ξηρούς ρύπους (σκόνη, ίνες,
κλωστές).
• Αυτή η συσκευή προορίζεται αποκλειστικά για
οικιακή και όχι για βιομηχανική χρήση. Μην
την χρησιμοποιείται για οποιονδήποτε άλλο
σκοπό εκτός από αυτόν που αναφέρεται
• Μην κάνετε τροποποιήσεις ή επισκευές στη
συσκευή. Σε περίπτωση οποιασδήποτε
ανωμαλίας στο καλώδιο ή οποιοδήποτε άλλο
μέρος μεταφέρετέ τη σε εξουσιοδοτημένη
υπηρεσία service.
• Μην χρησιμοποιείτε εξαρτήματα ή αξεσουάρ
που δεν παρέχονται ή συνιστώνται από τη
SOLAC.
• Μην χρησιμοποιείτε την ηλεκτρική σκούπα για
καθαρισμό ζώων.
• Ποτέ μην την τοποθετείτε πάνω από τέφρα,
θραύσματα, αιχμηρά αντικείμενα ή υγρά, η
απορρόφησή τους ενδεχομένως να προκαλέ-
σει ζημιά.
• Μην βάζετε τη συσκευή κοντά σε τοξικά υλικά
(αμμωνία, κ.λπ.).
• Μην καθαρίζετε σκόνη γραφίτη με την
ηλεκτρική σκούπα, αφού ο γραφίτης - που
χρησιμοποιείται σε εκτυπωτές και φωτοτυπικά
μηχανήματα - μπορεί να γίνει αγωγός ηλεκτρι-
κής ενέργειας.
• Πριν συνδέσετε τη συσκευή στο δίκτυο,
βεβαιωθείτε ότι η υποδεικνυόμενη τάση δεν
υπερβαίνει την εγκατάσταση του σπιτιού σας.
• Μη χρησιμοποιείτε το καλώδιο για να κλείσετε
τη συσκευή. Αποσυνδέετε πάντα τραβώντας
το βύσμα και όχι το καλώδιο.
• Βεβαιωθείτε ότι το καλώδιο δεν έρχεται σε

6
ENGLISH EN
DESCRIPTION
A Spray button
B Steam blast button
&6WHDPÀRZFRQWURO
D Auto-cleaning button
E Temperature regulator
F Pilot light
G Filling spout
H Spray nozzle
I Soleplate
•
Read these instructions carefully before
VZLWFKLQJRQWKHDSSOLDQFHDQGNHHSWKHPIRU
IXWXUHUHIHUHQFH)DLOXUHWRIROORZDQGREVHUYH
these instructions may result in an accident.
86($1'&$5(
•
)XOO\XQUROOWKHDSSOLDQFH¶VSRZHUFDEOHEHIRUH
each use.
•
Do not use the appliance if the accessories at-
tached to it are defective. Replace them imme-
diately. Do not use the appliance on any part of
the body of a person or animal.
•
Do not use the appliance on pets or animals.
•
Do not use the appliance to dry garments of
any kind.
•
Turning the thermostat control to the minimum
(MIN) setting does not guarantee that the iron
LVVZLWFKHGRIIFRPSOHWHO\
INSTRUCTIONS FOR USE
%()25(86(
•
3HHORIIDSSOLDQFH¶VSURWHFWLYH¿OP
•
Make sure that all the product’s packaging has
been removed.
•
Some parts of the appliance have been lightly
greased, consequently, the appliance may give
RIIDOLJKWVPRNHWKH¿UVWWLPHLWLVXVHG$IWHUD
VKRUWWLPHWKLVVPRNHZLOOGLVDSSHDU
•
Prepare the appliance according to the func-
WLRQ\RXZLVKWRXVH
),//,1*:,7+:$7(5
•
,WLVHVVHQWLDOWRKDYH¿OOHGWKHWDQNZLWKZDWHU
WREHDEOHWRZRUNZLWKVWHDP
•
2SHQWKHOLGRQWKH¿OOLQJVSRXW
•
Fill the tank, taking care to respect the MAX
level (Fig. 1).
•
&ORVHWKH¿OOLQJVSRXWOLG
86(
•
Unroll the cable completely before plugging it
in.
•
Connect the appliance to the mains.
•
Turn the thermostat control to the desired tem-
perature position.
•
Do not use temperatures higher than those in-
dicated on the garments to be ironed.
Ɣ 7HPSHUDWXUHIRUV\QWKHWLF¿EUHV
(Polyester, Nylon…).
ƔƔ7HPSHUDWXUHIRUVLONZRRO0LQLPXP
WHPSHUDWXUHIRULURQLQJZLWKVWHDP
ƔƔƔ 7HPSHUDWXUHIRUFRWWRQ
Max Temperature for linen.
•
,I JDUPHQW KDV YDULRXV NLQGV RI ¿EUHV VHOHFW
WKHWHPSHUDWXUHIRUWKH¿EUHWKDWUHTXLUHVWKH
ORZHVW WHPSHUDWXUH )RU H[DPSOH VHOHFW WKH
temperature for polyester for a fabric made out
of 60% polyester and 40% cotton).
•
Wait until the pilot light (F) has gone out, indi-
cating that the appliance has reached an ade-
quate temperature.
•
'XULQJXVHWKHSLORWOLJKW)ZLOODXWRPDWLFDOO\
ÀDVKRQDQGRIILQGLFDWLQJWKDWWKHKHDWLQJHO-
ements are operating in order to maintain the
desired temperature.
'5<,521,1*
•
7KH DSSOLDQFH KDV D VWHDP ÀRZ UHJXODWRU
ZKLFKZKHQVHWWRDOORZVGU\LURQLQJZLWK-
out steam).
67($0,521,1*
•
,WLVSRVVLEOHWRLURQZLWKVWHDPZKHQHYHUWKH
WDQNKDVZDWHUDQGWKHDGHTXDWHWHPSHUDWXUH
is selected.
67($0)/2:&21752/
•
The appliance has a (C) control knob for ad-
MXVWLQJWKHVWHDPÀRZ
635$<
•
The spray can be used in both steam and dry
ironing.
•
Press the spray button ( A ) to use this oper-
ation.
•
The spray button has to be pressed repeatedly
WRUHOHDVHWKH¿UVWVSUD\
67($0%/$67
•
This function provides extra steam for remov-
ing creases.
ΕΛΛΗΝΙΚΑ GR
επαφή με αιχμηρές άκρες ή θερμές επιφάνει-
ες.
• Μην αφήνετε το καλώδιο να κρέμεται πάνω
από την άκρη ενός τραπεζιού ή πάγκου εργα-
σίας, για να αποτρέψετε τα παιδιά τραβώντας
το, να προκαλέσουν πτώση της συσκευής.
• Μην βυθίζετε τη συσκευή σε νερό ή οποιοδή-
ποτε άλλο υγρό.
• Μην χειρίζεστε ποτέ την ηλεκτρική σκούπα ή
το βύσμα με βρεγμένα χέρια.
• Μην αφήνετε τη συσκευή συνδεδεμένη στο
ρεύμα χωρίς παρακολούθηση.
• Κρατήστε την ηλεκτρική σκούπα μακριά από
πηγές θερμότητας.
• Μην χρησιμοποιείτε ποτέ την ηλεκτρική σκού-
πα χωρίς τα προστατευτικά φίλτρα να είναι
τοποθετημένα σωστά.
• Διατηρείτε πάντα τις εισόδους και τις εξόδους
αέρα καθαρούς.
• Διατηρείτε τρίχες, ρούχα και τα δάχτυλά σας
μακριά από τις εισόδους-εξόδους αέρα.
• Να είστε πολύ προσεκτικοί όταν χρησιμοποιεί-
τε την ηλεκτρική σκούπα στις σκάλες.
• Μη χρησιμοποιείτε τη συσκευή σε περιορισμέ-
νους χώρους όπου μπορούν να συσσωρευ-
τούν εκρηκτικοί ή τοξικοί ατμοί.
• Μη χρησιμοποιείτε τη συσκευή πάνω από το
ύψος του καλωδίου τροφοδοσίας.
• Εκτελέστε τις υποδεικνυόμενες εργασίες
συντήρησης που θα βρείτε στην ενότητα
ΚΑΘΑΡΙΣΜΟΣ ΚΑΙ ΑΠΟΘΗΚΕΥΣΗ για να
παρατείνεται τη διάρκεια ζωής της συσκευής.
• Αφαιρέστε όλα τα στοιχεία από το εσωτερικό
ή το εξωτερικό της συσκευής που χρησιμο-
ποιήθηκε για προστασία κατά τη διάρκεια
μεταφορά της, επίσης όλες τις προσφορές
πωλήσεων, όπως χαρτί, πλαστικές σακούλες,
πλαστικά φύλλα, χαρτόνι και αυτοκόλλητα.
ΚΥΡΙΑ ΕΞΑΡΤΗΜΑΤΑ
1 Κύριο σώμα σκούπας.
2 Καλώδιο τροφοδοσίας.
3 Διακόπτης On / Off.
4 Κάλυμμα φίλτρου εξόδου αέρα
5 Χώρος για την τοποθέτηση βούρτσας .
6 Ηλεκτρονικός ρυθμιστής αναρρόφησης.
7 Φίλτρο εξόδου αέρα.
8 Κουμπί καλωδίου.
9 Λαβή μεταφοράς.
10 Δοχείο σκόνης.
11 Σύνδεση σωλήνα καθαρισμού.
12 Εύκαμπτος σωλήνας καθαρισμού.
13 Ρυθμιστής αναρρόφησης.
14 Φίλτρο προστασίας κινητήρα
15 Κουμπί αφαίρεσης δοχείου σκόνης.
16 Ανοιγμα καλύμματος δοχείου σκόνης.
17 Κάλυμμα δοχείου σκόνης.
18 Φίλτρο αέρα.
19 Μέγιστο επίπεδο πλήρωσης δοχείου σκόνης.
20 Τηλεσκοπικός μεταλλικός σωλήνας
καθαρισμού.
21 Ρύθμιση ύψους για τον σωλήνα.
22 Πτυσσόμενο κουμπί βούρτσας καθαρισμού.
23 Βούρτσα δαπέδου και μοκέτας.
24 Γάντζος προσωρινής στάσης.
25 Βούρτσα παρκετέζα
26 Κεφαλή αναρρόφησης για αυλάκια σκόνης
και δύσκολες γωνίες
27 Βούρτσα καθαρισμού επίπλων
28 Κουμπιά απελευθέρωσης εύκαμπτου
σωλήνα καθαρισμού
ΧΡΗΣΗ
ΤΕΧΝΟΛΟΓΙΑ ΚΑΘΑΡΙΣΜΟΥ
Η αναρροφημένη βρωμιά εισέρχεται στο δοχείο
σκόνης (10). Τα σωματίδια ρύπου που διαφεύ-
γουν συγκρατούνται στον εξωτερικό θάλαμο του
δοχείου σκόνης από το ειδικό φίλτρο (18) πριν
περάσετε στο φίλτρο προστασίας κινητήρα (14),
διασφαλίζοντας έτσι ότι ο αέρας είναι απαλλαγ-
μένος από σωματίδια σκόνης.
Αυτή η συσκευή έχει σχεδιαστεί αποκλειστικά
για αναρρόφηση βρωμιάς και σκόνης σε πα-
τώματα, χαλιά, έπιπλα και υφάσματα. Μην τη
χρησιμοποιείτε για οποιονδήποτε άλλο σκοπό.
1. Ελέγξτε ότι το δοχείο σκόνης (10) και τα φίλ-
τρα (18, 14 και 7) έχουν εγκατασταθεί σωστά.
Βλέπε ενότητα (Καθαρισμός και συντήρηση).
2. Τοποθετήστε τον εύκαμπτο σωλήνα (12) στη
σύνδεση (11) έως ότου κάνει «κλικ». Όταν
θέλετε να αφαιρέσετε το σωλήνα, πατήστε το
κουμπί απελευθέρωσης (28).
3. Συνδέστε τον τηλεσκοπικό μεταλλικό σωλήνα
(20).
4. Προετοιμάστε τα κατάλληλα εξαρτήματα για
την επιφάνεια που θέλετε να καθαρίσετε.
Βάλτε το επιθυμητό αξεσουάρ στην άκρη του
μεταλλικού σωλήνα καθαρισμού (20)
Βούρτσα δαπέδου και μοκέτας γενικής
χρήσης (23)
Μπορείτε να τη χρησιμοποιήσετε εύκολα,
δεδομένου ότι μπορεί να προσαρμοστεί σε
οποιαδήποτε επιφάνεια πρέπει να καθαριστεί

7
ENGLISH EN
DESCRIPTION
A Spray button
B Steam blast button
&6WHDPÀRZFRQWURO
D Auto-cleaning button
E Temperature regulator
F Pilot light
G Filling spout
H Spray nozzle
I Soleplate
•
Read these instructions carefully before
VZLWFKLQJRQWKHDSSOLDQFHDQGNHHSWKHPIRU
IXWXUHUHIHUHQFH)DLOXUHWRIROORZDQGREVHUYH
these instructions may result in an accident.
86($1'&$5(
•
)XOO\XQUROOWKHDSSOLDQFH¶VSRZHUFDEOHEHIRUH
each use.
•
Do not use the appliance if the accessories at-
tached to it are defective. Replace them imme-
diately. Do not use the appliance on any part of
the body of a person or animal.
•
Do not use the appliance on pets or animals.
•
Do not use the appliance to dry garments of
any kind.
•
Turning the thermostat control to the minimum
(MIN) setting does not guarantee that the iron
LVVZLWFKHGRIIFRPSOHWHO\
INSTRUCTIONS FOR USE
%()25(86(
•
3HHORIIDSSOLDQFH¶VSURWHFWLYH¿OP
•
Make sure that all the product’s packaging has
been removed.
•
Some parts of the appliance have been lightly
greased, consequently, the appliance may give
RIIDOLJKWVPRNHWKH¿UVWWLPHLWLVXVHG$IWHUD
VKRUWWLPHWKLVVPRNHZLOOGLVDSSHDU
•
Prepare the appliance according to the func-
WLRQ\RXZLVKWRXVH
),//,1*:,7+:$7(5
•
,WLVHVVHQWLDOWRKDYH¿OOHGWKHWDQNZLWKZDWHU
WREHDEOHWRZRUNZLWKVWHDP
•
2SHQWKHOLGRQWKH¿OOLQJVSRXW
•
Fill the tank, taking care to respect the MAX
level (Fig. 1).
•
&ORVHWKH¿OOLQJVSRXWOLG
86(
•
Unroll the cable completely before plugging it
in.
•
Connect the appliance to the mains.
•
Turn the thermostat control to the desired tem-
perature position.
•
Do not use temperatures higher than those in-
dicated on the garments to be ironed.
Ɣ 7HPSHUDWXUHIRUV\QWKHWLF¿EUHV
(Polyester, Nylon…).
ƔƔ7HPSHUDWXUHIRUVLONZRRO0LQLPXP
WHPSHUDWXUHIRULURQLQJZLWKVWHDP
ƔƔƔ 7HPSHUDWXUHIRUFRWWRQ
Max Temperature for linen.
•
,I JDUPHQW KDV YDULRXV NLQGV RI ¿EUHV VHOHFW
WKHWHPSHUDWXUHIRUWKH¿EUHWKDWUHTXLUHVWKH
ORZHVW WHPSHUDWXUH )RU H[DPSOH VHOHFW WKH
temperature for polyester for a fabric made out
of 60% polyester and 40% cotton).
•
Wait until the pilot light (F) has gone out, indi-
cating that the appliance has reached an ade-
quate temperature.
•
'XULQJXVHWKHSLORWOLJKW)ZLOODXWRPDWLFDOO\
ÀDVKRQDQGRIILQGLFDWLQJWKDWWKHKHDWLQJHO-
ements are operating in order to maintain the
desired temperature.
'5<,521,1*
•
7KH DSSOLDQFH KDV D VWHDP ÀRZ UHJXODWRU
ZKLFKZKHQVHWWRDOORZVGU\LURQLQJZLWK-
out steam).
67($0,521,1*
•
,WLVSRVVLEOHWRLURQZLWKVWHDPZKHQHYHUWKH
WDQNKDVZDWHUDQGWKHDGHTXDWHWHPSHUDWXUH
is selected.
67($0)/2:&21752/
•
The appliance has a (C) control knob for ad-
MXVWLQJWKHVWHDPÀRZ
635$<
•
The spray can be used in both steam and dry
ironing.
•
Press the spray button ( A ) to use this oper-
ation.
•
The spray button has to be pressed repeatedly
WRUHOHDVHWKH¿UVWVSUD\
67($0%/$67
•
This function provides extra steam for remov-
ing creases.
ΕΛΛΗΝΙΚΑ GR
με ηλεκτρική σκούπα. Για να αλλάξετε το είδος
του καθαρισμού, πατήστε το κουμπί βούρτσας
(22) με το πόδι. Συνιστούμε να καθαρίζετε
σκληρά δάπεδα, ξύλο και παρκέ με τη βούρ-
τσα ινών εκτεταμένη.
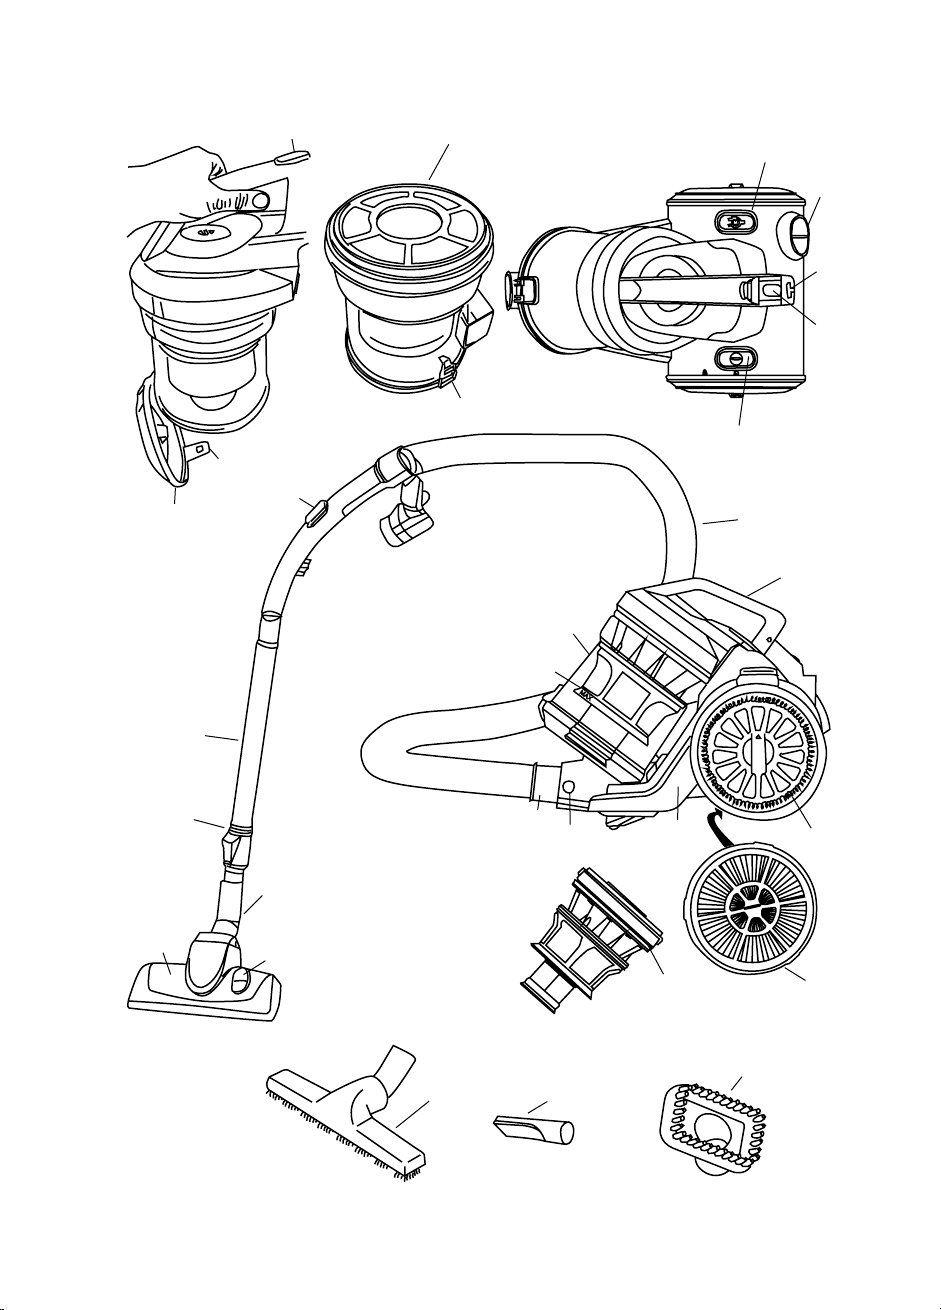
Κεφαλή αναρρόφησης (26)
Κατάλληλη για καθαρισμό δύσκολων, δυ-
σπρόσιτων στενών σημείων, αυλακώσεων και
γωνιών.
Παρκετέζα (25)
Σας συνιστούμε να τη χρησιμοποιήσετε σε
παρκέ και σκληρά δάπεδα (πλακάκια, κεραμι-
κά, μάρμαρα κ.λπ.)
Βούρτσα επίπλων (27)
Συνιστάται για τον καθαρισμό επίπλων, λα-
μπτήρων κ.λπ.
Μπορείτε να ρυθμίσετε το μήκος του τηλε-
σκοπικού σωλήνα (20). Σύρετε τη συσκευή
ρύθμισης (21) προς τα κάτω για να απελευθε-
ρώσετε το πάνω μέρος του σωλήνα. Ταυτό-
χρονα τραβήξτε προς τα πάνω ή προς τα
κάτω μέχρι να έχετε το επιθυμητό μήκος που
σας διευκολύνει.
5. Τραβήξτε το καλώδιο τροφοδοσίας (2) στο
κίτρινο σημάδι (ιδανικό μήκος). Εάν είναι απα-
ραίτητο το καλώδιο μπορεί να τραβηχτεί μέχρι
το κόκκινο σημάδι, αλλά όχι περισσότερο.
6. Συνδέστε στο ρεύμα.
7. Ενεργοποιήστε τη συσκευή πατώντας το
διακόπτη (3) και ρυθμίστε την ισχύ αναρρό-
φησης, το άνοιγμα και το κλείσιμό της από το
χειριστήριο ρυθμιστή που υπάρχει στη λαβή
(13). Η ισχύς αναρρόφησης μειώνεται με το
άνοιγμα της βαλβίδας και αυξάνεται με το
κλείσιμο της. Μπορείτε επίσης να ρυθμίσετε
την ισχύ αναρρόφησης χρησιμοποιώντας τον
ηλεκτρονικό ρυθμιστή (6). μεταξύ των θέσεων
MIN. και MAX. ανάλογα με την επιθυμητή
αναρρόφηση που θέλετε να δώσετε.
Όταν ακούτε έναν απότομο ήχο σφυρίγ-
ματος που διαφέρει από τον κανονικό ήχο
χρησιμοποιώντας τη συσκευή, απενεργο-
ποιήστε και αποσυνδέστε τη από το ρεύμα.
Ελέγξτε εάν οι είσοδοι και οι έξοδοι αέρα ή
τα φίλτρα εμποδίζονται. Εάν εμποδίζονται,
απομακρύνετε από τη συσκευή ότι εμποδί-
ζει την λειτουργία της.
Όταν χρησιμοποιείτε τη συσκευή μπορείτε να
την μετακινείται όπου θέλετε, μέσω της λαβής
(9) που επίσης χρησιμοποιείται για τη μεταφο-
ρά της ηλεκτρικής σκούπας.
Η συσκευή έχει μια θέση που ονομάζεται
«οριζόντια θέση στάθμευσης, η οποία είναι
βολική όταν χρησιμοποιείται κατά τη διάρκεια
στάσεων κατά τον καθαρισμό. Βάλτε τη σε
αυτή τη θέση, τοποθετήστε το άγκιστρο του
σωλήνα στην αυλάκωση (5) για βολικότερη
θέση της συσκευής (Εικόνα 1).
8. Όταν τελειώσετε, απενεργοποιήστε τη
συσκευή πατώντας το κουμπί On / Off (3).
Αποσυνδέστε, πατήστε το κουμπί (8) για να
τυλίξετε το καλώδιο. Κρατήστε το καλώδιο στο
χέρι σας για να αποτρέψετε το χτύπημά του
στο περίβλημα της ηλεκτρικής σκούπας.
ΘΕΡΜΟΣΤΑΤΗΣ ΑΣΦΑΛΕΙΑΣ
Το σύστημα διαθέτει θερμοστάτη ασφαλείας.
Εάν για οποιοδήποτε λόγο η ηλεκτρική σκούπα
πρέπει να υπερθερμανθεί, ο θερμοστάτης θα
κλείσει αυτόματα τη συσκευή. Εάν αυτό συμβεί:
1. Πατήστε το διακόπτη on / off (3) και αποσυν-
δέστε τη συσκευή από το ρεύμα.
2. Βεβαιωθείτε ότι δεν υπάρχουν είσοδοι και
έξοδοι αέρα φραγμένοι, σε αντίθετη περίπτω-
ση απαλλαγείτε από την αιτία της απόφραξης
τους.
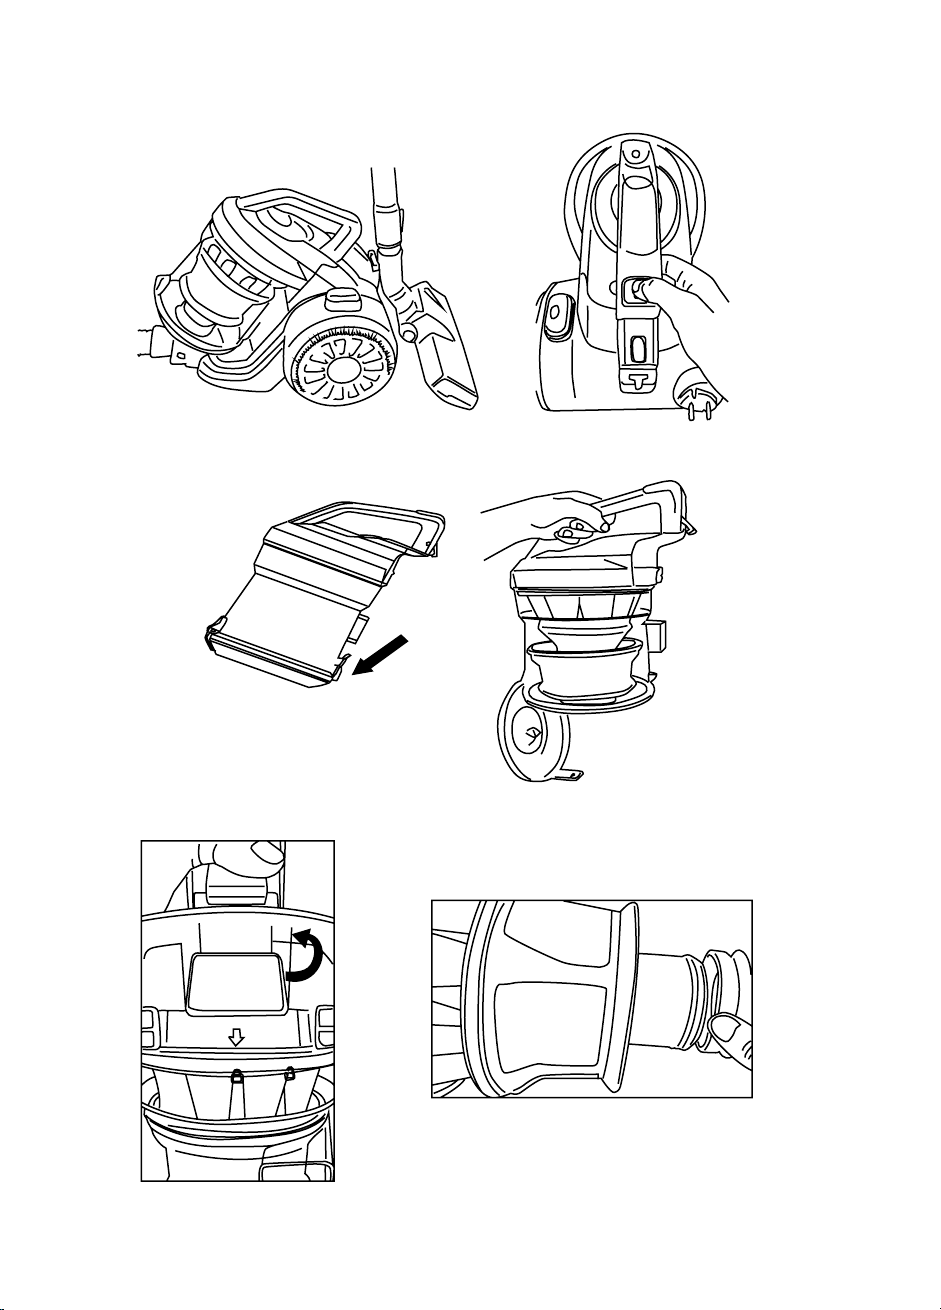
3. Αδειάστε το δοχείο σκόνης (εξωτερικό και
εσωτερικό). Δείτε την επόμενη ενότητα «Καθα-
ρισμός και Συντήρηση”.
4. Εάν η διακοπή οφείλεται σε υπερθέρμανση
του κινητήρα περιμένετε περίπου μία ώρα για
να κρυώσει η συσκευή πριν την ενεργοποιή-
σετε ξανά. Μπορείτε να μειώσετε τον χρόνο
αναμονής τοποθετώντας τη σε δροσερό ή
καλά αεριζόμενο μέρος, ώστε η θερμότητα να
διαλυθεί.
ΚΑΘΑΡΙΣΜΟΣ ΚΑΙ ΣΥΝΤΗΡΗΣΗ
1. Το δοχείο σκόνης (10) έχει μέγιστο σημάδι
πλήρωσης, βεβαιωθείτε ότι η βρωμιά δεν
υπερβαίνει αυτό το επίπεδο.
2. Πατήστε το κουμπί απελευθέρωσης (15),
ώστε να κρατήσετε το δοχείο σκόνης. (εικ. 2).
3. Αφαιρέστε τη βρωμιά, κρατώντας από πάνω,
όπως ένα σκουπιδοτενεκέ. Τραβήξτε προς τα
κάτω το κάλυμμα του δοχείου σκόνης ανοίγο-
ντας το (16) και αδειάστε το περιεχόμενο σε
κάδο απορριμμάτων (Εικ. 3).
4. Γυρίστε το κάλυμμα του δοχείου σκόνης
αριστερόστροφα, αφαιρέστε τα φίλτρα προ-
στασίας (14), (18). Αδειάστε το περιεχόμενο,

8
ENGLISH EN
DESCRIPTION
A Spray button
B Steam blast button
&6WHDPÀRZFRQWURO
D Auto-cleaning button
E Temperature regulator
F Pilot light
G Filling spout
H Spray nozzle
I Soleplate
•
Read these instructions carefully before
VZLWFKLQJRQWKHDSSOLDQFHDQGNHHSWKHPIRU
IXWXUHUHIHUHQFH)DLOXUHWRIROORZDQGREVHUYH
these instructions may result in an accident.
86($1'&$5(
•
)XOO\XQUROOWKHDSSOLDQFH¶VSRZHUFDEOHEHIRUH
each use.
•
Do not use the appliance if the accessories at-
tached to it are defective. Replace them imme-
diately. Do not use the appliance on any part of
the body of a person or animal.
•
Do not use the appliance on pets or animals.
•
Do not use the appliance to dry garments of
any kind.
•
Turning the thermostat control to the minimum
(MIN) setting does not guarantee that the iron
LVVZLWFKHGRIIFRPSOHWHO\
INSTRUCTIONS FOR USE
%()25(86(
•
3HHORIIDSSOLDQFH¶VSURWHFWLYH¿OP
•
Make sure that all the product’s packaging has
been removed.
•
Some parts of the appliance have been lightly
greased, consequently, the appliance may give
RIIDOLJKWVPRNHWKH¿UVWWLPHLWLVXVHG$IWHUD
VKRUWWLPHWKLVVPRNHZLOOGLVDSSHDU
•
Prepare the appliance according to the func-
WLRQ\RXZLVKWRXVH
),//,1*:,7+:$7(5
•
,WLVHVVHQWLDOWRKDYH¿OOHGWKHWDQNZLWKZDWHU
WREHDEOHWRZRUNZLWKVWHDP
•
2SHQWKHOLGRQWKH¿OOLQJVSRXW
•
Fill the tank, taking care to respect the MAX
level (Fig. 1).
•
&ORVHWKH¿OOLQJVSRXWOLG
86(
•
Unroll the cable completely before plugging it
in.
•
Connect the appliance to the mains.
•
Turn the thermostat control to the desired tem-
perature position.
•
Do not use temperatures higher than those in-
dicated on the garments to be ironed.
Ɣ 7HPSHUDWXUHIRUV\QWKHWLF¿EUHV
(Polyester, Nylon…).
ƔƔ7HPSHUDWXUHIRUVLONZRRO0LQLPXP
WHPSHUDWXUHIRULURQLQJZLWKVWHDP
ƔƔƔ 7HPSHUDWXUHIRUFRWWRQ
Max Temperature for linen.
•
,I JDUPHQW KDV YDULRXV NLQGV RI ¿EUHV VHOHFW
WKHWHPSHUDWXUHIRUWKH¿EUHWKDWUHTXLUHVWKH
ORZHVW WHPSHUDWXUH )RU H[DPSOH VHOHFW WKH
temperature for polyester for a fabric made out
of 60% polyester and 40% cotton).
•
Wait until the pilot light (F) has gone out, indi-
cating that the appliance has reached an ade-
quate temperature.
•
'XULQJXVHWKHSLORWOLJKW)ZLOODXWRPDWLFDOO\
ÀDVKRQDQGRIILQGLFDWLQJWKDWWKHKHDWLQJHO-
ements are operating in order to maintain the
desired temperature.
'5<,521,1*
•
7KH DSSOLDQFH KDV D VWHDP ÀRZ UHJXODWRU
ZKLFKZKHQVHWWRDOORZVGU\LURQLQJZLWK-
out steam).
67($0,521,1*
•
,WLVSRVVLEOHWRLURQZLWKVWHDPZKHQHYHUWKH
WDQNKDVZDWHUDQGWKHDGHTXDWHWHPSHUDWXUH
is selected.
67($0)/2:&21752/
•
The appliance has a (C) control knob for ad-
MXVWLQJWKHVWHDPÀRZ
635$<
•
The spray can be used in both steam and dry
ironing.
•
Press the spray button ( A ) to use this oper-
ation.
•
The spray button has to be pressed repeatedly
WRUHOHDVHWKH¿UVWVSUD\
67($0%/$67
•
This function provides extra steam for remov-
ing creases.
ΕΛΛΗΝΙΚΑ GR
ξεπλύνετε με νερό βρύσης (εικ. 4)
5. Καθαρίστε το φίλτρο (18) και το δοχείο σκόνης
με πινέλο και βρεγμένο πανί.
Για να καθαρίσετε το φίλτρο:
• Αφαιρέστε το λάστιχο (εικ. 5)
• Αφαιρέστε τη βάση περιστρέφοντάς την
αριστερόστροφα. (εικ.6)
• Αφαιρέστε το κάλυμμα (εικ. 7)
Για να επανασυναρμολογήσετε το φίλτρο, προ-
χωρήστε με τις παραπάνω οδηγίες, με αντίστρο-
φη σειρά.
1. Ελέγξτε ότι τα πλυμένα στοιχεία είναι εντελώς
στεγνά πριν τα επαναφέρετε μέσα στη συ-
σκευή.
2. Για να κλείσετε το δοχείο σκόνης, γείρετε το
κάτω κάλυμμα δοχείου (17) και πατήστε μέχρι
να φτάσετε να ακούστε ένα κλικ, υποδεικνύο-
ντας ότι το κάλυμμα είναι κλειστό σωστά.
3. Τοποθετήστε το φίλτρο στο δοχείο, στην εγκο-
πή στερέωσης που είναι τοποθετημένη στο
δοχείο σκόνης (Φωτό 8).
4. Τοποθετήστε το κάλυμμα του δοχείου στο
σημάδι και γυρίστε δεξιόστροφα.
5. Τοποθετήστε ξανά το δοχείο σκόνης μέσα στη
συσκευή. Σπρώξτε το δοχείο προς τη συσκευή
μέχρι να ακούσετε ένα “κλικ”
ΚΑΘΑΡΙΣΜΟΣ
ΚΑΙ ΑΝΤΙΚΑΤΑΣΤΑΣΗΦΙΛΤΡΩΝ
1. Σας συνιστούμε περιοδικά να ελέγχετε τα
φίλτρα αέρα για να βεβαιωθείτε ότι λει-
τουργούν σωστά. Καθαρίστε τα φίλτρα αν
εντοπίσετε ότι η ικανότητα αναρρόφησης
της συσκευής έχει μειωθεί.
2. Καθαρίστε τα φίλτρα χρησιμοποιώντας νερό
βρύσης και αφήστε τα να στεγνώσουν εντε-
λώς. Μην χρησιμοποιείτε στεγνωτήρα μαλ-
λιών για να στεγνώστε τα φίλτρα πιο γρήγορα.
3. Συνιστάται η αντικατάσταση των φίλτρων μία
ή δύο φορές το χρόνο, ανάλογα με το πόσο
συχνά χρησιμοποιείται η συσκευή.
Φίλτρο εξαγωγής αέρα (7)
1. Γυρίστε το κάλυμμα του φίλτρου εξόδου αέρα
(4) αριστερόστροφα
2. Αφαιρέστε το φίλτρο εξόδου (7) τραβώντας το
προς τα εσάς (εικ. 9).
3. Πατήστε απαλά το φίλτρο εξόδου στο πλάι για
απομάκρυνση τυχόν υπερβολικής βρωμιάς και
σκόνης. Ποτέ μην χρησιμοποιείτε την ηλεκτρι-
κή σκούπα χωρίς το φίλτρο εξόδου αέρα.
4. Τοποθετήστε το φίλτρο εξόδου αέρα στο
περίβλημά του.
5. Συνδέστε το κάλυμμα του φίλτρου εξόδου (4) ,
στρίψτε δεξιόστροφα.
Φίλτρο προστασίας κινητήρα (14)
1. Αδειάστε το δοχείο σκόνης πριν καθαρίσετε το
φίλτρο προστασίας κινητήρα. Βλέπε «αδειάζο-
ντας τη σκόνη (10)».
2. Αφαιρέστε το δοχείο σκόνης.
3. Γυρίστε το κάλυμμα του δοχείου σκόνης αρι-
στερόστροφα μέχρι το σημάδι.
4. Αφαιρέστε το φίλτρο τραβώντας το πάνω
μέρος προς τα πάνω (10).
5. Ανακινήστε το φίλτρο προστασίας του κινητή-
ρα, χτυπήστε απαλά στις πλευρές του μέχρι
να πέσει η σκόνη.
6. Ξεπλύνετε το φίλτρο προστασίας του κινητήρα
σε ζεστό νερό και αφήστε το να στεγνώσει
εντελώς.
ΚΑΘΑΡΙΣΜΟΣ ΤΗΣ ΣΥΣΚΕΥΗΣ
Πριν καθαρίσετε τη συσκευή, αποσυνδέστε
την από το ρεύμα. Ελέγξτε ότι δεν υπάρχει
νερό και υγρασία μέσα στη συσκευή.
Καθαρίστε τη συσκευή πριν τη χρησιμοποιήσετε
για πρώτη φορά, αμέσως μετά από κάθε χρήση
και αν έχετε να τη χρησιμοποιήσετε μεγάλο χρο-
νικό διάστημα. Έτσι θα εξασφαλίστε τη σωστή
λειτουργία της και θα παρατείνετε τη διάρκεια
ζωής της.
1. Καθαρίστε το εξωτερικό της συσκευής με
υγρό ύφασμα. Μην χρησιμοποιείτε λειαντικά
προϊόντα ή διαλύτες.
ΠΡΟΣΟΧΗ! Όταν θέλετε να πετάξετε το
συσκευή, ΠΟΤΕ μην τη πετάτε στον κάδο απορ-
ριμμάτων.Πάρτε τη στη συλλογή απορριμμά-
των που βρίσκεται πιο κοντά στο σπίτι σας για
επεξεργασία. Ετσι θα συμβάλετε στην φροντίδα
του περιβάλλοντος.
ΟΙΚΟΛΟΓΙΚΟΣ ΣΧΕΔΙΑΣΜΟΣ
ΠΛΗΡΟΦΟΡΙΕΣ ΣΥΜΜΟΡΦΩΣΗΣ ΜΕ ΟΙΚΟ-
ΛΟΓΙΚΕΣ ΑΠΑΙΤΗΣΕΙΣ ΣΧΕΔΙΑΣΜΟΥ
• Αυτή η ηλεκτρική σκούπα ανταποκρίνεται
στον οικολογικό σχεδιασμό και στις απαιτήσεις
όπως ορίζονται στο παράρτημα I του Κανονι-
σμός της ΕΕ (666/2013) μέσω της οποίας η
οδηγία Ισχύει 2009/125 / ΕΚ.
• Ευρωπαϊκά πρότυπα EN 60312-1, EN 60704-
2-1 y EN 60335-2-2 αναφέρονται για να προσ-
διορίζει τη συμμόρφωση με τον οικολογικό
σχεδιασμό.

9
ENGLISH EN
DESCRIPTION
A Spray button
B Steam blast button
&6WHDPÀRZFRQWURO
D Auto-cleaning button
E Temperature regulator
F Pilot light
G Filling spout
H Spray nozzle
I Soleplate
•
Read these instructions carefully before
VZLWFKLQJRQWKHDSSOLDQFHDQGNHHSWKHPIRU
IXWXUHUHIHUHQFH)DLOXUHWRIROORZDQGREVHUYH
these instructions may result in an accident.
86($1'&$5(
•
)XOO\XQUROOWKHDSSOLDQFH¶VSRZHUFDEOHEHIRUH
each use.
•
Do not use the appliance if the accessories at-
tached to it are defective. Replace them imme-
diately. Do not use the appliance on any part of
the body of a person or animal.
•
Do not use the appliance on pets or animals.
•
Do not use the appliance to dry garments of
any kind.
•
Turning the thermostat control to the minimum
(MIN) setting does not guarantee that the iron
LVVZLWFKHGRIIFRPSOHWHO\
INSTRUCTIONS FOR USE
%()25(86(
•
3HHORIIDSSOLDQFH¶VSURWHFWLYH¿OP
•
Make sure that all the product’s packaging has
been removed.
•
Some parts of the appliance have been lightly
greased, consequently, the appliance may give
RIIDOLJKWVPRNHWKH¿UVWWLPHLWLVXVHG$IWHUD
VKRUWWLPHWKLVVPRNHZLOOGLVDSSHDU
•
Prepare the appliance according to the func-
WLRQ\RXZLVKWRXVH
),//,1*:,7+:$7(5
•
,WLVHVVHQWLDOWRKDYH¿OOHGWKHWDQNZLWKZDWHU
WREHDEOHWRZRUNZLWKVWHDP
•
2SHQWKHOLGRQWKH¿OOLQJVSRXW
•
Fill the tank, taking care to respect the MAX
level (Fig. 1).
•
&ORVHWKH¿OOLQJVSRXWOLG
86(
•
Unroll the cable completely before plugging it
in.
•
Connect the appliance to the mains.
•
Turn the thermostat control to the desired tem-
perature position.
•
Do not use temperatures higher than those in-
dicated on the garments to be ironed.
Ɣ 7HPSHUDWXUHIRUV\QWKHWLF¿EUHV
(Polyester, Nylon…).
ƔƔ7HPSHUDWXUHIRUVLONZRRO0LQLPXP
WHPSHUDWXUHIRULURQLQJZLWKVWHDP
ƔƔƔ 7HPSHUDWXUHIRUFRWWRQ
Max Temperature for linen.
•
,I JDUPHQW KDV YDULRXV NLQGV RI ¿EUHV VHOHFW
WKHWHPSHUDWXUHIRUWKH¿EUHWKDWUHTXLUHVWKH
ORZHVW WHPSHUDWXUH )RU H[DPSOH VHOHFW WKH
temperature for polyester for a fabric made out
of 60% polyester and 40% cotton).
•
Wait until the pilot light (F) has gone out, indi-
cating that the appliance has reached an ade-
quate temperature.
•
'XULQJXVHWKHSLORWOLJKW)ZLOODXWRPDWLFDOO\
ÀDVKRQDQGRIILQGLFDWLQJWKDWWKHKHDWLQJHO-
ements are operating in order to maintain the
desired temperature.
'5<,521,1*
•
7KH DSSOLDQFH KDV D VWHDP ÀRZ UHJXODWRU
ZKLFKZKHQVHWWRDOORZVGU\LURQLQJZLWK-
out steam).
67($0,521,1*
•
,WLVSRVVLEOHWRLURQZLWKVWHDPZKHQHYHUWKH
WDQNKDVZDWHUDQGWKHDGHTXDWHWHPSHUDWXUH
is selected.
67($0)/2:&21752/
•
The appliance has a (C) control knob for ad-
MXVWLQJWKHVWHDPÀRZ
635$<
•
The spray can be used in both steam and dry
ironing.
•
Press the spray button ( A ) to use this oper-
ation.
•
The spray button has to be pressed repeatedly
WRUHOHDVHWKH¿UVWVSUD\
67($0%/$67
•
This function provides extra steam for remov-
ing creases.
ΕΛΛΗΝΙΚΑ GR
• Η ενδεικτική ετήσια κατανάλωση ενέργειας
(kWh ετησίως) υπολογιζόμενη βάσει 50 προ-
σπαθειών καθαρισμού. Η πραγματική ετήσια
κατανάλωση ενέργειας εξαρτάται από το πώς
μεταχειρίζεστε την συσκευή.
Αυτή η συσκευή συμμορφώνεται με την Οδηγία
2014/35 / ΕΕ για χαμηλή τάση, οδηγία 2014/30
/ ΕΕ σχετικά με την ηλεκτρομαγνητική συμβα-
τότητα, οδηγία 2011/65 / ΕΕ σχετικά με τους
περιορισμούς της χρήσης σε ορισμένες επικίν-
δυνες ουσίες και ηλεκτρονικός εξοπλισμός και
οδηγία 2009/125 / ΕΚ σχετικά με τις απαιτήσεις
οικολογικού σχεδιασμού για την ενέργεια- Σχετι-
κά προϊόντα.

10
engliSH en
·Read these instructions carefully before using
the appliance.
·This manual is an integral part of the product.
Keep it in a safe place for future reference.
cAution
Bear in mind the warnings described below, fai-
lure to follow these warnings may cause acci-
dents resulting in injury or damage.
generAl SAfetY inStruc-
tionS.
• This appliance can be used by
children aged from 8 years and
above and persons with redu-
ced physical, sensory or men-
tal capabilities or lack of expe-
rience and knowledge if they
have been given supervision
or instruction concerning use
of the appliance in a safe way
and understand the hazards in-
volved.
• This appliance is not a toy.
Children should be supervised
to ensure that they do not play
with the appliance.
• Cleaning and user maintenan-
ce shall not be made by chil-
dren without supervision.
• Always unplug the appliance
after use and before assem-
bling or removing parts, and
performing any maintenance
or cleaning operations. Also
unplug it in the case of a power
cut. The appliance must be
switched off before plugging or
unplugging it into the mains.
• If the power cord is damaged, it
should be replaced by the ma-
nufacturer or by your after-sa-
les service shop or similar
qualied personnel to prevent
possible hazards.
• This vacuum cleaner belongs to the “general
purpose vacuum cleaner” group, it has a brush
designed for cleaning both carpets and woo-
den oors.
• This vacuum cleaner is a dry vacuum designed
to collect only dry dirt (dust, bres, threads).
• This appliance is exclusively for household use
and not for industrial use. It is dangerous to
use it for any purpose other than the one indi-
cated (e.g. vacuuming liquids, dust from cons-
truction work, cement, etc.) .
• Do not make any modications or repairs to
the appliance. In the event of any anomaly in
the cord or any other part of the appliance, do
not use it and take it to an authorised service
centre.
• Do not use any parts or accessories not su-
pplied or recommended by SOLAC.
• Do not use the vacuum cleaner to clean ani-
mals.
• Never vacuum live ash, splinters, sharp ob-
jects, or liquids.
• Never vacuum lit matches or cigarette butts.
Do not vacuum toxic material (ammonia, etc.).
• Do not vacuum clean toner powder. The toner
that is used in printers and photocopiers, for
example, can be a conductor of electricity.
• Before plugging the appliance into the mains,
check that the indicated voltage is the same as
in your home.
• Do not use the cord to hang up the appliance.
Always unplug the appliance by pulling on the
plug, and not the cord.
• Make sure the cord does not come into contact
with sharp edges or hot surfaces.
• Do not leave the cord hanging over the edge
of a table or worktop, to prevent children from
pulling it and causing the appliance to fall.
• Do not immerse the appliance in water or
any other liquid.
• Never handle the vacuum cleaner or the plug
AS3252_aspirador.indd 10 11/7/16 16:26

11
ENGLISH EN
with wet hands.
• Do not leave the appliance plugged into the
mains unattended.
• Keep your vacuum cleaner away from heat
sources.
• Never use the vacuum cleaner without the dust
container or the protective lters correctly t-
ted.
• Always keep the air intakes and outlets clear.
• Keep hair, clothes, ngers or any other body
part away from the air intakes and outlets.
• Be very careful when using the vacuum clea-
ner on stairs.
• Do not use the appliance in conned spaces
where explosive or toxic vapours can build up.
• Do not use the appliance above the height of
the power cord.
• Carry out the maintenance operations indica-
ted in the CLEANING AND STORAGE section
to prolong the life of the appliance.
• Remove all elements from the inside or outsi-
de of the appliance used for protection during
transport or for sales promotions, such as pa-
per or plastic bags, plastic sheets, cardboard
and stickers.
MAIN COMPONENTS
1 Main body.
2 Power cord.
3 On/Off pedal switch.
4 Air outlet HEPA lter cover
5 Groove for attaching the brush during a tem-
porary stop.
6 Electronic suction regulator.
7 Air outlet HEPA lter.
8 Cord-winder pedal button.
9 Carry handle.
10 Dust container.
11 Flexible hose connection.
12 Flexible hose.
13 Mechanical suction regulator.
14 Motor protection lter
15 Dust container removal button.
16 Dust container cover opening tab.
17 Dust container cover.
18 Cyclone lter.
19 Maximum ll level of the container.
20 Telescopic metal tube.
21 Height adjustment for the telescopic tube.
22 Retractable brush button.
23 Universal oor and carpet brush.
24 Hook for temporary stop.
25 Brush for parquet oors
26 Suction head for vacuuming grooves and
corners
27 Furniture brush
28 Release buttons for the exible hose
USE
CYCLONE TECHNOLOGY
Suctioned dirt enters the dust container (10) and
remains in suspension thanks to cyclone tech-
nology. The dirt particles that escape from the
exterior chamber of the dust container are retai-
ned by the cyclone lter (18) before going throu-
gh the motor protection lter (14), thereby assu-
ring that exhausted air is free from dust particles.
+This appliance has been designed exclusively
for vacuuming oors, carpets, furniture and
fabrics. Do not use it for any other purpose.
1 Check that the dust container (10) and the l-
ters (18, 14 and 7) are installed correctly. See
the following section (Cleaning and Mainte-
nance).
2 Insert the exible hose (12) into the connec-
tion (11) until it clicks into place. When you
want to remove the hose, press the release
tabs (28) at the same time.
3 Attach the telescopic metal tube (20).
4 Prepare the appropriate attachments for the
surface you want to clean. Put the desired at-
tachment on the telescopic metal tube (20).
Universal oor and carpet brush (23)
You can use it for all kinds of oors, given that
it is retractable so that it can be adapted to the
surface to be vacuumed. To change the cleaning
position, press the brush button (22) with your
foot. We recommend cleaning hard oors, wood
and parquet with the bre brush extended, and
cleaning carpets and rugs with the bre brush
retracted.
Suction head (26)
For cleaning narrow places, grooves and cor-
ners.
Parquet brush (25)
We recommend using it on both parquet and
hard oors (tile, ceramic, marble, etc.).
Furniture brush (27)
Recommended for cleaning furniture, blinds,
lamp shades, etc.
You can adjust the length of the telescopic
AS3252_aspirador.indd 11 11/7/16 16:26

12
EN
tube (20). Slide the adjustment device (21)
downwards to release the top part of the tube.
Simultaneously pull upwards or downwards
on the top part until the desired tube length is
reached.
5 Pull out the cord (2) to the yellow mark (ideal
length). If necessary, the cord can be pulled
out to the red mark, but not any further.
6 Plug it into the mains.
7 Turn on the vacuum by pressing the pedal
switch (3), and adjust the suction power by
opening or closing the regulator on the handle
(13). (The suction power is decreased by ope-
ning the valve, and it is increased by closing
the valve). You can also adjust the suction
power using the electronic regulator (6). Sli-
de the regulator between the MIN. and MAX.
positions, depending on the desired suction
power.
If you hear a sharp whistling sound that
is different from the normal sound when
using the vacuum, turn it off and unplug it.
Check to see if the air inlets and outlets or
the lters are obstructed. If they are obs-
tructed, eliminate the cause.
When using the vacuum, pull it behind you as
if it were a cart. The handle (9) can also be
used to carry the vacuum cleaner.
This appliance has a position called the “ho-
rizontal parking” position, which can be con-
veniently used during stops while cleaning. To
put it in this position, insert the hook of the te-
lescopic tube in the groove (5) of the vacuum
cleaner body (Figure 1).
8 When nished, switch the appliance off by
pressing the On/Off button (3). Unplug it, and
press the button (8) to wind up the cord. Hold
the cord plug in your hand to prevent it from
banging against the vacuum cleaner housing.
SAFETY THERMOSTAT
The system has a safety thermostat. If for any
reason the vacuum cleaner should overheat, the
thermostat will automatically shut off the applian-
ce. If this should happen:
1 Press the on/off switch (3) and unplug the
appliance from the mains.
2 Check that the air intakes and outlets are not
blocked. If they are blocked, get rid of the cau-
se of the blockage.
3 Empty the dust container (outer and inner
chamber). See the next section “Cleaning and
Conservation”.
If the automatic shut-off was due to the motor
overheating, wait for about one hour for the
appliance to cool before turning it on again.
You can reduce the waiting time by placing the
appliance in a cool or well-ventilated place to
allow the heat to dissipate.
CLEANING AND MAINTENANCE
EMPTYING THE DUST CONTAINER (10)
The dust container (10) has a maximum level
mark. Be sure that dirt does not exceed this
level.
1 Press the release button (15), this releases
the dust container. (g. 2).
2 Remove the dust container and hold it over a
rubbish bin. Pull down the dust container co-
ver opening tab (16), and empty its contents
into the rubbish bin (Fig. 3).
3 Turn the dust container cover anti-clockwise
and remove the motor protection lter (14)
and the cyclone lter (18). Empty the con-
tents, rinse the lter with tap water (g. 4)
4 Clean the cyclone lter (18) and dust contai-
ner with a brush and wet cloth.
To clean the cyclone lter:
• Remove the rubber (g.5)
• Remove the base by turning it counter-cloc-
kwise. (g.6)
• Remove the cyclone shroud (g. 7)
To reassemble the lter, proceed with the above
instructions, in reverse order.
Check that the washed elements are comple-
tely dry before putting them back together.
5 To close the dust container, tilt the bottom co-
ver of the container (17), and press until you
hear a click, indicating that the cover is closed
correctly.
6 Insert the cyclone lter in the container, until
the fastening tab is seated in the dust contai-
ner (check that the marks coincide). (Figure
8).
7 Place the container cover on the mark and
turn it clockwise to the mark .
8 Put the dust container back inside the applian-
ce. Push the container towards the appliance
body till you hear a “click”
FILTER CLEANING AND REPLACEMENT
We recommend that you periodically
check the air lters to make sure that they
work correctly. Clean the lters if you de-
tect that the appliance’s suction capacity
AS3252_aspirador.indd 12 11/7/16 16:26

13
www.solac.com
Ελληνικά / ΕΛ
English / EN
Model: AS3252
Rated Power: 220-240V~
50/60Hz
800W
AS3252_aspirador.indd 72 11/7/16 16:26
dB
kWh/annum
665/2013 - II
+++
A
++
A
A
B
C
D
A+
A
SOLAC AS3252
25.3
79
ABCDEFG
ABCDEFG ABCDEFG
Table of contents
Other SOLAC Vacuum Cleaner manuals

SOLAC
SOLAC AS3104 User manual

SOLAC
SOLAC AE2529 User manual

SOLAC
SOLAC AS3190 User manual

SOLAC
SOLAC AE2502 User manual

SOLAC
SOLAC AS3240 User manual

SOLAC
SOLAC AS3102 User manual

SOLAC
SOLAC AS3258 User manual

SOLAC
SOLAC Turbobat Power 29.6V User manual

SOLAC
SOLAC AS3260 User manual

SOLAC
SOLAC AB2650 User manual

SOLAC
SOLAC AS3244 User manual

SOLAC
SOLAC LUCID i10 User manual

SOLAC
SOLAC AE2505 User manual

SOLAC
SOLAC AB 2700 User manual

SOLAC
SOLAC AS3250 User manual

SOLAC
SOLAC More Brave User manual

SOLAC
SOLAC LUCID i10 User manual

SOLAC
SOLAC AS3103 User manual

SOLAC
SOLAC AS3242 User manual

SOLAC
SOLAC AE2501 User manual