Solo 456 User manual

OPERATOR’S MANUAL & PARTS LIST 456, 457, 456F
If you are missing parts, instructions or have questions, DO NOT take this unit back to the store.
Call 1300 798 022. Solo will send the missing parts/information to you promptly.
STOP
Visit us on the web at www.soloaustralia.com.au Troubleshooting and parts ordering available on-line.
CUSTOMER SERVICE COMMITMENT FROM SOLO’S SERVICE DEPARTMENT: In the event the sprayer you have purchased has missing or damaged parts,
please call 1300 798 022, 9:00am – 5:00pm Mon-Fri. In order to assist your service representative, please have the following information available: sprayer model number,
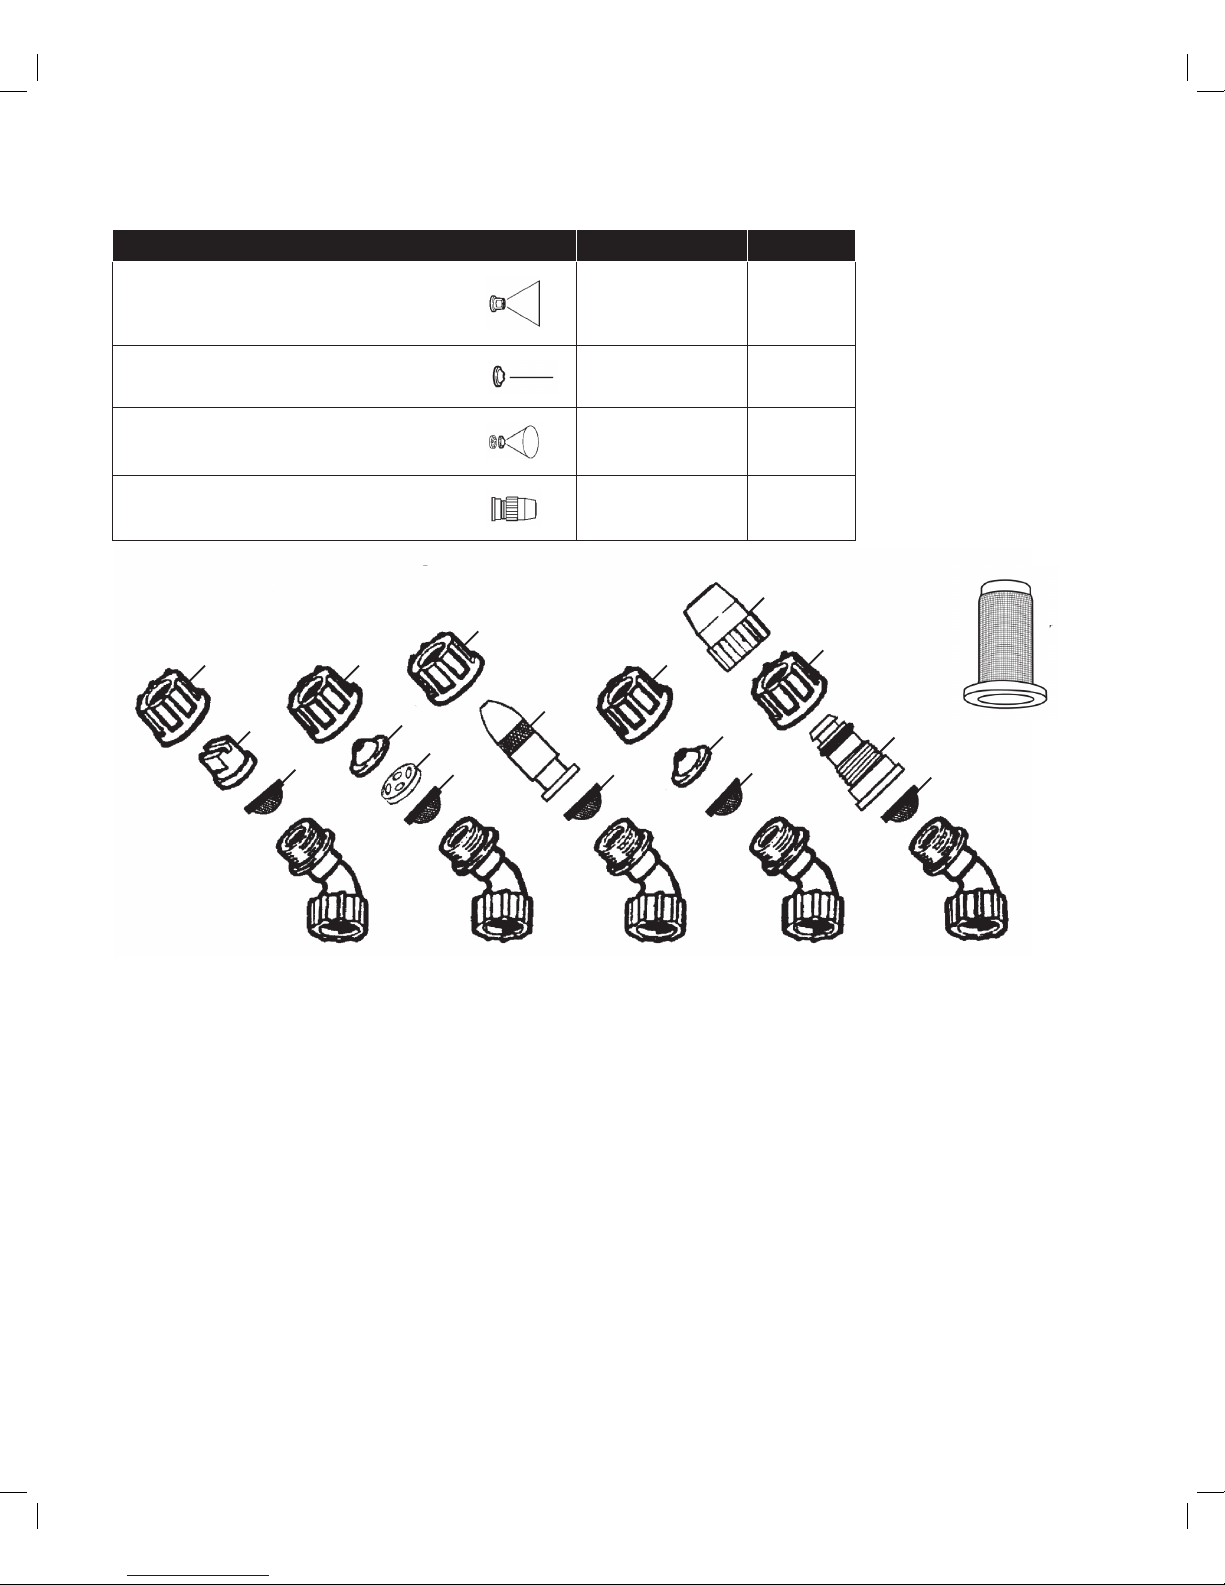
part description and part number. A parts list is included in your operator’s manual. Solo is committed to your satisfaction and is continuing its efforts to earn your future business.
If you suspect or observe indications that the material may be unsafe
in a Solo sprayer... STOP! Do Not Use or Apply Chemical. ALWAYS
WEAR RUBBER GLOVES, SAFETY GOGGLES AND APPROPRIATE
PROTECTIVE CLOTHING.
Read and follow operating instructions.
• Donotllsprayerovermaximumllmark.Releasingpressureinan
overllconditioncancauseharmfulventingofsprayercontents.
• Relievepressureonlywithsprayeruprightandwhilestandingon
the side of the sprayer opposite the pressure relief valve. Venting of
sprayer contents can occur if liquid is over bottom of relief valve.
• CAUTION:Topreventinjuryfromejectedpumpassemblyand/or
solution,neverstandwithfaceorbodyoverthetopofthetankwhen
pumping, or loosening pump.
• Donotmodifysprayerorpressurereliefvalve.
• Neversprayinthedirectionofhumans,animalsorpropertywhich
mightbeinjuredordamagedbysprayformula.
• Donotusedisinfectants,solventsorimpregnatingagentsunlessrst
tested to ensure they are not harmful to the environment and sprayer.
• Donotuseliquidswithatemperatureabove45°C.
• Rememberthatasprayerwithliquidisasignicantamountofweight
(1kgperlitre).Usecautionwhenbending,leaningorwalking.Bend
onlyatthekneesandsupportyourselfasrequiredtoensurepersonal
safety.
• Donotinatesprayerwithoutliquidinthetank.
• Donotclimbonladders,treesorotherunsteadyorpotentiallyunsafe
structures.
ASSEMBLY INSTRUCTIONS FOR WAND
1. Ensure that the O-ring is on the
non-threaded end of the wand.
2. Insert the non-threaded end of the
wand into the O-ring into the open
end of the shut- off valve.
3. Tighten the screw cap.
WARRANTY
SolobackpacksprayersarecoveredbySolo’sWARRANTY
(2yearsformodels456,457,456F).Solomanufacturedpartswhichfail
duetodefectivematerialorworkmanshipwillberepairedorreplaced
without charge. Refer to Warranty sections for consumer and commercial
use, of this Owners Manual, for full details.
SAFETY PRECAUTIONS
•Do not exceed 3 bar (45 psi) pressure.
•Do not fill with, use or spray flammable
materials.
•Do not use gasoline, acid, acetone, caustic or
potentially injurious chemicals.
• Atthetimeofmanufactureofthissprayer,
we are not aware of any approved plant
protection chemicals which would adversely
affect this sprayer when applied in their usual
concentration.
•Observe the recommendations of the
chemical manufacturer.
•Prior to removing any part of the sprayer pull the pressure relief
valve to release any pressure in the tank.
•Wear rubber gloves, safety goggles and appropriate protective
clothing.
•After pumping be sure handle is in the locked down position.
• Individualsshouldbetrainedintheproperuseofthissprayer.Where
training is not available, individuals should study and follow the
procedures detailed in this manual.
• Donotuseacetonebasedchemicals.
WARNING
Chemicals can be harmful to individuals and the environment if
improperly used. In addition, some chemicals are caustic, corrosive,
or poisonous and should be avoided. Read warnings and chemical
manufacturer’s instructions. Solo high density polyethylene sprayers
arettedwithViton®sealswhichareresistanttoawidevarietyof
agricultural, industrial and household chemicals; however, care should
beexercisedtoensurethatsprayercomponentsareclean,functioning
properly, and in a good state of repair before and during use. If in doubt
aboutaparticularchemical,checkwithmanufacturer.
1

CLEANING
• Carefullycleansprayeraftereveryuse.
• Pourorsprayallremainingchemicaloutofsprayer.
• Pourasmallamountofwaterforwatersolublechemicals,ormineral
spiritsforoil-basedchemicals,intothetank.
• Pressuriseandspraythroughsystemuntilallliquidisgone.
• Repeatprocesswithwarmsoapywater.
• Repeatprocesswithwarmclearwater.
• Useanabsorbentclothtodryallinternalsurfaces.
• Followtherecommendationsofthechemicalmanufacturerfor
disposing of waste water and chemicals.
• Donotuseaggressiveorabrasivecleaningagents.
MAINTENANCE:
• Priortostorage,empty,cleananddrysprayer.
• Alwaysstorethesprayerinadryarea,protectedfromfreezing,heat
and sunlight.
• LubricateO-ringinpressurereliefvalvewithnon-watersoluble
grease* on a regular basis.
Disassembly:Unscrewpressurereliefvalvefromtankandpullthe
valve body out of the screw cap. Clean, lubricate, and replace.
• Pump Maintenance: Pump pressure sealing is accomplished with an
O-ring(5)onthepumppiston(4)whichmoveswithinthecylinder(3).
Periodically this O-ring should be greased with a non-water soluble
grease*. If worn, it should be replaced. A small umbrella valve at the
bottom of the cylinder prevents the formula from entering the cylinder.
Keep these parts clean and replace if worn.
Disassembly:Unscrewpumpassemblyfromtank.Carefullyremove
umbrellavalve(6)fromthebottomofcylinder(3).Whileholding
cylinderrmlywithonehandandthehandleofthepumppiston(4)
rmlyintheother,withthepistonfullyinsertedinthecylinder,pull
backonthepistonquicklyandforcefully.Tore-assemble,placethe
pistonassemblybackintocylinder,placeheelofhandsonopposite
sidesofthetankcap,whilekeepingcylinderinplacewithngers,tap
bottomofcylinderagainstaatpaddedsurface.Assemblywilllock
into place.
• Tank Cap: Asmallamountofnon-watersolublegrease*ontankcap
threadsandbothsidesofthegasketeasestighteningandloosening.
• Regular Inspection: Inspect and replace worn or damaged parts
promptly.Payparticularattentiontotankcapgasket,pressurerelief
valveandseal,inationvalve(iftted),umbrellavalveO-ringsand
seals throughout sprayer. Regular lubrication of O-rings and seals is
recommended.
REMOVING THE NOZZLE
Unscrewthenozzlecap(1)fromthenozzlebody(3).Thisisbest
accomplishedwhiletheretainingnut(2)isfastenedtightlytotheelbow
(5).Next,unscrewtheretainingnut(2).Pushthenozzlebody(3)out
oftheretainingnut(2).Thelterwithgasket(4)willcomeoutwiththe
body.Toreinstallthenozzle,reversethe
above instructions.
OPERATION
• Beforeusingsprayerwithchemicals,llsprayerwithfreshwaterto
assure that you have it properly assembled; pressurise and then
practice spraying. When thoroughly familiar with sprayer operation,
follow normal operating procedures.
• Turnpumphandlecounterclockwisetoremovepump.
• Filltankwithpremixedformulauptodesiredlevel.(Do not exceed
maximum fill mark.)Observerecommendationsofchemical
manufacturer.
• Tightencapandpumpassemblyforagoodseal.
• Pumptoamaximum45psior3barpressure.Thevalvestemonthe
pressurereliefvalvewillriseuptoventexcesspressureover45psi.
• Startorstopsprayingbysqueezingorreleasingtheleveronthe
shut-offvalve(3).Thespraypressurecanbemonitoredwithan
optional pressure gauge.
• Priortoeveryremovalofpump(1),releasepressurerstbypulling
uponthepressurereliefvalvestem(2).
1. Nozzle
2. Retaining Nut
3. Nozzlebody
4. FilterwithGasket
5. Elbow
1
2
3
*Petroleumjellyworkswell.
4
5
3
4
5
6
2

Flat spray Hollow Cone spray Brass
Adjustable
nozzle
Jet Stream Plastic
Adjustable
nozzle
13
4
22
8 8
8
7
22
3
8
8
6
2
5
1.Flatspraynozzle
2. Filter
3. Jet cap
4.Swirlplate
5.Nozzlecap
6.Nozzlebody
7.Brassadj.nozzle
8.Nozzleretainingnut
OPERATING FEATURES
Nozzles–YourSolosprayerhasavailablethefollowingnozzlearrangements,toprovideavarietyofspraypatterns.
Item Application Part
Flatspraynozzle Row treatment 40742631
Jetstreamnozzle Spot & longer range 4074755
JetstreamnozzleandSwirlplate=hollowcone Shrubs and bushes 4074755
4074756
PlasticadjustableSpot,nozzle
(Suppliedwith425&475only)
Spot, shrubs &
bushes 4900527
Note: DifferentSolomodelsaresuppliedwithdifferentspraynozzles.
WILL THE PLASTIC MATERIAL LAST?
Only high-grade polyethylene is used. The material is chosen for high
molecularweight,high-impactstrength,andexcellentresistanceto
chemicals and stress. Ultraviolet inhibitors are used in the material to
reduce deterioration caused by sunlight.
HOW HEAVY IS THE UNIT?
Compressionsprayersweighapproximately3kg.
CAN I USE WEED KILLER AND INSECTICIDE
IN THE SAME SPRAYER?
In theory you can, if the sprayer is thoroughly cleaned out with a bleach
water solution of 1:25. In practice, the use of both types of chemicals in
thesameunitisnotrecommendedastherisktoplantscanbehigh.Use
caution when handling any type of chemicals and when cleaning your
sprayer.Donotmixcleaningagents.
SPRAY TIP ASSEMBLY (Spray tips should be assembled as follows for desired spray patterns.)
WHAT SPRAY NOZZLE SHOULD I USE?
Aatspraynozzleissuppliedforsprayingpaths,gardenbeds,and
generalareaspraying.Aconenozzleisalsosuppliedforspotspraying
and for the treatment of bushes and small trees. For spot spraying,
simplyremoveswirlplatefrombehindnozzletip.Savetheswirlplatefor
futureuse.Awideselectionofnozzlessuchasdeector,adjustable,and
anti-driftnozzlesareavailable.
CAN I DO SPOT SPRAYING?
The shut-off valve on the Solo sprayer is well suited for spot spraying.
It’s almost effortless! The shut-off valve handle incorporates a clip which
holds the valve open for area spraying without tiring the operator’s hand. A
pressuregaugemaybeaddedwithincrementsfrom0to6Bar(0-90psi).
In the best interest of continued technological progress, we reserve the right to change
designandcongurationofanyproductwithoutpriororothernotice.Therefore,please
notethattextandillustrationsofthismanualarenottobeconsideredbindinganddonot
constitute a basis for legal or other claims.
No-drip-checkvalve
replaces # 2 on
heavy-duty models
3

Note: Alwayswearrubbergloves,safetygogglesandappropriateprotectiveclothingwhenrepairingasprayer.Oncearepairiscompleted,ll
theunitwithcleanwater,pressurise,andcheckforleaks.Ifthesprayerleaks,DONOTUSE.Repairleaksandre-check.
SERVICE AND REPAIR SECTION HANDHELD SPRAYER TROUBLE SHOOTING GUIDE
Problem Cause Solution
Difcultyinmovingpumphandle • dirtycylinderwall
• O-ringonpistonswollen
(notcleanedproperly)
• removepiston,clean,greaseandreplace
• replaceO-ring,grease
Lowpressure&resistanceduringpumping • Nolubeonpiston/cylinder
• Chemicalincylinder
• DamagedO-ringinpressurereliefvalve
• wornordamagedO-ringinshut-offvalve
• tankcapnottight
• lubricatewithheavygrease
• Replaceumbrellavalve
• replaceO-ring
• replaceO-ring
• tightencap
Leaksfromendofspraywand • wornordamagedO-ringinshut-offvalve • rebuildshut-offvalve
Leaksfrominsidecylinder • nolubeonpistoncylinder • lubricatepiston,O-ringandcylinder
Leaksundercap • wornordamagedumbrellavalve • replaceumbrellavalveatbottom
of cylinder
Leaksfromshut-offvalve • damagedormissinggasket • replacegasket
Leaksfromhose • screwcapnottight • tightentankcap
Pressurereliefvalvesticks • worn,damagedorloosettings,
lackoflubrication
• tightenttingsandreplacewornparts,
disassemble and lubricate O-rings
Airleak-aircomingoutbetweenhalvesof
the pump support
• worn,damagedorloosettings
• lackoflubricationorcontaminated
pressure relief valve assembly
• tankcapnottight
• gaskettwistedorlackinglubrication
• tanklipdamaged
• tightenttingsandreplacewornparts
• cleanandlubricatepressurerelief
valve assembly
• tightentankcap
• straightengasketandlubricatewithgrease
• repairorreplacetank
ACCESSORIES
Thefollowingaccessoriesarenotstandard.OrderthemfromyourSOLOdealer.
Pressure Control Gauge (49 00 356)
Displays spraying pressure so operator can maintain desired pressure level.
Brass adjustable nozzle (49 00 207), Plastic (49 00 527)
Affordsoperatorafullrangeofspraysfromnetojetstream.
Drift Guard (49 00 430)
Helpscontrolapplicationofformulaunderbreezyconditions.
2-Nozzle Mini Boom (49 00 514)
Handheldsprayboommountsonendofspraywand(totalwidth84cm;
distancebetweennozzles61cm).Includes2atspraynozzles.
Double Spray Nozzle (49 00 477)
Thisisamulti-purposenozzlethatattachestotheendofthespraywandfordoublerow
application.
Brass Spray Lance (49 00 528)
The spray wand is 150cm long and replaces the standard spray tube for treating trees up to
heightsof5metres.Additionalextensiontubeavailablein50cmlength(4900513).
Note: Anorderformisprovidedonthebackpagesofthismanual.
4

NOZZLE TIP SPECIFICATION
Description Order number
Spray Volume Pressure
Angle Applications
1/min. gal/min. atu atm psi
Flat Spray Nozzle 40742631
Red
0.88
1.25
1.53
.23
.33
.40
1.0
2.0
3.0
15
29
44
120°
120°
120°
area and row treatment
Flat Spray Nozzle
4074501
Yellow
0.65
0.80
0.92
0.172
0.211
0.243
2.0
3.0
4.0
29
44
59
80°
80°
80°
Adjustable Nozzle
Brass
Plastic
4900207
4900525
1.53
0.76
0.40
0.20
2.8
2.8
40
40
Straight
stream
Hollow
Cone
tree spraying
(adjustablesprayingpattern)
Hollow Cone Nozzle
1mm orifice
4074755*
Black
0.4
0.55
0.10
0.15
1.0
2.0
15
29
shrubs, bushes
Hollow Cone Nozzle
1.4mm orifice
4074758
Grey
0.64
0.91
1.11
0.17
0.24
0.29
1.0
2.0
3.0
15
29
44
50°
65°
65°
Hollow Cone Nozzle
1.8mm orifice
4074726
Blue
0.88
1.25
1.53
0.23
0.33
0.40
1.0
2.0
3.0
15
29
44
55°
70°
72°
No-drift Nozzle
AN 1.0
4074385
Yellow
0.28
0.38
0.46
0.07
0.10
0.12
0.4
0.7
1.0
6
10
15
100°
100°
100°
mainly for herbicides
a low pressure
No-drift Nozzle
AN 2.0
4074386
Red
0.55
0.76
0.91
0.15
0.20
0.24
0.4
0.7
1.0
6
10
15
100°
100°
100°
No-drift Nozzle
AN 2.5
4074514
Brown
0.72
0.95
1.14
0.19
0.25
0.30
0.4
0.7
1.0
6
10
15
110°
110°
110°
No-drift Nozzle
AN 5
4074513
Blue
1.80
1.90
2.28
0.48
0.50
0.60
0.4
0.7
1.0
6
10
15
120°
120°
120°
Foam Nozzle 30-DC-04-2 Pest control, cleaning
•Standardequipment
5

SOLO WARRANTY
Solo Australia warrant the product from the date of purchase, for a period
of 2 years. The warranty covers manufacturer’s defects in material or
workmanship.Thewarrantydoesnotcovermalfunctionsduetomisuse
or due to failure to follow the instructions in this manual. Any alterations
to the product are to be performed by a Solo Australia approved service
agent. Any repairs performed by non approved personnel may void the
warranty.
Tomakeaclaim,contactClaytonEngineering,26FrenchAve,Brendale,
Q,4500onphone1300798022oremailsales@claytonengineering.
com.au.Youwillbeaskedtoprovideproofofpurchaseandthenwillbe
instructed on the procedure for repairing or replacement of the product
under warranty. All costs incurred for repair or replace, and additional
claims can be discussed at this stage.
This warranty is provided in addition to other rights and remedies
you have under law: Our goods come with guarantees that cannot be
excludedundertheAustralianConsumerLaw.Youareentitledtoa
replacementorrefundforamajorfailureandforcompensationforany
other reasonably foreseeable loss or damage.You are also entitled to
have the goods repaired or replaced if the goods fail to be of acceptable
qualityandthefailuredoesnotamounttoamajorfailure.
ITEMS NOT COVERED BY WARRANTY
Provisions of the Warranty will not apply to the following:
Normal service requirements arising during the warranty period, such as
cleaning,normalwear,lubrication,lter,spraytips,etc.Normalservice
workoverandabovetherepairorreplacementofdefectiveparts.
Any failure that results from an accident, customer abuse, normal
wear, neglect or failure to operate the product in accordance with
the instructions provided in the operator’s manual or provided with
theproduct.Whenanalterationormodicationhasbeenperformed
on a Solo product, Solo is responsible only for products as originally
furnishedbySolo,providedthealterationsormodicationsdonot
adversely affect the product’s operation, performance or durability. Parts
or accessories that are incompatible with the product are not approved
by Solo.
Full disclosure of Solo’s Warranty is available from your local Solo dealer
orSOLOAustralia.
POS. NO. DESCRIPTION ORDER NO.
Find Spare Parts and Accessories at your local retailer
1Handle(Includesparts2-3-4) 4400256
2 O-ring 0062264
3 O-ring 0062258
4Plug 4074454
5TankLid 4073528
6 CylinderSupport(require2) 407438752
7 Cylinder 407383452
8LidSeal 0062175
9 Valve Plate 0094308
10 Handle and Cylinder Assembly 4400257
11 Relief Valve 4900512
12 O-Ring 0062166
13 O-Ring 0062258
14 Hose & Tube Assembly 4900515
15 Carry Strap 4300245
16 Hand Piece Repair Kit 0610402
17 PVCSprayWand50cm+Nozzle 4900439
18 Hand Piece Assembly 4900440
19 Retaining Nut 4074336
20 O-ring 0062271
21 Retaining Nut 4074362
23 Retaining Nut 4074999
24 O-ring 0062144
25 O-ring 0062106
26 Spray Tube 4900391
27 Retaining Nut 4074337
28 O-ring 0062115
29 Elbow 407452725
30 O-ring 0062115
31 Jet Filter 4074922
32 O-ring 0062106
33 Flat Spray Jet 40742631
34 Retaining Nut 4074148
35 O-ring 0062115
36 Swirl Plate 4074756
37 NozzleCone 4074755
454/456/457RepairKit-includesparts:2,3,8,9,12,
13,20,24,25,28,30,32
4900441
PARTS BREAKDOWN
1
10
2
3
4
5
6
7
8
9
12
13
11
28
29
30
31
32
33
26
34
25
27
16
35
36
37
TUBE
18
15
24
23
20
21
19
6

Order parts and accessories from your Solo dealer.
If there is no local dealer, use this form to order from Solo.
Part No. Item Names/Description Retail Price Qty. Total
Nozzles
49 00 527 Plastic Adjustable Nozzle $7.95
49 00 207 Brass Adjustable Nozzle $12.95
06 10 408-P 8 – Piece Elbow & Nozzle Set $29.50
49 00 477 Double Spray Nozzle $32.95
40 74 666-P 3 in 1 Nozzle $15.00
Extension tubes and spray wands
49 00 230-P PVC Spray Wand 50cm + Nozzle $29.95
49 00 513 PVC Extension Wand 50cm $22.95
49 00 449 Carbon Tree Lance 120cm $49.50
49 00 457 Carbon Telescopic Wand 60-120cm $76.50
49 00 445 Carbon Telescopic Wand 120-230cm $89.95
49 00 450 Flexible Spray Tube $22.95
49 00 519 Brass Spray Wand 50cm $29.95
49 00 428 Brass Spray Wand 75cm $29.50
49 00 528 Brass Tree Lance 150cm $39.50
49 00 478 Brass Telescopic Wand 57-100cm $39.50
Spray booms
49 00 514 2–Nozzle Mini Boom $49.50
Specialty items
49 00 430 Drift Guard – Large $28.50
49 00 626 Drift Guard – Small $9.95
49 00 356 Pressure Gauge for Hand Piece $29.50
48 00 170-P Hand Piece Assembly $29.50
SUBTOTAL $
ORDER FORM
Pricesandtechnicalspecicationsaresubjecttochangewithoutnotice.
7

ORDER FORM
Part No. Item Names/Description Retail Price Qty. Total
Repair Kits
49 00 405-K Repair Kit 456/457 $29.50
06 10 402-K Hand Piece Repair Kit $12.50
Miscellaneous
49 00 600 Sprayer Cleaner 500ml $12.95
page 7 TOTAL $
page 8 TOTAL $
TOTAL $
SHIPPING CHARGE $7.95
GRAND TOTAL $
Goodswillbedespatchedbypostwithin2workingdays.
Mail or Fax to: Solo Australia, 24 Healey Road, Dandenong South, VIC 3175
Phone: 1300 798 022 • Fax: 03 9706 9533
Pleasedonotsendcashwiththisorder.MakechequepayabletoClaytonInvestmentsPtyLtd.
Form of Payment: Credit Card Cheque
Credit Card Number ExpirationDate
Signature Phone Number
Wecannotprocessyourcreditcardpurchasewithoutasignatureandexpirationdate.
Email:
PLEASE PRINT:
Name
Address
City State P/Code
✁
8
Other manuals for 456
4
This manual suits for next models
2
Table of contents
Other Solo Paint Sprayer manuals

Solo
Solo 206 Eazy User manual

Solo
Solo 425 Classic User manual

Solo
Solo 425 Classic Installation and operation manual

Solo
Solo 416 Li User manual

Solo
Solo 201 User manual

Solo
Solo 425 Classic User manual

Solo
Solo 433 User manual

Solo
Solo 405-HE Operation manual

Solo
Solo 456 User manual

Solo
Solo 442 User manual