English
WARNING
To
prevent
fire
or
shock
hazard,
do
not
expose
the
unit
to
rain
or
moisture.
To
avoid
electrical
shock,
do
not
open
the
cabinet.
Refer
servicing
to
qualified
personnel
only.
TABLE
OF
CONTENTS
PCAUNES>
.
cecct
i
shat
polit
el
eh
olan
e
oes
cnet
inh
hee
ee
coteu
eat
lnrem
et
2
ODEAtiNG
VONAOE:
seo
erecooe
nls
Mato
caw
se
eenrcineiee
authori
3
PLCCAUTIONGS:
sartudte
avches
atic
vaniwags
sales
otesaeenen
nena
soee
teste
ay
3
Location
and
function
of
ControlS
.........
cece
cece
cee
nen
neces
4
TUM
aDIe
ASSEMDNY
-ceenciceeneeesescelnan
Surccdin
Meritage
on
Picatade
5
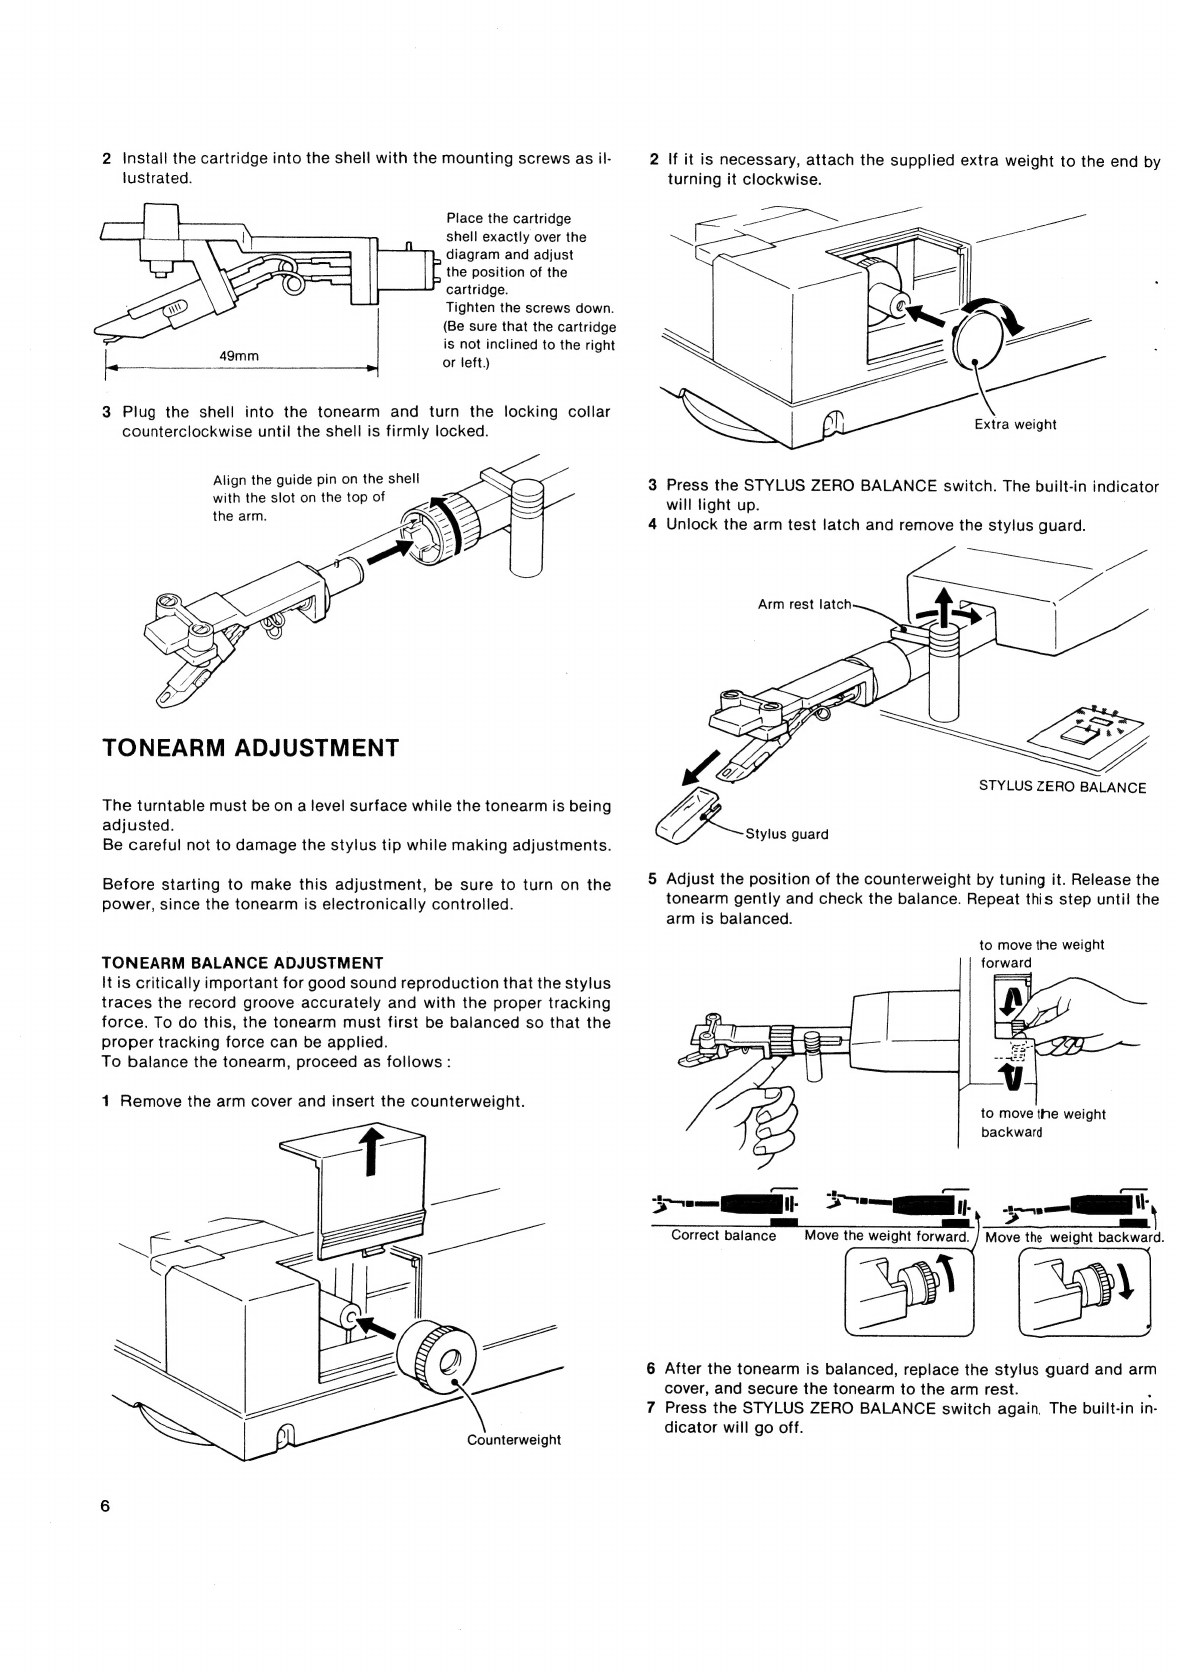
Cartridge
installation
TonearmadiuStMent.
saeidesechessdevie
waar yeed
eeeeen
aes
(bees
deen
dedsaeves
6
Tonearm
balance
adjustment
Stylus
force
adjustment
COMMCCTION
SG
vinxcen
diay
ea
iain’,
ca
wumiensieeedahrayenneuaeeen
orc
dea
eda
7
RECOM
DIAVING.
a:cc2is
cuncncetoeteasusitcstutdeneedciahaerotesoniunutuaeld
8
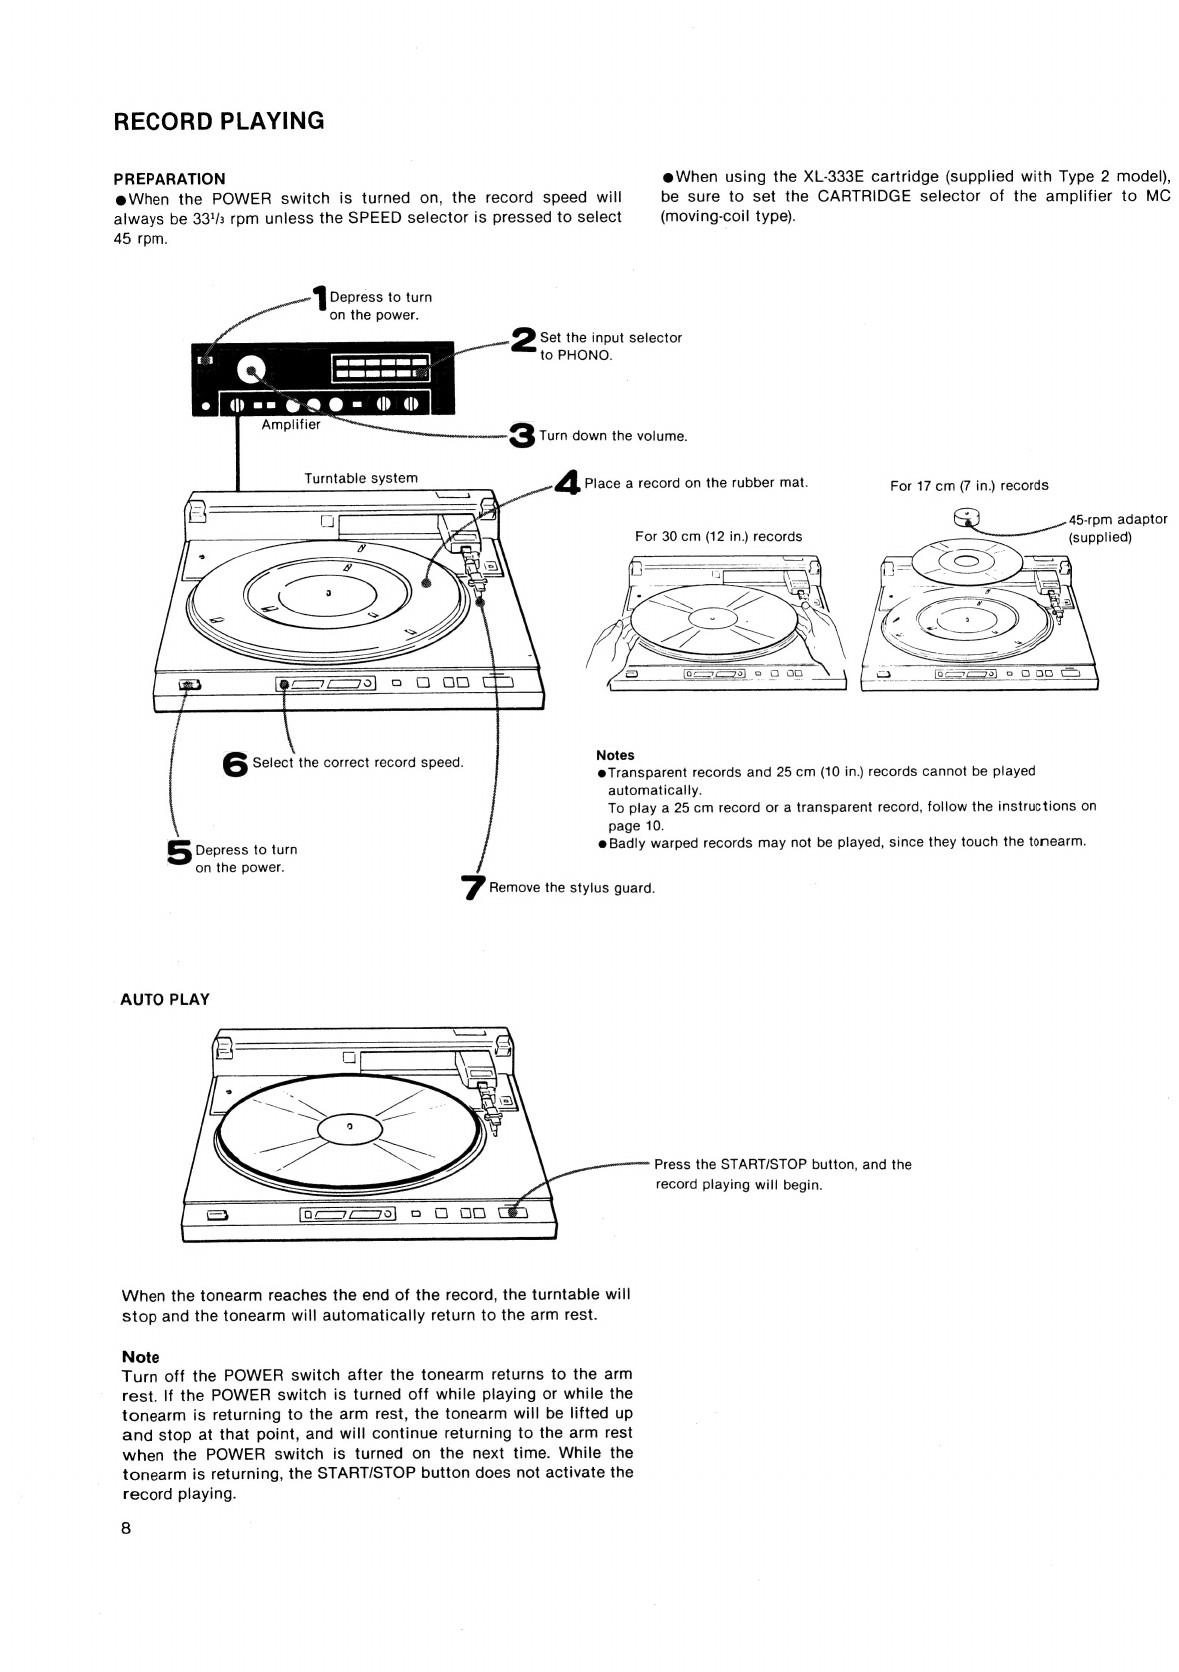
Preparation
Auto
play
,
To
begin
record
play
at
a
particular
point—
Manual
play
To
move
to
a
different
part
of
a
record
while
the
record
is
playing
To
lift
up
the
stylus
during
play
To
stop
during
play
To
repeat
play
How
the
auto-record-size
selection
Works
...............ccccee
cece
sence
10
TFiPS-OR
TECORd
NAN
CiNG
esc
atetsiocuiets
veoh
vn
bineptteuent
ar
eaetad
an
keel
10
Synchronized
play
of
the
turntable
and
a
cassette
deck
............
11
Instantaneous
Start
of
play
(CUEING)
.........
cece
cece
eee
eee eee
12
Tonearm
drop-point
adjustMent
.............
ccc
cece
cece
eee eee cee eee eee
ees
12
RPEPlAacing
(he
StVlUS
25.
cen
caseihosecvuguused
Tus
one
eiaets
ueaaels
SeOoresens
12
CNaNngING
The
CamtiidGe
ast
s
en
oe
ia
deat
la
enaeenrens
walSacaece
13
Mal
NteRANnG
Gs
sacs
h
tated
cuanto
tae
site
tin
aon
dscicodinueduacaceuencs
13
SDECITICATIONS:
teearevinnda
arco
edusstescrannehlade
nmtlaeen
ad
cutee,
14
FOUDIC
CHECKS:
.tscr
ise
eaten
es
enuhons
ovaeuis
atten
Caetano
15
FEATURES
Linear
tracking
tonearm
A
linear
tracking
tonearm
is
designed
to
duplicate
the
movement
of
the
head
which
cuts
the
record
master.
Compared
with
a
pivoted
tonearm,
a
linear
tracking
arm
has
a
very
small
tracking
error
(which
means
greatly
reduced
harmonic
distor-
tion)
and
almost
no
pressure
on
the
inside
wall
of
the
groove
(which
means
improved
tracking
ability
and
channel
separation).
Biotracer
electronic
tonearm
The
horizontal
and
vertical
movement
of
the
tonearm
is
monitored
by
the
Biotracer’s
own
sensors,
and
this
information
is
transmitted
to
the
tonearm
by
the
tonearm’s
own
linear
motors
to
suppress
resonance
at
low
frequencies
and
to
obtain
the
maximum
signal-to-
noise
ratio.
With
the
microcomputer
incorporated,
the
tonearm
movement,
up/down
or
forward/backward,
is
accurate
and
smooth.
Front
panel
operation
with
the
dust
cover
closed
The
ARM
TRANSPORT
buttons
allow
you
to
move
the
tonearm
easi-
ly
over
the
desired
point
of
the
record
with
the
dust
cover
closed.
Start/stop
of
the
record
play
and
tonearm
up/down
can
also
be
con-
trolled
using
the
buttons
on
the
front
panel.
Electronic
stylus
force
adjustment
As
the
stylus
force
is
adjusted
by
the
control
on
the
front
panel
and
digitally
read
out,
it
can
be
easily
adjusted
even
during
record
play.
Automatic
record
size
selection
The
record
size
is
automatically
set
by
a
photo
sensor
system.
If
no
record
is
on
the
turntable,
the
tonearm
will
not
descend
but
will
automatically
return
to
the
arm
rest.
Muting
system
A
muting
system
activates
when
the
tonearm
is
lifted
and
is
deac-
tivated
after
the
tonearm
lowers
onto
a
record
so
there
is
no
need
to
turn
the
amplifier
volume
down
every
time
a
stylus
is
placed
ona
record.
Quartz
lock
and
magnedisc
servo
system
The
turntable
maintains
an
accurate
and
drift-free
speed
by
refer-
ring
to
a
frequency
generated
by
a
very
stable
quartz
oscillator,
and
with
aid
of
a
speed
monitoring
system
which
utilizes
a
magnetic
pick-up
head
and
a
pulse
signal
derived
from
a
magnetic
coating
at
the
edge
of
the
platter.
Linear
torque
BSL
motor
Direct
drive
system
with
Sony’s
unique
BSL
(brushless
and
slotless)
motor
which
has
an
extremely
low
noise
level
and
whose
smoothness
virtually
eliminates
wow
and
flutter.
Its
high
torque
assures
a
quick
Start
to
33
1/3
rpm
after
only
a
half
revolution.
Synchronized
operation
with
the
Sony
cassette
decks
When
the
tonearm
lowers
onto
the
lead-in
groove
of
a
record,
the
cassette
deck
stand-by
mode
is
released
and
the
record
mode
assumed.
When
play
finishes,
the
cassette
deck
is
automatically
set
first
in
the
record
muting
mode,
then
in
the
pause
mode.
This
synchronized
operation
is
possible
with
Sony
cassette
decks
equipped
with
a
four-pin
remote
control
jack
which
is
connected
with
the
Sony
RM-65
synchro
remote
control
unit.