SORG Boogie Drive Service manual

1 of 36
2019-07-16 Service Record Boogie Drive
Boogie Drive
Unique people, unique solutions.
Service Record Boogie Drive
ENG
Service Record
In the following all individual adjustments of the standing aid are
described. These adjustments require tools and specialised
knowledge. Please leave the adjustments to a qualied rehab
consultant.

2 of 36 Service Record Boogie Drive 2019-07-16
Imprint
SORG Rollstuhltechnik GmbH+Co.KG
Benzstraße 3-5
68794 Oberhausen-Rheinhausen / Germany
Tel. +49 7254-9279-0
Fax +49 7254-9279-10
E-Mail [email protected]
Web www.sorgrollstuhltechnik.de
Revision status
2019-07-12
Technical status
Technical changes and misprints reserved. The
pictures in this Instructions for use can dier
from the actual equipment components. How-
ever, a corresponding conduction is possible.
Copyright
All texts, pictures and graphics underlie co-
pyright protection. All rights, including co-
pying, publishing, editing and translating,
remain reserved. © by SORG Rollstuhltech-
nik GmbH+Co. KG Benzstraße 3-5, 68794
Oberhausen-Rheinhausen / Germany.
Our terms and conditions can be found
on our order forms and at www.sorgrollstuhl-
technik.de/impressum.

3 of 36
2019-07-16 Service Record Boogie Drive
Table of content
1 Standing aid overview 5
2 General information 6
2.1 General indications 6
2.2 Documentation indications 6
2.3 Required torques and tools 6
2.4 Explanation of symbols 7
2.5 General safety instructions 8
3 Assembly Groups 9
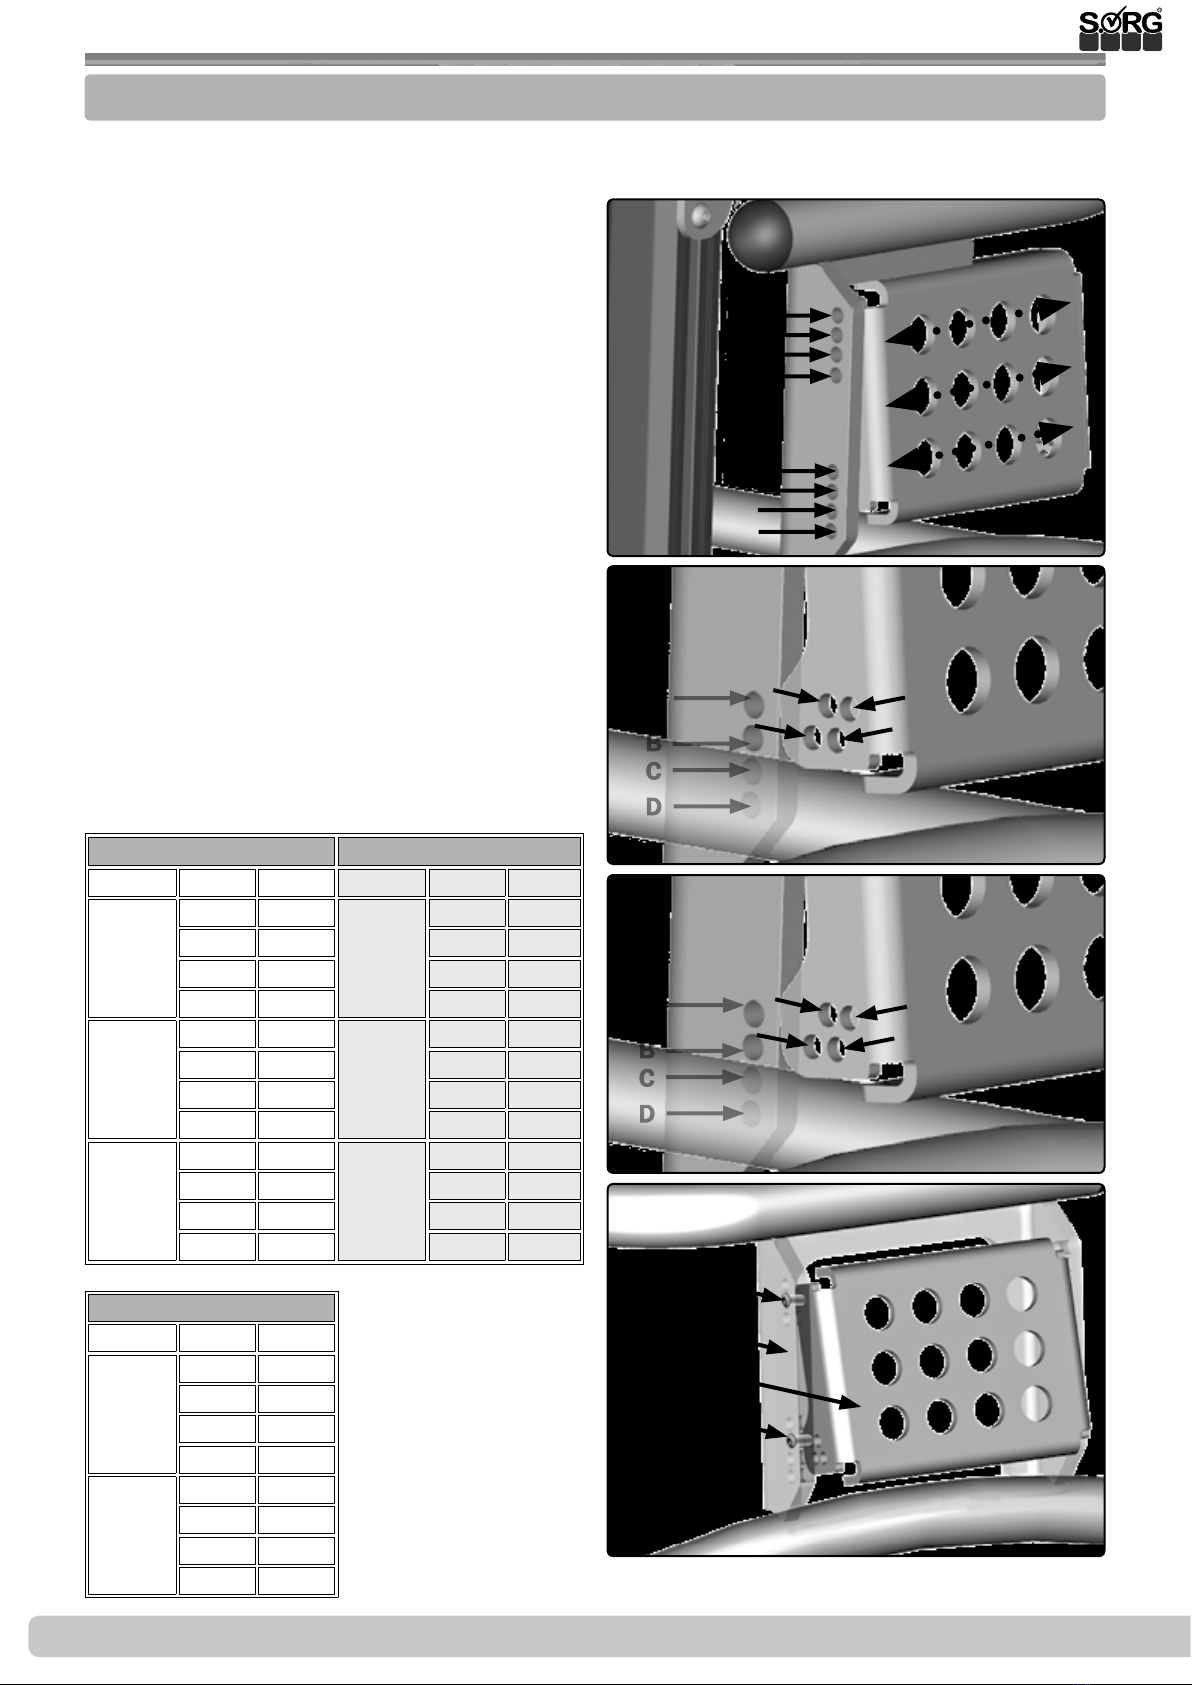
3.1 Assembly Group Wheels 9
3.1.1 Wheel position 9
3.1.2 Camber 10
3.1.3 Sprung back casters 11
3.2 Assembly Group Centre Column 12
3.3 Assembly Group Leg support 14
3.3.1 Food plates standard 14
3.3.2 Setting the angle of the 3D foot
plates 15
3.4 Assembly Group foot shells 16
3.4.1 To shift 16
3.4.2 To displace 16
3.5 Assembly Group Chest truss pad 17
3.5.1 Chest truss pad 17
3.5.2 Side chest truss pas 18
3.6 Assembly Group Pelvis truss pad 19
3.7 Assembly Group Posterior truss pad 20
3.7.1 Posterior truss pad pluggable 20
3.7.2 Side posterior truss pads 20
3.7.3 Truss pad with crank and swivel
bracket 21
3.8 Assembly Group Back truss pad 22
3.8.1 Back truss pads 22
3.9 Assembly Group Knee truss pad 23
3.9.1 Standard knee truss pad 23
3.9.2
Knee truss pads with resting brackets
24
3.10 Assembly Group Theraphy table 26
3.10.1 Standard mounting 26
3.10.2 Mounting on the chest truss pad
holder 27
3.11 Assembly Group Frame 28
3.11.1 Frame size 1 and 2
(gas pressure spring or telescop) 28
3.11.2 Frame size 3 and 4 (telescop) 28
3.11.3 Frame size 3 and 4 (telescop) 28
3.12 Assembly Group Belt 29
4 Repairs and maintenance 30
4.1 Repairs 30
4.2 Spare parts 30
4.3 Maintenance 30
4.4 Disinfection 30
4.5 Storage 30
4.6 Reinstatement 31
4.7 Disposal 31
4.8 Maintenance/ Inspection 31
5 Technical specications 33
5.1 Data and measurements 33
5.2 Meaning of labels 34
5.3 Declaration of conformity 34

4 of 36 Service Record Boogie Drive 2019-07-16

5 of 36
2019-07-16 Service Record Boogie Drive
1 Standing aid overview
15
16
17
18
19
15 side chest pad
16 cushion for posterior truss pad
17 swivel bracket
18 side posterior truss pad
19 centre column
20 gas pressure spring
21 caster
22 release lever gas pressure
spring
1chest truss pad
2theraphy table
3crank for posterior truss pad
4trum brake nub
5rear wheel
6handrim
7belt for chest trus pad
8lock for the pelvis truss pad with
crank and swivel bracket
9cushion for posterior truss pad
10 axle plate
11 knee truss pad
12 food plate
13 detecting lever for caster
14 caster
1
2
3
4
5
6
202122
14
13
12
11
10
9
8
7

6 of 36 Service Record Boogie Drive 2019-07-16
2 General information
2.1 General indications
In the following all individual settings, adjustments and repairs as well as the yearly inspection
of the standing aid are described. These adjustments require tools and specialised knowledge.
Please leave the adjustments to a qualied rehab consultant.
Should questions or suggestions come up then please contact your medical supply store or our
team (+49 7254 9279-0).
2.2 Documentation indications
Please note:
• Information about before sale can be found in the instructions for use
• Infomation for the user can be found in the instructions for use
• For maintenance instructions see: Chapter 4 (Repair & Maintenance)
2.3 Required torques and tools
For the following screws needed torque:
• M5: 5 Nm;
• M6: 7 Nm;
• M6 (axle plate) 10 Nm
• M8: 20 Nm;
• M10 (nut): 25 Nm; (caster)
• quick release axle tting 40 Nm
Needed tools:
• torque wrench (5-50 Nm)
• open end wrench
• ex ratchet handle with socket wrench inserts
• hexagon screw driver
• Phillips screw driver
• at head screw driver
• plastic mallet
• side cutter
• threadlocker (uid)
• bicycle inner tube repair kit
• work bench/jaw vise with rubber pads

7 of 36
2019-07-16 Service Record Boogie Drive
2 General information
2.4 Explanation of symbols
ATTENTION! Warnings for perso-
nal Safety aspects that are of the
utmost importance.
CORRECT safety adjustment/ use
WRONG adjustment/ use
NOT ALLOWED
References to additional/conti-
nuing reading.
Setting or adjusting the angle
open/ close
Turn clockwise
Turn counter-clockwise
steps to be done at the same
time
steps to be done after each other
steps to be done on both sides
Use
(A); (B)
1. 1.
1. 2.
;
2x
push/ pull/ insert / move/
Push in specic direction
important detail
correct or proper use/setting
incorrect or improper use/setting
reference from text to detail
point of view
view from top
view from the side
view from the bottom
view from the front
view from the back
fasten parts
remove parts

8 of 36 Service Record Boogie Drive 2019-07-16
2 General information
2.5 General safety instructions
Check before every use:
• the rm seat of all pads,
• Frames, attachments and accessories for visible damage, bends, cracks or missing / loose
screws,
• Wheels / thru axles on rm seat,
• sucient tire pressure, tire tread,
• Functioning of the brakes,
• tight t of the locking mechanisms (tripod springs, thru axles, eccentric tensioners, etc.),
whether all previously dismantled parts are plugged in again and rmly locked.
There is a risk of injuries (such as bruising) to all rotating, rotating or folding parts, inclu-
ding adjustments, repairs and transport.
All standing aid parts are to be handled properly. Do not throw or drop removable parts!
Before starting the test, repair or adjustment work, clean / disinfect the standing aid and
secure it against tipping over and / or falling down.
Use only original spare parts.
Safety nuts may only be used once. Once loosened safety nuts must be replaced by new
ones.
Only the regular maintenance of all safety-related parts on the standing aid by a qualied
rehab workshop protects against damage and maintains our manufacturer's warranty.
When adjusting the angle of the central center column via telescope and clamping lever,
there must not be any users in the standing aid.
The standing aid may only be used indoors, on level (horizontal) and rm ground and
only by the patient for whom it has been adapted. Outdoor use is not permitted.
Structural changes must not be made without our express permission. They must be exe-
cuted and documented by us or by an authorized rehab technician.

9 of 36
2019-07-16 Service Record Boogie Drive
3.1 Assembly Group Wheels
3.1.1 Wheel position
The chart below shows which distances and dimensions with which body height and with which
driving wheel are possible.
The chart on the next page explains, where the quick release axle fittings and the axle plate need
to be mounted when the wheel size and/or the camber is changed.
(1) With the horizontal change of the wheel po-
sition along the hole rows 1, 2 or 3 you change
the gripping distance and the centre of gravity.
A verticle adjustment of the wheel
position is only possible when the wheel size
is changes at the same time.
(2) To change the wheel position remove the
driving wheels and secure the mobile standing
device from rolling away with the wheel locks
of the back casters:
• Remove the quick release axle fitting (A)
on both sides incl. the drum brake coun-
terholder (B),
• place the fittings (A) in the desired new
position and retighten it.
• Proceed with the counterholder (B) in
the same manner.
• Make sure that the fittings (A) are
mounted symetrical on both sides.
(A) (B)
(1)
(2)
1
2
3
Frame size Size 1 Size 2
Body height
80-110 cm 100-130 cm
AWheel size
24"x1"
ø58 cm
26"x1"
ø63 cm
28"x1"
ø68 cm
28"x1"
ø68 cm
30"x1"
ø75 cm
32"x1"
ø80 cm
Recomended at
elbow height
47 cm 52 cm 57 cm 57 cm 64 cm 69 cm
BFoot plate to top
handrim
39-47 cm 44-52 cm 49-57 cm 49-57 cm 56-64 cm 61-69 cm
CUpper
distance
between
the wheels
with
camber:
0°
not possible not possible not possible not possible not possible not possible
3°
44 cm 44 cm 43 cm 55 cm 54 cm 54 cm
6°
42 cm 41 cm 40 cm 52 cm 50 cm 50 cm
9°
40 cm 38 cm 37 cm 49 cm 47 cm 46 cm
12°
37 cm 35 cm 33 cm 46 cm 44 cm 42 cm
Frame size Size 3
Body height
120-150 cm
A Wheel size
32"x1"
ø80 cm
36"x1"
ø90 cm
Recomended at
elbow height
71 cm 81 cm
B Foot plate to top
handrim
61-69 cm 71-79 cm
C Upper dis-
tance be-
tween the
wheels with
camber:
0°
58 cm 58 cm
3°
55 cm 54 cm
6°
51 cm 49 cm
9°
48 cm 45 cm
12°
not possible not possible

10 of 36 Service Record Boogie Drive 2019-07-16
3.1 Assembly Group Wheels
3.1.2 Camber
We mount the wheels according to your specifications to the desired camber. With the camber
you can change the distance at the top between the driving wheels.
Picture 1 shows each row (1-3) of the quick re-
lease axle for the appropriate wheel size (see
chart below) as well as the appropriate attach-
ment (A, B, C, D) of the axle plate in the axle
plate holder.
Picture 2 shows the bore picture for the possib-
le camber setting for frame size 1 and 2,
Picture 3 shows the bore picture for the possib-
le camber setting for frame size 3 and 4.
(4) To change the camber remove the driving
wheels and secure the mobile standing device
from rolling away with the wheel locks of the
back casters.
• Remove on both sides both screws (A).
• Remove on both sides both screws (B).
• Move the axle plate (C) in the axle plate
holder (D) corresponding to the details
on the basis of the chart below.
• Replace all of the screws and tighten
them and replace the wheels.
3°
6°
9°
12°
C1
A
B
D2
3
(1)
(2)
(A)
(B)
(C)
(D)
(3)
(4)
0°
3°
6°
9°
C
A
B
D
Frame size 1 Frame size 2
wheel size camber position wheel size camber position
24"
3° 3A
28"
3° 3B
6° 3A 6° 3C
9° 3B 9° 3C
12° 3C 12° 3D
26"
3° 2A
30"
3° 2A
6° 2A 6° 2A
9° 2B 9° 2B
12° 2C 12° 2C
28"
3° 1A
32"
3° 1A
6° 1A 6° 1A
9° 1B 9° 1B
12° 1C 12° 1C
Frame size 3
wheel size camber position
32"
0° 3A
3° 3A
6° 3B
9° 3C
36"
0° 1A
3° 1A
6° 1B
9° 1C

11 of 36
2019-07-16 Service Record Boogie Drive
3.1 Assembly Group Wheels
3.1.3 Sprung back casters
If the mobile standing device is used in an area without thresholds, it is recommended to set the
wheels so that each wheel has contact with the ground.
If you need to overcome doorways or the like more frequently, it is recommended to set the back
casters so that the front casters are not touching the ground. These adjustments are made by the
height adjustment of the back casters
(1+2) The height of the back casters is set as
follows:
• Place the mobile standing device on an
even surface and secure it from rolling
away by locking the drum brake.
• Loosen, on both sides, the screw (A) of
the clamp (B) on the back caster wheels,
• pull the steering gear case (C) as far out
of the clamp (B) or push it in as far until
the desired height is reached.
• First tighten the screw (A) on one side.
• Adjust the steering gear case on the
other side according to this adjustment.
• Proceed as just described
• and also retighten the screws (A) there.
On the steering gear case (C) there are grooves
(D) at a distance of 5 mm with which you can
control the evenness on both sides.
(A)
(D)
(A)
(B)
(B)
(2)
(1)
(C)
(C)
Steering gear case mounted short.
Steering gear case mounted long.

12 of 36 Service Record Boogie Drive 2019-07-16
3.2 Assembly Group Centre Column
The centre column can be set and adjusted in angle and with frame size 1 it can also be adjusted
in height.
Height adjustment of the centre column with
frame size 1
Should it become necessary to move the centre
column down:
• (1) Secure the mobile standing device
from rolling away by operating the drum
brakes and with the wheel locks of the
back casters.
• Remove the driving wheels and, for bet-
ter handling, all truss pads.
• Remove both screws (A) and spacer
bushings on the centre column (B).
• Move the centre column (B) one drilled
hole down.
• Replace the screws (A) and the spacer
bushings
• and retighten them.
Setting the angle of the centre column by
telescope and clamp lever
The angle setting of the centre column with telescope and clamp lever can only take place
when nobody is in the mobile standing device.
(2) To change the angle:
• Secure the mobile standing device from
rolling away by operating the drum bra-
kes and with the wheel locks of the back
casters.
• Loosen the clamp lever (A) of the tele-
scope (B),
• place the centre column (C) in the desi-
red position,
• close the clamp lever (A) tightly.
(A)
(A)
(B)
(C)
(1)
(2)
(B)

13 of 36
2019-07-16 Service Record Boogie Drive
Angle adjustment of the centre column by gas
pressure spring
For frequent angle adjustment of the the centre
column (e.g. for alternating load) it is recom-
mended to adjust the angle with a gas pressure
spring.
(1) To change the angle:
• Secure the mobile standing device from
rolling away by operating all wheel locks
(see above).
• Carefully operate the foot lever (A) of
the gas pressure spring (B) and place
the centre column in the desired tilt.
• Secure the user (with/without the help
of a carer) with both hands at the same
time.
• Release the foot lever.
The angle adjustment of the centre column can only take place when the mobile standing
device is still and with activated wheel locks (drum brakes and back casters).
(A)
(B)
(1)
3.2 Assembly Group Centre Column

14 of 36 Service Record Boogie Drive 2019-07-16
3.3 Assembly Group Leg support
3.3.1 Food plates standard
(1+2) With the position of the foot plate
holder, the distance between foot plates and
the top of the hand rim can be set.
The foot plates can be shifted independently
from one another forward/backward, abducted
in the distance to the centre column and
additionally can be turned inward or outward
on the foot plate holder independently.
For all adjustment work on the foot plates,
remove the driving wheels first and secure the
mobile standing device with the wheel locks of
the back casters from rolling away.
Setting the height of the foot plate holder
(3) To adjust the height of the foot plate holder
(A):
• Loosen the set screw (B)
• and remove the screw (C).
• Move the foot plate holder (A) in the
centre column (D) along the drilled
holes (E).
• Place the screw (C) back in and tighten
it.
• Retighten the set screw (B).
• Replace the wheels.
Positioning the standard foot plates
(4) Zum Anpassen der Position nach vorne/hin-
ten:
• Loosen the four screws (A).
• Remove the four screws (B) and move
the foot plates (C) forward or backward
to the desired measuremen.
• Replace the four screws (B) and
retighten all eight screws (A+B).
Abducting the standard foot plates
(4) To abduct:
• Loosen the screws (A+B).
• (5) Move the foot plates (C) to the desi-
red position,
• retighten all screws.
Turning the standard foot plates horizontally
(4) To turn:
• Loosen all eight screws (A+B) and turn
the foot plates (C) to the desired posi-
tion.
• Retighten all eight screws (A+B).
(1) (2)
(3)
(B)
(A)
(C)
(D)
(E)
(4)
(5)
(A)
(A)
(A)
(C)
(C)
(C)

15 of 36
2019-07-16 Service Record Boogie Drive
3.3 Assembly Group Leg support
3.3.2 Setting the angle of the 3D foot plates
The 3D foot plates can be adjusted, tilted and
turned three-dimensional (This can be done
seperately to one another and stepless.).
(1) To adjust the 3D-angle:
• Loosen the clamp lever (A) and place
the foot plate in the desired tilt/positi-
on/rotation.
• Retighten the clamp lever (A).
Abducting the 3D foot plates
(1) To abduct:
• Loosen the set screw (B) and move the
foot plate along the pillar (C) to the
desired position.
• Retighten the set screw (B).
Setting the height of the 3D foot plates
(2) To set the height:
• Loosen the set screw (A) and
• move the respective foot plate along the
pillar (B) in the desired position.
• Retighten the set screw (A).
To set the depth:
• Loosen the set screw (B) and completely
remove the foot plate bracket (D).
• Turn the bracket (D) 180° and
• mount it back on the pillar (C).
• Retighten the set screw (B).
(2)
(B)
(A)
(1) (D)
(B)
(C)
(A)

16 of 36 Service Record Boogie Drive 2019-07-16
3.4 Assembly Group foot shells
3.4.1 To shift
(1) To shift the foot shells:
• Loosen both screw connections (A),
• slide the foot shell along the elongated
hole forward or backward in the desired
position and
• retighten the screw connections (A).
• Replace and retighten the screw con-
nections (A).
(1)
(A)
(B)
3.4.2 To displace
(1) To displace the foot shells:
• Remove both screw connectioins (A),
• displace the foot shell in the alternative drilled holes (B) and/or the alternative elongated
holes (C),

17 of 36
2019-07-16 Service Record Boogie Drive
3.5 Assembly Group Chest truss pad
3.5.1 Chest truss pad
The truss pads can be equipped with either set screws or clamp levers.
In the following chapters the setting process will be described according to the respective picture.
Should your mobile standing device be equipped differently then please proceed correspondingly.
The chest truss pad must have been set to the individual measurements of the child/ado-
lescent as exact as possible before the first use of the mobile standing device. When the user
is standing in the mobile standing device, only fine adjustments are then allowed to be made.
(1) To adjust the height:
• Loosen the set screw (A),
• telescope the whole pillar of the chest
truss pad (B) in the desired position and
• retighten the screw (A).
(2) And/or:
• Remove both screws (A),
• move the chest truss pad in the alterna-
tive holes (B) and
• retighten both screws (A).
Angle of the chest truss pad
(3) To adjust the angle:
• Loosen the clamp lever (A),
• place the chest truss pad (B) to the desi-
red angle and
• retighten the clamp lever (A).
(A)
(A)
(C)
(B)
(1)
(2)
(B)
(B)
(A)
(B)
(3)

18 of 36 Service Record Boogie Drive 2019-07-16
3.5.2 Side chest truss pas
(1) To adjust the height:
• Remove both screws (C),
• place the holder of the side chest truss
pads in the alternative holes (B) and
• retighten the screws (C).
(2) To adjust the width:
• Loosen the set screws on both sides (A),
• place the side chest truss pads (B) in the
desired distance and
• retighten the set screws (A).
(2) To adjust the depth:
• Loosen the set screws on both sides (C),
• place the side chest truss pads (B) in the
desired position and
• retighten all set screws/clamp levers (C).
3.5 Assembly Group Chest truss pad
(2)
(A)
(C)
(B)
(A)
(C)
(1)
(B)
(B)

19 of 36
2019-07-16 Service Record Boogie Drive
3.6 Assembly Group Pelvis truss pad
The truss pads can be equipped with either set screws or clamp levers.
In the following chapters the setting process will be described according to the respective
picture. Should your mobile standing device be equipped differently then please proceed
correspondingly.
(1) To adjust the height:
• Open the clamp lever (A),
• Move the holder (B) along the centre
column (C) to the desired spot
• and retigthen the clamp lever (A).
Adjusting the width
(2) To adjust the width:
• Open both clamp levers (A),
• telescope both bails (B) to the desired
measurements
• and retighten the clamp levers (A).
Adjusting the depth
(3) To adjust the depth
• Open the clamp levers (A) on both sides,
• move both truss pads (B) to the desired
position
• and retighten both clamp levers (A).
(A)
(B)
(1)
(2)
(3)
(A)
(A)
(B)
(B)
(C)

20 of 36 Service Record Boogie Drive 2019-07-16
3.7.1 Posterior truss pad pluggable
3.7 Assembly Group Posterior truss pad
The posterior truss pad must have been set to the individual measurements of the child/
adolescent as exact as possible before the first use of the mobile standing device. When the
user is standing in the mobile standing device, only fine adjustments are then allowed to be
made.
(1) To adjust the height loosen the clamp lever
(A),
• push the crotch cushion (B) to the desi-
red position,
• retighten the clamp lever (A).
Posterior cushion
• (2) To adjust the height loosen the
clamp lever (A),
• move the posterior truss pad (B) to the
desired position,
• retighten the clamp lever (A).
The jamming of the posterior truss pad occurs
between the drill holes of the holder (G).
Should a back truss pad be additionally used
then the jamming occurs with a longer clamp
lever in the drill holes.
• (2)
To adjust the width loosen both set
screws (C),
• move both holders (D) of the side
posterior truss pads (E) to the desired
distance,
• retighten both set screws (C).
• (2) To adjust the depth
loosen the set
screws (F) on both sides,
• place both side posterior truss pads (E)
in the desired position,
• retighten both set screws (F).
3.7.2 Side posterior truss pads
(A)
(B)
(1)
(2)
(A)
(C)
(G) (F)
(E)
(B)
(D)
Other manuals for Boogie Drive
3
Table of contents
Other SORG Wheelchair manuals

SORG
SORG Loop RS Service manual

SORG
SORG LoopSORG 802 User manual

SORG
SORG Jump beta User manual

SORG
SORG Vector Service manual

SORG
SORG kika User manual

SORG
SORG Mio Carbon Design 2018 User manual

SORG
SORG Dynamis TSD Service manual

SORG
SORG Airon Service manual

SORG
SORG Mio User manual

SORG
SORG Dynamis TSD User manual