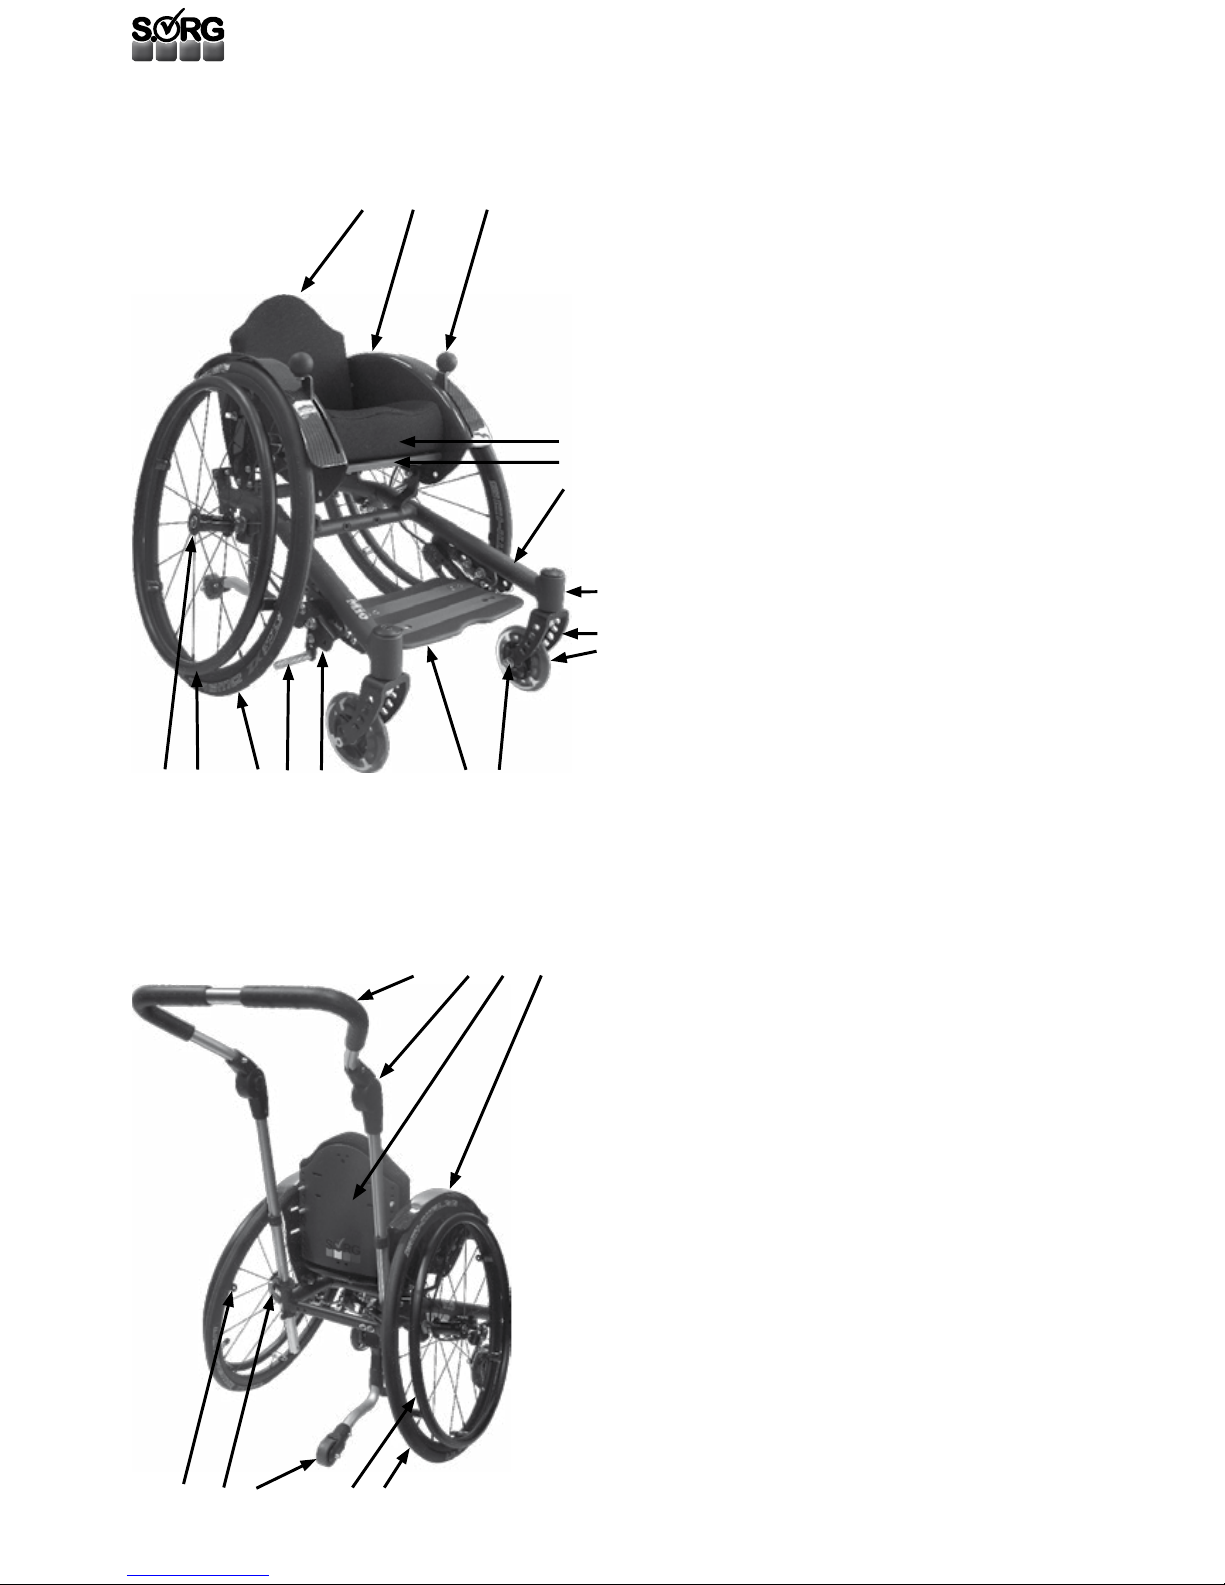
SORG Mio User manual

User Manual
1
User Manual
Mio

Mio
2
IMPRINT
SORG Rollstuhltechnik GmbH+Co.KG
Benzstraße 3-5
D-68794 Oberhausen-Rheinhausen
Germany
Tel. +49 7254-9279-0
Fax +49 7254-9279-10
E-mail info@sorgrollstuhltechnik.de
Web www.sorgrollstuhltechnik.de
REVISION STATUS
Revision from September 15, 2015
TECHNICAL STATUS
Technical changes and misprints reserved. The pictures in
this user manual can – depending on the individual equip-
ment – differ from the actual equipment components. How-
ever, a corresponding conduction is possible.
rehaKIND
We are a member of rehaKIND e.V.
International association
child and adolescent rehabilitation
COPYRIGHT
© by SORG Rollstuhltechnik GmbH + Co. KG Benzstraße
3-5, 68794 Oberhausen-Rheinhausen.
All texts and pictures in this user manual underlie the
international copyright protection and are not allowed to be
published without our consent – not even in excerpts!
CERTIFICATION
We are certied according to the Quality Management
System ISO 90001:2008 under the certicate no. 12 100
20070 at TÜV SÜD.

User Manual
3
IMPRINT 2
REVISION STATUS 2
TECHNICAL STATUS 2
rehaKIND 2
COPYRIGHT 2
CERTIFICATION 2
wheelchair overview 4
1 Preamble 5
1.1 General information 5
1.2. Signs and symbols 5
1.3 Indication 5
1.4 Counter indication 5
1.6 Application 6
1.5 Specification Mio 6
1.7 Reception 7
1.8 Documentation 7
1.9 Service and maintenance 7
1.10 Accessory and attachment drives 7
2 Safety Instructions 8
2.1 General indications 8
2.2 Handling 8
2.2.1 Getting in and out 8
2.2.2 Starting and slowing down 9
2.2.3 Danger of tipping and flipping over 9
2.2.4 Up and downhill 11
2.3 Changing seats independently 12
2.4 Grabbing objects 13
2.5 Overcoming obstacles 14
2.6 Wheel lock 16
2.7 Anti-tipper 16
2.8 Angle adjustable back and seat tilt 17
2.9 Casters 17
2.10. Loading and transporting 18
2.10.1Transport in public transportation 18
2.10.2 Transport in other vehicles 18
2.11 Other risks 19
3 Handling 20
3.1 Wheels 20
3.1.1 Quick release axle wheels 20
3.1.2 Drum brake wheels 20
3.1.3 Double hand rim 21
3.2 Casters 21
3.3 Special hand rims 22
3.3.1 Knob hand rims 22
3.3.2 Hand rim covers / Maxgrepp hand rims
22
3.4 Seat 22
3.5 Back 22
3.5.1 Standard back 22
3.5.2 Back extension submersible 22
3.6 Side guard/skirt guard 22
3.7 Push aids 23
3.7.1 Push bails /Push handles 23
3.7.2 Angle adjustment push aids 24
3.7.3 Tensioning force of eccentric clamp 24
3.8 Leg supports 25
3.8.1 Standard leg support 25
3.8.2 Leg support foldable 25
3.8.3 Locking 25
3.9 Brakes 26
3.9.1 Drum brake as driving brake 26
3.9.2 Drum brake as wheel lock 26
3.9.3 Knee lever brake (wheel lock) 26
3.10 Anti-tipper 27
3.11 Head rests 27
3.12 Abduction wedge 28
3.13 Therapy table 28
3.14 Thorax truss pads 28
3.15 Push aid for outside 29
(Outdoor Front End) 29
4. Repairs and Maintenance 30
4.1. Repairs 30
4.2 Spare parts 30
4.3 Disposal 30
4.4 Tire Change 30
4.5 Maintenance 31
4.5.1 Cleaning and Care 31
4.5.2 Disinfection 31
4.5.3 Reinstatement 31
4.6 Service/Inspection 32
4.6.1 Check list 32
4.6.2 Check list yearly inspection 32
4.6.3 Service List 32
4.7 Technical Data 34
4.7.1 Measurements and dimensions 34
4.7.2 Meaning of labels 34
4.7.3 Measurements Mio 34
4.8 DOCUMENTATION YEARLY
INSPECTION 35

Mio
4
wheelchair overview
1. back cushion (for curved back plate model 3)
2. active side guard with built-in cable brake
3. brake lever (for cable brake)
4. anatomically formed seat
5. firm seat plate
6. taurus frame (with small abduction)
7. caster adapter
8. caster fork
9. caster
10. caster axle
11. foot plate
12. locking brake
13. brake pressing bolt
14. driving wheel
15. hand rim
16. quick release axle
1. height adjustable push bail
2. angle adjustment for push bail
3. firm curved back plate (model 3)
4. side guard
5. driving wheel
6. hand rim
7. anti-tipper
8. locking lever (eccentric clamp) for push bail
9. loop to mount hand rims (wide/tight)
1 2 3
4
6
7
8
9
101112131415
16
5
1 2 3 4
789 56
Overview Mio

User Manual
5
1 Preamble
1.1 GENERAL INFORMATION
The wheelchair has been built, adjusted and given to
you operable according to your individual instructions.
A qualied Technician will make any changes
necessary, should modication be needed during use.
As any other aid, a wheelchair is a technical device
that can hold risks if not properly used. This brochure
is to help you familiarize yourself with the wheelchair
and its functions.
ATTENTION
Read the following instructions and manuals
carefully.
• User manual
• Info-brochure Crash Test ISO 7176-19
ATTENTION
If the user of the wheelchair is a child or a person
with limited competence, the parents or authorized
supervisor have to make sure that they have fully
understood the handling of the wheelchair before it
is rst used.
If you have any questions your medical supply store
or our competent team is glad to assist you (+49
07254/92790).
This user manual is directed to both you and your
rehab technician. It contains instructions on the
correct adjustments of Jump to your physical
situation.
1.2. SIGNS AND SYMBOLS
ATTENTION
This is how individual-related safety aspects of
utmost importance are indicated.
�INDICATION
This is how possible indications of utmost
importance are labelled.
INFORMATION
This is how INFORMATION on mounting and
adjustment work is labelled.
READ
This refers to other chapters within the brochure or to
additional material.
BOLD PRINT
Text in bold print highlights important passages or
remarks.
1.3 INDICATION
Mio is a small, light, active wheelchair which can grow
for children 12 months of age. Mio has two frame
variations (retro and Taurus) with two differently
strong v-shaped abductions and a xed camber of 9°.
The seat-back-unit can be precisely set according to
the shoulder-rear wheel-position for an ideal gripping
point. Mio is also suitable as a base for a seat shell
build.
It is indicated by/to:
• brittle bone disease (BBD)
• all forms of neuromuscular sicknesses
• all forms of muscular atrophy
• all forms of muscular dystrophy
• muscular torso-hypotension
• infantile Cerebral Palsy
• Spina bida
• spinal amyotrophy
• progressive muscular dystrophy
• restricted or missing head control
• muscle changes
• skeletal deformities
• build and strengthen the whole bone
structure
• build and activate the whole muscle tone
• reactivate after a severe concussion
• stabilize scoliosis
• regulate dyskinesia
With the Mio, the following therapeutic goals can be
supported:
• vestibular stimulation
• transfer of the perception of mobility with, at
the same time, an upright stance
• preservation, developing and/or
strengthening of the entire muscle tonicity
• preservation, developing and/or
strengthening of (auto-)mobility
• stabilizing the torso and putting it into an
upright position
• skeletal stabilization, strengthening of the
spine
• stimulation and stabilization of the
metabolism and circulation
• participation in social life (inclusion)
1.4 COUNTER INDICATION
Mio is counter indicated by:
• tonicity deregulation
• perception disorders
• high disturbances of equilibrium
• limb loss on both arms
• joint contractures/joint damages on both
arms
• unable to sit
• not enough eyesight

Mio
6
ATTENTION
Under the following circumstances and/or
symptoms, the active and/or passive use of the Mio
must be thoroughly discussed with the doctor or
therapist in charge of treatment.
• Users without intact skin (especially in
the areas of the buttocks, back, thigh,
hands etc.) may experience dermatological
complications (pressure marks, irritations,
open traumata)
• with severe tonicity deregulation
• with extreme restricted perception, the
active participation on the street is NOT
possible without a accompanying person.
� INDICATION
We are NOT liable for health problems and/or
other damages on persons or objects that occurred
from using the Mio, despite the above described
conditions.
1.5 SPECIFICATION MIO
Mio is a light and versatile active wheelchair for
indoors and outdoors (apartment, school, work,
leisure time, travels). Its aluminum frame displays
excellent driving qualities. The frame is available in
two different V-shaped abductions and two different
shapes (Taurus/retro). Through its frame, Mio gains
high torsion rigidness.
For a long term, effective therapeutic use the back
height, seat depth and seat width were designed
to grow. It ideally adjusts to the physiognomic
circumstances.
For the seat-back-area Mio is equipped with various
possibilities in order to meet the many different
therapeutic demands:
• rm seat plate with rm curved back plate,
• anatomical seat and back units
• and all kinds of seat shells (type 1-3).
Mio can be used for children and adolescents starting
at a seat width of 18cm and up to a maximum load of
50 kg.
• Frame size 1 (20” wheel)
• Frame size 2 (22” wheel)
• Frame size 3 (24” wheel)
• (frame size “0” with 18” wheel only after
consultation)
The allowed max. load of 50 kg cannot be exceeded.
1.6 APPLICATION
ATTENTION
The wheelchair serves solely to actively or passively
transport the person to whom the wheelchair has
been adjusted for by a qualied specialized trade.
It can be used on rm ground without any restrictions
indoors and outdoors. With suitable equipment (e.g.
outdoor front end) the wheelchair can also be used
on surfaces such as sand, cobblestones, gravel etc.
ATTENTION
The allowed load capacity (including seat shell) is
not to be exceeded.
ATTENTION
The wheelchair cannot be used in extremely wet
surroundings (shower, sauna etc.) or salt water nor
can it have excessive contact with moisture.
ATTENTION
The wheelchair must not be used as means of
transportation for goods, objects and the like.
INFORMATION
Regular maintenance and care (after chapter 4)
is necessary for the guaranteed service life of the
wheelchair.

User Manual
7
1.7 RECEPTION
PLEASE NOTE
DELIVERY
Each wheelchair is mounted, tested for functionality
and correctness in our works and packaged into
special cardboard boxes by our shipping experts.
FORWARDING COMPANY
For liability reasons we have to ask you to check the
wheelchair immediately after receiving it and in the
presence of the deliverer (forwarding company) for
possible damages that may have occurred during
transportation.
TRANSPORTAION DAMAGES
In case of damage, please proceed as follows:
• write a short record of the damage and review
of events, if possible include pictures clearly
showing the damage,
• get the personal information of the bearer
(driver’s license etc.),
• inform us immediately.
�INDICATION
Do not sign the notice of receipt from the forwarding
company before thoroughly checking the wheelchair
for defects.
�INDICATIION
According to the valid law, damages reported late
can neither be asserted to us nor to the forwarding
company.
1.8 DOCUMENTATION
�INDICATION
Keep this user manual in a safe place. Have all work/
repairs done on your wheelchair documented by the
medical supply store in the maintenance plan. If
applicable, hand it back to your benefactor along
with the wheelchair.
�INDICATION
In the event of the wheelchair being reused, the
service book is an important source of information
for you benefactor. It provides evidence of regular
inspections which might be relevant in the event of
warranty claim.
ATTENTION
For safety reasons have all repairs done and
documented solely by a qualied specialized trade.
1.9 SERVICE AND MAINTENANCE
READ
According to § 33 subparagraph 1, clause 4,
[German] SGB V, the responsibility of maintenance,
repairs and replacement lies with the benefactor.
After agreement with your benefactor, be sure to
have all safety relevant inspections, maintenance
work and if necessary repairs conducted in order to
make the wheelchair functional.
ATTENTION
Be careful with all moveable parts since there is a
RISK of crushing ngers and other body parts.
ATTENTION
The regular inspection of all safety relevant parts
on the wheelchair by a qualied rehab workshop is
the only way to prevent damages and maintain our
liability.
ATTENTION
Only original parts are to be used for all service and
maintenance work.
INFORMATION
Proceed according to the maintenance plan in chapter
4 of this user manual.
1.10 ACCESSORY AND ATTACHMENT DRIVES
ATTENTION
The addition of these accessory and attachment
drives is done by either the manufacturer or the
sanitary house and solely in their responsibility
INFORMATION
Ask the manufacturer for the respective requirements.

Mio
8
2 Safety Instructions
2.1 GENERAL INDICATIONS
ATTENTION
The risk of injuries is on all rotatable and turnable
parts. This also goes for adjustment and repair
work.
ATTENTION
The wheelchair can only be used according to its
specications. Any other use or misuse can contain
serious risks for you and your surroundings. Also
the guarantee or product liability can be terminated
in case of misuse.
Slowly familiarize yourself with the wheelchair at the
rst use and after adjustment work has been done.
First practice on level grounds with the help of an
experienced person. Only then are you allowed to try
uphill and downhill with the help of an experienced
person.
From putting on and taking off the accessories, the
measurements of the wheelchair, its weight, the
handling and tilting changes.
ATTENTION
A strong seat inclination plus a very active rear
wheel position plus unfavorable posture can cause
tipping over even on a at surface.
ATTENTION
All mounting alterations on your wheelchair must
be coordinated and made by the manufacturer or
your rehab technician.
ATTENTION
Do not make any adjustments, repairs and/or do
maintenance work yourself. Contact your qualied
medical supply store.
READ
Consider the indications for maintenance and
inspection on your wheelchair at the end of the
operating instructions.
2.2 HANDLING
2.2.1 Getting in and out
ATTENTION
(1) Getting in and out can only occur on a at
surface and with ACTIVATED WHEEL LOCK.
Activate the tilt safety for each transfer and always
turn the caster forward in order to enhance the
stability.
Let someone help you getting in and out if possible/
necessary. Let the helping person know of possible
hazards such as tripping, edges and your degree of
disability.
ATTENTION
(2) NEVER use the footrest/s to get in and out.
The wheelchair can tip forward. Please fold (when
possible) the footrest/s to the side or to the back in
order to get closer to the wheelchair.
�INDICATION
(3)
For some children it is asked for, therapeutically,
that they get in and out on their own by using the
footrest. In this case consider the following
:
• turn casters forward,
• secure the wheelchair from rolling away,
• activate tilt safety,
• don’t let the child get in and out unattended,
• be ready to give assistance.
(1)
(2)
(3)

User Manual
9
2.2.2 Starting and slowing down
ATTENTION
Avoid jerky starts. The wheelchair could tip
backwards. Thus, when possible, lean your upper
body forward when starting. With children we
always recommend to use the tilt safety whenever
possible.
ATTENTION
While driving, braking occurs through controlled
pressure applied to the hand rims from your palms/
ngers. Please keep in mind that you require more
strength in order to brake going downhill. When
driving downhill make sure to drive slow enough
that you are able to bring the wheelchair to a full
stop at any time.
ATTENTION
Also keep in mind that the hand rims heat up from
friction (especially hand rims with a cover).
ATTENTION
If necessary, use gloves with a leather inner surface
as used by cycling, but NEVER wool gloves.
2.2.3 Danger of tipping and flipping over
ATTENTION
Generally the hazard of ipping and tipping occurs
(also see pictures on the next page)
(1) from all kinds of height differences of the
ground surface,
(2) from stairs (never manage alone),
(3) from participation in public trafc under
the inuence of medication, drugs, alcohol,
etc.,
(4) when driving uphill and/or the emphasis of
different objects on the back of the wheel-
chair,
(5) when leaning out of the wheelchair,
(6) from longitudinal grooves such as streetcar
rails (hazard of getting stuck). Always cross
at a 90° angle.
(1)
(3)
(2)

Mio
10
(4)
(5)
(6)

User Manual
11
2.2.4 Up and downhill
ATTENTION
Keep in mind the higher strain in order to drive or
brake going up or downhill (see 2.2.1).
ATTENTION
(1) If possible, tilt your upper body, when driving up
or downhill, in the direction of the hill.
ATTENTION
Only go up ramps or hills with an incline or descent
greater than 6% with assistance.
ATTENTION
NEVER go on ramps or hills WITHOUT the anti-tipper
activated.
ATTENTION
(2) NEVER drive on inclines, descents or curbs
sideways to the road, you may tip over.
(2)
(1)

Mio
12
2.3 CHANGING SEATS INDEPENDENTLY
ATTENTION
Changing seats independently is dangerous and
requires experience. Practice this rst with the help
of a carer, before you change seats by yourself.
ATTENTION
The footrests are located in the leg area, whereby
the danger of tripping can occur! Make sure
that the footrest is NOT in the maneuver area!
Otherwise, change the transfer side if possible.
Fold the footrest/s, if possible, away or ip the leg
support/s out.
(1) In order to transfer independently drive as close
as possible (forwards or in a 45°angle) to the other
seating area and assure yourself of the rm xation. If
possible, ip the side part back. Lock the wheel lock
and hold on to the new, nonslip seat
(2) It is an advantage to have a nonslip board or a
similar device. Make sure that the nonslip board is
securely on the surface and can’t slip around itself
and proceed as already described.
(1)
(2)

User Manual
13
2.4 GRABBING OBJECTS
Carefully test the tilt behavior of the wheelchair to the
side, front and back with the help of an experienced
and strong helper.
ATTENTION
(1) Do not grab objects behind the wheelchair
reaching over the back of the chair, DANGER OF
FLIPPING OVER. Turn the wheelchair around and go
towards the object from the front or the side.
ATTENTION
In order to grab objects from the side/in front of
the wheelchair secure the wheelchair from rolling
away! Do not lean too far out of the wheelchair.
�INDICATION
Generally, using a reacher is safer.
(2) If possible, when leaning out of the wheelchair
sideways, hold on to something on the opposite side
with your free hand and try not to shift too much
weight.
(3) If you have to lean forward out of the wheelchair,
NEVER strain the leg supports, DANGER OF
FLIPPING OVER! First turn the casters forward for
better positioning.
In addition, (if possible) put both feet on the ground,
preferably as far from you as possible. Here you are
generally on the safe side if you use a reacher. Your
medical store will gladly advise you.
(2)
(1)
(3)

Mio
14
2.5 OVERCOMING OBSTACLES
ATTENTION
A WHEELCHAIR IS NOT FOR CARRYING. IT WAS NOT
DESIGNED NOR TESTED OR BUILT FOR THIS:
For this reason avoid stairs whenever possible!
Instead to overcome height differences use ramps
or elevators.
ATTENTION
(1) NEVER overcome stairs etc. with the wheelchair
ALONE.
ATTENTION
(2) Only overcome stairs with the help of two
experienced people. For this, the anti-tipper must
be deactivated. Be sure that the wheelchair is only
held by metal parts which are screwed securely to
the frame.
ATTENTION
(3) NEVER PULL OR CARRY THE WHEELCHAIR
OVER AN OBSTACLE BY THE REMOVEABLE SLIDING
HANDLE OR THE PUSH HANDLE.
ATTENTION
The plastic caps on the push handle can loosen due
to adverse conditions (heat, precipitation, heavy
strain etc). Inform your carer of the dangers.
ATTENTION
The same goes for the removable leg support,
foldable desk side guard and/or foot rests.
ATTENTION
Do not under any circumstances use escalators,
not even with a carer. Shopping malls and public
building with escalators always have elevators as
well.
(1)
(2)
(3)

User Manual
15
ATTENTION
Do not drive towards, for example, curbsides
without braking, DANGER OF TIPPING OVER!
ATTENTION
(1) In order to overcome height differences or
when using an elevator and lifting platforms, you
generally have to deactivate the anti-tipper. You
could become restricted in maneuverability.
(2) In order to overcome curbsides your carer should
slightly tilt you backwards, lift both casters over the
threshold and then, with the driving wheels, carefully
push the wheelchair over the edge-DO NOT LIFT. The
anti-tipper must be deactivated.
(3) When driving off of the curb please proceed
correspondingly.
ATTENTION
For this, the casters must stay in the air until the
rear wheels are over the threshold. DO NOT put the
caster down rst, DANGER OF FLIPPING OVER.
(4) Practiced drivers can overcome curbsides with the
so called wobbling without someone’s help. Slowly
and with the help of a carer familiarize yourself with
this technique.
ATTENTION
This maneuver requires a lot of practice and control
over the wheelchair!
• Drive slowly in a 90° angle up to the spot you
want to overcome and wobble the wheelchair
slowly backwards so that the casters do not
have contact to the ground.
• Bring the casters hanging in the air over the
threshold/edge and drive the wheelchair up to
the obstacle.
• Drive over the threshold/edge with your upper
body leaning forward as far as possible and
put the casters down on the ground after.
(4)
(3)
(1)
(2)

Mio
16
2.6 WHEEL LOCK
ATTENTION
The knee lever brake is a wheel lock and NOT
designed to brake during the drive. While driving,
(especially downhill) you could bring the wheelchair
to a sudden full stop, whereby you could fall out of
the wheelchair. A service brake, such as a drum
brake, allows controls braking.
ATTENTION
Before each drive make sure to check
• the correct tire pressure (information is on
the outer tire)
• and if necessary the brake pressing bolt.
• and if necessary the cable controls
ATTENTION
Cable controls are high maintenance! Especially
the clamp screws and the Bowden cable need to be
checked on a regular basis and retuned if necessary.
These cable controls are used for:
• Drum brakes
• Cable brake (integrated in the side guard)
• One hand brake
• Accompany brake (only by older models).
ATTENTION
The reverse gear stop is effective on an incline of
max. 12,3% (=7°) with a load (passenger incl. seat
shell or similar) of up to 90kg.
ATTENTION
Regularly remove lint and dirt from the brake bolts.
ATTENTION
Keep in mind that dirt, wetness, ice, snow, mud etc.
can impair the brake force of the wheel lock.
ATTENTION
Do not make repairs on the wheel lock yourself. Ask
your rehab technician.
ATTENTION
After all changes on the rear wheels (position of the
axle plate, tire changing) the functionality of the
wheel lock must be checked and if necessary newly
adjusted.
2.7 ANTI-TIPPER
ATTENTION
We recommend inexperienced and young users to
use the anti-tipper whenever possible.
� INDICATION
Additionally, each one of our wheelchairs can be
equipped with anti-tippers.
(1) In order to independently activate the anti-tipper
you must secure the wheelchair from rolling away,
slowly reach behind you without leaning too far out of
the wheelchair, push the anti-tipper down and turn it
180° on its own axis until it snaps back into the guide
slot. If possible hold with your other hand on to the
rear wheel/hand rim on the opposite side:
ATTENTION
(2) When overcoming height differences or when
using elevators or lifting platforms deactivate
the anti-tipper. You could become restricted in
maneuverability.
(2)

User Manual
17
2.8 ANGLE ADJUSTABLE BACK AND SEAT TILT
ATTENTION
(1) With an angle adjustable back or seat tilt the
anti-tipper is to be activated starting from a setting
of 90°.
ATTENTION
For active use the back or seat tilt must be in an
upright (90°) position.
Make sure that when adjusting the back angle or
when tilting that the head has enough support from
for example a head rest.
ATTENTION
NEVER activate the seat tilt or the angle adjustment
while driving.
� INDICATION
(2) In the case of amputations or leg elevation and
simultaneously “leaning back”, we recommend
for improvement of the tilt stability a wheel base
elongation, at least the use of an anti-kipper.
ATTENTION
A wheel base extension is strictly NOT a replacement
for an anti-tipper!
2.9 CASTERS
ATTENTION
Casters which are not correctly adjusted or driving
too fast, especially downhill, can cause the casters
to dangerously ap back and forth.
� INDICATION
Clean the axes and the axle holder regularly,
removing lint and dirt.
INFORMATION
After every change on the rear wheels the casters
must be newly adjusted. Let this be done by an
experienced rehab technician.
� INDICATION
(3) When transferring in and out of the wheelchair
turn the casters forward for greater stability by
slightly moving the wheelchair backwards.
(1)
(2)
(3)

Mio
18
2.10. LOADING AND TRANSPORTING
For the transport of your wheelchair in a car please
consider the following points:
• If necessary ip the anti-tipper inwards.
• If necessary remove the push handle/s or han-
dle bars.
• If possible remove the hollow molded back and
fold the back down.
• If possible fold the wheelchair and close it se-
curely with the folding xture strap.
• Unlock the wheel lock and remove the driving
wheels.
• Secure the wheelchair with tension belts in the
vehicle.
• The tension belts can only be secured on xed
frame parts. Foot rests, side guards, back or
seat adapters are not suitable for this.
• Secure all removed parts of the wheelchair in
the vehicle so that they cannot hurt anyone in
case of sudden braking.
ATTENTION
There is a risk of getting hurt from loose, ying
objects such as leg supports, seat shells, wheels,
sticks, bags etc.
Inform yourself by your car salesman about safely
securing the wheelchair with lashing exes or other
suitable safety measures in your vehicle before
transporting the wheelchair.
2.10.1 Transport in public transportation
In every public transportation a spot must be provided
to place the wheelchair according to the EG-guideline
2001/85/EG.
ATTENTION
The spot in public transportation is only arranged for
EMPTY wheelchairs.
ATTENTION
Place the wheelchair in the provided area opposite
the driving direction so that the backrest and a side
guard rest securely on the edge of the provided area.
• The wheelchair is not allowed to shift in case
of an accident.
• Close the wheel lock.
• During the drive leave the wheelchair and seat
yourself in the provided seat next to the spot
for your wheelchair.
• If available, use the seat belt!
Let someone help you get in and out of the public
transportation,
• so that you don’t get stuck in the crack be-
tween the door and the sidewalk,
• so that you don’t panic
• so that your claim for the marked seat possibly
gets more emphasis,
• so that you can be helped getting into the seat
and tying down the wheelchair.
2.10.2 Transport in other vehicles
Wheelchairs can never reach the stabile features of a
rmly mounted car seat because of their purpose and
light build.
ATTENTION
Thus, we recommend you to NOT use the wheelchair
as a seat while transporting in a vehicle.
READ
Read our info brochure “Crash Test ISO 7176-19”.
Here, the potential dangers and regulations of the
ISO 7176-19 are described.
ATTENTION
Only wheelchairs that have successfully passed a
dynamic crash test according to ISO 7176-19 are
allowed to be used as a seat in a vehicle.
Our successfully tested wheelchairs are provided with
this international symbol on the type sign and are
additionally marked on our order form with our “crash
test button”.
If necessary, inform yourself
by your retailer or under
www.sorgrollstuhltechnik.
de, if your model is approved
as a seat in a vehicle.

User Manual
19
2.11 OTHER RISKS
ATTENTION
After a collision, contact your rehab service station
to check the carriage, frame and Bowden cables
and have the damages xed.
� INDICATATON
Avoid direct sunrays. Dark parts on the wheelchair
can heat quickly and can possibly cause burns.
ATTENTION
FIRE RISK from the textile parts (seat shell and
back covering, seat cushion or plastic parts). Keep
sources of ignition away from the wheelchair.
ATTENTION
Hand rims heat up from strong friction especially
from braking while driving fast or from driving
downhill for a while.
� INDICATION
For sensitive skin we recommend to wear gloves as
used for cycling (nger stalls with a leather inner
surface---but NEVER wool gloves).
ATTENTION
RISK OF HAND INJURY from turning parts. Do not
grab in between the spokes of the driving wheel or
between the rear wheel and the knee lever brake.
ATTENTION
Do not use the wheelchair in damp rooms or drive
in salt water with it. Important parts may corrode
and not work properly anymore, whereby the driving
qualities or the lifespan of the wheelchair are
negatively inuenced.
ATTENTION
The position of the driving wheels in the axle plate
can only be changed by a qualied specialty store! It
inuences the focus (tilt ability) and the functionality
of the knee lever brake.
ATTENTION
Do not put your ngers between the hand rims and
the driving wheels. (Grooved wheels with built in
hand rims make this impossible.)
ATTENTION
Be cautious by tight spots: You can bruise your
ngers (4) and/or damage the hand rims.
ATTENTION
From braking with the hand rims, heat occurs
through friction. If necessary, use leather gloves as
used for cycling.
ATTENTION
Regularly check the screwing and the secure position
of the hand rims according to the maintenance plan.
ATTENTION
Regularly check the secure position of the spokes
according to the maintenance plan.
ATTENTION
From strong sunrays, the wheels can heat up to 42°
and you could burn yourself.
In
AwhenEVE

Mio
20
3 Handling
3.1 WHEELS
3.1.1 Quick release axle wheels
All of our rear and 12” wheels are equipped with
quick release axles for fast removal.
(1) To release or apply the quick release axle, push
the lock button (A) in the middle of the wheel nub and
release it after the action.
(2) After applying, the lock ball (A) must be completely
in sight at the end of the quick release axle. The
wheels should not be able to be removed.
Be sure to regard the following points:
• Wheels are turning parts and can cause
injuries to ngers.
• After fastening the wheels, check the secure
hold of the quick release axle.
• (2) Check the small lock ball (tension spring)
(A) at the end of the quick release axle to be
sure it functions properly.
• Check the air pressure of the rear wheels
regularly, in order to ensure the functionality of
the brakes!
With camber of wheels the toe in can be corrected if
needed (see service record under “track alignment”).
ATTENTION
It is absolutely necessary that you let your rehab
technician do the required work.
3.1.2 Drum brake wheels
To apply or remove please proceed as described with
the rear wheels.
ATTENTION
The drum brake wheels’ brake pads are extremely
sensitive and can lose their functionality from
dirt or scratches on the brake pads. Remove lint
and dirt from the brake pads regularly with a soft
brush. Check the functionality of the Bowden cables
regularly, in short intervals.
(3) To slow the ride down, the carer pushes both brake
levers simultaneously (A).
(4) To secure the wheelchair, pull both levers (A) up
and latch the small lock levers (B) in the grooves (C).
The drum brakes are now blocked.
To unlock the blockage, pull both brake levers (A) a
little bit higher to unlock the small lock levers (B).
(1)
(A)
(A)
(2)
(4)
(A)
(C) (B)
(3)
(A)
Other manuals for Mio
3
Table of contents
Other SORG Wheelchair manuals

SORG
SORG Airon Service manual

SORG
SORG Jump alpha Service manual

SORG
SORG Vector User manual

SORG
SORG Mio Service manual

SORG
SORG Jump beta User manual

SORG
SORG Tilty vario User manual

SORG
SORG Mio Move 604 User manual

SORG
SORG Siro II User manual

SORG
SORG Jump beta User manual

SORG
SORG Mio Carbon Service manual

SORG
SORG Tilty vario User manual

SORG
SORG MIO MOVE User manual

SORG
SORG Vector Service manual

SORG
SORG Loop RS User manual

SORG
SORG MIO MOVE Service manual

SORG
SORG Loop RS Service manual

SORG
SORG Dynamis MV Service manual

SORG
SORG Vector Service manual

SORG
SORG Loop Service manual

SORG
SORG Tilty vario Service manual