SORG Tilty vario User manual

User Manual
1
Tilty
Vario
User Manual

Tilty Vario
2
IMPRINT
SORG Rollstuhltechnik GmbH+Co.KG
Benzstraße 3-5
D-68794 Oberhausen-Rheinhausen
Germany
Tel. +49 7254-9279-0
Fax +49 7254-9279-10
E-mail info@sorgrollstuhltechnik.de
Web www.sorgrollstuhltechnik.de
REVISION STATUS
Revision from April 25, 2016
TECHNICAL STATUS
Technical changes and misprints reserved. The pictures in
this user manual can – depending on the individual equip-
ment – differ from the actual equipment components. How-
ever, a corresponding conduction is possible.
REHAKIND
We are a member of rehaKIND e.V.
International association
child and adolescent rehabilitation
COPYRIGHT
© by SORG Rollstuhltechnik GmbH + Co. KG Benzstraße
3-5, 68794 Oberhausen-Rheinhausen.
All texts and pictures in this user manual underlie the
international copyright protection and are not allowed to be
published without our consent – not even in excerpts!
CERTIFICATION
We are certied according to the Quality Management
System ISO 90001:2008 under the certicate no. 12 100
20070 at TÜV SÜD.

User Manual
3
REVISION STATUS 2
TECHNICAL STATUS 2
REHAKIND 2
COPYRIGHT 2
CERTIFICATION 2
WHEELCHAIR OVERVIEW 4
1 Preamble 5
1.1 GENERAL INFORMATION 5
1.2. SIGNS AND SYMBOLS 5
1.3 INDICATION 5
1.4 COUNTER INDICATION 5
1.6 APPLICATION 6
1.7 RECEPTION 6
1.8 DOCUMENTATION 6
1.5 SPECIFICATION TILTY VARIO 6
1.9 SERVICE AND MAINTENANCE 7
1.10 ACCESSORY AND ATTECHMENT
DRIVES 7
2 Safety Instructions 7
2.1 GENERAL INDICATIONS 7
2.2 HANDLING 8
2.2.1 GETTING IN AND OUT 8
2.2.2 STARTING AND SLOWING DOWN 9
2.2.3 DANGER OF TIPPING AND
FLIPPING OVER 9
2.2.4 UP AND DOWNHILL 10
2.3 GRABBING OBJECTS 10
2.4 OVERCOMING OBSTACLES 11
2.5 WHEEL LOCK 11
2.6 ANTI-TIPPER 12
2.7 CASTERS 12
2.8 COMBINATION WITH ELECTRIC
PUSH AND BRAKE AIDS AND
ELECTRIC ADD-ON DRIVES 12
2.9 LOADING AND TRANSPORTING 13
2.9.1 TRANSPORT IN PUBLIC TRANSPORTA-
TION 13
2.9.2 TRANSPORT IN OTHER VEHICLES 13
2.10 OTHER RISKS 14
3 Handling 15
3.1 ASSEMBLY GROUP WHEELS 15
3.1.1 QUICK RELEASE AXLE WHEELS 15
3.1.2 DRUM BRAKE WHEELS 15
3.1.3 CASTERS 16
3.2 SPECIAL HAND RIMS 16
3.2.1 DOUBLE HAND RIM 16
3.2.2 KNOB HAND RIMS 17
3.2.3
HAND RIM COVERS /
MAXGREPP HAND RIMS 17
3.3 SEAT-BACK UNIT 17
3.3.1 TILTING 17
3.3.2 ADJUSTING THE BACK ANGLE 18
3.3.3 FOLDING THE BACK DOWN 18
3.3.4 SUBMERSIBLE BACK EXTENSION 18
3.3.5 ADJUSTING THE BACK ANGLE WITH
A GAS PRESSURE SPRING 19
3.3.6
FOLDING THE BACK ANGLE
DOWN WITH A GAS PRESSURE SPRING
19
3.4 PUSH AIDS 20
3.4.1 PUSH HANDLES/PUSH BAIL 21
3.4.2 CLAMPING FORCE OF THE
ECCENTRIC CLAMP 22
3.4.3 ANGLE ADJUSTMENT PUSH BAIL 22
3.4.4 PUSH AID FOR OUTSIDE
(OUTDOOR FRONT END) 23
3.5 LEG SUPPORTS 24
3.5.1 LOCKING AND UNLOCKING THE
FOOT PLATE/S 24
3.5.2 STANDARD LEG SUPPORT,
CONTINUOUS OR DIVIDED 25
3.5.3 LEG SUPPORT CAN BE ELEVATED,
CONTINUOUS OR DIVIDED 26
3.5.4 LEG REST 26
3.6 BRAKES 27
3.6.1 STANDARD WHEEL LOCK 27
3.6.2 CABLE BRAKE 27
3.6.3 DRUM BRAKE AS DRIVING BRAKE 28
3.6.4 DRUM BRAKE AS WHEEL LOCK 28
3.7 ANTI-TIPPER 29
3.8 THORAX TRUSS PADS 30
3.9 ABDUCTION WEDGE 30
3.10 HEAD RESTS 31
3.11 THERAPY TABLE 31
3.20 ARM CUSHION 32
3.20 TIPPING LEVER 32
3.21 CANE HOLDER 33
3.4 ONE-HAND STEERING 33
4. Repairs and maintenance 34
4.1 REPAIRS 34
4.2 SPARE PARTS 34
4.3 DISPOSAL 34
4.4 TIRE CHANGE 34
4.5 MAINTENANCE 35
4.5.1 CLEANING AND CARE 35
4.5.2 DISINFECTION 35
4.5.3 REINSTATEMENT 35
4.6 SERVICE/INSPECTION 36
4.6.1 CHECK LIST 36
4.6.2 CHECK LIST YEARLY INSPECTION 36
4.6.3 SERVICE LIST 36
4.7 TECHNICAL DATA 38
4.7.1 MEASUREMENTS AND DIMENSIONS 38
4.7.2 MEANING OF LABELS 38
4.7.3 MEASUREMENTS TILTY VARIO 38
4.8
DOCUMENTATION YEARLY INSPECTION
39
4.9 RETAILER VERIFICATION 40

Tilty Vario
4
Wheelchair overview
1. push bail, angle adjustable
2. firm curved back plate, angle
adjustable
3. arm rest, height and angle
adjustable
4. side guard
5. anatomically formed seat
6. frame
7. foot plate, folds back
8. caster fork
9. caster
10.control lever for knee lever
brake
11.brake pressing bolt
12.axle plate
13.drum brake hub with quick
release axle
14.anti-tipper
15.driving wheel
16.handrim
17. clamp lever height
adjustment push bail
18.clamp lever angle adjustment
push bail
19.release lever gas pressure
spring for back angle
adjustment
20. control lever drum brake
1. axle plate with camber
adapter
2. gas pressure spring for tilting
3. frame crossbar (screwed on
for growing feature)
4. plug bolt to lock the back gas
pressure spring
5. gas pressure spring for back
angle adjustment
6. eccentric clamp for the height
adjustment of the push bail
7. release lever seat tilt
mechanism
8. control lever drum brake
1 2 3 4 5
6
7
8
9
8
7
6
5
17
18
19
20
1011
12
13141516
4 43 2 1

User Manual
5
1 Preamble
1.1 GENERAL INFORMATION
The wheelchair has been built, adjusted and given to
you operable according to your individual instructions.
A qualied Technician will make any changes neces-
sary, should modication be needed during use.
As any other aid, a wheelchair is a technical device
that can hold risks if not properly used. This brochure
is to help you familiarize yourself with the wheelchair
and its functions.
ATTENTION
Read the following instructions and manuals
carefully.
User manual
Info-brochure Crash Test ISO 7176-19
ATTENTION
If the user of the wheelchair is a child or a person
with limited competence, the parents or authorized
supervisor have to make sure that they have fully
understood the handling of the wheelchair before it
is rst used.
If you have any questions your medical supply store or
our competent team is glad to assist you
(+49 07254/92790).
1.2. SIGNS AND SYMBOLS
ATTENTION
This is how individual-related safety aspects of utmost
importance are indicated.
�INDICATION
This is how possible indications of utmost importance
are labelled.
INFORMATION
This is how INFORMATION on mounting and adjustment
work is labelled.
READ
This refers to other chapters within the brochure or to
additional material.
BOLD PRINT
Text in bold print highlights important passages or
remarks.
1.3 INDICATION
Tilty Vario is indicated
• by all therapy forms for changing positions
• to stimulate/strengthen the whole metabo-
lism, the nervous system and or the whole car-
diovascular system,
• to preserve, rebuild and to activate the whole
muscle tone or individual muscle groups,
• to build and to strengthen the whole bone
structure,
• to slow or to limit the development of scolio-
sis,
• to slow or to limit atrophic or dystrophic musc-
le changes,
• to stimulate/strengthen the sensitive integra-
tion (perception or vestibular stimulation),
• by all forms of Paresis and/or neuromuscular
sicknesses,
• to reactivate after a severe concussion,
• by all therapy forms in reference to side domi-
nance.
1.4 COUNTER INDICATION
Tilty Vario is as an active wheelchair counter indicated
by:
• grave vestibular and perception disorder,
• limb loss on both arms,
• joint contractures/joint damages on both
arms,
• unable to sit,
• not enough eyesight.
ATTENTION
Under the following circumstances and/or symp-
toms, the active and/or passive use of the Tilty Va-
rio must be thoroughly discussed with the doctor or
therapist in charge of treatment:
• users without intact skin,
• with severe tonicity deregulation
• or with severe motor disfunctions.
�INDICATION
We are NOT liable for health problems and/or other
damages on persons or objects that occurred from
using the Tilty Vario despite the above described
conditions.

Tilty Vario
6
1.7 RECEPTION
�INDICATION
DELIVERY
Each wheelchair is mounted, tested for functionality
and correctness in our works and packaged into
special cardboard boxes by our shipping experts.
FORWARDING COMPANY
For liability reasons we have to ask you to check the
wheelchair immediately after receiving it and in the
presence of the deliverer (forwarding company) for
possible damages that may have occurred during
transportation.
TRANSPORTATION DAMAGES
In case of damage, please proceed as follows:
• write a short record of the damage and review
of events, if possible include pictures clearly
showing the damage,
• get the personal information of the bearer
(driver‘s license etc.),
• inform us immediately.
�INDICATION
Do not sign the notice of receipt from the forwar-
ding company before thoroughly checking the
wheelchair for defects.
�INDICATION
According to the valid law, damages reported late
can neither be asserted to us nor to the forwarding
company!
1.8 DOCUMENTATION
�INDICATION
Keep this user manual in a safe place. Have all
work/repairs done on your wheelchair documen-
ted by the medical supply sotre in the maintenance
plan. If applicable, hand it back to your benefactor
along with the wheelchair.
�INDICATION
In the event of the wheelchair being reused, this is
an important source of information for your bene-
factor. It provides evidence of regular inspections
which might be relevant in the event of warranty
claim.
ATTENTION
For safety reasons have all repairs done and docu-
mented solely by a qualified specialized trade.
1.5 SPECIFICATION TILTY VARIO
Tilty Vario is a growable active wheelchair with tilt func-
tion for children, adolescents and adults:
• Seat height and seat position can be set,
• tilt function with gas pressure spring by 25°,
• back angle adjustement with raster from 78°
to 126°, in addition can be folded forward
• frame abducted by 10 cm
,
• back height growable by 5 cm, seat width
growable by 4 cm and seat depth growable by
4 cm without purchased parts
• various side guards (with built in cable control
among other things),
• anti-tipper,
• leg supports with continuous or divided foot
plates, mounted in the middle under the seat,
distance can be set freely, opt. can be eleva-
ted,
• steer and push aids for outdoors (Outdoor
Front End),
• positioning aids (side truss pads, abduction
wedge, anatomically formed seat unit, head
rest, telescopic back extension),
• one-hand aid (double hand rim, one-hand
steering, one-hand brake),
• legrest(s),
• suitable for setting up a seat shell,
• various driving wheels and casters.
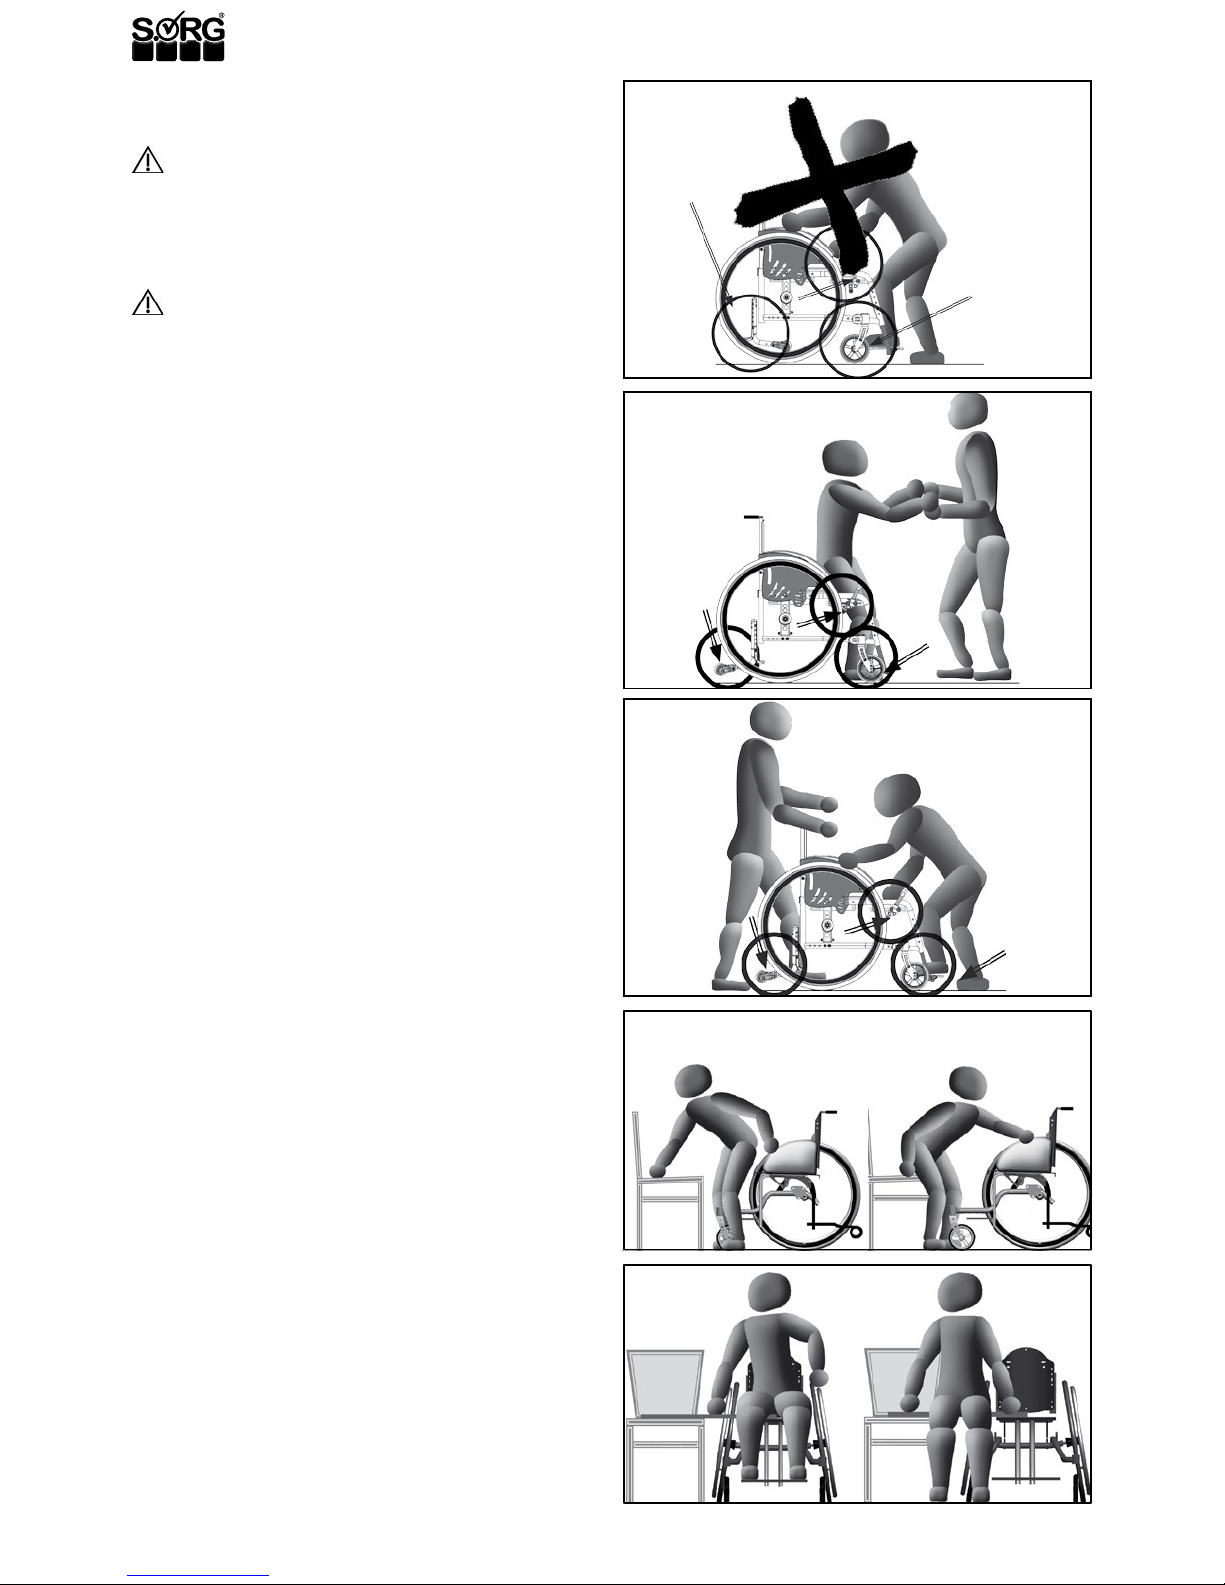
1.6 APPLICATION
ATTENTION
The wheelchair serves solely to actively or passively
transport the person whom the wheelchair has been
adjusted for by a qualified specialzed trade.
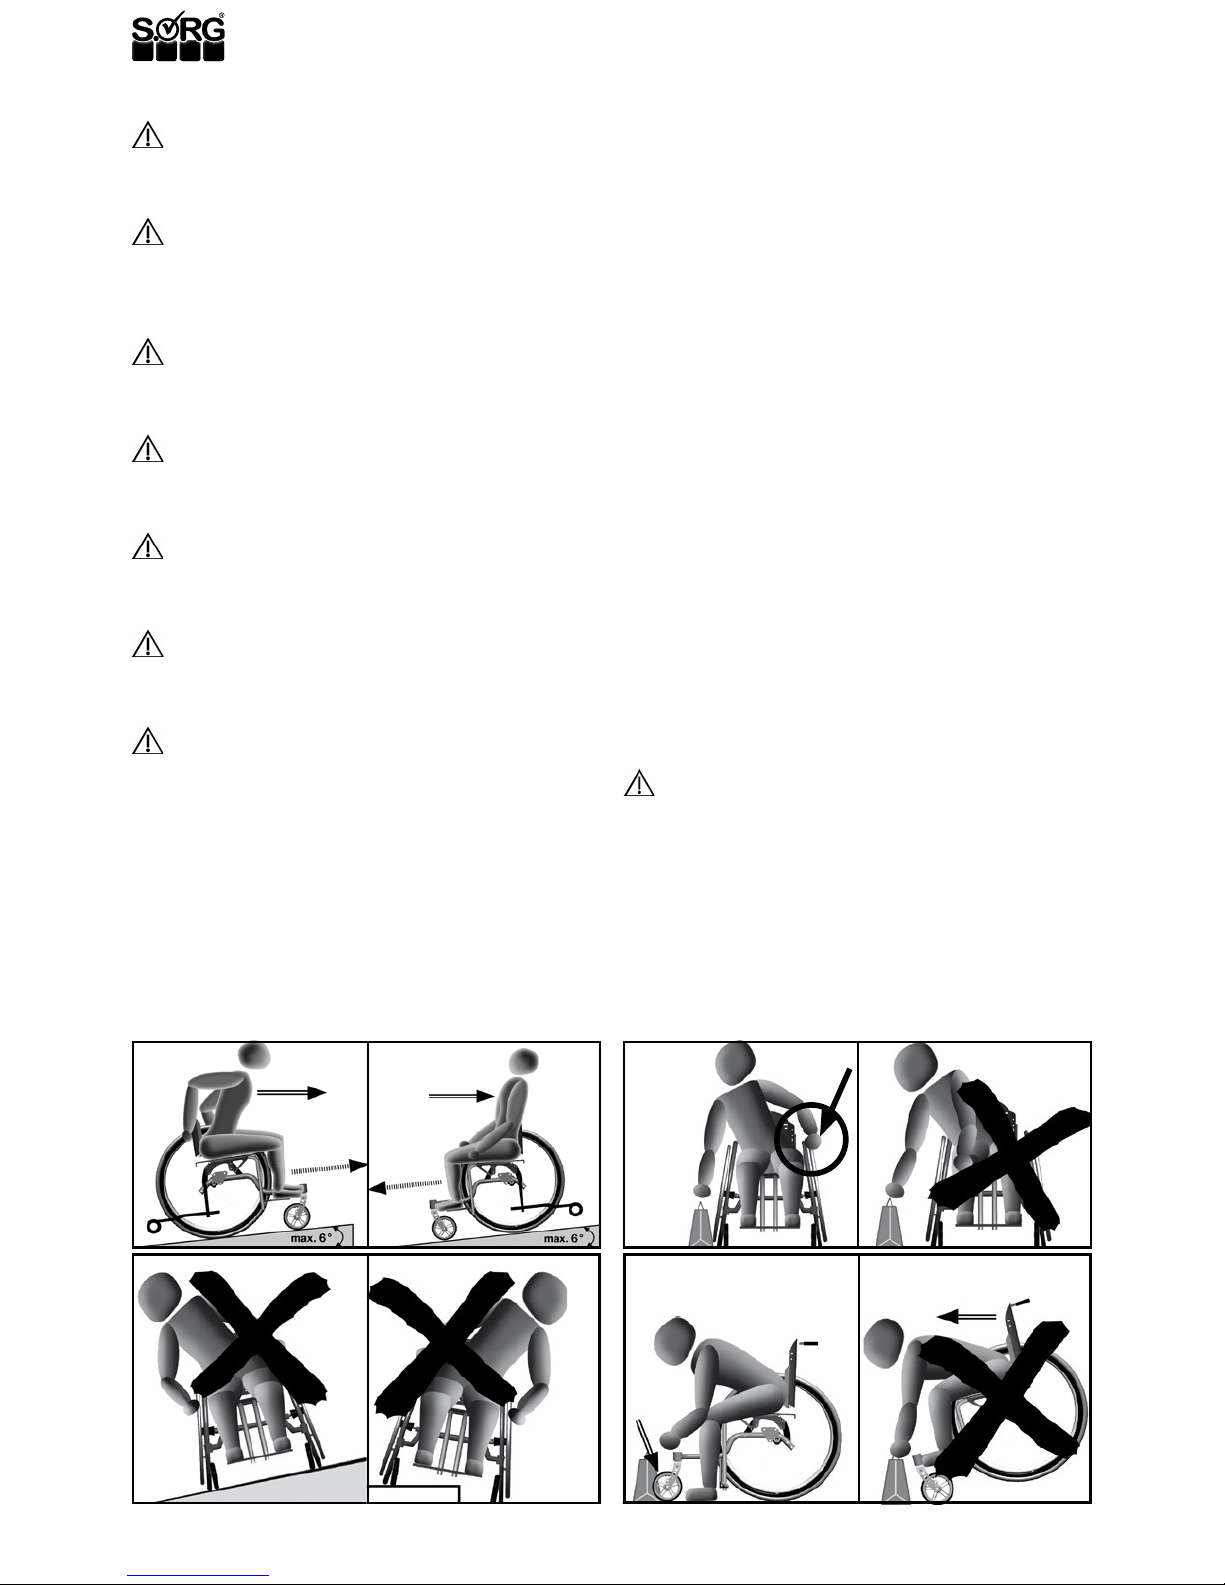
It can be used on firm ground without any restrictions
indoors and outdoors. With suitable equipment (e.g.
Outdoor Front End) the wheelchair can also be used
on surfaces such as sand, cobblestones, gravel etc.
ATTENTION
The allowed load capacity (including seat shell if ap-
plicable) is not to be exceeded.
ATTENTION
The wheelchair cannot be used in extremely wet
surroundings (shower, sauna, etc.) or salt water nor
can it have excessive contact with moisture.
ATTENTION
The wheelchair must not be used as means of tran-
portaiton for goods, objects and the like.
INFORMATION
Please follow the care and maintenance plan
.

User Manual
7
1.9 SERVICE AND MAINTENANCE
READ
According to § 33 subparagraph 1, clause 4, [Ger-
man] SGB V, the responsibility of maintenance, re-
pairs and replacement lies with the benefactor. Af-
ter agreement with your benefactor, be sure to have
all safety relevant inspections, maintenance work
and if necessary repairs conducted in order to make
the wheelchair functional.
ATTENTION
Be careful with all moveable parts since there is a
RISK of crushing fingers and other body parts.
ATTENTION
The regular inspection of all safety relevant parts
on the wheelchair by a qualified rehab workshop is
the only way to prevent damages and maintain our
liability.
ATTENTION
Only original parts are to be used for all service and
maintenance work.
INFORMATION
Proceed accoring to the maintenance plan in chapter
4 of this user manual.
1.10 ACCESSORY AND ATTECHMENT DRIVES
ATTENTION
The addition of these accessory and attachment
drives is done by either the manufacturer or the
sanitary house and solely in their responsibility.
INFORMATION
Ask the manufacturer for the respective requirements.
2 Safety Instructions
2.1 GENERAL INDICATIONS
ATTENTION
The risk of injuries is on all rotatable and turnab-
le parts. This also goes for adjustment and repair
work.
READ
Before use read this user manual thoroughly.
ATTENTION
The wheelchair can only be used according to its
specifications. Any other use or misuse can contain
serious risks for you and your surroundings. Also the
guarantee or product liability can be terminated in
case of misuse!
Slowly familiarize yourself with the wheelchair at the
first use and after adjustment work has been done.
First practice on level grounds with the help of an ex-
perienced person. Only then are you allowed to try
uphill and downhill with the help of an experienced
person.
From putting on and taking off the accessories, the
measurements of the wheelchair, its weight, the hand-
ling and tilting changes.
Under certain circumstances the wheelchair can tip
over backwards on level grounds with a back tilt of
>90°. This also occurs also and to a special degree
when the seat position is tilted.
ATTENTION
THE WHEELCHAIR CAN ONLY BE USED WITH ACTI-
VATED ANTI-TIPPER WHEN TILTED AND/OR A BACK
ANGLE OF >90°.
ATTENTION
All mounting alterations must be coordinated and
documtented.
ATTENTION
Do not make any adjustments, repairs and/or do
maintenance work yourself. Contact your qualified
medical supply store.
READ
Consider the indications for maintenance and
inspection on your wheelchair at the end of the
operating instructions.

Tilty Vario
8
2.2 HANDLING
2.2.1 Getting in and out
ATTENTION
(1+2) Getting in and out can only occur on a flat
surface and with ACTIVATED WHEEL LOCK. The se-
at cannot be tilted. Activate the anti-tipper for each
transfer and turn the casters forward.
ATTENTION
(1) NEVER use the footrest/s in order to get in or
out. Fold them back.
�INDICATION
(3) For some children it is asked for, therapeutically,
that they get in and out on their own by using the
footrest. In this case consider the following:
• turn the casters forward,
• secure the wheelchair from rolling away,
• activate the anti-tipper and assist.
(4) Active transfer:
• Drive as close as possible to the front of the
chair or seat.
• Secure the wheelchair from rolling away and
activate the anti-tipper.
• Support yourself with one hand on the new
seating area (the chair) and with the other one
on the wheelchair.
• Turn your pelvis by shifting your weight in the
direction of the new seating arrangement.
• Changing back proceed analog.
(5) Transfer with sliding board
• Drive as close as possible to the side of the
chair.
• Secure the wheelchair from rolling away and
activate the anti-tipper.
• Place the one end of the sliding board under
your thigh and the other on the chair.
• Pull yourself on the sliding board to the chair.
• Changing back proceed analog.
(1)
(2)
(3)
(4)
(5)

User Manual
9
(5)
(5)
(3)
(3)
(1) (2)
(4)
(4)
2.2.2 Starting and slowing down
ATTENTION
Avoid jerky starts. The wheelchair could tip back-
wards. With children we recommend, whenever pos-
sible, to use a headrest.
ATTENTION
When driving downhill more strength is required.
This is why you should drive slow enough downhill
that you are able to bring the wheelchair to a full
stop at any time.
ATTENTION
Hand rims heat up from friction. If necessary, use
gloves with a leather inner surface as used by
cycling but NEVER wool gloves.
2.2.3 Danger of tipping and flipping over
Special caution is necessary when driving (active and
passive) with a tiltied seat and/or a back angle greater
than 90°, because the centre of gravity is massively
changed by this and it can become wobbily on a level
surface.
ATTENTION
WE RECOMMEND, IF POSSIBLE, NOT TO DRIVE OR
OVERCOME OBSTACLES WITH A TILTED SEAT AND/
OR BACK ANGLE >90°. FOR THIS ALWAYS PLACE
THE SEAT AND THE BACK IN A VERTICAL POSITION!
ATTENTION
DO NOT HANG OBJECTS (BAGS ETC.) ON THE BACK
OR THE BACK TUBES/ PUSH HANDLES/BAIL. WITH
THIS YOU INFLUENCE THE TILT BEHAVIOUR OF THE
WHEELCHAIR MASSIVELY.
ATTENTION
Generally the hazard of flipping and tipping over occurs
• (1) from all kinds of height differences of the
ground surface,
• (2) from chairs (never manage alone),
• (3) from participation in public traffic under
the influence of medication, drugs, alcohol
etc.,
• (4) when leaning out of the wheelchair,
• (5) from longitudinal grooves (streetcar rails
etc.), curbsides etc. Always cross at 90°
angle,
• (6) from driving uphill and/or objects which
change the centre of gravity on the back,
driving with tilted seat. If possible, lean your
upperbody as far as possible in the direction
of the hill.
(4) (4)
(6)

Tilty Vario
10
2.2.4 Up and downhill
ATTENTION
Keep in mind the higher strain in order to drive/
push or brake going up or downhill.
ATTENTION
Be sure to check the FUNCTIONAL EFFICIENCY
OF THE WHEEL LOCK and the drum brake BEFORE
EACH DRIVE.
ATTENTION
The seat and back unit must be in a vertical 90° po-
sition when driving on inclines/descents.
ATTENTION
(1) If possible, the user should tilt their body when
driving up or downhill in the direction of the hill.
ATTENTION
Only go up/down ramps or hills with an incline or
descent greater than 6% with assistance.
ATTENTION
NEVER go on ramps or hills WITHOUT the anti-tipper
activated.
ATTENTION
(2) NEVER drive on inclines, descents or curbs side-
ways to the road, you may tip over.
2.3 GRABBING OBJECTS
Grabbing objects requires some practice and experi-
ence. Slowly familiarise yourself with the action with
the help of an experienced and strong assisting per-
son.
(3) In order to grab objects from the side/in front of
the wheelchair
• secure the wheelchair from rolling away,
• do not lean too far out the wheelchair,
• hold on with your free hand (if possible) ,
• try to shift as little weight as possible in the
grabbing direction.
(4) If you have to lean forward out of the wheelchair,
NEVER STRAIN THE LEG SUPPORTS, DANGER OF
FLIPPING OVER!
• For a better stance, turn the casters forward
by driving back a little bit,
• (if possible) place both feet on the ground and
as far forward as possible,
• (if possible) secure yourself with your free
hand as far back as possible,
• try to shift as little weight as possible in the
grabbing direction.
�INDICATION
Generally, using a reacher is safer.
ATTENTION DANGER OF FLIPPING OVER!
Do not grab objects behind the wheelchair over the
wheelchair back. Turn your wheelchair and drive to-
ward the object from the front or side.
(1)
(2) (4)
(3)

User Manual
11
2.4 OVERCOMING OBSTACLES
A WHEELCHAIR IS NOT FOR CARRYING. For this
reason avoid stairs! Whenever possible, use ramps or
elevators in order to overcome height differences.
ATTENTION
BE SURE THAT THE ECCENCTRIC CLAMPS OF THE
PUSH HANDLES/BAILS ARE TIGHTLY LOCKED AND
EFFECTIVE.
ATTENTION
ONLY CARRY THE WHEELCHAIR BY ITS FRAME,
NEVER BY THE SEAT SHELL, THE LEG SUPPORT
AND/OR THE FOOT PLATE/S.
ATTENTION
(1) NEVER overcome stairs etc. with the wheelchair
ALONE.
ATTENTION
(2+3) Only overcome stairs with the help of two
experienced people. For this, the anti-tipper must
be deactivated. Be sure that the wheelchair is only
held by metal parts which are screwed securely to
the frame.
ATTENTION
Do not under any circumstances use escalators,
not even with a carer! Shopping malls and public
buildings with escalators always have elevators as
well.
ATTENTION DANGER OF FLIPPING OVER
Do not drive towards, for example, curbsides without
braking!
ATTENTION
(4) In order to overcome height differences or
when using an elevator and lifting platforms, you
generally have to deactivate the anti-tipper. You
could become restricted in maneuverability.
(5) In order to overcome curbsides your carer should
slightly tilt you backwards, lift both casters over the
threshold and then, with the driving wheels, carefully
push the wheelchair over the edge. The anti-tipper
must be deactivated.
When driving off of the curb the casters must stay in
the air until the driving wheels have driven over the
threshold.
ATTENTION DANGER OF FLIPPING OVER
DO NOT put the casters down first. The wheelchair
could flip forward with the occupant.
2.5 WHEEL LOCK
ATTENTION
THE KNEE LEVER BRAKES ARE ONLY TO PLACE
THE WHEELS IN A RESTING POSITION. THEY ARE
NOT DESIGNED TO BRAKE THE WHEELCHAIR FROM
DRIVING.
A service brake, such as a drum brake, allows
controlled braking.
ATTENTION
Before each (longer) drive be sure to check
• the correct tire pressure (information is on
the tire cover),
• and if necessary the brake pressing bolt.
(4)(3)
(5)
(1) (2)

Tilty Vario
12
ATTENTION
Cable controls are high maintenance! The clamp
screws on the Bowden cable need to be checked on
a regular basis and retightened if necessary.
Check the functional efficiency of all brakes regu-
larly! The wheelchair with occupant (max. load ca-
pacity) must stand still on a ramp with a 7° (= 12,3
%) incline with the brake in use.
ATTENTION
Dirt, wetness, ice, snow, mud etc. can impair the bra-
ke force of the wheel lock.
ATTENTION
Do not carry out repair work on the wheel lock your-
self. Ask your rehab technician.
2.6 ANTI-TIPPER
ATTENTION
We recommend inexperienced and young users to
use the anti-tipper whenever possible.
ATTENTION
Deactivate the anti-tipper in order to overcome
height differences, when using elevators or lifting
platforms.
(1+2) In order to activate the anti-tipper secure the
wheelchair from rolling away, push the step (A) of the
anti-tipper down and turn it 180° on its own axis until
it snaps into place.
2.7 CASTERS
ATTENTION
Casters which are not correctly adjusted or driving
too fast, especially downhill, can cause the casters
to dangerously flap back and forth.
�INDICATION
Clean the axles and the axle holders regularly, re-
moving lint and dirt.
INFORMATION
After every change on the driving wheels the casters must
be newly adjusted. Have this done by an experienced re-
hab technician.
�INDICATION
When transfering in and out of the wheelchair turn
the casters forward by driving backwards a little, in
order to ensure more stability.
2.8 COMBINATION WITH ELECTRIC PUSH AND
BRAKE AIDS AND ELECTRIC ADD-ON
DRIVES
ATTENTION
The wheelchair can only be combined with the elec-
tric push and brake aids and electric add-on drives
that are explicitly cleared by SORG Rollstuhltechnik.
Thereby restrictions or adjustments of the mounting
on the final configuration of the wheelchair apply to
the supplier of the add-on drives.
ATTENTION
Please follow the instruction manual of your electric
push and brake aid or your electric add-on drive. In
combination with your wheelchair specific strains
occur which can otherwise cause damage to your
wheelchair.
ATTENTION
If possible, overcome curbsides/obstacles back-
wards (with the large driving wheels first). Should
this not be possible: drive slowly toward the obstac-
le and overcome it carefully.
�INDICATION
Please note the safety instructions stated in chap-
ter 2.4 overcoming obstacles.
(1)
(2)
(A)

User Manual
13
2.9 LOADING AND TRANSPORTING
For the transport of your wheelchair in a car please
consider the following points:
• If necessary flip the anti-tipper inwards.
• Fold the back down.
• Unlock the wheel lock and remove the driving
wheels.
• Secure the wheelchair with tension belts in
the vehicle.
• The tension belts can only be secured on fixed
frame parts. Foot rests, side guards, back or
seat adapters are not suitable for this.
• Secure all removed parts of the wheelchair in
the vehicle so that they cannot hurt anyone in
case of sudden braking.
ATTENTION
There is a risk of getting hurt from loose, flying
objects such as leg supports, seat shells, wheels,
sticks, bags etc.
Inform yourself by your car salesman about safely
securing the wheelchair with lashing eyes or other
suitable safety measures in your vehicle before
transporting the wheelchair.
2.9.1 Transport in public transportation
In every public transportation a spot must be provided
to place the wheelchair according to the EG-guideline
2001/85/EG.
ATTENTION
The spot in public transportation is only arranged
for EMPTY wheelchairs.
ATTENTION
Place the wheelchair in the provided area opposite
the driving direction so that the backrest and a side
guard rest securely on the edge of the provided
area.
• The wheelchair should not shift in case of an
accident.
• Close the wheel lock.
• During the drive leave the wheelchair and seat
yourself in the provided seat next to the spot
for your wheelchair.
• If available, use the seat belt!
Let someone help you get in and out of public trans-
portation,
• so that you do not get stuck in the crack bet-
ween the door and the sidewalk,
• so that you can be helped getting into the seat
and tying down the wheelchair.
2.9.2 Transport in other vehicles
Wheelchairs can never reach the stable features of a
rmly mounted car seat because of their purpose and
light build.
ATTENTION
THUS, WE RECOMMEND YOU TO NOT USE THE
WHEELCHAIR AS A SEAT WHILE TRANSPORTING IN
A VEHICLE.
READ
Read our info brochure “Crash Test ISO 7176-19”.
Here, the potential dangers and regulations of the
ISO 7176-19 are described.
ATTENTION
Only wheelchairs that
have successfully passed
a dynamic crash test ac-
cording to ISO 7176-19
are allowed to be used as
a seat in a vehicle.
Our successfully tested
wheelchairs are provided
with this international sym-
bol on the type sign and are
additionally marked on our
order form with our “crash
test button”.
If necessary, inform
yourself by your retailer
or under www.sorgrolls-
tuhltechnik.de, if your mod-
el is approved as a seat in a vehicle.

Tilty Vario
14
2.10 OTHER RISKS
ATTENTION
After a collision, contact your rehab service station
to check the carriage, frame and Bowden cables
and have the damages xed.
INDICATION
Avoid direct sun rays. Dark parts on the wheelchair
can heat quickly and can possibly cause burns.
The wheels can heat up to 42° and you could burn
yourself.
ATTENTION
FIRE RISK from the textile parts (seat shell and
back covering, seat cushion or plastic parts). Keep
sources of ignition away from the wheelchair. The
extent of the reliability against ignition of textile
materials and assembly groups has been tested and
standardized according to DIN EN 1021-1 and 1021-
02.
ATTENTION
Hand rims heat up from strong friction especially
from braking while driving fast or from driving
downhill for a while. If necessary, use leather gloves
as used for cycling, NEVER use wool gloves.
�
INDICATION
For sensitive skin we recommend to wear gloves as
used for cycling (nger stalls with a leather inner
surface---but NEVER wool gloves).
ATTENTION
RISK OF HAND INJURY from turning parts. Do not
grab in between the spokes of the rear wheel or
between the rear wheel and the knee lever brake.
INDICATION
Do not use the wheelchair in damp rooms or drive
in salt water with it. Important parts may corrode
and not work properly anymore, whereby the driving
qualities or the lifespan of the wheelchair are
negatively inuenced.
ATTENTION
The position of the rear wheels in the axle plate can
only be changed by a qualied specialty store!
ATTENTION
Do not put your ngers between the hand rims and
the rear wheels. (Grooved wheels with built in hand
rims make this impossible.)
ATTENTION
Be cautious by tight spots: You can bruise your
ngers and/or damage the hand rims.
ATTENTION
Check the secure position of the spokes regularly
according to the maintenance plan.
ATTENTION
Check the screwing and the secure position of the
hand rims regularly according to the maintenance
plan.
ATTENTION
In certain cases it can occur that the product can
cause an interaction with an electromagnetic eld
(e.g. security systems of stores etc.). There is no
danger for the user and/or the attendant from this.

User Manual
15
3 Handling
3.1 ASSEMBLY GROUP WHEELS
3.1.1 Quick release axle wheels
(1) To release or apply the quick release axle, push
the locking knob (A) in the middle of the wheel hub,
pull the wheel out of the tting (B) and release it after
the action.
ATTENTION
(2) AFTER APPLYING, THE LOCK BALL (A) MUST STI-
CKING VISUALLY STICKING OUT OF THE FITTING (B) AT
THE END OF THE QUICK RELEASE AXLE.
Be sure to regard the following points:
• Wheels are rotating parts and can cause
injuries to fingers.
• After replacing the wheels, check the secure
hold of the quick release axle! The wheel
should not be able to be removed.
• (2) Check the locking knob (A) (tension spring)
regularly to make sure it functions properly.
3.1.2 Drum brake wheels
To apply/remove, please proceed as described above.
ATTENTION
The drum brake wheels’ brake pads are extremely
sensitive and can lose their functionality from
dirt or scratches on the brake pads. Remove lint
and dirt from the brake pads regularly with a soft
brush. Check the functionality of the Bowden cables
regularly, in short intervals.
(3) To brake the drive, the assisting person pushes
both brake levers (A).
ATTENTION
Uneven pressure causes swerving.
(4) To secure the wheelchair
• pull both levers (A) up and snap the small lo-
cking levers (B) in the grooves (C).
• The drum brake is now blocked.
To release the lock
• pull both levers (A) a little bit further up, until
the small locking levers (B) are unlocked and
• after release the levers (A).
(1)
(A)
(B)
(A)
(2)
(4)
(A)
(C) (B)
(3)
(A)
(B)

Tilty Vario
16
3.1.3 Casters
ATTENTION
At the first sign of the casters „flapping“ (espe-
cially when driving fast or on downhill) slow the
wheelchair down immediately!
ATTENTION
Regularly remove lint and dirt from the caster axles,
forks and quick release axles.
For casters with exchange rate please proceed as
with the quick release axles of the driving wheels.
Track fixation
Locking/unlocking
(1) Picture 1 shows the track fixation unlocked.
To lock pull the locking bolt (A) a little bit forward, turn
it 90° and let it slide into the guiding slot (C).
To unlock proceed analog.
3.2 SPECIAL HAND RIMS
3.2.1 Double hand rim
Familiarize yourself, with the help of an experienced
helper and in familiar surroundings, with the technolo-
gy of this particular way of driving.
ATTENTION
AFTER PUTTING ON THE WHEELS THE LOCK (1B, 2C)
MUST BE ACTIVATED. THE WHEELS SHOULD NOT BE
ABLE TO COME OFF.
ATTENTION
To brake you must apply the same pressure to the
hand rims (inside and outside), otherwise you will
swerve unwillingly and become a hazard to yourself
and your surroundings.
ATTENTION
Especially when driving downhill, make sure that
you are able to bring your wheelchair to a stop at
any time or have someone help you.
(2) To remove the wheels with a double hand rim:
• Push the telescope tube (A) together on both
ends
• and unlock the rear wheels.
• Turn the latch (B) 90° and remove the wheels.
(3) To put on the wheels with a double hand rim:
• Place the axle (A) in the fitting (B).
• Lock the wheels with the latch (C).
• Press the telescope tube together and
• place the ends (D) on the axle (A).
(2)
(3)
(A)
(D)
(B)
(C)
(B) (A)
(1)
(A)
(B) (C)

User Manual
17
ATTENTION
Do not hang anything (bags etc.) on the push bail;
especially not in a tilted position and/or a back
angle >90°.
3.3.1 Tilting
To activate the tilting:
• (1+2) pull the lever (A) and
• hold it until the desired position is reached.
• Then release it.
• To adjust the push height, adjust the angle of
the push bail after (B).
3.2.2 Knob hand rims
ATTENTION INJURY RISK!
Regard that the knob hand rims turn when you are
being pushed!
ATTENTION
Braking with pressure on the hand rims is not pos-
sible. This applies especially when driving downhill.
Let an experienced and strong carer assist you.
3.2.3
Hand rim covers / Maxgrepp hand rims
ATTENTION
All hand rim covers and the Maxgrepp hand rims are
made of several black synthetic materials and can
heat to over 42° in the sun!
ATTENTION
Under unfavorable circumstances the black coa-
tings can stretch from heat and can detach from the
hand rim. Avoid direct sunrays.
(1)
(A)
(B)
3.3 SEAT-BACK UNIT
ATTENTION
WITH THE ANGLE ADJUSTMENT OF THE SEAT-BACK
UNIT (TILTING) AND/OR THE BACK >90°, THE CEN-
TRE OF GRAVITY AND THE TILTING BEHAVIOR OF
THE WHEELCHAIR CHANGES DISTINCTLY.
ATTENTION
THE BACK AND THE BACK-SEAT UNIT CAN ONLY BE
ADJUSTED OR TILTED TO >90°WITH LOCKED BRA-
KES AND ON AN EVEN, FIRM SURFACE. NEVER OPE-
RATE THE TILTING MECHANISM DURING THE DRIVE.
ATTENTION
BEFORE EACH TILTING OF THE SEAT-BACK UNIT
ACTIVATE THE ANTI-TIPPER AND SECURE THE
WHEELCHAIR FROM ROLLING AWAY.
ATTENTION
With a tilted wheelchair and/or a back angle >90°
a suitable support for the head must be provided
(head rest or submersible back extension).
(2)

Tilty Vario
18
3.3.2 Adjusting the back angle
(1) To adjust the back angle:
• With the cord (A) pull the bolts (B) out of the
row of holes (C) on both sides, so that the bolts
(B) unlock on both sides.
• Hold the cord (A) while adjusting.
• Slide the back along the row of holes (C) to the
desired position.
• Release the cord (A) so that both bolts (B) can
click into place in the wanted bore of the row
of holes (C).
ATTENTION
After every back angle adjustment make sure that
BOTH bolts (B) are locked in tightly in the bores of
the row of holes (C)!
3.3.3 Folding the back down
To fold down:
• Proceed as described above and fold the back
down to the front.
�INDICATION
In order to make the wheelchair more compact for
transport fold the push bail forward after and remo-
ve the wheels.
To restraighten the back:
• Fold the back back and at the same time pull
with the cord (A) the bolts (B) inward, so that
they can glide past the row of holes (C).
• Release the cord (A) so that the bolts (B) can
click into the row of holes (C) on both sides, in
the desired angle.
3.3.4 Submersible back extension
ATTENTION
THE SUBMERSIBLE BACK EXTENSION IS NOT SUITA-
BLE AS A HEAD REST IN A VEHICLE!
(2+3) To extend the submersible back:
• Remove the head cushion (A),
• loosen the star knob screws (B) on both sides,
• pull the back extension (C) evenly (without til-
ting!) up,
• retighten both star knob screws (B) and
• attach the head cushion (A) on the front side
of the back extension (C).
To submerse the back extension proceed correspon-
dingly.
(1)
(A)
(B) (C)
(2)
(B)
(B)
(A)
(A)
(C)
(3)

User Manual
19
(A)
(A)
(1)
(2)
(3)
3.3.5 Adjusting the back angle with a gas
pressure spring
ATTENTION
WITH THE ANGLE ADJUSTMENT OF THE BACK >90°
THE CENTRE OF GRAVITY AND THE TILTING BEHA-
VIOR OF THE WHEELCHAIR CHANGES DISTINCTLY.
THUS, NEVER CHANGE THE BACK ANGLE WHILE
DRIVING.
ATTENTION
With a back angle >90° a suitable support for the
head must be provided. (head rest or submersible
back extension).
(1) To adjust the back angle with a gas pressure
spring:
• Press both levers (A)
and hold them until you
have brought the back in the desired position.
• Then release the levers.
3.3.6 Folding the back angle down with a gas
pressure spring
(2) To fold the back down to the front:
• Secure the wheelchair from rolling away.
• Press the small red button
(A)
on the locking
bolt
(B),
• at the same time pull the bolt
(B)
completely
out of the carrier
(C)
.
• Fold the back forward.
(2) To restraighten the back:
• Pull the back back into a vertical position.
• Place the locking bolt (B) in the bore of the car-
rier (C) until the springs (D) stop.
• Guide the release button
(E) of the gas pres-
sure spring into the carrier
(C)
.
• Press the red button
(A)
of the locking bolt
(B)
(the springs
(D)
glide inward) and
• put the bolt (B) completely through the carrier
(C) and through the bore (F) of the release (E).
• Proceed correspondingly on the opposite side.
ATTENTION
(3) After using the release (E) of the gas pressure
spring the spring (D) of the locking bolt (B) must be
visually sticking out on the outer side of the carrier
(C).
OUTHERWISE THE WHEELCHAIR IS NOT USABLE.
Make sure that the locking bolts
(B)
cannot be ta-
ken out.
(A) (B)
(B)
(D)
(D)
(C)
(C)
(F)
(E)
(E)

Tilty Vario
20
3.4 PUSH AIDS
(1) For all various push aids (push bails, handle/s)ple-
ase regard:
ATTENTION
�ALL PUSH AIDS ARE ONLY THERE TO PUSH THE PER-
SON ON THE WHEELCHAIR - NOT TO CARRY THEM!!!
ATTENTION
THE SPRING (1B) MUST AWLAYS BE VISIBLY STI-
CKING OUT OF THE HOLES AT THE BOTTOMW OF
THE HOLDER (1C) .
ATTENTION
Picture (3) shows the tube BEFORE inserting in to
the holder! THE WHEELCHAIR IS NOT USEABLE
WITH THE PUSH BAIL IN THIS POSITION!
ATTENTION
The eccentric clamps (1A) can loosen under adver-
se conditions. Before overcoming each obstacle,
be sure to check them to make sure they are tightly
closed.
ATTENTION DANGER OF TIPPING OVER
Do not hang any objects (bags etc.) on the push
aids!
ATTENTION
(2) The curves at the end of the eccentric clamp (A)
must always be concise with the half shell (B). The
proper functioning is not guaranteed if the eccen-
tric clamp (A) is not concise with the half shell (B).
�INDICATION
(3) The holder (A) of the push handle tubes (B) is pro-
vided with an inner profile (C) that is consistent with
the profile (D) of the tubes (B). With this, the tubes
(B) can only be guided into the holder (A) one way
and are secure from turning.
(2)
(3)
(A)
(A)
(B)
(B)
(C)
(D)
(1)
(A)
(C)
(B)
Other manuals for Tilty vario
4
Table of contents
Other SORG Wheelchair manuals

SORG
SORG Loop RS Service manual

SORG
SORG Tilty vario User manual

SORG
SORG Tilty vario Service manual

SORG
SORG Vector User manual

SORG
SORG Jump alpha Service manual

SORG
SORG MIO MOVE Service manual

SORG
SORG Loop RS User manual

SORG
SORG Loop Service manual

SORG
SORG Vector Service manual

SORG
SORG Vector Service manual