Spice S-900 User manual

Spice S-900
User Manual
15G06C048000

Contents
Welcome 1
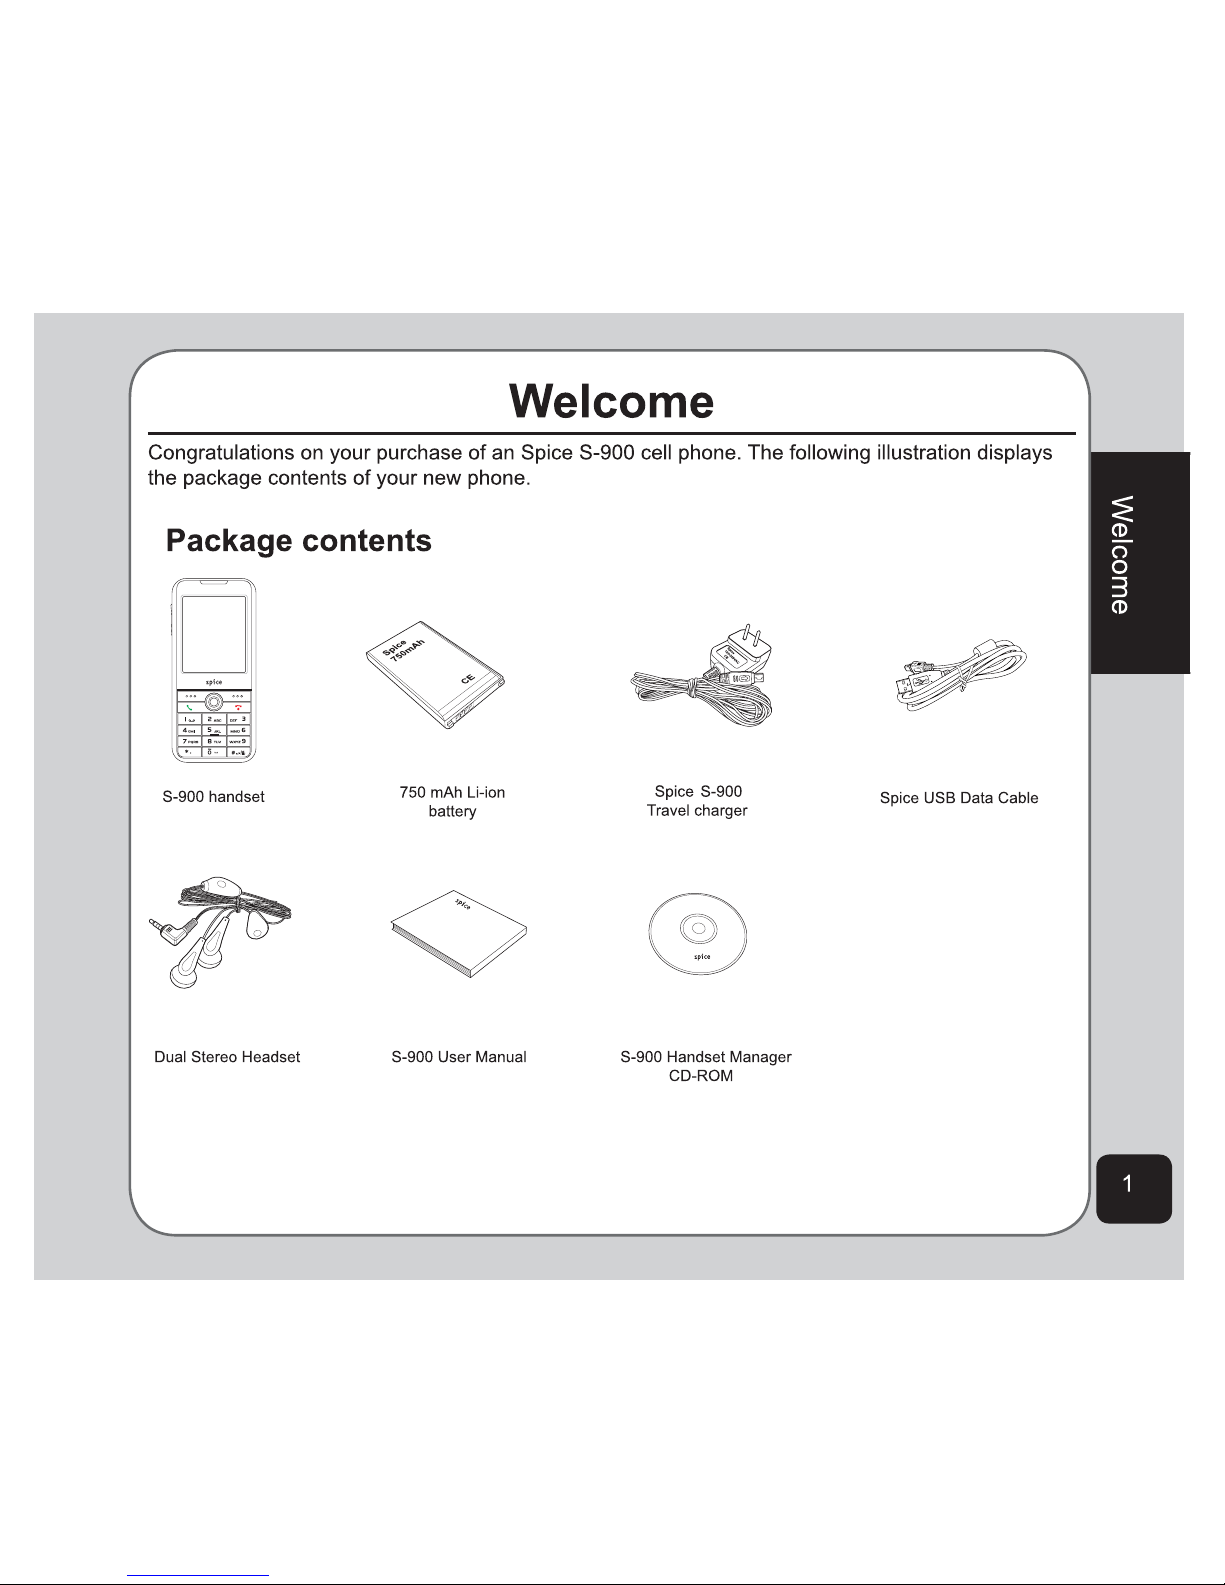
Package contents 1
Overview 2
6SHFL¿FDWLRQV 3
Getting started 5
Inserting the SIM card, miniSD™ card, and
battery 5
Charging the battery 6
Turning the phone on/off 6
Function keys 7
Joystick key 7
Front view 8
Rear view 9
Left view 9
Right view 9
Bottom view 9
Locking/unlocking the keypad 9
Standby mode 10
Using the Menu 11
Text entry 12
Connecting to a computer 14
Calls 15
Making a call 15
Answering a call 15
Answer mode 15
Rejecting an incoming call 16
Diverting a call 16
Redialing a number 16
Call logs 16
Call time/cost 17
Options during a call 18
Other call options 18
Phonebook 19
Adding contacts 19
Searching for a contact 19
Shortcut to contact entries 20
Copying contacts 20
Deleting contacts 21
Caller Groups 21
Extra Number 22
Phonebook settings 23
My vCard 23
Speed Dial 23
Password Protection 24
Messages 25
8QL¿HG,QER[ 25
SMS 25
MMS 27
Chatting Rooms 29
E-mail 29
Voice Mail 30
Cell Broadcast 30
3UR¿OHV 33
3UR¿OH6HWWLQJV 33
Settings 35
Phone Settings 35..........
Display Settings 36

Tone Settings 38
Call Settings 38
Network Settings 41
Bluetooth Settings 41
Security Settings 43
Factory Settings 44
Camera 45
Taking photos 45
Viewing and managing photos 45
Photo capture settings 46
Recording videos 48
Viewing and managing videos 48
Video capture settings 49
My Secret Album
My Secret Video 51
Photo Artist 51
QR Code Decoder 52
Media Center 53
Audio Player 53
Video Player 54
Schedule FM Record 56
Java Games &Applications 56
Java Settings 57
Organizer 59
File Manager 59
Alarm 60
Power On/Off Timer 60
Calendar 60
Tasks List 61
Calculator 62
World Clock 63
Voice Recorder 63
AB Repeater 63
Stopwatch 63
Countdown 64
Units Converter 65
Currency Exchange 65
Health Manager 66
Flashlight 66
Network 67
WAP 67
Data Account 68
Handset Manager 69
Installing the Handset Manager 69
Starting the Handset Manager 69
Main Panel 70
Navigating the Handset Manager Tools 71
Music Manager 73
Important notes 74
Appendix 77
Additional Information 94
European Notice 94
&HUWL¿FDWLRQ
,QIRUPDWLRQ
6$5 94
Proper Disposal 95
Safety Warnings 96
GPRS Internet Setting SOP 81
HM Bluetooth interface settings SOP 77

Preface
Congratulations on your purchase of an Spice S-900 mobile phone. Read this manual carefully and
keep it in a safe place for future reference.
About this manual
Every effort has been made to ensure that the contents of this manual are correct and up to date.
However, the manufacturer makes no guarantee regarding the accuracy of the contents, and
reserves the right to make changes without notice.
User Manual

2
Overview
The S-900 is a stylish and fashionable new phone from Spice , with all the functions and utilities
to make it a useful tool in today’s mobile world. The S-900 comes equipped with a built-in camera,
MMS/SMS messaging capability, organizer, Java games, audio player, WAP, GPRS, and a
miniSD™ card slot. In addition to the internal 64 MB* phone memory, the miniSD™ card* provides
additional memory where you can store your contact information, messages, text, graphics, and
DXGLR¿OHV7KH6¶VDXGLRSOD\HUHQDEOHV\RXWRSOD\EDFN\RXUIDYRULWHPXVLF
Features
• Wide variety of calling and messaging functions
• Built-in camera
• Media center with audio player, FM radio receiver, and games for your entertainment
• MMS and SMS messaging capability
• Personal information organizer with alarm, calendar, calculator and other useful tools to
manage your time
• WAP and GPRS capability to check e-mail or browse web services
*NOTE: The miniSD™ card is an optional accessory. The accessory bundle may vary in different territories.
*NOTE: The Capacity that can actually be used could be less than the quoted figure.
3
Welcome
6SHFL¿FDWLRQV
System supported GSM900/1800/1900; GPRS Class 10
Dimensions 101 x 44 x 16 mm
Weight 80 g
Battery 750 mAh Li-ion
Standby time 200 ~ 300 hours
Talk time 2 ~ 5 hours
Color black
Main display 2.0” TFT, 262K colors, 176 x 220
Sub display N/A
Phonebook 1000 sets + SIM card
Messaging Supports SMS, EMS, MMS
Camera 2.0 Megapixel CMOS
Video recording 5HFRUGVDQXQOLPLWHGQXPEHURI¿OHVGHSHQGLQJRQLQWHUQDORUH[WHUQDOPHPRU\VWDWXV
Ringtone 64 chord polyphonic ring tones
Supports MP3 ringtones
Voice recording 5HFRUGVDQXQOLPLWHGQXPEHURI¿OHVGHSHQGLQJRQLQWHUQDORUH[WHUQDOPHPRU\VWDWXV
Internal memory 64 MB*
Java Supported
Games 2 Java games
Connectivity USB 1.1 support
WAP WAP 1.2.1 / 2.0, Blueooth v1.2
Other features MP3 music player / MP3 ring tone / FM radio
6XSSRUWV+03(**3$$&
miniSD™ extension
Supports Bluetooth printing/stereo handset (A2DP Profile)
*NOTEThe Capacity that can actually be used could be less than the quoted figure
4
5
Getting started
Getting started
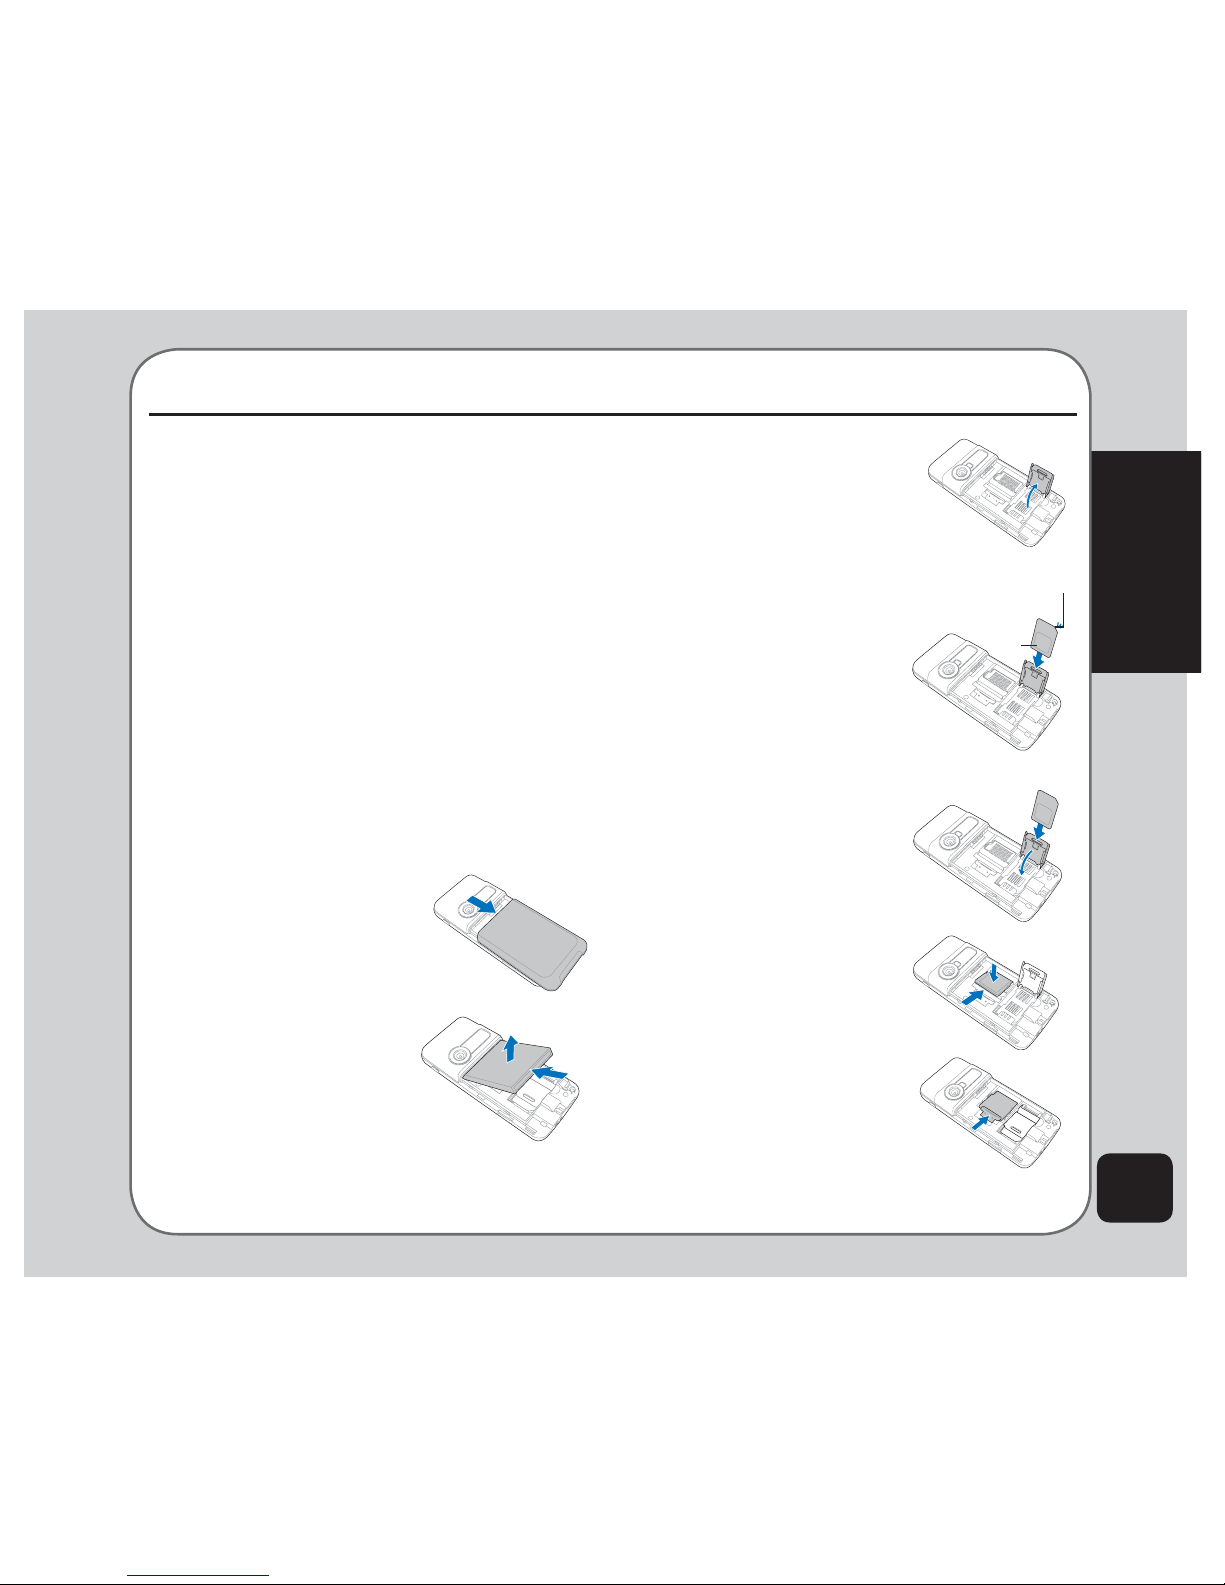
Inserting the SIM card,
miniSD™ card, and battery
When you register with a service provider, you
UHFHLYHD6XEVFULEHU,GHQWLW\0RGXOH6,0
card. Your phone must have a SIM card in order
to make calls. The SIM card is a computer chip
that contains your phone number, phonebook
information, and service provider information.
Handle it with care and do not bend it or expose
it to static electricity or dirt. Be sure the power
to your phone is off before you insert your SIM
card.
The SIM card and the miniSD™ card slots are
situated underneath the battery.
4. Insert the SIM card
into the holder. The
gold contacts of the
SIM card should face
down and the notched
edge should be on the
top right corner.
Lift and set it aside.
2. Remove the
battery. The battery
compartment has
a groove at the top
to make it easier to
remove the battery.
3. Push the SIM card
holder in the direction
of the “Open” arrow,
then lift it using your
¿QJHUQDLO
5. Place the SIM card
holder back in place
and slide in the
direction of the “Lock”
arrow to secure.
To insert the miniSD™ card:
1. Place the card in the
slot with the gold
contacts facing down.
2. Secure the miniSD™
card in place with the
metal clasp by moving
it towards the card.
NOTE: In some regions, the miniSD™ card may be supplied as
an optional accessory only.
To insert the SIM card:
1. Slide the cover in the
direction of the arrow.
Gold contact
Notched edge

6
3. Place the battery
back into the battery
compartment noting the
correct polarity.
Turning the phone on/off
To turn the phone on:
• Hold down the power/end key until
the screen lights up.
If needed, enter your SIM card PIN code
and press the enter key.
To turn the phone off:
• Press the power/end key and hold
until the phone shuts down.
NOTE: If you set an alarm using the Organizer menu, then turn
off the phone, the phone will turn itself on when the alarm is
activated. After you disable the alarm, the phone prompts you if
you want to keep the phone turned on or off. See the Organizer
section for details about setting an alarm.
NOTE: For best battery performance, allow the battery to
FKDUJHDQGGLVFKDUJHFRPSOHWHO\WKH¿UVWIHZWLPHV\RXXVHLW
4. Replace the back
cover, sliding it
upward until it snaps
in place.
CAUTION:
8VHRQO\DQ6SLFHFHUWL¿HGEDWWHU\8VLQJDQ
incompatible battery with the phone may cause the
risk of an explosion.
• Dispose of the used batteries according to the
manufacturer’s instructions, or ask your local
authorities for assistance.
Charging the battery
1. Connect the charger plug to a power
outlet.
2. Connect the charger to the socket at the
bottom of the phone. The connector can
only be inserted one way.
7
Getting started
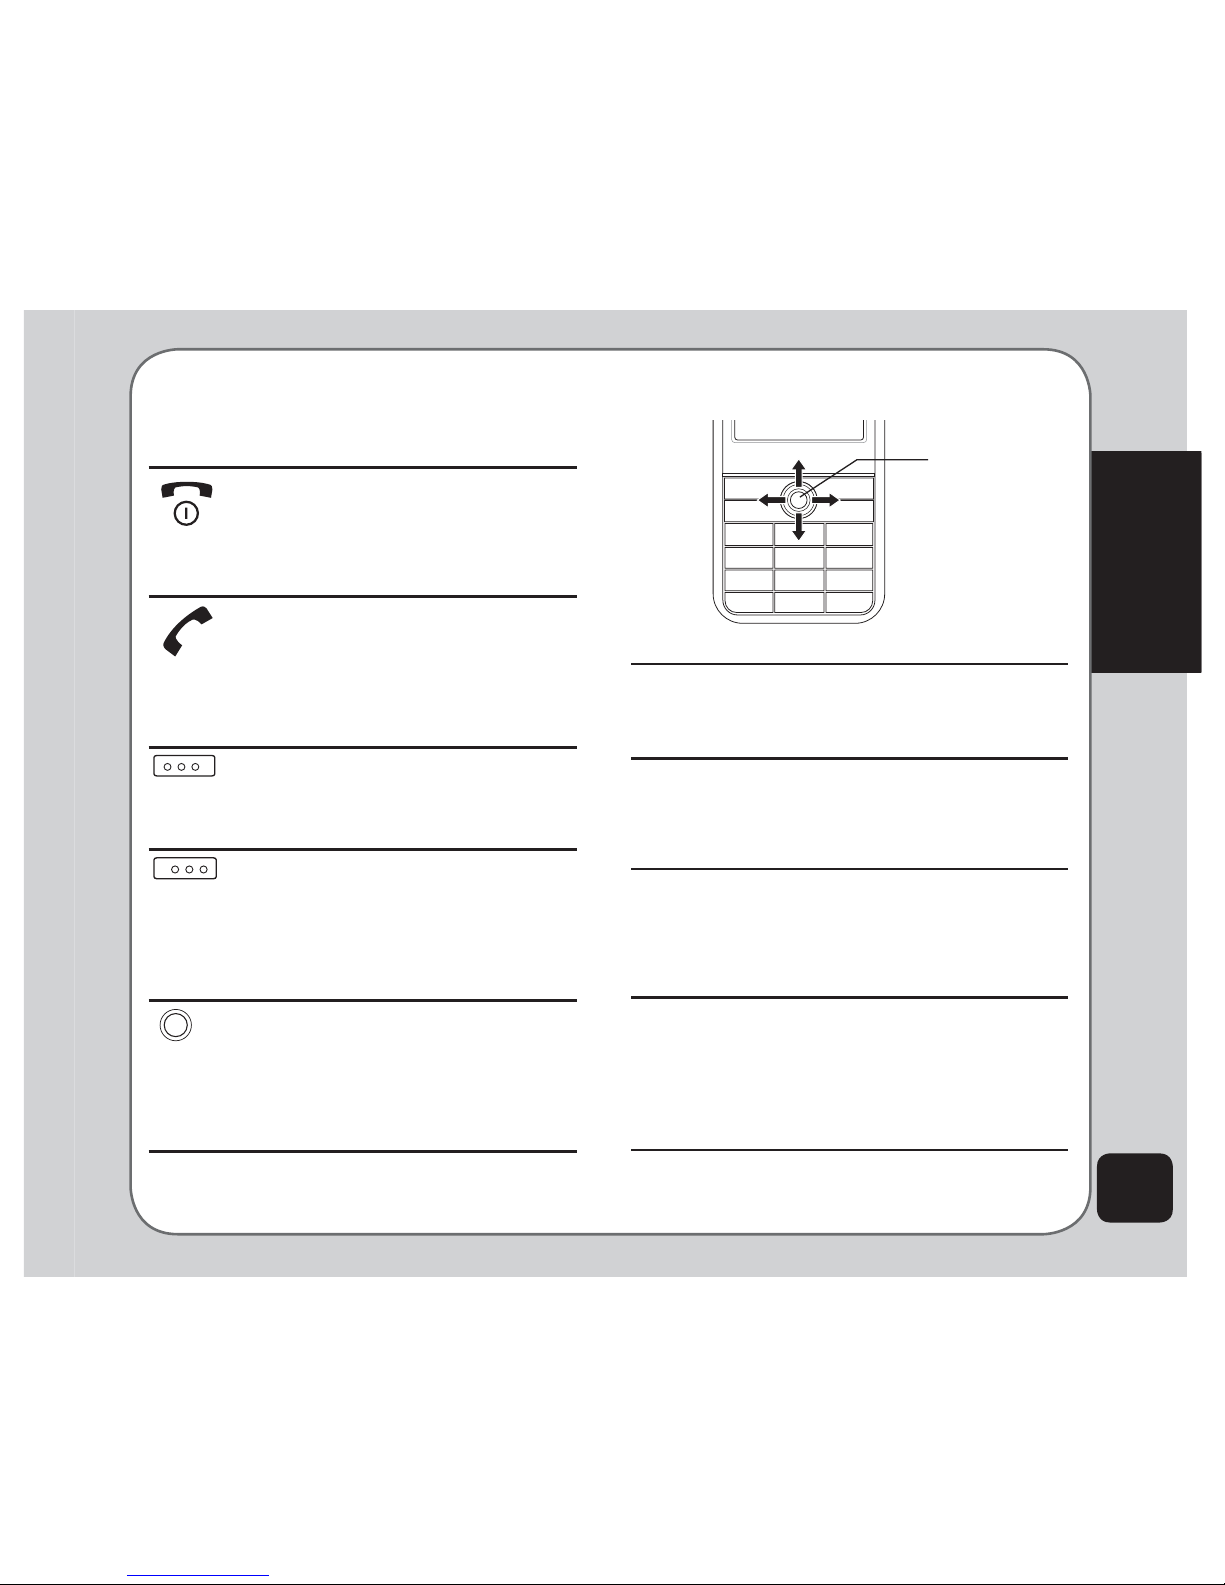
Function keys
The following table lists the phone keys and
their functions.
Power/end key
• Hold to turn the phone on or off.
• Press to stop an incoming call or
cancel a call you are dialing.
• Press to exit a menu or submenu.
Call key
• Press to dial or answer calls.
• Hold to display the call logs or
to redial the last number called
when the phone is in standby
mode.
Left soft key
• Press to perform the function
currently displayed on the lower
left corner of the screen.
Right soft key
• Press to view phonebook when
the phone is in standby mode.
• Press to perform the function
currently displayed on the lower
right corner of the screen.
Enter key
• Press to display the main menu
when the phone is in standby
mode.
3UHVVWRFRQ¿UPVHOHFWLRQRID
menu item.
Joystick key
Upward
Downward
Forward Backward
Press the joystick key upward
• to scroll up through menu items.
• to open GPRS homepage.
Press the joystick key downward
• to scroll down through menu items.
• to display a list of your shortcuts when the
phone is in standby mode.
Press the joystick key forward
• to scroll right through menu items.
• to open/enter the highlighted menu item.
• to display Write Messages screen when
the phone is in standby mode.
Press the joystick key backward
• to scroll left through menu items.
• to go back to the previous page in the
menu list .
• to display the Bluetooth Setting menu
when the phone is in standby mode.
Joystick key
8
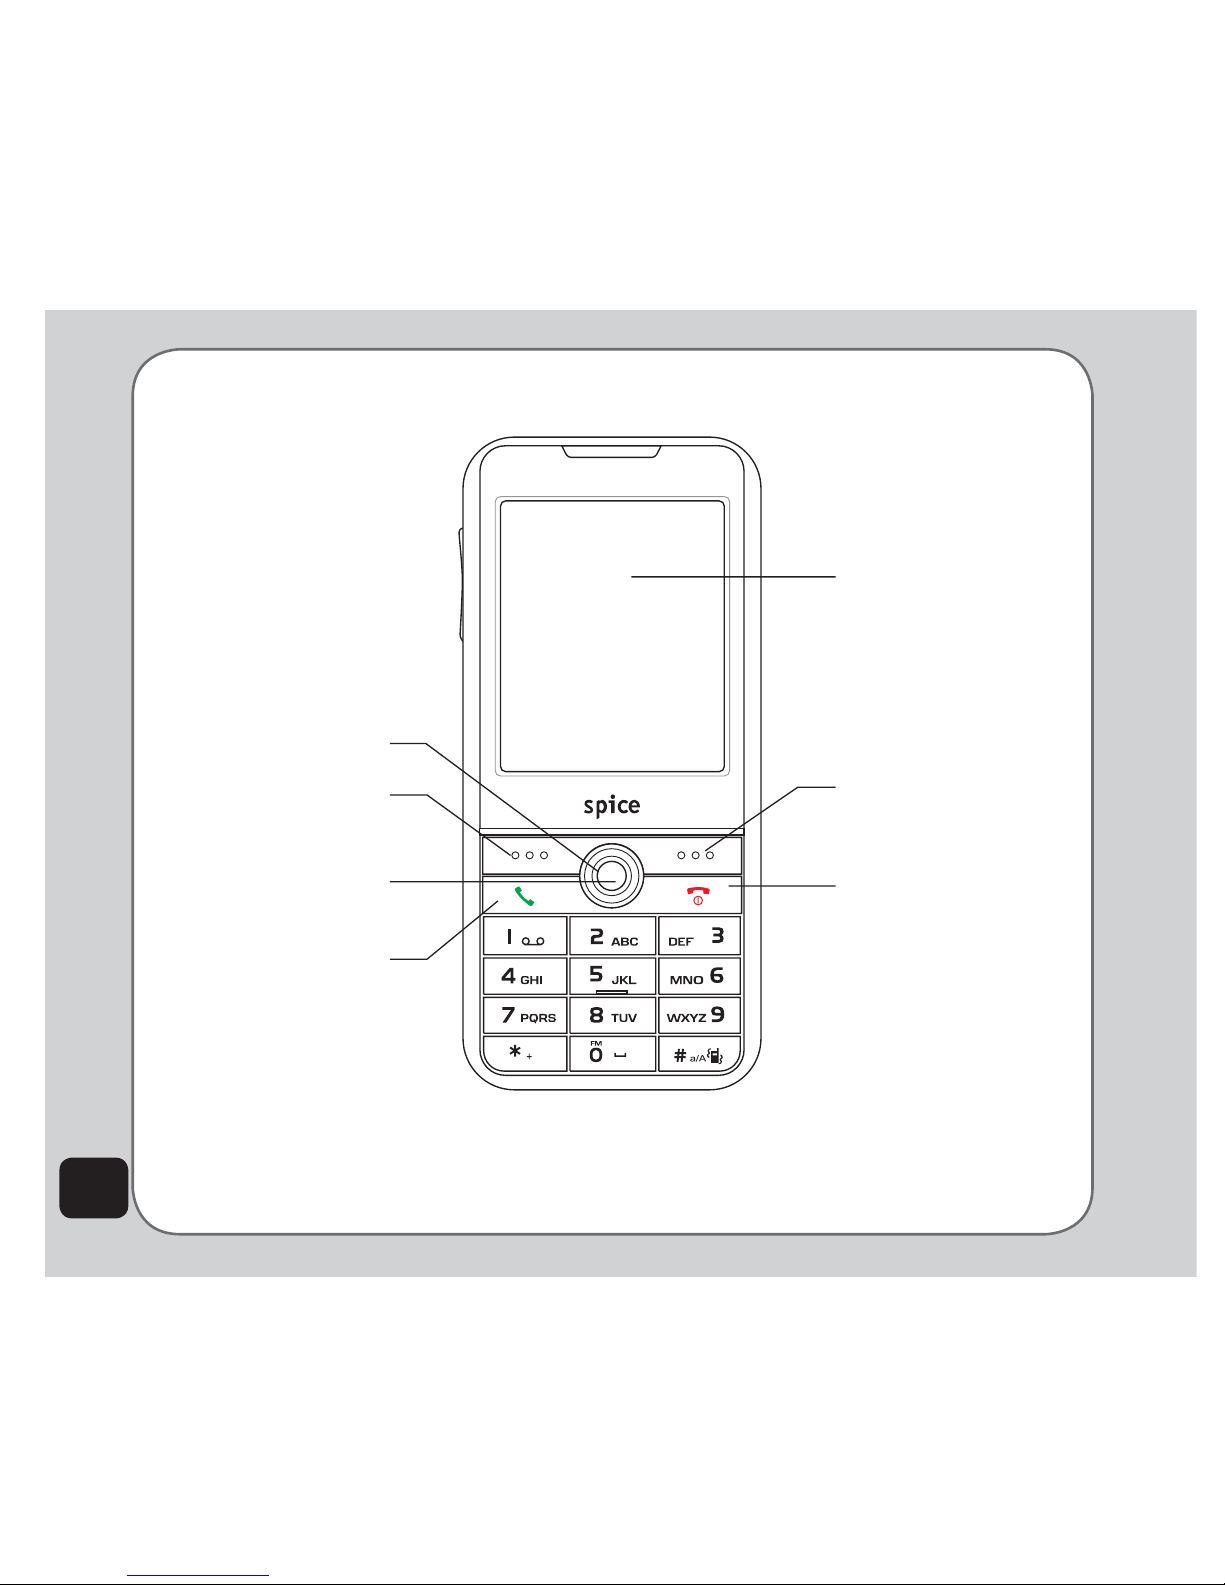
Right soft key
Screen
Power/end key
Left soft key
Call key
Enter key
Joystick key
Front view
NOTE: Refer to the previous page for function key descriptions.
9
Getting started
Locking/unlocking
the keypad
You can lock the phone keypad to prevent
tampering or accidental pressing of any buttons.
To lock the keypad:
1. Put the phone on standby mode.
2. Press the right soft key .
3. Press the #key on the keypad.
To unlock the keypad:
1. Put the phone on standby mode.
2. Press the right soft key just under
the word Unlock on the screen.
3. Press the #key to unlock the keypad.
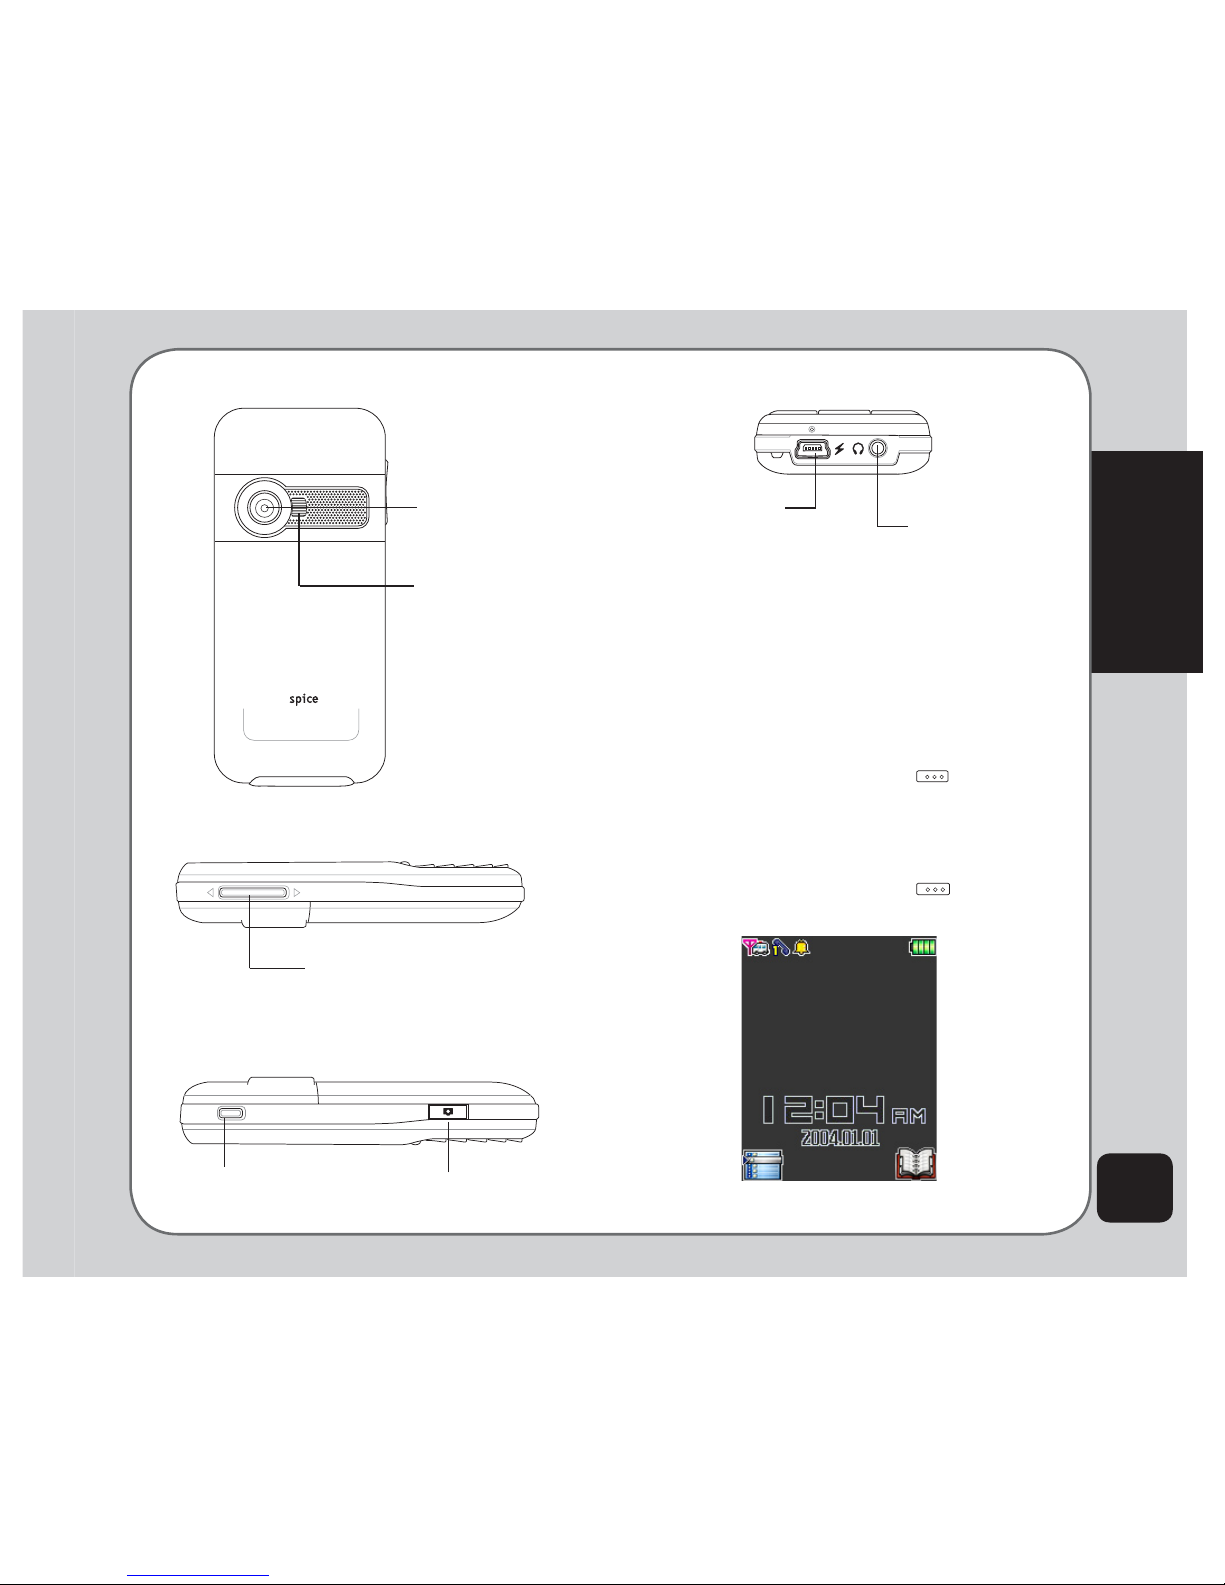
Capture button
Captures photos
Volume key
Increases or decreases the volume for
FDOOVNH\WRQHVRUSOD\LQJPHGLD¿OHV
Left view
Charger/
mini-USB socket
Bottom view
Headset port
MP3 button
Plays MP3 music.
www.spicemobile.in
Right view
Rear view
Camera
Flashlight
10
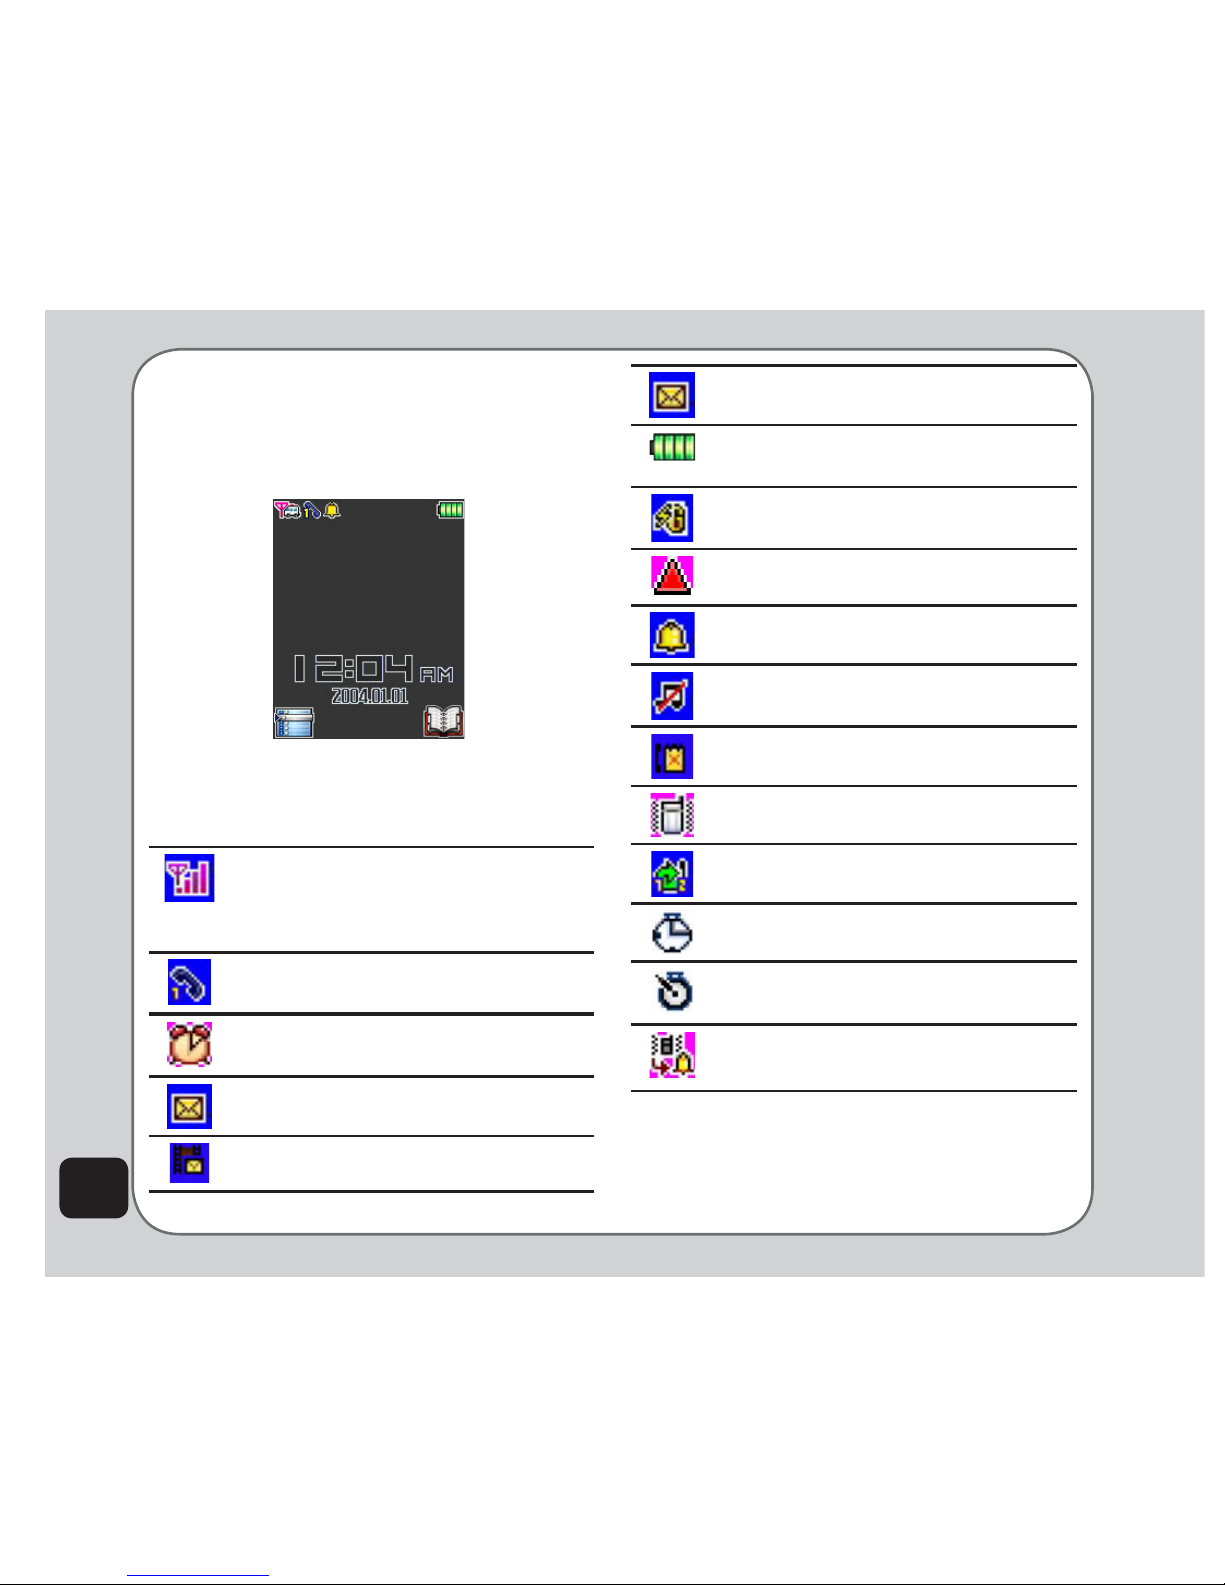
Standby mode
When your phone is on, but not in use, it is in
standby mode. During standby mode, the upper
part of the display screen shows various icons.
7KH606PHPRU\LVIXOOEOLQNLQJ
LFRQ
Indicates battery charge status.
Phone is using GPRS network.
Phone is in roaming mode.
Ringtone is enabled.
Ringtone is disabled.
Indicates a missed call.
Vibrate mode is enabled.
Call divert is enabled.
Stopwatch is activated.
The countdown feature is enabled.
Vibrate then Ring mode is enabled.
The Standby screen icons and their
descriptions are as follows:
Alarm has been set.
A text message has been received.
A multimedia message has been
received.
Vertical bars indicate the strength of
the GSM network signal. Four bars
indicate that your current position has
the best reception.
Line 1 or line 2 is selected for calls.
11
Getting started
3. Press the left soft key to select the
Missed Calls option. A list of missed calls
opens.
The following table provides a list of all the
main menu items:
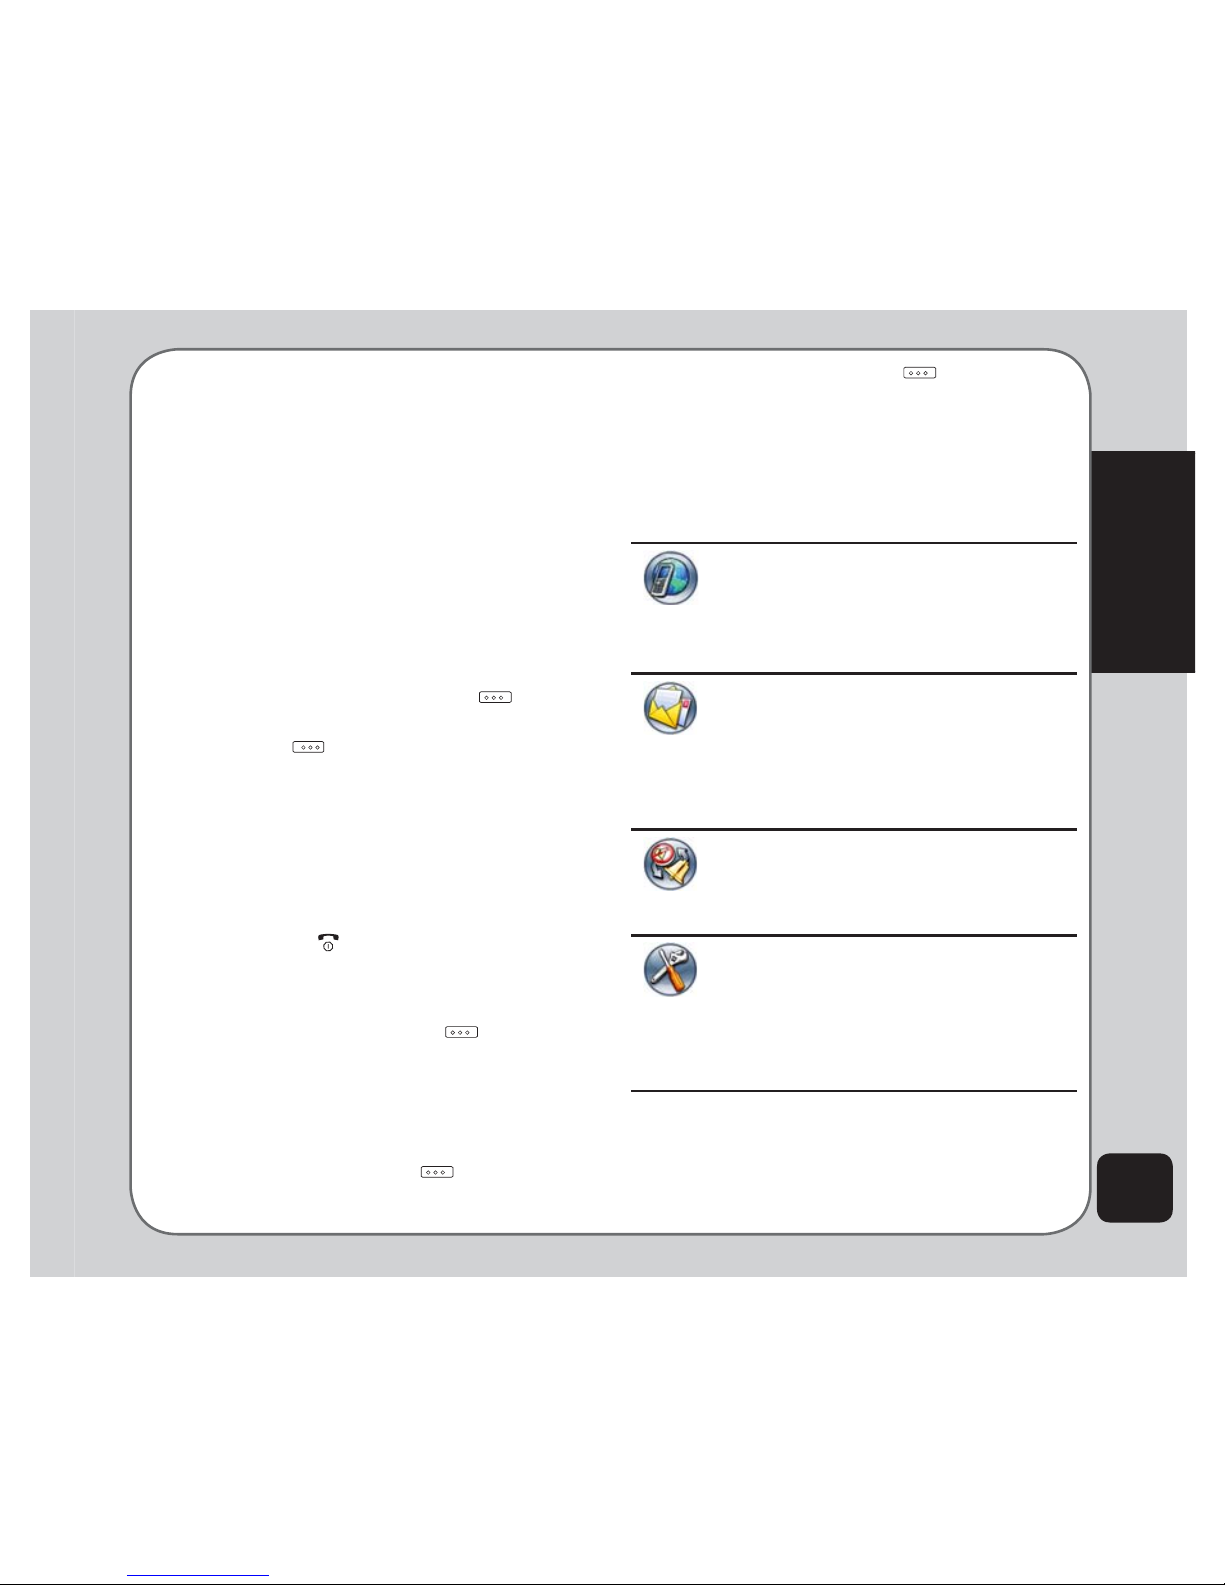
Network: Enables you to specify the
WAP and data settings and set up
GSM and GPRS settings. Enables
access to the internet and STK SIM
card services.
Messages: Allows you to access,
write, send, receive, and organize
WH[W606PXOWLPHGLD006
and email messages. You can also
check email, chat, and broadcast a
message using this menu.
3UR¿OHV: Enables you to select and
customize the phone settings
including the ring tone, volume, ring
type, and answer mode.
Settings: Lets you adjust phone
settings, display settings, tone
settings, call settings, network
settings, and security settings. You
can also restore all settings to their
factory default from this menu.
Using the Menu
To view the main menu, go to standby mode,
then press Enter. Follow these tips to navigate
through the menu and menu options.
• To view the menu, press the enter key.
NOTE: Some menu services are network-dependent/
subscribed. Contact your provider for details on how to avail of
these services.
• Press the joystick key upward/downward/
forward/backward to move through the
various menu items.
• The upper part of the screen displays the
name of the menu item currently selected
while the lower right corner displays
Back. Press the left soft key key
to select the menu item. Press the right
soft key key under Back to exit the
menu.
• Below each menu item is a small
number. You can also select the menu
item by pressing the corresponding
number on the keypad.
• To quickly exit from the menu, press the
Power/End key.
• Use the joystick key to select the
submenu items and options. You can
also use the left soft key to open
various options in some submenus.
For example, to view missed calls:
1. Use the joystick key to select Calls from
the main menu.
2. Press the left soft key WRFRQ¿UPWKH
selection. The Calls submenu opens.

12
Camera: Enables you to take
pictures as well as record video with
your phone. You can also access and
organize all your pictures and videos
from this menu item.
Media Center: Consists of an audio
player, video player, FM radio,
schedule FM record, Java games &
applications, and Java settings.
Organizer: Contains useful tools
such as an alarm, a calendar for
scheduling appointments, a to-do-list,
a stopwatch, a countdown function,
and a calculator. You can also record
memos, manage all your data using
D¿OHPDQDJHURUFRQYHUWXQLWVRU
currency, and manage your health.
Phonebook: Enables you to manage
names and telephone numbers for
easy access and caller recognition.
Calls: Stores information about calls
made, received, and missed. You can
also track call costs, SMS sent and
received, and GPRS usage from this
menu.
Text entry
When you add names to your phonebook, send
a text message, or use your WAP browser, you
need to enter text. Your cell phone has several
text entry methods. You can enter letters
individually or with predictive text entry, which
helps you complete words as you enter them.
You can enter letters in upper case, lower case,
or both, or insert symbols.
Basics
• Use the alphanumeric keypad to enter
letters and numbers. Each key is
assigned multiple characters.
• Press the right soft key to select
Clear, on the lower right corner of the
screen, to delete a letter if you make a
mistake.
• To enter spaces, press the key. To
display the symbol table, press the * key.
Use the joystick to highlight a symbol and
press the enter key to select it. The
character represents a space.
Key Assigned characters
. , - ? ! ‘ @ : # $ / _ 1
A B C 2
D E F 3
G H I 4
J K L 5
M N O 6
P Q R S 7
T U V 8

13
Getting started
W X Y Z 9
0, inputs space
Choosing text entry methods
From any text entry screen, such as a text
message window, select Options > Input
Method; or, press the # key in Edit mode to
switch input methods .
ABC input
ABC input enables you to enter individual
letters one by one. This is ideal for adding a
phonebook entry or entering a WAP address.
When you press a key, the characters assigned
to the key appear in the lower center of the
screen. Press the key repeatedly to scroll
through these characters. Pause for a moment
and the selected letter appears on the screen.
)RUSUDFWLFHWU\FUHDWLQJDWH[WPHVVDJH606
as follows:
From the menu, go to Messages > SMS >
Write Message. Before entering text, press
Options and select Multitap.
To enter the words “my phone” into the text
entry area, follow these steps:
1. Press to select m.
2. Press three times to select y.
3. Press to enter a space.
4. Press to enter p, then press
twice to enter h. Continue in this fashion
until the word “phone” is entered.
Smart ABC
Smart ABC is a predictive text entry method,
which uses a built-in dictionary to predict the
word you are typing. You can choose the
correct word by pressing the keys repetitively
and scrolling through the words suggested
by the phone. By reducing the number of
keystrokes, the smart ABC helps some users to
type messages more quickly.
Whenever you press a key, a list of possible
characters or character combinations is
created. To enter text, press the joystick key
XSZDUGRUGRZQZDUGWR¿QGWKHFKDUDFWHU
combination you want. Press the joystick key
forward to proceed entering the next character.
If you make a mistake, press Clear.
Here is an example of how to enter the word
“baby” using smart text entry.
1. Press . The letter aappears on the
screen.
2. Press again quickly to go to the
next suggestion which is ba. If you press
the joystick upward/downward, the phone
scrolls through all possible two-letter
combinations of the letters a, b, and c.
3. Press again quickly to display
three-letter combinations of the letters a,
b, and c.
4. Press and the word baby appears.
5. Press SelectWRFRQ¿UP
NOTE: For smart text entry to work properly, ensure the
language settings in your phone match the language you
14
want to type in. To set the language, go to Settings > Phone
Settings > Language.
Numeric text entry
Numeric text entry allows you to create a text
message composed of numbers. To use this
method, select Options > Input Method, then
select Numeric. Now you can directly input the
numbers using the keypad.
Symbols text entry
With this method, you can enter various types
of symbols. Select Options > Input Method >
Insert Symbols. A list of symbols is displayed.
Use the joystick key to select the desired
symbol and select OK when done. You may
also press * to display the symbol table.
Dictionary
Dictionary feature allows you to add your own
words to the build-in dictionary so that you can
enter type messages more quickly. To show the
list of words, select Messages > SMS > Write
Message > Options > Dictionary, then you
can insert the words to the mesage. You may
also delet some words from the list by pressing
Dictionary > Options.
Follow the example below to add a new word to
the dictionary:
1. Press the # key and select Smart abc to
enter text.
2. Press to select o, then press
Select to choose done.
3. Press to enter space. The phone
automatically checks if “oic” exists in
the build-in dictionary. If not, the word is
added to the dictionay.
NOTE: Dictionay can save up to 16 phrases, each phrase
contains 32 characters at most.
Connecting to a computer
Connect the mobile phone to a computer using
the supplied USB cable. The Mass Storage
window appears. Press OK to continue. The
phone shuts down.
The phone memory appears on your computer
as a removable disk. If the miniSD™ card is
installed in the phone, it also appears on the
computer as a removable disk.
<RXFDQWUDQVIHU¿OHVEHWZHHQWKHFRPSXWHU
DQGWKHSKRQHXVLQJD¿OHYLHZHUVXFKDV
Windows®Explorer or My Documents.
For increased functionality, including tools for
creating and editing messages, images, music,
and more, use the Handset Manager software
included in your package.
For more information, refer to the Handset
Manager section of this user guide.
15
Calls
Making a call
To place a call:
1. Enter the number you want to dial using
the keypad. If you make a mistake, select
Clear to delete at any time. The right soft
key is just under the word Clear on
the lower right screen; select this key to
clear a number.
To cancel the call and return to standby
mode, press the Power/end key.
2. Press the Call key to connect the call
DIWHU\RX¿QLVKGLDOLQJWKHQXPEHU
To enable the loudspeaker, select H-Free
on the lower right corner of the screen by
pressing the right soft key .
3. Press the Power/end key to
disconnect the call.
Making international calls
To make an international call:
1. Enter a +by holding down the * key.
2. Enter the international access code for
the country you want to dial, followed by
the area code and the telephone number.
Calls
Answering a call
When you receive a call, the phone alerts
you by sounding the ring tone and vibration
DFFRUGLQJWRWKHVSHFL¿HGULQJWRQHDQG
vibration settings. To answer the call, do the
following:
1. Press the Call key to answer the call.
2. Press the Power/end key to end the
call and disconnect.
You may also select Options > Answer to
answer the call.
Answer mode
The default setting for the phone is to answer
when you press the Call key. However, you
can also set the phone to pick up by pressing
any key. To answer a call by pressing any
key, select 3UR¿OHVfrom the main menu, then
FKRRVHWKHSUR¿OHVHWWLQJ\RXZDQW
For example, select Normal, then press
the left soft key to choose Options >
Personalize > Answer Mode > Any Key. Use
the enter key to check the Any Key option to
enable the setting.
Press the left soft key to Save.
Remember to Activate WKHSUR¿OHVHWWLQJWR
make sure that the answer mode is set.

16
Rejecting an incoming call
To reject an incoming call, press the Power/end
key. Depending on your service provider,
the call may be transferred to your voice mail or
your calling party may hear a busy signal.
Diverting a call
To divert an incoming call to another number:
1. When you receive the call, press
Options, then select the 'HÀHFWitem.
2. Use the keypad to enter the phone
number to which you want to divert, or
select Search using the left soft key
then browse through the phone book to
select a number.
3. Select OK when done.
Redialing a number
The phone provides a quick method to redial a
previously dialed number.
To redial a number:
1. Press the Call key. The Call logs
screen appears, displaying a list of
previously dialed numbers. The last
number dialed is on top of the list.
2. Select the number you want to dial, then
press the Call key to dial the number.
You can also access dialed numbers from Calls
> Dialed Calls.
Call logs
Call logs consist of information about missed,
dialed, and received calls. To view lists of
missed, dialed calls or received calls, select
Calls from the main menu, then select Missed
Calls, Dialed Calls, or Received Calls to view
the type of calls you require. The number of
calls in a list is limited to 20 entries. Older
calls are dropped from the list when the limit is
UHDFKHG0RVWUHFHQWFDOOVDSSHDU¿UVWLQDOLVW
You may also view call logs by pressing the
Call key when the phone is on standby
mode.
Returning a missed call
If you have missed a call, a message appears
on your standby screen to tell you a call was
missed. Select Read to see the most recent
missed calls.
To view a complete list of missed calls:
1. Select Calls > Missed Calls.
2. Scroll through the list and select the
desired call. Press the Call key to call
the number.
To view additional information, select a missed
call number from the list, then select OK. You
will see the date, time, phone number of the
calling party, and the number of times the call
was received is displayed. To call the number,
press the Call key, or select Options > Dial.
Table of contents
Other Spice Cell Phone manuals

Spice
Spice M-5161n User manual

Spice
Spice S-909 User manual

Spice
Spice D-80 User manual

Spice
Spice XLife-480Q User manual

Spice
Spice M-5252n User manual

Spice
Spice Blueberry Express User manual

Spice
Spice S-820 User manual

Spice
Spice M-5360 User manual

Spice
Spice popkorn m-9000 User manual

Spice
Spice S-525 User manual


