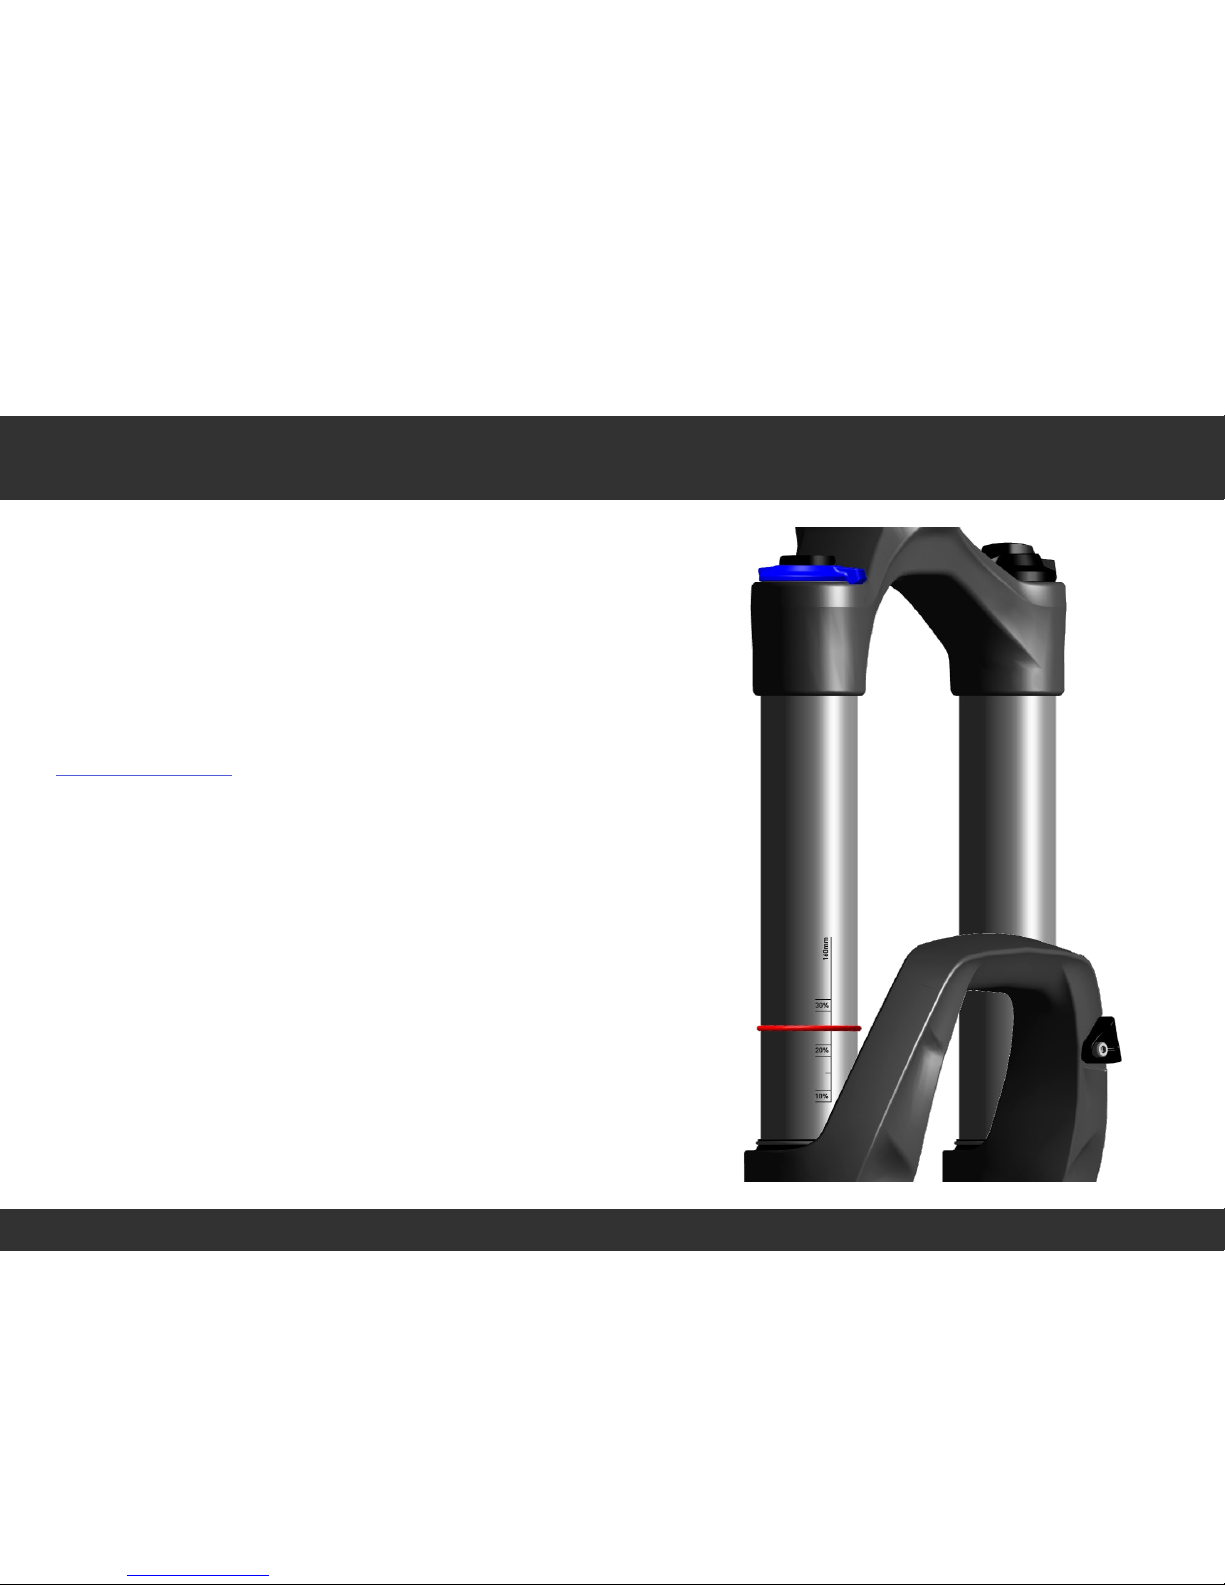
SRAM rock shox User manual

GEN0000000000000
© 2015 SRAM, LLC
Front Suspension
Setup and Tuning Guide
GEN.00000000005623 Rev A
© 2018 SRAM, LLC

2
Table of Contents
Introduction ...................................................................................................................................................................... 4
Set Sag.............................................................................................................................................................................. 5
Dampers ............................................................................................................................................................................................ 6
Air Springs - Solo Air™, DebonAir™, Dual Position Air™ ............................................................................................................7
Coil Spring - Dual Crown Forks ..................................................................................................................................................10
Coil Spring - External Preload Adjuster Knob.........................................................................................................................12
Coil Spring - Paragon™ Silver.......................................................................................................................................................15
Rebound Damping..........................................................................................................................................................17
Rebound - Optimal .........................................................................................................................................................................18
Rebound - Too Fast........................................................................................................................................................................19
Rebound - Too Slow......................................................................................................................................................................20
Low Speed Compression Damping............................................................................................................................. 21
Rolling Terrain.................................................................................................................................................................................22
Bumps............................................................................................................................................................................................... 23
High Speed Compression Damping............................................................................................................................24
Square Bumps and Drops ...........................................................................................................................................................25
Threshold (Pedal)...........................................................................................................................................................26

3
Lockout............................................................................................................................................................................ 27
Compliance and Blow-Off...........................................................................................................................................................28
Air Spring Bottom Out Tuning - Bottomless Tokens™ ...............................................................................................29
Fork Models and Damper Adjustments......................................................................................................................30
Service and Settings ..................................................................................................................................................... 31

4
To achieve maximum suspension performance, proper setup and tuning is essential.
This guide will help you identify and understand the features and adjustments that may be included on
your RockShox® suspension fork, as well as guide you through spring setup, damper adjustments and
tuning, and air spring bottom out tuning.
Tuning suggestions are starting points. It may take trying various adjustments to find the settings that
work best for each individual rider and trail condition.
Try the Quarq® ShockWiz™ suspension tuning device for more detailed ride data analysis and setting
suggestions. Go to www.quarq/shockwiz.com for more information.
For quick setup after fork service and tuning has been performed, make a note of your fork
settings on page 31.
Go to www.rockshox.com/app for suggested air spring pressure and rebound damper
settings for your fork.
Go to www.sram.com/service for additional product and technical information.
• Air spring pressure and coil spring tables are available in the RockShox® Front
Suspension Oil, Air, Coil, Token, and Specification documents.
• For a complete list of available coil springs and Bottomless Tokens™,
consult the RockShox Spare Parts Catalog.
• Consult the RockShox service manual for your fork for complete
disassembly and assembly procedures.
Your product's appearance may differ from the images in this
publication.
All setup procedures picture the fork only. Perform actual fork
sag and tuning on a complete, assembled bicycle.
All performance examples illustrated are for conceptualization
and may vary from actual performance.
Compression
Damper
Adjusters
Spring
(Air or Coil)
Rebound
Damper
Adjuster
Introduction

5
Suspension sag can be used to set the proper suspension spring rate.
Sag is the amount of travel, measured as a percentage of full travel, that the
suspension compresses when the rider, including gear, is on the bicycle in
the normal riding position. Setting the correct sag allows the suspension to
actuate effectively and efficiently.
• More sag (20% - 30%) increases bump sensitivity and suspension
movement. More bump sensitivity results in a smoother ride and is
typically preferred on longer travel bicycles.
• Less sag (10% - 20%) decreases bump sensitivity and suspension
movement. Less bump sensitivity results in a more firm, efficient ride and
is typically preferred on shorter travel bicycles.
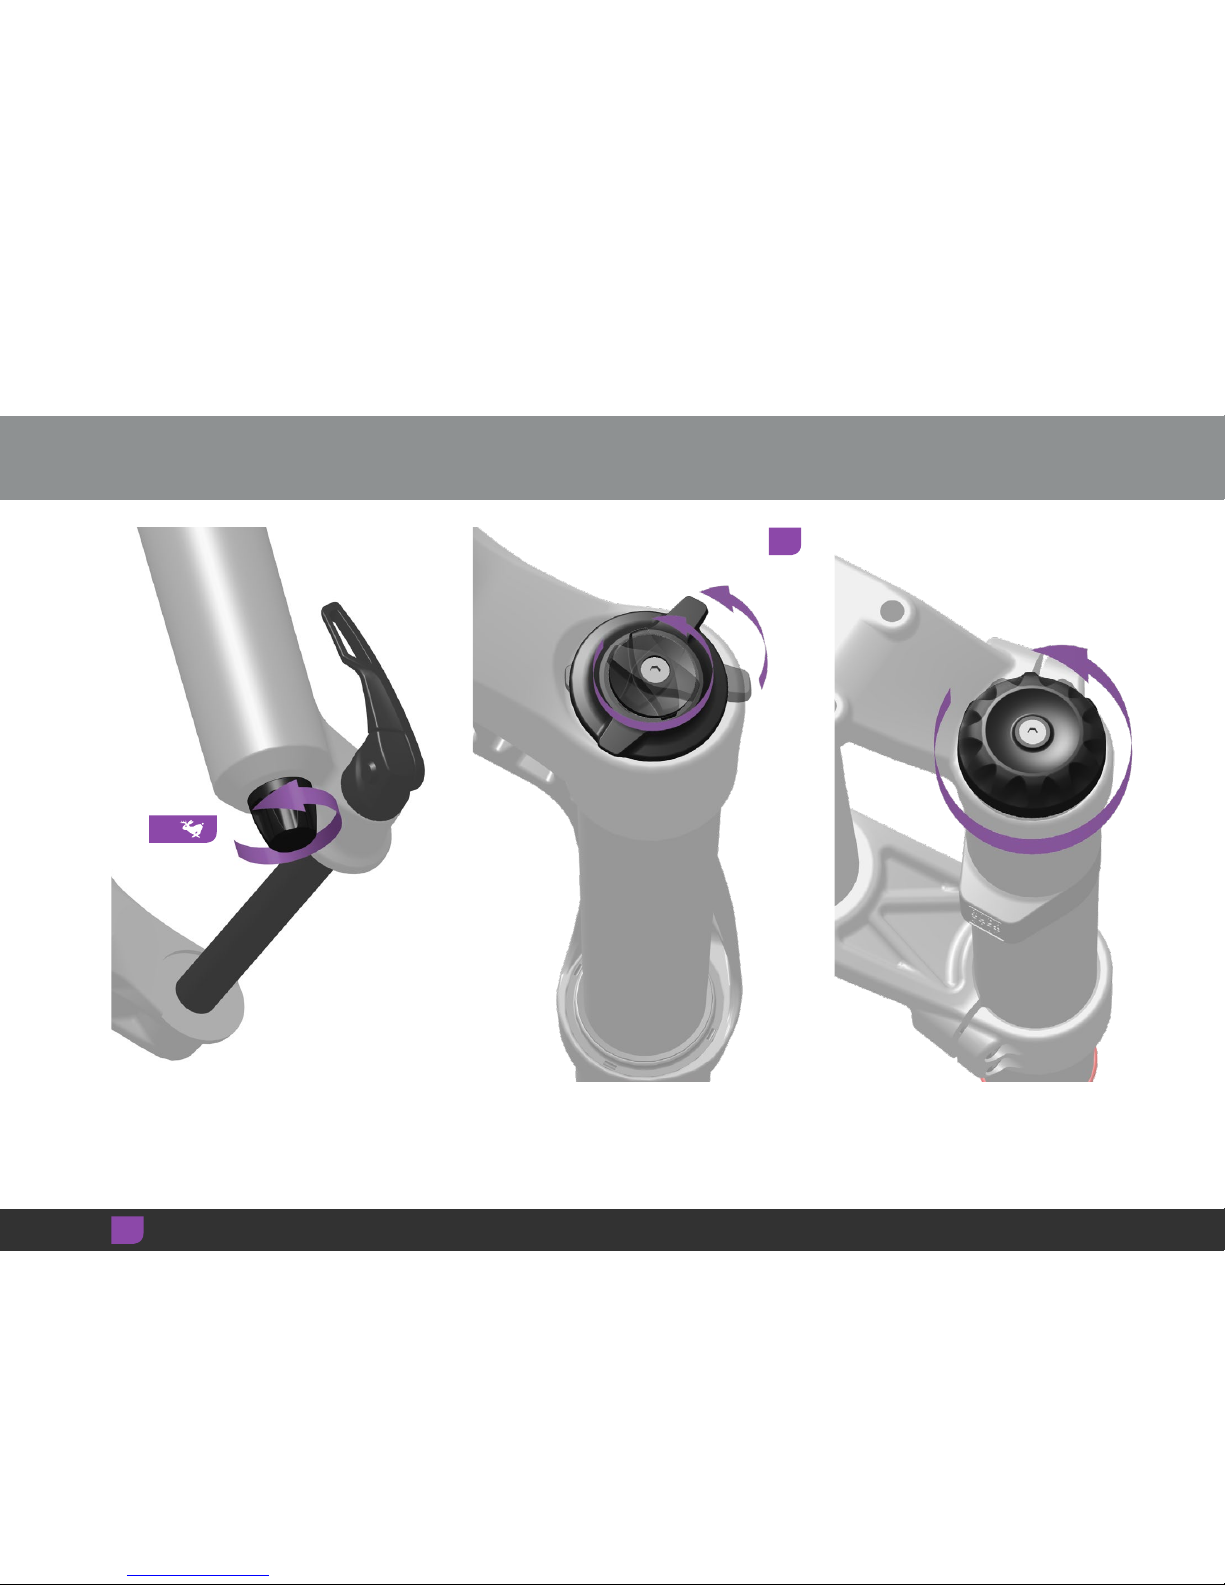
Air pressure recommendations on the back of your fork, or at
www.rockshox.com/app, are suggested for initial spring setup. After sag is
set, your fork's optimal air pressure may differ based on fork travel, bicycle
geometry, and rider preference.
Important - Sag must be set before making any damping adjustments.
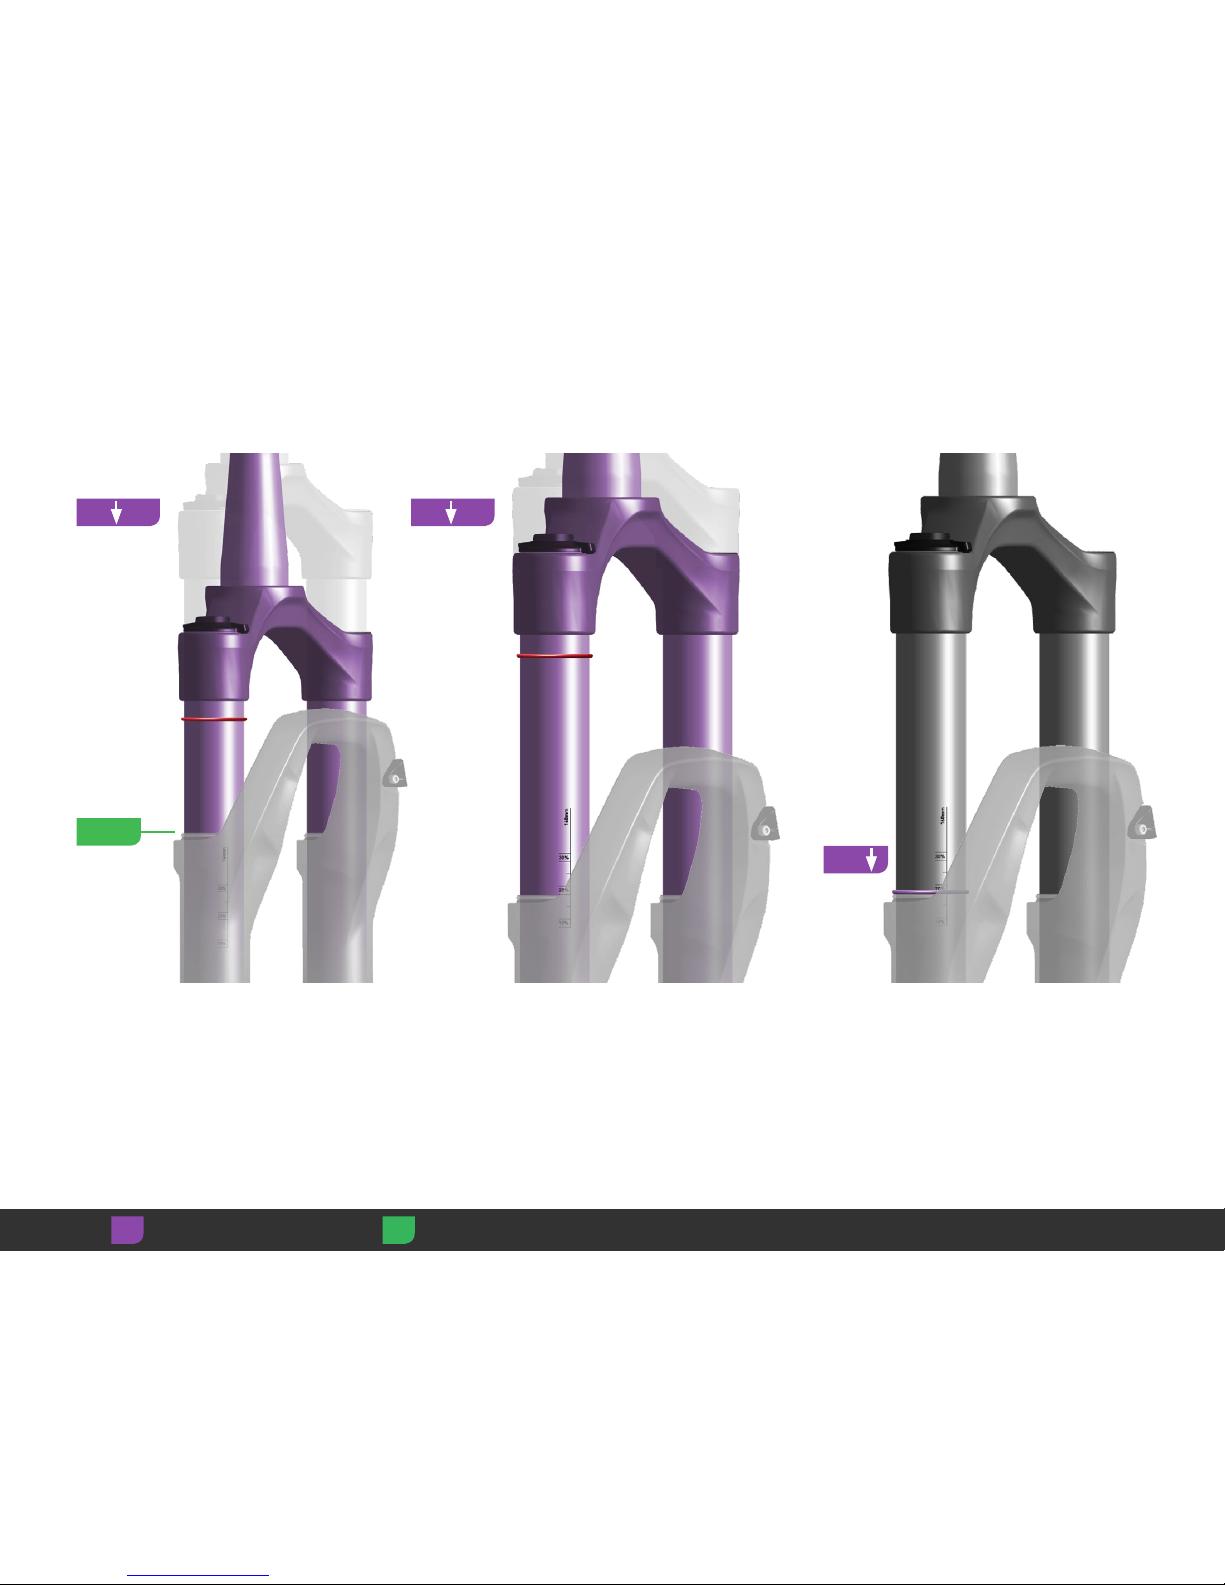
Many RockShox® forks include sag percentage gradients and a sag o-ring
on one of the upper tubes.
If a sag o-ring is not on your fork, install a plastic cable tie around the upper
tube just tight enough so it does not slide down the upper tube. Remove the
cable tie before riding.
If your fork does not have sag percentage gradients, multiply the target sag
percentage by the total amount of suspension fork travel. Use a ruler to
measure the length of exposed upper tube above the dust wiper seal to the
sag o-ring.
If your fork's travel is unknown, before sag is measured, fully compress
the fork to bottom out. Release and use a ruler to measure the length of
exposed upper tube below the sag o-ring.
Set Sag

6
1
Before setting sag, set the dampers to the full open positions. Rotate the knobs counter-clockwise until they stop.
Dampers
2
Adjust

7
Pressurize the air spring to the
recommended starting air pressure.
Remove the pump.
For Dual Position Air forks, pressurize the
fork in the full travel position. Proceed to
step 6.
Solo Air and DebonAir only: Compress the
fork through at least 50% of its travel five
times to equalize positive and negative air
pressures.
Air pressure equalization ensures the
positive air spring is accurately pressurized.
Pressurize the air spring to the
recommended starting pressure once more.
Remove the pump.
3
x5
≥50%
Air Springs - Solo Air™, DebonAir™, Dual Position Air™
1
2
4
AdjustRemove Measure

8
Solo Air™ and DebonAir™ only: Compress
the fork through at least 50% of its travel five
more times to equalize positive and negative
air pressures.
With riding gear on, and an assistant holding
the bike, stand on the pedals, and compress
the fork three times. Then sit or stand in your
normal riding position.
5
x5
Have your assistant slide the sag o-ring
down to the top of the dust wiper seal.
7
≥50%
6
x3
Adjust Measure

9
Note the sag percentage where the o-ring
stopped.
Gently step off the bicycle without
compressing the fork any further.
If your target sag percentage is not
achieved, air pressure must be adjusted.
Increase air pressure to decrease sag.
Decrease air pressure to increase sag.
Repeat the sag process until your target sag
percentage is achieved.
8
<10%
40%
Adjust Measure

10
Gently step off the bicycle without
compressing the fork any further.
Coil Spring - Dual Crown Forks
2
3
With riding gear on, and an assistant holding
the bike, stand on the pedals, and compress
the fork three times. Then sit or stand in your
normal riding position.
Have your assistant slide the sag o-ring
down to the top of the dust seal.
1
x3
Adjust

11
Note the sag percentage where the o-ring
stopped.
If your target sag percentage is not
achieved, spring preload adjustment and/or
coil spring replacement must be performed.
Coil spring preload in RockShox® dual
crown forks is an internal adjustment that
compresses or decompresses the spring
without initiating travel.
The coil spring can be preloaded with up to
five internal preload spacers.
Remove preload spacers to decrease
preload and increase sag.
Install preload spacers to increase preload
and decrease sag.
Spring preload can be used to fine tune sag,
but preload does not change coil spring rate
and is not a substitute for the proper coil
spring rate.
If your target sag cannot be achieved with
the maximum of five preload spacers,
replace the coil spring with a firmer spring.
If your target sag cannot be achieved with
zero preload spacers, replace the coil spring
with a softer spring.
Repeat the sag process until your target sag
percentage is achieved.
<10%
>30%
AdjustMeasure Install

12
Turn the preload adjuster knob counter-
clockwise until it stops.
This is the least amount of spring preload, or
the softest setting.
Coil Spring - External Preload Adjuster Knob
3
1
With riding gear on, and an assistant holding
the bike, stand on the pedals, and compress
the fork three times. Then sit or stand in your
normal riding position.
Have your assistant slide the sag o-ring
down to the top of the dust seal.
2
x3
Adjust

13
Note the sag percentage where the o-ring
stopped.
Gently step off the bicycle without
compressing the fork any further.
20%
If your target sag percentage is not
achieved, spring preload adjustment and/or
coil spring replacement must be performed.
4
>30%
<10%
Adjust Measure

14
Spring preload adjustment can be used to fine tune sag, but preload does not change spring
rate and is not a substitute for the proper coil spring weight.
If the proper sag cannot be acheived after external preload adjustment, the coil spring
assembly must be replaced with a softer or firmer spring.
To increase sag, install a softer coil spring assembly.
To decrease sag, install a firmer coil spring assembly.
Repeat the sag process until your target sag percentage is achieved.
External spring preload adjustment
compresses or decompresses the spring
without initiating travel.
Turn the preload adjuster knob clockwise to
increase spring preload and decrease sag.
Turn the preload adjuster knob counter-
clockwise to decrease spring preload and
increase sag.
Adjust

15
Have your assistant slide the sag o-ring
down to the top of the dust seal.
Gently step off the bicycle without
compressing the fork any further.
Coil Spring - Paragon™ Silver
3
2
With riding gear on, and an assistant holding
the bike, stand on the pedals, and compress
the fork three times. Then sit or stand in your
normal riding position.
1
x3
Adjust

16
Note the sag percentage where the o-ring
stopped.
If your target sag percentage is not
achieved, spring preload adjustment must
be performed.
Coil spring preload in RockShox® Paragon™
is an internal adjustment that compresses or
decompresses the spring without initiating
travel.
The coil spring can be preloaded 5 mm or
10 mm with the internal preload spacer.
Remove the top cap to remove or re-orient
the internal preload spacer.
A) Standard 5 mm (factory installed) preload
spacer orientation.
B) To decrease preload and increase sag,
remove the preload spacer.
C) To increase preload and decrease sag,
reorient the preload spacer to the 10 mm
preload position.
Repeat the sag process until your target sag
percentage is achieved.
A
BC
20%
>30%
<10%
AdjustMeasure

17
Rebound Damping
Rebound damping controls suspension fork
extension/return speed which affects traction and
control.
• Optimal rebound damping allows the fork to
extend at a controlled speed and maintain
traction and control.
• Rebound that is too fast allows the fork to
extend too quickly which causes the wheel to
bounce off of objects and the ground resulting
in a 'pogo' effect.
• Rebound that is too slow prevents the fork from
extending quickly enough to regain contact with
the ground or prepare for the next impact.
Rebound damping can be tuned to rider weight,
spring rate, and travel, as well as for terrain and
rider preference.
As air pressure or spring rate increases, extension/
return speed increases. To achieve the optimal
setting, rebound damping may need to be increased
when air pressure or spring rate increases.
For recommended rebound settings go to
www.rockshox.com/app. After setting sag, adjust the
rebound damper, go for a ride, and adjust again as
preferred.
To decrease rebound speed (slower return),
turn the rebound adjuster clockwise.
To increase rebound speed (faster return),
turn the rebound adjuster counter-clockwise.
Adjust

18
Rebound - Optimal
A
The fork rebounds at a controlled speed and the wheel maintains contact with the ground.
B
The fork crown, handlebars, and rider are more level with the ground over each bump. Suspension movement is predictable and controlled.
Adjustment - No adjustment is needed.
A
B

19
Rebound - Too Fast
A
The fork rebounds too quickly causing a 'pogo' effect where the wheel bounces off of the terrain
unpredictably. Traction and control are decreased.
B
The fork crown and handlebars are forced upward after the wheel bounces off of the ground. Rider weight
may shift upward and back uncontrollably.
Adjustment - Turn the rebound adjuster clockwise to decrease rebound speed, and increase traction and control.
Adjust
A
B

20
Rebound - Too Slow
A
The fork does not extend quickly enough after absorbing a bump. The fork stays compressed through
successive bumps, reducing travel and increasing impact firmness. Available travel, traction and control
are decreased.
B
The fork stays in a compressed state which puts the crown and handlebars in a lowered position. Rider
weight may shift forward.
Adjustment - Turn the rebound adjuster knob counter-clockwise to increase rebound speed and improve bump
performance.
Adjust
A
B
Other manuals for rock shox
1
Table of contents
Other SRAM Bicycle Accessories manuals

SRAM
SRAM HydroR User manual

SRAM
SRAM Zipp Wheels User manual

SRAM
SRAM SRAM SPECTRO S7 User manual

SRAM
SRAM Zipp Wheels User manual

SRAM
SRAM Guide Ultimate User manual

SRAM
SRAM eTap AXS User manual

SRAM
SRAM SRAM S-900 Aero HRD User manual

SRAM
SRAM Revelation User manual

SRAM
SRAM G2 ULTIMATE User manual

SRAM
SRAM Zipp User manual

SRAM
SRAM ROCK SHOX BoXXer User manual

SRAM
SRAM eTap HRD Series User manual

SRAM
SRAM 1x MTB Series User manual

SRAM
SRAM RockShox Reverb Stealth User manual

SRAM
SRAM FORCE User manual

SRAM
SRAM eTap AXS User manual

SRAM
SRAM G2 RE User manual

SRAM
SRAM Guide Ultimate User manual

SRAM
SRAM MTB User manual

SRAM
SRAM RockShox RS-1 User manual