manuals.online logo
Brands
  1. Home
  2. •
  3. Brands
  4. •
  5. Steelcase
  6. •
  7. Indoor Furnishing
  8. •
  9. Steelcase Folio Desk Frame User manual

Steelcase Folio Desk Frame User manual

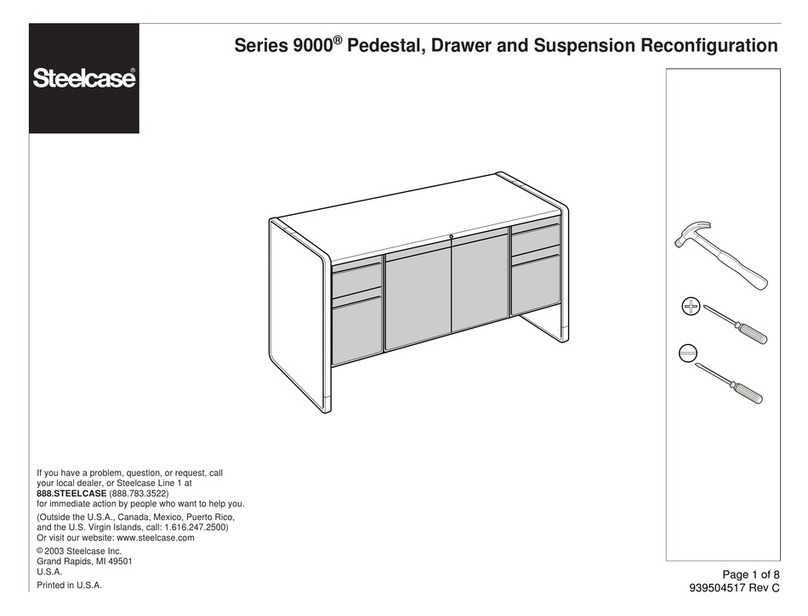
Folio™ Desk Frame, Desk Frame and End Panel
& Desk Frame with Back Panel
If you have a problem, question, or request, call
your local dealer, or Steelcase Line 1 at
888.STEELCASE (888.783.3522)
for immediate action by people who want to help you.
(Outside the U.S.A., Canada, Mexico, Puerto Rico,
and the U.S. Virgin Islands, call: 1.616.247.2500)
Or visit our website: www.steelcase.com
©2014 Steelcase Inc.
Grand Rapids, MI 49501
U.S.A.
Printed in U.S.A.
®
Page 1 of 14
939500540 Rev F
CAUTION
FAILURE TO FOLLOW THESE
INSTRUCTIONS COULD RESULT IN
PROPERTY DAMAGE OR PERSONAL
INJURY.
Read the entire Assembly Direction
before beginning installation or assembly.
Building construction varies greatly and
is outside Steelcase's control. The
Building's Engineer of Record is
responsible for the design of studs,
backing, reinforcement, supporting
members etc. which the units are
attached to and must verify the adequacy
of the mounting hardware. These
instructions and any hardware provided
by Steelcase are for convenience only
and are not an indication of what may be
required by your local Code.
The building owner or designated agent
is responsible for verifying that the
installation is in compliance with all local
Codes and regulations.
Desk Frame
with Back Panel
(with or without Doors)
Desk Frame
with End Panel
Desk Frame
CLAMP
WOOD BLOCK
3/8" SPADE BIT
MASKING TAPE
(Used to help prevent
any possible chipping
while drilling)
Page 2 of 14
939500540 Rev F
Installing a Desk Between Two Cabinets
onto Drywall
1. Pull drawer(s) forward from the base cabinet(s) (1a). Remove
drawer(s) completely by one of the methods shown below (1b). Push
slide rails back into base cabinet(s).
TIP: Mark all drawers so they can be easily re-installed in their
original positions.
2. Place desk frame piece between the cabinets and secure to
wall using appropriate wall anchors and screws.
3. Assembly three (3) remaining desk frame assembly pieces as
shown. Locate cam and secure by turning right 1/4 turn (3a, 3b & 3c).
1a
OROR
1b
2
3a
3b
3c
2x
2x
DRAWER
SLIDE
ROLLER ON CASE
ROLLER ON DRAWER
Page 3 of 14
939500540 Rev F
4. Use existing clearance holes in desk frame sides for
drilling location. Drill two (2) holes through side of desk
frame assembly and into cabinet.
NOTE: Use masking tape to prevent any possible chipping
while drilling and backup with clamped wood block.
5. Secure desk frame assembly to base cabinet using
two (2) 1-1/2" connector bolts. Repeat steps 4 and 5 for other
end of desk frame assembly.
6. If desk frame is 60", 66" or 72" wide, install reinforcement
channel underneath worksurface toward the front.
Secure using eight (8) 1/2" wood screws.
7. Re-install drawers in the base cabinets.
6
5
4x
4
FOR 60", 66" & 72" WIDTHS ONLY
1/2" WOOD
SCREW
REINFORCEMENT
CHANNEL
WORKSURFACE
1-1/2" CONNECTOR
BOLT
WOOD BLOCK
MASKING TAPE
Clamp a wood block on
other side of panel to
prevent excessive
blowout.
Use a sharp 3/8" drill bit
to drill holes through.
1a
1b
2
3a
3b
3c
1x
2x
Page 4 of 14
939500540 Rev F
Installing a Desk with an End Panel onto Drywall
1. Pull drawer(s) forward from the base cabinet (1a). Remove
drawer(s) completely by one of the methods shown below (1b).
Push slide rails back into base cabinet(s).
TIP: Mark all drawers so they can be easily re-installed in their
original positions.
2. Place desk frame piece between the cabinet and the end panel
and secure to wall using appropriate wall anchors and screws.
3. Assembly three (3) remaining desk frame assembly pieces as
shown. Locate cam and secure by turning right 1/4 turn (3a, 3b & 3c).
OROR
DRAWER
SLIDE
ROLLER ON CASE
ROLLER ON DRAWER
Page 5 of 14
939500540 Rev F
4. Secure end panel to desk frame with two (2) 5/16-18 x 1-1/4" bolts (4a).
Use existing clearance holes in desk frame sides for drilling location (4b).
NOTE: Use masking tape to prevent any possible chipping while drilling and
backup with clamped wood block.
5. Secure desk frame assembly to base cabinet using two (2)
1-1/2" connector bolts.
6. Position desk frame bracket centered (top to bottom) on end panel (6a).
Secure to wall using appropriate wall anchors and three (3) screws.
Secure to end panel with three (3) 1/2" wood screws (6b).
7. If desk frame is 60", 66" or 72" wide, install
reinforcement channel underneath worksurface
toward the front. Secure using eight (8) 1/2"
wood screws.
8. Re-install drawers in the base cabinet.
FOR 60", 66" & 72" WIDTHS ONLY
1/2" WOOD
SCREW
REINFORCEMENT
CHANNEL
WORKSURFACE
WOOD BLOCK
5
7
4x
6a 6b
4a
4b
5/16-18 x 1-1/4"
BOLT
DESK FRAME
BRACKET
1-1/2" CONNECTOR
BOLT
Clamp a wood block on
other side of panel to
prevent excessive
blowout.
Use a sharp 3/8" drill bit
to drill holes through.
MASKING TAPE
Page 6 of 14
939500540 Rev F
Installing a Desk Frame with Back Panel
(with or without Doors) onto Drywall
1. Pull drawers forward from the base cabinet (1a). Remove each
drawer completely by one of the methods shown below (1b). Push
slide rails back into base cabinets.
TIP: Mark all drawers so they can be easily re-installed in their
original positions.
2. Place desk frame piece between the cabinets, making sure the
top and back of the units are flush.
NOTE: The desk frame is a different height than the cabinets it's
attached to because there's no base. Make sure tops are properly
aligned.
1a
1b
2
OROR
DRAWER
SLIDE
ROLLER ON CASE
ROLLER ON DRAWER
4
3
4
Page 7 of 14
939500540 Rev F
3. Use existing clearance holes in desk frame sides for drilling
locations. Drill four (4) 3/8" diameter holes through side of desk
frame assembly and into cabinet.
NOTE: Use masking tape to prevent any possible chipping while
drilling and backup with clamped wood block.
4. Secure desk frame assembly to base cabinet using four (4)
1-1/2" connector bolts. Repeat steps 3 & 4 for other side of desk
frame assembly.
5. Re-install drawers in the base cabinets in their original
positions.
WOOD BLOCK
MASKING TAPE
1-1/2" CONNECTOR
BOLT
Clamp a wood block on
other side of panel to
prevent excessive
blowout.
Use a sharp 3/8" drill bit
to drill holes through.
Page 8 of 14
939500540 Rev F
Installing a Desk Frame Between Two
Cabinets onto V.I.A. On-Module
1.
Pull drawers forward from the base cabinet(s) (1a).
Remove each drawer completely by one of the methods
shown below (1b). Push slide rails back into base
cabinet(s).
TIP: Mark all drawers so they can be easily re-installed
in their original positions.
2. Attach brackets to back rail of desk frame, using
two (2) 12-14 x .750 fasteners.
1a 1b
OR
OR
DRAWER
SLIDE
ROLLER ON CASE
ROLLER ON DRAWER
2
BRACKET
(LEFT HAND)
ITEM Qty.
Hardware
1
4
BRACKET-LOWER,
FOLIO-VIA, LH
NUT-JOINT
CONNECTOR,
STA FAST
1
BRACKET-LOWER,
FOLIO-VIA, RH
BOLT-JOINT
CONNECTOR,
STA FAST
4
4
SCREW-TAPPING
TR HD. SERR.
10-10 x .550
14
SCREW-TAPPING
CTSK. HEAD,
12-14 x .750
BRACKET
(RIGHT HAND)
NOTE: The following steps assume that all V.I.A.
vertical structure has been plumbed and leveled
with skins installed.
Page 9 of 14
939500540 Rev F
3. Locate slot in vertical post closest to 34-1/2”
from the floor. (31-1/2” for ADA cabinets).
NOTE: Before installing brackets onto V.I.A.-
Using an X’acto knife, cut slots in the seal
using the furniture slots as guides.
CUT SLOTS
SKINSKIN
4. Install brackets by inserting thetop hook
into slot from step 3 (4a), then rotate remaining
hooks into slots and slide down (4b).
NOTE: Use the LH and RH brackets in the
proper orientation.
4a
(RH BRACKET SHOWN)
4b
HEALTH
Page 10 of 14
939500540 Rev F
5
6
WOOD BLOCK
5. Use existing clearance holes in desk frame sides for drilling
locations. Drill two (2) 3/8" diameter holes through side of desk
frame assembly and into cabinet.
NOTE: Use masking tape to prevent any possible chipping while
drilling and backup with clamped wood block.
6. Secure desk frame assembly to base cabinet using two (2)
1-1/2" connector bolts. Repeat steps 5 & 6 for other side of desk
frame assembly.
7. Re-install drawers in the base cabinets in their original
positions. 1-1/2"
CONNECTOR
BOLT
MASKING TAPE
Clamp a wood block on
other side of panel to
prevent excessive
blowout.
Use a sharp 3/8" drill bit
to drill holes through.
Page 11 of 14
939500540 Rev F
Installing End Panel onto V.I.A. - On-Module
8”
9.
Locate slot in vertical post closest to 8” from the floor.
10.
Install bracket by inserting the top hook into slot,
from step 9, then rotate remaining hooks into slots and
slide down.
11.
Secure end panel to bracket using two (2) 1/2”
tapping screws.
14.
End panel glides should be adjusted to ensure all
glides are touching the floor.
1/2”
TAPPING
SCREWS
TOP HOOK
GLIDES
8.
Secure end panel to desk frame using two (2) 5/16-18
x 1-1/4” fasteners.
12.
Secure work surface bracket to desk frame side
rail using two (2) 5/8” tapping screws. Ensure bracket
is centered over the rear cam hole and flush to the
underside of the work surface.
Secure work surface to bracket using two (2) 1/2”
tapping screws.
13.
ITEM Qty.
Hardware
2
2
1
SCREW-TAPPING,
TR HD. SERR.
10-10 x .550
4
SCREW-TAPPING,
HEX WASHER HEAD,
.312-18 x 1.250
BRACKET- PLASTIC,
BLACK
SCREW-TAPPING,
PAN HEAD,
8-15 x .625
5/8”
TAPPING
SCREWS
11
9
10
12
WORK
SURFACE
BRACKET
1a
1b
Page 12 of 14
939500540 Rev F
Installing a Desk Frame with Back Panel (with
or without Doors) Between Two Cabinets onto
V.I.A. On-Module
1. Pull drawer(s) forward from the base cabinet(s) (1a). Remove
drawer(s) completely by one of the methods shown below (1b).
Push slide rails back into base cabinet(s).
TIP: Mark all drawers so they can be easily re-installed in their
original positions.
2. Attach brackets to back panel of desk frame using two (2)
12-14 x .750 fasteners.
3. Locate slot in vertical post closest to 34-1/2” from the floor.
OR
OR
DRAWER
SLIDE
ROLLER ON CASE
ROLLER ON DRAWER
ITEM Qty.
Hardware
1
4
BRACKET-LOWER,
FOLIO-VIA, LH
NUT-JOINT
CONNECTOR,
STA FAST
1
BRACKET-LOWER,
FOLIO-VIA, RH
BOLT-JOINT
CONNECTOR,
STA FAST
4
4
SCREW-TAPPING
CTSK. HEAD,
12-14 x .750
BRACKET
(LEFT HAND)
BRACKET
(RIGHT HAND)
NOTE:
The following steps assume that all V.I.A. vertical structure
has been plumbed and leveled with skins installed.
2
Page 13 of 14
939500540 Rev F
NOTE: Before installing brackets onto V.I.A.- Using an
X’acto knife, cut slots in the seal using the furniture
slots as guides.
CUT SLOTS
SKINSKIN
4b
NOTE: Use the LH and RH brackets in the proper
orientation.
4. Install brackets and desk frame by inserting the top
hook into slot from step 3 (4a), then rotate the remaining
hooks into slots and slide down (4b). Make sure the top
and back of the units are flush.
NOTE: The desk frame is a different height than
the cabinets it's attached to because there's no
base. Make sure tops are properly aligned
4a
(RH BRACKET SHOWN)
Page 14 of 14
939500540 Rev F
Clamp a wood block on
other side of panel to
prevent excessive
blowout.
Use a sharp 3/8" drill bit
to drill holes through.
WOOD
BLOCK
MASKING TAPE
5. Using existing clearance holes in desk frame sides for
drilling locations. Drill (4) 3/8” diameter holes through side
of desk frame assembly and into cabinet.
NOTE: Use masking tape to prevent any possible chipping
while drilling and backup with clamped wood block.
6.
Secure desk frame assembly to base cabinet using four
(4) 1-1/2” connector bolts. Repeat steps 6 & 7 for the other
side of the desk frame assembly.
5
7.
Reinstall drawers in the base cabinet in their original
positions.
6
1-1/2"
CONNECTOR
BOLT

This manual suits for next models

2

Other Steelcase Indoor Furnishing manuals
Steelcase Flex Active Frame User manual

Steelcase

Steelcase Flex Active Frame User manual

Steelcase Think 465 User manual

Steelcase

Steelcase Think 465 User manual

Steelcase 3 Series User manual

Steelcase

Steelcase 3 Series User manual

Steelcase c:scape Parts list manual

Steelcase

Steelcase c:scape Parts list manual

Steelcase RELEVANT Firmware update

Steelcase

Steelcase RELEVANT Firmware update

Steelcase Elective Elements Freestanding Desk Shell User manual

Steelcase

Steelcase Elective Elements Freestanding Desk Shell User manual

Steelcase QiVi User manual

Steelcase

Steelcase QiVi User manual

Steelcase Mitra Reference guide

Steelcase

Steelcase Mitra Reference guide

Steelcase Umami Fascia User manual

Steelcase

Steelcase Umami Fascia User manual

Steelcase Migration SE User manual

Steelcase

Steelcase Migration SE User manual

Steelcase Elective Elements Adjustable-Height Underworksurface... User manual

Steelcase

Steelcase Elective Elements Adjustable-Height Underworksurface... User manual

Steelcase Elective Elements Spanner Worksurface User manual

Steelcase

Steelcase Elective Elements Spanner Worksurface User manual

Steelcase 800 Series User manual

Steelcase

Steelcase 800 Series User manual

Steelcase Migration Bench SE User manual

Steelcase

Steelcase Migration Bench SE User manual

Steelcase FrameOne Plus User manual

Steelcase

Steelcase FrameOne Plus User manual

Steelcase Flex User manual

Steelcase

Steelcase Flex User manual

Steelcase Tableau Firmware update

Steelcase

Steelcase Tableau Firmware update

Steelcase Opus User manual

Steelcase

Steelcase Opus User manual

Steelcase Flex Active Frames User manual

Steelcase

Steelcase Flex Active Frames User manual

Steelcase FrameOne User manual

Steelcase

Steelcase FrameOne User manual

Steelcase ap40 User manual

Steelcase

Steelcase ap40 User manual

Steelcase Think User manual

Steelcase

Steelcase Think User manual

Steelcase AMQ Currency Enhanced User manual

Steelcase

Steelcase AMQ Currency Enhanced User manual

Steelcase FitWork 7 Series User manual

Steelcase

Steelcase FitWork 7 Series User manual

Popular Indoor Furnishing manuals by other brands

Samson M8302040 installation instructions

Samson

Samson M8302040 installation instructions

Furniture of America CM7099Q Assembly instructions

Furniture of America

Furniture of America CM7099Q Assembly instructions

Rauch 59851.0210 Assembly instructions

Rauch

Rauch 59851.0210 Assembly instructions

Home affaire Ayanna 14862667 Assembly instructions

Home affaire

Home affaire Ayanna 14862667 Assembly instructions

Seconique Panama 100-102-044 Assembly instructions

Seconique

Seconique Panama 100-102-044 Assembly instructions

Allen + Roth LWSJ36VBR manual

Allen + Roth

Allen + Roth LWSJ36VBR manual

Walnutt CB2 manual

Walnutt

Walnutt CB2 manual

BLACK RED WHITE MALTA B136-KOM1S Assembly instructions

BLACK RED WHITE

BLACK RED WHITE MALTA B136-KOM1S Assembly instructions

Costco 689317 manual

Costco

Costco 689317 manual

Hanna 706-16-1014 Assembly instructions

Hanna

Hanna 706-16-1014 Assembly instructions

Cooper Lighting HALO L3700 Specifications

Cooper Lighting

Cooper Lighting HALO L3700 Specifications

Cypress Hills GREYSTONE AXCRGREY04 Assembly instructions

Cypress Hills

Cypress Hills GREYSTONE AXCRGREY04 Assembly instructions

Safco 1208 Assembly instructions

Safco

Safco 1208 Assembly instructions

mazzivo LUGO BED Assembly manual

mazzivo

mazzivo LUGO BED Assembly manual

INDA A03750 Mounting instructions

INDA

INDA A03750 Mounting instructions

FourStarGroup 11224575VB quick start guide

FourStarGroup

FourStarGroup 11224575VB quick start guide

Kartell TopTop Assembly instructions

Kartell

Kartell TopTop Assembly instructions

Renz Talk Assembly instruction

Renz

Renz Talk Assembly instruction

manuals.online logo
manuals.online logoBrands
  • About & Mission
  • Contact us
  • Privacy Policy
  • Terms and Conditions

Copyright 2025 Manuals.Online. All Rights Reserved.