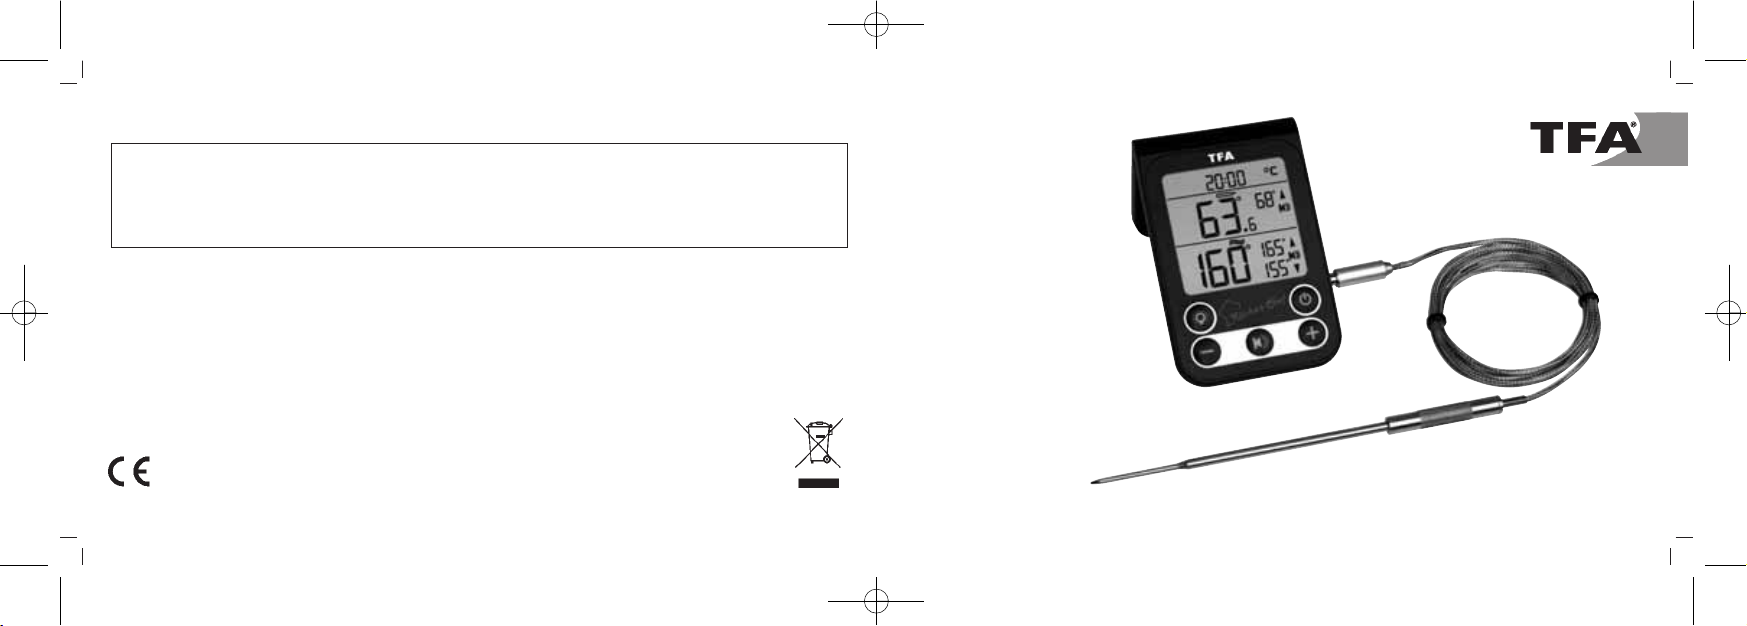
TFA 14.1512 User manual

Bedienungsanleitung
Instruction manual
Mode d’emploi
Istruzioni per l'uso
Gebruiksaanwijzing
Instrucciones de uso
Kat. Nr. 14.1512
RoHS
Zubehör / Accessory / Accessoires / Accessorio / Toebehoren / Avíos
30.3525.60
2 Edelstahl-Clips zur Befestigung des Fühlers
2 stainless steel clips to fix the probe
2 clips en acier inoxydable pour fixer la sonde
2 clips in acciaio inossidabile per il fissaggio della sonda
2 clips uit roestvrijstaal om de sonde te bevestigen
2 clips de acero inoxidable para fijar la sonda
TFA_No. 14.1512_Anleitung 14.03.2018 9:56 Uhr Seite 1

32
Fig. 1 Fig. 2
A 9
A 10
A 12
A 2
A 4
A 8
A 5
A 6
B 1
A 11
A 1
A 3
A 7
B 3
C 2
C 4
C 3
C 1
B 5 B 2 B 4
TFA_No. 14.1512_Anleitung 14.03.2018 9:56 Uhr Seite 2

54
Küchen-Chef –
Digitales Grill-Braten-/ Ofenthermometer
Vielen Dank, dass Sie sich für dieses Gerät aus dem Hause TFA entschieden haben.
1. Bevor Sie mit dem Gerät arbeiten
•Lesen Sie sich bitte die Bedienungsanleitung genau durch.
So werden Sie mit Ihrem neuen Gerät vertraut, lernen alle Funktionen und Bestandteile kennen, erfahren wichtige Details
für die Inbetriebnahme und den Umgang mit dem Gerät und erhalten Tipps für den Störungsfall.
•Durch die Beachtung der Bedienungsanleitung vermeiden Sie auch Beschädigungen des Gerätes und die Gefährdung
Ihrer gesetzlichen Mängelrechte durch Fehlgebrauch. Für Schäden, die aus Nichtbeachtung dieser Bedienungsanlei-
tung verursacht werden, übernehmen wir keine Haftung.
•Ebenso haften wir nicht für inkorrekte Messwerte und Folgen, die sich aus solchen ergeben können.
•Beachten Sie besonders die Sicherheitshinweise!
•Bewahren Sie diese Bedienungsanleitung gut auf!
2. Lieferumfang
• Digitales Grill-Braten-/ Ofenthermometer
• Edelstahlfühler mit ca. 120 cm Kabel (Kat.-Nr. 30.3528)
• Bedienungsanleitung
3. Einsatzbereich und alle Vorteile Ihres neuen Gerätes auf einen Blick
• Gleichzeitige Überwachung der Ofen- und Kerntemperatur
• Zur optimalen Zubereitung von Fleisch und Geflügel
Fig. 3
D 5 D 4
D 1 D 3 D 2
TFA_No. 14.1512_Anleitung 14.03.2018 9:56 Uhr Seite 3

76
Küchen-Chef –
Digitales Grill-Braten-/ Ofenthermometer
• Verwendbar für den Backofen oder Grill, ideal auch zum Garen bei Niedrigtemperatur
• Einstichfühler aus Edelstahl mit ca. 120 cm Kabel
• Individuelle Temperaturvorgabe einstellbar
• Alarmton bei Erreichen der Zieltemperatur
• Uhrzeit
• Hintergrundbeleuchtung
• Mit Befestigungsmagnet und ausklappbarem Ständer
4. Zu Ihrer Sicherheit
• Das Produkt ist ausschließlich für den oben beschriebenen Einsatzbereich geeignet. Verwenden Sie das Produkt nicht
anders, als in dieser Anleitung dargestellt wird.
• Das eigenmächtige Reparieren, Umbauen oder Verändern des Gerätes ist nicht gestattet.
• Dieses Gerät ist nicht für medizinische Zwecke geeignet.
Vorsicht!
Verletzungsgefahr:
• Tragen Sie hitzebeständige Schutzhandschuhe, wenn Sie den Messfühler während oder nach dem Kochvorgang berühren.
Verbrennungsgefahr!
• Benutzen Sie das Gerät nicht in der Mikrowelle.
• Vorsicht beim Umgang mit dem spitzen Einstichfühler.
Küchen-Chef –
Digitales Grill-Braten-/ Ofenthermometer
• Bewahren Sie das Gerät und die Batterien außerhalb der Reichweite von Kindern auf.
• Batterien enthalten gesundheitsschädliche Säuren und können bei Verschlucken lebensgefährlich sein. Wurde eine Batte-
rie verschluckt, kann dies innerhalb von 2 Stunden zu schweren inneren Verätzungen und zum Tode führen. Wenn Sie
vermuten, eine Batterie könnte verschluckt oder anderweitig in den Körper gelangt sein, nehmen Sie sofort medizinische
Hilfe in Anspruch.
• Batterien nicht ins Feuer werfen, kurzschließen, auseinandernehmen oder aufladen. Explosionsgefahr!
• Um ein Auslaufen der Batterien zu vermeiden, sollten schwache Batterien möglichst schnell ausgetauscht werden. Ver-
wenden Sie nie gleichzeitig alte und neue Batterien oder Batterien unterschiedlichen Typs.
• Beim Hantieren mit ausgelaufenen Batterien chemikalienbeständige Schutzhandschuhe und Schutzbrille tragen!
Wichtige Hinweise zur Produktsicherheit!
• Setzen Sie das Anzeigegerät keinen extremen Temperaturen, Vibrationen und Erschütterungen aus. Nur der Fühler und
das Kabel sind hitzebeständig bis 300°C. Halten Sie niemals den Fühler direkt über Feuer.
• Tauchen Sie das Anzeigegerät, den Fühlergriff und das Kabel nicht in Wasser, sonst kann Feuchtigkeit eindringen und zu
Fehlfunktionen führen. Nicht in der Spülmaschine reinigen.
• Vorsicht bei scharfkantigen Rahmen und Scharnieren! Das Kabel nicht knicken oder daran ziehen.
5. Bestandteile
A: Display (Fig. 1):
A 1: Uhrzeit A 2: Temperatureinheit
TFA_No. 14.1512_Anleitung 14.03.2018 9:56 Uhr Seite 4

98
Küchen-Chef –
Digitales Grill-Braten-/ Ofenthermometer
Display Kerntemperatur
A 3: Aktuelle Kerntemperatur A 4: Zieltemperatur
A 5: Symbol Temperaturobergrenze A 6: Alarmsymbol
Display Ofentemperatur
A 7: Aktuelle Ofentemperatur A 8: Temperaturobergrenze
A 9: Symbol Temperaturobergrenze A 10: Alarmsymbol
A 11: Temperaturuntergrenze A 12: Symbol Temperaturuntergrenze
B: Tasten (Fig. 1):
B 1: ON/OFF Taste B 2: ALARM Taste
B 3: LIGHT Taste B 4: + Taste
B 5: – Taste
C: Gehäuse (Fig. 2):
C 1: Anschluss für Temperaturfühler C 2: Batteriefach
C 3: Ständer (ausklappbar) C 4: Befestigungsmagnet
D: Fühler (Fig. 3):
D 1: Einstichfühler D 2: Griff
Küchen-Chef –
Digitales Grill-Braten-/ Ofenthermometer
D 3: Sensor Ofentemperatur D 4: Kabel
D 5: Anschlussstecker
6. Inbetriebnahme
• Stecken Sie den Verbindungsstecker für das Fühlerkabel in den Anschluss.
• Öffnen Sie das Batteriefach und legen Sie zwei neue Batterien 1,5 V AAA ein. Achten Sie auf die richtige Polarität beim
Einlegen der Batterien. Es werden alle LCD Segmente kurz angezeigt.
• Schließen Sie das Batteriefach wieder.
• Die Stundenanzeige blinkt.
• Stellen Sie mit der +oder –Taste die Stunden ein.
• Bestätigen Sie mit der ON/OFF Taste.
• Geben Sie auf gleiche Weise die Minuten ein.
• Bestätigen Sie mit der ON/OFF Taste.
• Das obere Display zeigt Ihnen die Uhrzeit, das mittlere und das untere Display die aktuelle Temperatur an.
• Das Gerät ist betriebsbereit.
7. Bedienung
• Mit der ON/OFF Taste können Sie das Gerät aus- bzw. anschalten.
• Drücken und halten Sie die ALARM Taste, um zwischen °F (Fahrenheit) oder °C (Celsius) als Temperaturanzeige auszu-
wählen.
TFA_No. 14.1512_Anleitung 14.03.2018 9:56 Uhr Seite 5

1110
Küchen-Chef –
Digitales Grill-Braten-/ Ofenthermometer
• Drücken Sie die LIGHT Taste. Die Hintergrundbeleuchtung wird kurzzeitig aktiviert.
• Halten Sie im Einstellmodus die +oder –Taste gedrückt, gelangen Sie in den Schnelllauf.
• Halten Sie die ON/OFF Taste im Normalmodus für drei Sekunden gedrückt, um in den Einstellmodus für die Uhrzeit zu
gelangen.
7.1 Messvorgang
• Zum Messen der Kerntemperatur: Stecken Sie den Fühler mindestens 2,5 cm tief in die Mitte des dicksten Bratenteils, bei
Geflügel zwischen Rumpf und Schenkel; er sollte weder Knochen noch Knorpel berühren und nicht aus dem Braten her-
ausragen. Schieben Sie den Braten in den Ofen und stellen Sie die entsprechende Ofentemperatur ein. Der Messfühler
bleibt während des ganzen Bratvorgangs im Braten.
• Die Ofentemperatur wird gleichzeitig gemessen.
• Führen Sie das Kabel einfach nach außen. Es passt sich der Form der Ofendichtung an. Vorsicht bei scharfkantigen Rah-
men und Scharnieren!
• Das Thermometer in Ofennähe (Kabellänge ca. 120 cm) platzieren. Mit dem Magnet können Sie das Gerät auf einer
Metalloberfläche befestigen oder benutzen Sie den ausklappbaren Ständer zum Aufstellen oder Aufhängen.
7.2 Temperaturalarm
• Drücken Sie die ALARM Taste, um in den Alarmmodus zu gelangen.
• „- -” erscheint im Display der Kerntemperatur und das Symbol und das Alarmsymbol blinken.
Küchen-Chef –
Digitales Grill-Braten-/ Ofenthermometer
• Drücken Sie die ON/OFF Taste, um den Alarm zu aktivieren. Das Alarmsymbol erscheint.
• 70°C (Voreinstellung) oder der zuletzt eingestellte Wert blinkt im Display.
• Stellen Sie mit der +oder –Taste die gewünschte Kerntemperatur ein.
• Bestätigen Sie Ihre Eingabe mit der ALARM Taste.
• „- -” erscheint im Display der Ofentemperatur und das Symbol und das Alarmsymbol blinken.
• Drücken Sie die ON/OFF Taste, um den oberen Garraumalarm zu aktivieren. Das Alarmsymbol erscheint.
• 70°C (Voreinstellung) oder der zuletzt eingestellte Wert blinkt im Display.
• Sie können mit der +oder –Taste den oberen Temperaturwert einstellen.
• Bestätigen Sie Ihre Eingabe mit der ALARM Taste.
• „- -” erscheint im Display der Ofentemperatur und das Symbol und das Alarmsymbol blinken.
• Drücken Sie die ON/OFF Taste, um den unteren Garraumalarm zu aktivieren. Das Alarmsymbol erscheint.
• 0°C (Voreinstellung) oder der zuletzt eingestellte Wert blinkt im Display. Sie können mit der +oder –Taste den unteren
Temperaturwert einstellen.
• Bestätigen Sie Ihre Eingabe mit der ALARM Taste.
7.3 Alarmfall
• Ein Alarmton ertönt:
• Wenn die eingestellte Kerntemperatur erreicht ist
TFA_No. 14.1512_Anleitung 14.03.2018 9:56 Uhr Seite 6

1312
Küchen-Chef –
Digitales Grill-Braten-/ Ofenthermometer
• Wenn die eingestellte Temperaturobergrenze im Garraum überschritten wird
• Wenn die eingestellte Temperaturuntergrenze im Garraum unterschritten wird
• Die Hintergrundbeleuchtung schaltet sich ein.
• Drücken Sie eine beliebige Taste, um den Alarmton auszuschalten.
• Das Alarmsymbol blinkt solange weiter, bis die gemessene Kerntemperatur unter der eingestellten Temperatur liegt
bzw. bis die gemessene Ofentemperatur wieder innerhalb der Alarmgrenzen liegt.
• Wird der Alarm nicht unterbrochen, schaltet sich der Alarmton automatisch nach 3 Minuten aus.
• Schalten Sie die einzelnen Alarmfunktionen mit der ON/OFF Taste im jeweiligen Alarmmodus aus. Das Alarmsymbol
erscheint.
8. Pflege und Wartung
• Reinigen Sie das Gerät und den Fühler mit einem weichen, leicht feuchten Tuch. Keine Scheuer- oder Lösungsmittel ver-
wenden! Vor Feuchtigkeit schützen.
• Sollte Wasser oder Dampf in die Buchse eindringen, kann dies den Kontakt mit dem Fühlerkabel beeinträchtigen. Trock-
nen Sie den Stecker vor Gebrauch mit einem Tuch ab, bevor Sie ihn am Anzeigegerät anschließen.
• Schalten Sie das Gerät nach Gebrauch aus.
• Entfernen Sie die Batterien, wenn Sie das Gerät längere Zeit nicht verwenden.
• Bewahren Sie Ihr Gerät an einem trockenen Platz auf.
Küchen-Chef –
Digitales Grill-Braten-/ Ofenthermometer
8.1 Batteriewechsel
• Wenn das Batteriesymbol erscheint, wechseln Sie bitte die Batterien.
• Öffnen Sie das Batteriefach und legen Sie zwei neue Batterien 1,5 V AAA polrichtig ein.
• Schließen Sie das Batteriefach wieder.
9. Fehlerbeseitigung
Problem Lösung
Keine Anzeige ➜ Gerät mit der ON/OFF Taste einschalten
➜ Batterien polrichtig einlegen
➜ Batterien wechseln
Unkorrekte Anzeige ➜ Batterien wechseln
➜ Kontakt des Steckers mit der Buchse prüfen, gegebenenfalls abtrocknen
Anzeige „- - -°C” ➜ Kabelfühler einstecken
➜ Kontakt des Steckers mit der Buchse prüfen
➜ Temperatur außerhalb des Messbereichs
Temperaturanzeige zu hoch ➜ Sitz des Messfühlers im Braten prüfen
Wenn Ihr Gerät trotz dieser Maßnahmen immer noch nicht funktioniert, wenden Sie sich an den Händler, bei dem Sie das Pro-
dukt gekauft haben.
TFA_No. 14.1512_Anleitung 14.03.2018 9:56 Uhr Seite 7

1514
Küchen-Chef –
Digitales Grill-Bratenthermometer
10. Entsorgung
Dieses Produkt wurde unter Verwendung hochwertiger Materialien und Bestandteile hergestellt, die recycelt und wiederver-
wendet werden können.
Batterien und Akkus dürfen keinesfalls in den Hausmüll!
Als Verbraucher sind Sie gesetzlich verpflichtet, gebrauchte Batterien und Akkus zur umweltgerechten Entsorgung
beim Handel oder entsprechenden Sammelstellen gemäß nationaler oder lokaler Bestimmungen abzugeben.
Die Bezeichnungen für enthaltene Schwermetalle sind:
Cd=Cadmium, Hg=Quecksilber, Pb=Blei
Dieses Gerät ist entsprechend der EU-Richtlinie über die Entsorgung von Elektro- und Elektronik-Altgeräten
(WEEE) gekennzeichnet.
Dieses Produkt darf nicht mit dem Hausmüll entsorgt werden. Der Nutzer ist verpflichtet, das Altgerät zur
umweltgerechten Entsorgung bei einer ausgewiesenen Annahmestelle für die Entsorgung von Elektro- und
Elektronikgeräten abzugeben.
11. Technische Daten
Messbereich -20 °C…300°C (-4…+572°F)
Auflösung
Kerntemperatur 0,1°C
Ofentemperatur 1°C
Küchen-Chef –
Digitales Grill-Bratenthermometer
Spannungsversorgung 2 x 1,5 V AAA Batterien (nicht inklusive)
Gehäusemaße 60 x 20 (96) x 99 (61) mm
Gewicht 80 g (nur das Gerät)
Diese Anleitung oder Auszüge daraus dürfen nur mit Zustimmung von TFA Dostmann veröffentlicht werden. Die technischen Daten entsprechen dem Stand
bei Drucklegung und können ohne vorherige Benachrichtigung geändert werden.
Die neuesten technischen Daten und Informationen zu Ihrem Produkt finden Sie unter Eingabe der Artikel-Nummer auf unserer Homepage.
www.tfa-dostmann.de
TFA Dostmann GmbH & Co.KG, Zum Ottersberg 12, D-97877 Wertheim, Deutschland 03/18
TFA_No. 14.1512_Anleitung 14.03.2018 9:56 Uhr Seite 8

1716
Küchen-Chef –
Digital BBQ meat / oven thermometer
Thank you for choosing this instrument from TFA.
1. Before you use this product
•Please make sure you read the instruction manual carefully.
This information will help you to familiarize yourself with your new device, to learn all of its functions and parts, to find
out important details about its first use and how to operate it and to get advice in the event of a malfunction.
•Following and respecting the instructions in your manual will prevent damage to your instrument and loss of your
statutory rights arising from defects due to incorrect use. We shall not be liable for any damage occurring as a result
of non following of these instructions.
•Likewise, we take no responsibility for any incorrect readings or for any consequences resulting from them.
•Please take particular note of the safety advice!
•Please keep this instruction manual safe for future reference.
2. Delivery contents
• Digital BBQ meat / oven thermometer
• Stainless steel probe with approx. 120 cm cable (Cat. No. 30.3528)
• Instruction manual
3. Range of application and all the benefits of your new instrument at a glance
• Simultaneous monitoring of the oven and core temperature
• For the optimal preparation of meat and poultry
Küchen-Chef –
Digital BBQ meat / oven thermometer
• Can be used for the oven or grill, also ideal for cooking at low temperatures
• Stainless steel probe with approx. 120 cm cable
• Individual target temperatures can be programmed
• Alarm warning when the target temperature is reached
• Time
• Backlight
• With magnet and table stand (fold out)
4. For your safety
• This product is exclusively intended for the range of application described above. It should only be used as described
within these instructions.
• Unauthorized repairs, alterations or changes to the product are prohibited.
• This product should not be used for medical purposes.
Caution!
Risk of injury:
• Wear heat-resistant protective gloves when touching the probe during or after cooking. Risk of burns!
• Do not use the instrument in the microwave.
• Be careful when handling the sharp probe.
TFA_No. 14.1512_Anleitung 14.03.2018 9:56 Uhr Seite 9

1918
Küchen-Chef –
Digital BBQ meat / oven thermometer
• Keep this instrument and the batteries out of reach of children.
• Batteries contain harmful acids and may be hazardous if swallowed. If a battery is swallowed, this can lead to serious
internal burns and death within two hours. If you suspect a battery could have been swallowed or otherwise caught in the
body, seek medical help immediately.
• Batteries must not be thrown into a fire, short-circuited, taken apart or recharged. Risk of explosion!
• Low batteries should be changed as soon as possible to prevent damage caused by leaking. Never use a combination of
old and new batteries together, nor batteries of different types.
• Wear chemical-resistant protective gloves and safety glasses when handling leaking batteries.
Important information on product safety!
• Do not expose the display unit to extreme temperatures, vibrations or shocks. Only the probe and the cable are up to
300 °C heat-resistant. Never hold the probe directly over a fire.
• Do not immerse the display unit, the probe handle and the cable in water. Water can penetrate and cause malfunction. Not
suitable for dishwasher.
• Be careful with sharp-edged frames and hinges. Do not pull or bend the cable.
5. Elements
A: Display (Fig. 1):
A 1: Time A 2: Temperature unit
Küchen-Chef –
Digital BBQ meat / oven thermometer
Core temperature display
A 3: Current core temperature A 4: Target temperature
A 5: Symbol upper temperature limit A 6: Alarm symbol
Oven temperature display
A 7: Current oven temperature A 8: Upper temperature limit
A 9: Upper temperature limit symbol A 10: Alarm symbol
A 11: Lower temperature limit A 12: Lower temperature limit symbol
B: Buttons (Fig. 1):
B 1: ON/OFF button B 2: ALARM button
B 3: LIGHT button B 4: + button
B 5: – button
C: Housing (Fig. 2):
C 1: Temperature probe jack C 2: Battery compartment
C 3: Stand (fold out) C 4: Magnet
D: Probe (Fig. 3):
D 1: Probe D 2: Handle
TFA_No. 14.1512_Anleitung 14.03.2018 9:56 Uhr Seite 10

2120
Küchen-Chef –
Digital BBQ meat / oven thermometer
D 3: Oven temperature sensor D 4: Cable
D 5: Probe connector
6. Getting started
• Plug the probe cable connector into the jack.
• Open the battery compartment and insert two new AAA 1,5 V batteries. Make sure the polarity is correct. All segments
will be displayed briefly.
• Close the battery compartment again.
• The hour digits flash.
• Press the +or –button to set the hours.
• Confirm the setting with the ON/OFF button.
• Set the minutes in the same way.
• Confirm the setting with the ON/OFF button.
• The upper display shows the time, the middle and lower display show the current temperature.
• The device is ready for use.
7. Operation
• Press ON/OFF button to switch the instrument on or off.
• Press and hold the ALARM button to change between °C (Celsius) or °F (Fahrenheit) as temperature unit.
Küchen-Chef –
Digital BBQ meat / oven thermometer
• Press the LIGHT button. The backlight is activated briefly.
• Press and hold the +or –button in setting mode for fast mode.
• Press and hold the ON/OFF button in normal mode for three seconds, to enter the time setting mode.
7.1 Measuring procedure
• For measuring the core temperature of meat: Plunge the probe at least 2,5 cm into the middle of the thickest part of the
meat; for poultry, between the torso and the thigh - it should not touch bones or cartilage and it should not protrude from
the meat. Put the meat into the oven and set the relevant oven temperature. The probe should remain in the meat
throughout the cooking process.
• The oven temperature is measured simultaneously.
• Simply run the cable to the outside. The cable adapts to the oven seal. Be careful with sharp-edged frames and hinges.
• Place the thermometer securely near the oven (cable length approx. 120 cm). You can either attach the device onto a
metal surface with its magnet or use the fold-out stand to place it onto a flat surface or to hang it.
7.2 Temperature alarm
• Press the ALARM button to enter the alarm mode.
• “- -” appears on the core temperature display and the symbol and the alarm symbol flash.
• To activate the alarm press the ON/OFF button. The alarm symbol appears.
• 70°C (default) or the last adjusted value flashes on the display.
• Press the +or –button to set the desired core temperature.
TFA_No. 14.1512_Anleitung 14.03.2018 9:56 Uhr Seite 11

2322
Küchen-Chef –
Digital BBQ meat / oven thermometer
• Confirm the setting with the ALARM button.
• “- -” appears on the oven temperature display and the symbol and the alarm symbol flash.
• To activate the upper oven temperature alarm press the ON/OFF button. The alarm symbol appears.
• 70°C (default) or the last adjusted value flashes on the display.
• You can use the +or –button to set the upper temperature limit.
• Confirm the setting with the ALARM button.
• “- -” appears on the oven temperature display and the symbol and the alarm symbol flash.
• To activate the lower oven temperature alarm press the ON/OFF button. The alarm symbol appears.
• 0°C (default) or the last adjusted value appear on the display. You can use the +or –button to set the lower temperature
limit.
• Confirm the setting with the ALARM button.
7.3 In case of alarm
• The device will alert you with a beep:
• As soon as the core temperature is reached
• If the set upper temperature limit in the cooking chamber is exceeded
• If the set lower temperature limit in the cooking chamber has fallen below
• The backlight turns on.
Küchen-Chef –
Digital BBQ meat / oven thermometer
• Press any button to stop the alarm sound.
• The alarm symbol will continue flashing until the measured core temperature has fallen below the set temperature
limit or until the measured oven temperature is within the alarm limits.
• The alarm sound automatically turns off after 3 minutes if not stopped manually.
• To turn off the alarm functions, press the ON/OFF button in the respective alarm mode. The alarm symbol appears.
8. Care and maintenance
• Clean the instrument and the probe with a soft damp cloth. Do not use solvents or scouring agents. Protect it from mois-
ture.
• Should water or steam enter the device’s jack, it could affect the contact with the probe. Dry the probe connector with a
cloth before connecting it to your instrument.
• Turn off the instrument after use.
• Remove the batteries if the device will not be used for an extended period of time.
• Keep the device in a dry place.
8.1 Battery replacement
• Change the batteries when the battery symbol appears on the display.
• Open the battery compartment and insert two new AAA 1.5 V batteries, polarity as illustrated.
• Close the battery compartment again.
TFA_No. 14.1512_Anleitung 14.03.2018 9:56 Uhr Seite 12

2524
Küchen-Chef –
Digital BBQ meat / oven thermometer
9. Troubleshooting
Problem Solution
No display ➜ Press the ON/OFF button to switch on the instrument
➜ Ensure the batteries' polarity are correct
➜ Change the batteries
Incorrect indication ➜ Change the batteries
➜ Check the contact between probe connector and jack, dry it if necessary
Display “- - -°C” ➜ Plug in the sensor cable
➜ Check the contact between plug and socket
➜ Temperature is outside measuring range
Temperature display is too high ➜ Check the position of the probe in the meat
If your device fails to work despite these measures, contact the retailer where you purchased the product.
10. Waste disposal
This product has been manufactured using high-grade materials and components which can be recycled and reused.
Never dispose of empty batteries and rechargeable batteries in ordinary household waste.
Küchen-Chef –
Digital BBQ meat / oven thermometer
As a consumer, you are required by law to take them to your retail store or to an appropriate collection site
depending on national or local regulations in order to protect the environment.
The symbols for the contained heavy metals are:
Cd = cadmium, Hg = mercury, Pb = lead
This product is labelled in accordance with the EU Waste Electrical and Electronic Equipment Directive
(WEEE).
Please do not dispose of this product in ordinary household waste. As a consumer, you are required to take
end-of-life devices to a designated collection point for the disposal of electrical and electronic equipment, in
order to ensure environmentally-compatible disposal.
11. Specifications
Measuring range -20 °C… 300 °C (-4…+572 °F)
Resolution
Core temperature 0.1°C
Oven temperature 1°C
Cable length 1,2 m
Power consumption 2 x AAA 1,5 V batteries (not included)
TFA_No. 14.1512_Anleitung 14.03.2018 9:56 Uhr Seite 13

2726
Küchen-Chef –
Digital BBQ meat / oven thermometer
Housing dimension 60 x 20 (96) x 99 (61) mm
Weight 80 g (device only)
No part of this manual may be reproduced without written consent of TFA Dostmann. The technical data are correct at the time of going to print and may
change without prior notice.
The latest technical data and information about your product can be found by entering the product number on our homepage.
www.tfa-dostmann.de
TFA Dostmann GmbH & Co.KG, Zum Ottersberg 12, D-97877 Wertheim, Germany 03/18
Küchen-Chef –
Thermomètre de cuisson / du four numérique
Nous vous remercions d'avoir choisi l'appareil de la société TFA.
1. Avant d'utiliser votre appareil
•Veuillez lire attentivement le mode d'emploi.
Vous vous familiariserez ainsi avec votre nouvel appareil, vous découvrirez toutes les fonctions et tous les éléments qui le
composent, vous noterez les détails importants relatifs à sa mise en service et vous lirez quelques conseils en cas de dys-
fonctionnement.
•En respectant ce mode d'emploi, vous éviterez d'endommager votre appareil et de perdre vos droits légaux en cas de
défaut si celui-ci résulte d’une utilisation non-conforme. Nous n'assumons aucune responsabilité pour des domma-
ges qui auraient été causés par le non-respect du présent mode d'emploi.
•De même, nous n’assumons aucune responsabilité pour des relevés incorrects et les conséquences qu’ils pourraient
engendrer.
•Suivez bien toutes les consignes de sécurité !
•Conservez soigneusement le mode d'emploi !
2. Contenu de la livraison
• Thermomètre de cuisson/ du four numérique
• Sonde en acier inoxydable avec câble d’env. 120 cm (n° de l'art. 30.3528)
• Mode d'emploi
TFA_No. 14.1512_Anleitung 14.03.2018 9:56 Uhr Seite 14

2928
Küchen-Chef –
Thermomètre de cuisson / du four numérique
3. Aperçu du domaine d'utilisation et de tous les avantages de votre nouvel appareil
• Surveillance simultanée de la température à cœur et de la température du four
• Pour une préparation parfaite des viandes et des volailles
• Adapté au barbecue ou au four, idéal pour la cuisson à basse température
• Sonde en acier inox avec câble d’env. 120 cm
• Température cible réglable individuellement
• Tonalité d'alarme lorsque la température désirée est atteinte
• Horloge
• Éclairage de fond
• Avec aimant et support (dépliable)
4. Pour votre sécurité
• Le produit est destiné uniquement à l'utilisation décrite ci-dessus. N'utilisez jamais l’appareil à d'autres fins que celles
décrites dans le présent mode d'emploi.
• Vous ne devez en aucun cas réparer, démonter ou modifier l'appareil par vous-même.
• Cet appareil ne convient pas à une utilisation médicale.
Attention !
Danger de blessure :
• Portez toujours des gants de protection contre les risques de brûlures, lorsque vous manipulez la sonde pendant ou après
la cuisson. Risque de brûlure !
Küchen-Chef –
Thermomètre de cuisson / du four numérique
• N'utilisez jamais votre appareil dans un four à micro-ondes.
• Faites attention en utilisant la sonde pointue.
• Gardez votre appareil et les piles hors de la portée des enfants.
• Les piles contiennent des acides nocifs pour la santé et peuvent être mortelles dans le cas d’une ingestion. Si une pile a
été avalée, elle peut entraîner des brûlures internes graves ainsi que la mort dans l’espace de 2 heures. Si vous craignez
qu’une pile ait pu être avalée ou ingérée d’une autre manière, quelle qu’elle soit, contactez immédiatement un médecin
d’urgence.
• Ne jetez jamais de piles dans le feu, ne les court-circuitez pas, ne les démontez pas et ne les rechargez pas. Risque d'ex-
plosion !
• Une pile faible doit être remplacée le plus rapidement possible afin d'éviter toute fuite. N'utilisez jamais simultanément de
piles anciennes avec des piles neuves ou des piles de types différents.
• Pour manipuler des piles qui ont coulé, utilisez des gants de protection chimique spécialement adaptés et portez des
lunettes de protection !
Conseils importants de sécurité du produit !
• Évitez d’exposer l’appareil d'affichage à des températures extrêmes, à des vibrations ou à des chocs. Seuls la sonde et le
câble sont résistants à une chaleur de 300 °C. Ne placez jamais la sonde directement sur le feu.
• N'immergez pas l’appareil d'affichage, la poignée de la sonde ou le câble dans l'eau car l'humidité pourrait pénétrer et
causer un dysfonctionnement. Votre instrument ne peut pas être lavé au lave-vaisselle.
• Attention aux charnières à arêtes vives ! Ne pas plier ou tirer sur le câble !
TFA_No. 14.1512_Anleitung 14.03.2018 9:56 Uhr Seite 15

3130
Küchen-Chef –
Thermomètre de cuisson / du four numérique
5. Composants
A : Affichage (Fig. 1) :
A 1 : Horloge A 2 : Unité de température
Affichage température à cœur
A 3 : Température à cœur actuelle A 4 : Température cible
A 5 : Symbole limite supérieure pour la température A 6 : Symbole d'alarme
Affichage température du four
A 7 : Température du four actuelle A 8 : Limite supérieure pour la température
A 9 : Symbole limite supérieure pour la température A 10 : Symbole d'alarme
A 11 : Limite inférieure pour la température A 12 : Symbole limite inférieure pour la température
B : Touches (Fig. 1) :
B 1 : Touche ON/OFF B 2 : Touche ALARM
B 3 : Touche LIGHT B 4 : Touche +
B 5 : Touche –
C : Boîtier (Fig. 2) :
C 1 : Prise pour sonde C 2 : Compartiment à piles
C 3 : Support (dépliable) C 4 : Aimant
Küchen-Chef –
Thermomètre de cuisson / du four numérique
D : Sonde (Fig. 3) :
D 1 : Sonde D 2 : Poignée
D 3 : Senseur température du four D 4 : Câble
D 5 : Connecteur
6. Mise en service
• Insérez le connecteur de branchement du câble de la sonde dans la prise.
• Ouvrez le compartiment à piles et insérez deux piles neuves de type 1,5 V AAA. Veillez à la bonne polarité des piles. Tous
les segments s'allument brièvement.
• Refermez le compartiment à piles.
• L'affichage de l'heure clignote.
• Réglez l'heure avec la touche +ou –.
• Validez le réglage au moyen de la touche ON/OFF.
• Procédez de même pour régler les minutes.
• Validez le réglage au moyen de la touche ON/OFF.
• L'affichage supérieur vous indique l’heure, l'affichage central et l'affichage inférieur la température actuelle.
• Votre appareil est maintenant prêt à fonctionner.
TFA_No. 14.1512_Anleitung 14.03.2018 9:56 Uhr Seite 16

3332
Küchen-Chef –
Thermomètre de cuisson / du four numérique
7. Utilisation
• Arrêter ou mettez l’appareil en marche à l’aide de la touche ON/OFF.
• Maintenez la touche ALARM appuyée pour passer de l’affichage de la température en degrés Celsius (°C) à l’affichage en
degrés Fahrenheit (°F).
• Appuyez sur la touche LIGHT. L'éclairage de fond est activé temporairement.
• Si vous maintenez la touche +ou –appuyée au cours d'un mode de réglage, vous passez en déroulement rapide.
• Maintenez la touche ON/OFF appuyée pendant trois secondes en mode normal pour accéder au mode de réglage de
l'heure.
7.1 Procédé de mesure
• Pour la mesure de la température à cœur de la viande : insérez la sonde au minimum à 2,5 cm de profondeur dans la par-
tie la plus épaisse de la viande, pour les volailles entre la carcasse et la cuisse ; la pointe ne doit pas être en contact avec
les os ou avec le cartilage. Elle ne doit pas dépasser du morceau de viande. Placez la viande dans le four et réglez le four
sur la température voulue. La sonde de mesure reste dans la viande pendant toute la durée de cuisson.
• La température du four est mesurée simultanément.
• Faites passer le câble vers l'extérieur. Le câble s’adapte à la forme de l’isolant du four. Attention aux charnières à arêtes
vives !
• Fixer le thermomètre à proximité du four (longueur du câble 120 cm). Avec l'aimant, vous pouvez fixer l'appareil sur une
surface métallique ou utilisez le support dépliable pour le poser au l'accrocher.
Küchen-Chef –
Thermomètre de cuisson / du four numérique
7.2 Alarme de température
• Appuyez sur la touche ALARM pour arriver au mode d’alarme.
• « - - » apparaît sur l'écran de la température à cœur et le symbole et le symbole d'alarme clignotent.
• Appuyez sur la touche ON/OFF pour activer l'alarme. Le symbole d'alarme apparaît sur l'écran.
• 70°C (par défaut) ou la valeur réglée précédemment clignote sur l'écran.
• Réglez la température à cœur désirée avec la touche +ou –.
• Validez au moyen de la touche ALARM.
• « - - » apparaît sur l'écran de la température du four et le symbole et le symbole d'alarme clignotent.
• Appuyez sur la touche ON/OFF pour activer la limite supérieure de la température du four. Le symbole d'alarme appa-
raît sur l'écran.
• 70°C (par défaut) ou la valeur réglée précédemment clignote sur l'écran.
• Vous pouvez régler la limite de température supérieure à l'aide de la touche +ou –.
• Validez au moyen de la touche ALARM.
• « - - » apparaît sur l'écran de la température du four et le symbole et le symbole d'alarme clignotent.
• Appuyez sur la touche ON/OFF pour activer la limite inférieure de la température du four. Le symbole d'alarme appa-
raît sur l'écran.
• 0°C (par défaut) ou la valeur réglée précédemment clignote sur l'écran. Vous pouvez régler la limite de température infé-
rieure à l'aide de la touche +ou –.
• Validez au moyen de la touche ALARM.
TFA_No. 14.1512_Anleitung 14.03.2018 9:56 Uhr Seite 17

3534
Küchen-Chef –
Thermomètre de cuisson / du four numérique
7.3 Cas d'alarme
• Un signal sonore se fait entendre :
• lorsque la température à cœur réglée est atteinte
• si la limite supérieure réglée pour la température du four est dépassée vers le haut
• si la limite inférieure réglée pour la température du four est dépassée vers le bas
• L’éclairage de fond est activé.
• Appuyez sur une touche de votre choix pour arrêter l’alarme.
• Le symbole d'alarme continue à clignoter jusqu'à ce que la température à cœur mesurée soit inférieure à la tempéra-
ture souhaitée ou jusqu'à ce que la température du four mesurée soit dans les limites d'alarme.
• Si l'alarme n'est pas coupée, elle s'arrêtera automatiquement après 3 minutes.
• Appuyez sur la touche ON/OFF pour désactiver les alarmes individuelles en mode d'alarme correspondant. Le symbole
d'alarme apparaît sur l'écran.
8. Entretien et maintenance
• Pour le nettoyage de votre appareil et de la sonde, utilisez un chiffon doux et humide. N’utilisez pas de solvants ou
d'agents abrasifs ! Protégez-le contre l'humidité.
• Si de l’eau ou de la vapeur pénètrent dans la prise, cela peut empêcher un bon contact avec la sonde. Essuyez la prise
avec un chiffon avant de la brancher dans votre appareil.
• Éteignez votre appareil après chaque utilisation.
• Retirez les piles si vous n'utilisez pas votre appareil pendant une durée prolongée.
• Conservez votre appareil dans un endroit sec.
Küchen-Chef –
Thermomètre de cuisson / du four numérique
8.1 Remplacement des piles
• Si le symbole de piles apparaît sur l'écran, changez les piles.
• Ouvrez le compartiment à piles et insérez deux nouvelles piles de type 1,5 V AAA en respectant la polarité +/-.
• Refermez le compartiment à piles.
9. Dépannage
Problème Solution
Aucun affichage ➜ Mettez l’appareil avec la touche ON/OFF en marche
➜ Contrôlez la bonne polarité des piles
➜ Changez les piles
Affichage incorrect ➜ Changez les piles
➜ Vérifiez le contact de la fiche avec la prise, séchez au besoin
Affichage « - - - °C » ➜ Connectez la sonde câblée
➜ Vérifiez le contact de la fiche avec la prise
➜ Température mesurée hors de la plage de mesure
Température trop élevée ➜ Vérifiez l'emplacement de la sonde de mesure
Si votre appareil ne fonctionne toujours pas malgré ces mesures, adressez-vous au vendeur chez qui vous l'avez acheté.
TFA_No. 14.1512_Anleitung 14.03.2018 9:56 Uhr Seite 18

3736
Küchen-Chef –
Thermomètre de cuisson / du four numérique
10. Traitement des déchets
Ce produit a été fabriqué avec des matériaux de haute qualité qui peuvent être recyclés et réutilisés.
Les piles usagées ne doivent pas être jetées dans les détritus ménagers.
En tant qu'utilisateur, vous avez l'obligation légale de rapporter les piles et piles rechargeables usagées à votre
revendeur ou de les déposer dans une déchetterie proche de votre domicile conformément à la réglementation
nationale et locale.
Les métaux lourds sont désignés comme suit : Cd=cadmium, Hg=mercure, Pb=plomb
Cet appareil est conforme aux normes de l'UE relatives au traitement des déchets électriques et électroniques
(WEEE).
L'appareil usagé ne doit pas être jeté dans les ordures ménagères. L’utilisateur s’engage, pour le respect de
l’environnement, à déposer l’appareil usagé dans un centre de traitement agréé pour les déchets électriques et
électroniques.
11. Caractéristiques techniques
Plage de mesure -20 °C…300°C (-4…+572°F)
Résolution
Température à cœur 0,1°C
Température du four 1°C
Küchen-Chef –
Thermomètre de cuisson / du four numérique
Longueur de câble 1,2 m
Alimentation Piles 2 x 1,5 V AAA (non incluses)
Dimensions du boîtier 60 x 20 (96) x 99 (61) mm
Poids 80 g (appareil seulement)
La reproduction, même partielle, du présent mode d'emploi est strictement interdite sans l'accord explicite de TFA Dostmann. Les caractéristiques techni-
ques de ce produit ont été actualisées au moment de l'impression et peuvent être modifiées sans avis préalable. Les dernières données techniques et les
informations concernant votre produit peuvent être consultées en entrant le numéro de l'article sur notre site Internet.
www.tfa-dostmann.de
TFA Dostmann GmbH & Co.KG, Zum Ottersberg 12, D-97877 Wertheim, Allemagne 03/18
TFA_No. 14.1512_Anleitung 14.03.2018 9:56 Uhr Seite 19

3938
Küchen-Chef –
Termometro digitale per arrosti e grigliate / per forno
Vi ringraziamo per aver scelto l'apparecchio della TFA.
1. Prima di utilizzare l'apparecchio
•Leggete attentamente le istruzioni per l'uso.
Avrete così modo di familiarizzare con il vostro nuovo apparecchio, di scoprirne tutte le funzioni e le componenti, di
apprendere importanti dettagli sulla sua messa in funzione, di acquisire dimestichezza nel suo utilizzo e di usufruire di
alcuni validi consigli da seguire in caso di guasti.
•Seguendo le istruzioni per l'uso, eviterete anche di danneggiare il prodotto e di pregiudicare, a causa di un utilizzo
scorretto, i diritti del consumatore che vi spettano per legge. Decliniamo ogni responsabilità per i danni derivanti
dal mancato rispetto delle presenti istruzioni per l'uso.
•Allo stesso modo, non siamo responsabili per eventuali misurazioni errate e per le conseguenze che ne possono
derivare.
•Prestate particolare attenzione alle misure di sicurezza!
•Conservate con cura queste istruzioni per l'uso.
2. La consegna include
• Termometro digitale per arrosti e grigliate/ per forno
• Sonda in acciaio inossidabile con cavo di ca. 120 cm (Cat.-N. 30.3528)
• Istruzioni per l'uso
Küchen-Chef –
Termometro digitale per arrosti e grigliate / per forno
3. Tutte le applicazioni e tutti i vantaggi del vostro nuovo apparecchio
• Monitoraggio contemporaneo della temperatura interna e della temperatura del forno
• Adatto per la preparazione ottimale di carne e pollame
• Adatto per il forno o la griglia, ideale anche per la cottura a basse temperature
• Sonda in acciaio inossidabile con cavo di ca. 120 cm
• Temperatura regolabile individualmente
• L’allarme suonerà al raggiungimento della temperatura desiderata
• Orologio
• Retroilluminazione
• Con magnete e supporto (pieghevole)
4. Per la vostra sicurezza
• Il prodotto è adatto esclusivamente agli utilizzi di cui sopra. Non utilizzate il prodotto in maniera diversa da quanto
descritto in queste istruzioni.
• Non sono consentite riparazioni, alterazioni o modifiche non autorizzate del dispositivo.
• Questo apparecchio non è adatto a scopi medici.
Attenzione!
Pericolo di lesioni:
• Indossare guanti resistenti al calore quando si entra in contatto con il sensore durante o dopo la cottura. Pericolo di ustione!
TFA_No. 14.1512_Anleitung 14.03.2018 9:56 Uhr Seite 20
Table of contents
Languages:
Other TFA Thermometer manuals