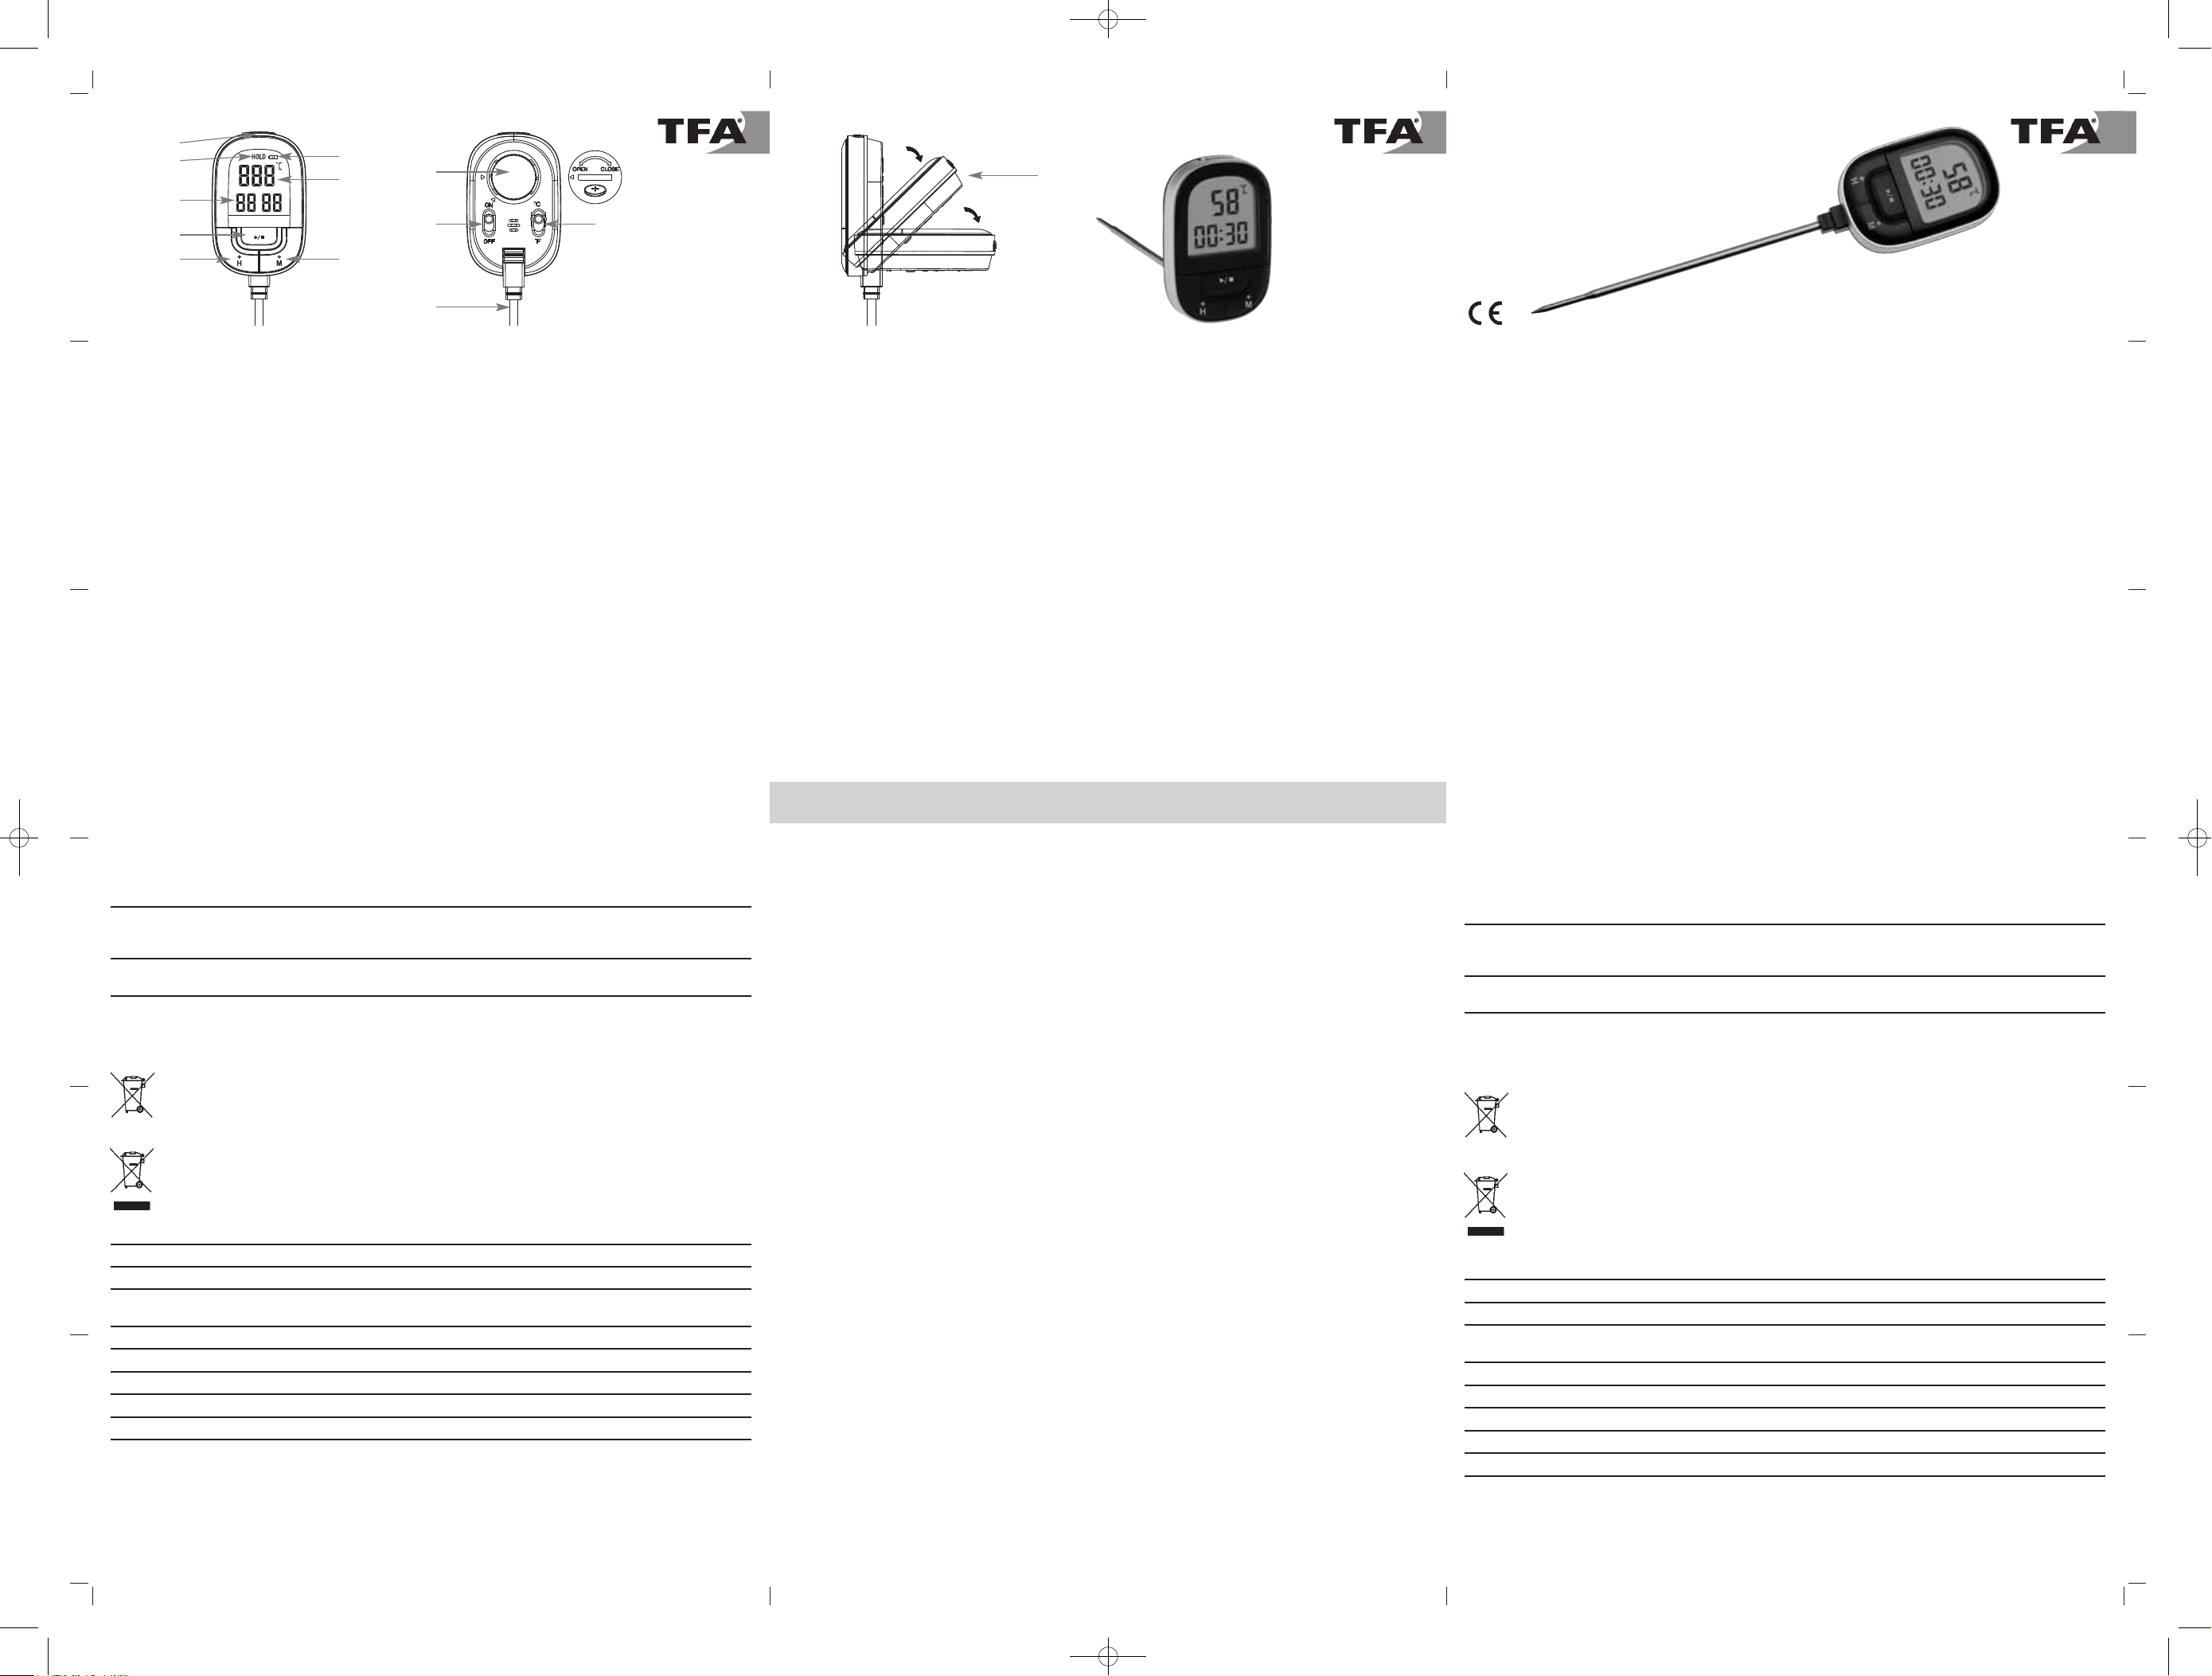
TFA 30.1062 User manual

Digitales Küchenthermometer-Fleischthermometer Digitales Küchenthermometer-Fleischthermometer
Vielen Dank, dass Sie sich für dieses Gerät aus dem Hause TFA entschieden haben.
1. Bevor Sie mit dem Gerät arbeiten
•Lesen Sie sich bitte die Bedienungsanleitung genau durch.
•Durch die Beachtung der Bedienungsanleitung vermeiden Sie auch Beschädigungen des Geräts und die Gefährdung
Ihrer gesetzlichen Mängelrechte durch Fehlgebrauch. Für Schäden, die aus Nichtbeachtung dieser Bedienungsanleitung
verursacht werden, übernehmen wir keine Haftung. Ebenso haften wir nicht für inkorrekte Messwerte und Folgen, die
sich aus solchen ergeben können.
•Beachten Sie besonders die Sicherheitshinweise!
•Bewahren Sie diese Bedienungsanleitung gut auf!
2. Lieferumfang
• Einstichthermometer • Kunststoffhülle
• Batterie 1 x 3 V CR2032 • Bedienungsanleitung
3. Einsatzbereich und alle Vorteile Ihres neuen Gerätes auf einen Blick
• Zur Temperaturkontrolle von Speisen und Getränken
• Ideal zum Messen der Kerntemperatur von Fleisch
• Display 3-stufig klappbar (90°)
• Edelstahl-Einstechfühler 118 mm
• HOLD-Funktion
• Timer und Stoppuhr-Funktion
• Hintergrundbeleuchtung
4. Zu Ihrer Sicherheit
• Das Produkt ist ausschließlich für den oben beschriebenen Einsatzbereich geeignet. Verwenden Sie das Produkt nicht
anders, als in dieser Anleitung beschrieben wird.
• Das eigenmächtige Reparieren, Umbauen oder Verändern des Gerätes ist nicht gestattet.
• Dieses Gerät ist nicht für medizinische Zwecke bestimmt.
Vorsicht!
Verletzungsgefahr!
• Vorsicht beim Umgang mit der Einstichsonde. Immer mit der Schutzkappe aufbewahren!
• Bewahren Sie das Gerät und die Batterie außerhalb der Reichweite von Kindern auf.
• Batterien können bei Verschlucken lebensgefährlich sein. Wurde eine Batterie verschluckt, kann dies innerhalb von 2 Stun-
den zu schweren inneren Verätzungen und zum Tode führen. Wenn Sie vermuten, eine Batterie könnte verschluckt oder
anderweitig in den Körper gelangt sein, nehmen Sie sofort medizinische Hilfe in Anspruch.
• Batterien nicht ins Feuer werfen, kurzschließen, auseinander nehmen oder aufladen. Explosionsgefahr!
• Batterien enthalten gesundheitsschädliche Säuren. Um ein Auslaufen der Batterien zu vermeiden, sollten schwache Batterien
möglichst schnell ausgetauscht werden.
• Beim Hantieren mit ausgelaufenen Batterien chemikalienbeständige Schutzhandschuhe und Schutzbrille tragen!
Wichtige Hinweise zur Produktsicherheit!
• Setzen Sie das Gerät nicht extremen Temperaturen, Vibrationen und Erschütterungen aus.
• Nur der Fühler ist hitzebeständig bis 200°C.
• Halten Sie niemals den Fühler direkt über Feuer.
• Benutzen Sie das Gerät nicht in der Mikrowelle, im Backofen oder Grill.
• Vor Feuchtigkeit schützen! Tauchen Sie das Anzeigeelement nicht in Wasser, sonst kann Feuchtigkeit eindringen und zu Fehl-
funktionen führen. Nicht in der Spülmaschine reinigen.
5. Bestandteile (Fig. 1 + 2)
A 1: HOLD A 2: Batteriesymbol
A 3: Aktuelle Temperatur A 4: Timer
A 5: HOLD Taste A 6: /START/STOP Taste
A 7: H+ Stunden Taste A 8: M+ Minuten Taste
A 9: ON/OFF Schiebeschalter A 10: °C/°F Schiebeschalter
A 11: Einstechfühler A 12: Batteriefach
A 13: Display 3-stufig klappbar (90°)
6. Inbetriebnahme
• Ziehen Sie die Schutzfolie vom Display.
• Öffnen Sie das Batteriefach, indem Sie den Deckel mit Hilfe einer Münze in Pfeilrichtung (OPEN) drehen und entfernen Sie
den Batterieunterbrechungsstreifen. Vergewissern Sie sich, dass die Batterie polrichtig eingelegt ist (+ Pol nach oben).
Schließen Sie das Batteriefach wieder.
• Nehmen Sie die Schutzhülle von der Einstichsonde.
• Stellen Sie den ON/OFF Schiebeschalter auf ON.
• Das Display zeigt die momentan gemessene Temperatur an.
• Der Sensor befindet sich in der Sondenspitze.
7. Bedienung
7.1 Messen der Kerntemperatur von Fleisch
• Nehmen Sie das Fleisch aus dem Ofen/vom Grill
• Stecken Sie den Fühler mindestens 2 cm tief in die Mitte des dicksten Bratenteils, bei Geflügel zwischen Rumpf und Schen-
kel; er sollte weder Knochen noch Knorpel berühren und nicht aus dem Braten herausragen.
• Die aktuelle Kerntemperatur wird auf dem Display angezeigt.
• Stellen Sie den Neigungswinkel nach Bedarf ein.
7.2 Hold-Funktion
• Drücken Sie die HOLD Taste.
• HOLD erscheint auf dem Display.
• Es wird die gemessene Temperatur festgehalten.
• Drücken Sie die HOLD Taste noch einmal, gelangen Sie in den Messmodus zurück.
Digital cooking thermometer - meat thermometer
Thank you for choosing this instrument from TFA.
1. Before you use this product
•Please make sure you read the instruction manual carefully.
•Following and respecting the instructions in your manual will prevent damage to your instrument and loss of your statu-
tory rights arising from defects due to incorrect use. We shall not be liable for any damage occurring as a result of non-
following of these instructions. Likewise, we take no responsibility for any incorrect readings or for any consequences
resulting from them.
•Please take particular note of the safety advice!
•Please keep this instruction manual safe for future reference.
2. Delivery contents
• Digital probe thermometer • Plastic cover
• Battery 1x CR2032 • Instruction manual
3. Range of application and all the benefits of your new instrument at a glance
• For temperature control of food and drinks
• Ideal for measuring the core temperature of meat
• Display foldable in 3 steps (90°)
• 118 mm stainless steel probe
• HOLD function
• Count-up and count-down timer
• Backlight
4. For your safety
• This product is exclusively intended for the range of application described above. It should only be used as described within
these instructions.
• Unauthorized repairs, alterations or changes to the product are prohibited.
• This product is not be used for medical purpose.
Caution!
Risk of injury!
• Be careful when handling the sharp probe. Store the probe with its protective cap.
• Keep this device and the battery out of reach of children.
• Batteries may be hazardous if swallowed. If a battery is swallowed, this can lead to serious internal burns and death within
two hours. If you suspect a battery could have been swallowed or otherwise caught in the body, seek medical help imme-
diately.
• Batteries must not be thrown into a fire, short-circuited, taken apart or recharged. Risk of explosion!
• Batteries contain harmful acids. Low batteries should be changed as soon as possible to prevent damage caused by leaking.
• Wear chemical-resistant protective gloves and safety glasses when handling leaking batteries.
Important information on product safety!
• Do not expose the device to extreme temperatures, vibrations or shocks.
• Only the probe is heat resistant up to 200 °C.
• Never hold the probe directly over a fire.
• Do not use the instrument in the microwave, oven or grill.
• Protect it from moisture! Do not immerse the display unit in water. Water can penetrate and cause malfunction. Not suitable
for dishwasher.
5. Elements (Fig. 1 + 2)
A 1: HOLD A 2: Battery symbol
A 3: Current temperature A 4: Timer
A 5: HOLD button A 6: /START/STOP button
A 7: H+ hours button A 8: M+ minutes button
A 9: ON/OFF switch A 10: °C/°F switch
A 11: Probe A 12: Battery compartment
A 13: Display foldable in 3 steps (90°)
6. Getting started
• Remove the protective film from the display.
• Open the battery compartment by turning the lid in direction of the arrow (OPEN) using a coin and remove the battery insula-
tion strip. Make sure the polarities are correct (+pole above). Close the battery compartment again.
• Remove the protective cover from the probe.
• Slide the ON/OFF switch to ON.
• The actual temperature is shown on the display.
• The sensor is located at the probe tip.
7. Operation
7.1 To measure the core temperature of meat
• Remove the meat from the oven/barbecue.
• Plunge the probe at least 2 cm into the middle of the thickest part of the meat, for poultry between the torso and the thigh; it
should not touch bones or cartilage and it should not protrude from the meat.
• The actual core temperature is displayed.
• Adjust the angle as needed.
7.2 HOLD function
• Press the HOLD button.
• HOLD appears on the display.
• The hold function for the current temperature is activated.
• Press the HOLD button again and you will return to measuring mode.
7.3 Nach dem Gebrauch
• Stellen Sie den ON/OFF Schiebeschalter auf OFF.
• Das Gerät schaltet sich aus.
• Reinigen Sie den Fühler mit einem weichen, leicht feuchten Tuch.
• Ziehen Sie die Schutzkappe über die Einstichsonde.
7.4 Umschalten °C/°F
• Mit dem °C/°F Schiebeschalter können Sie zwischen °C (Celsius) oder °F (Fahrenheit) als Temperatureinheit auswählen.
7.5 Count Down Timer
• Stellen Sie mit der H+ Taste die Stunden und der M+ Taste die Minuten ein. Halten Sie die Tasten gedrückt, gelangen Sie in
den Schnelllauf.
• Drücken Sie die /START/STOP Taste und die Zählung beginnt. " : " fängt an zu blinken.
• Mit der /START/STOP Taste können Sie die Zählung anhalten und neu starten.
• Nach Ablauf der Zeit blinkt die Displaybeleuchtung und ein Alarmsignal ertönt.
• Drücken Sie die /START/STOP Taste, um das Alarmsignal zu beenden.
• Durch gleichzeitiges Drücken der H+ und M+ Taste wird die Anzeige gelöscht.
7.6 Stoppuhr
• Drücken Sie die /START/STOP Taste, und die Zählung beginnt. " : " fängt an zu blinken.
• Mit der /START/STOP Taste können Sie die Zählung anhalten und neu starten.
• Durch gleichzeitiges Drücken der H+ und M+ Taste wird die Anzeige gelöscht.
7.7 Beleuchtung
• Zum kurzzeitigen Aktivieren der Hintergrundbeleuchtung drücken Sie eine beliebige Taste.
8. Pflege und Wartung
• Reinigen Sie das Gerät mit einem weichen, leicht feuchten Tuch. Keine Scheuer- oder Lösungsmittel verwenden!
• Entfernen Sie die Batterie, wenn Sie das Gerät längere Zeit nicht verwenden.
• Bewahren Sie Ihr Gerät an einem trockenen Platz auf.
8.1 Batteriewechsel
• Tauschen Sie die Batterie aus, wenn das Batteriesymbol erscheint.
9. Fehlerbeseitigung
Problem Fehlerbeseitigung
Keine Anzeige ➜Gerät einschalten (ON)
➜Batterie polrichtig einlegen (+Pol nach oben)
➜Batterie wechseln
Unkorrekte Anzeige ➜Sitz des Messfühlers prüfen
➜Batterie wechseln
Wenn Ihr Gerät trotz dieser Maßnahmen immer noch nicht funktioniert, wenden Sie sich an den Händler, bei dem Sie das Pro-
dukt gekauft haben.
10. Entsorgung
Dieses Produkt wurde unter Verwendung hochwertiger Materialien und Bestandteile hergestellt, die recycelt und wiederverwendet
werden können.
Batterien und Akkus dürfen keinesfalls in den Hausmüll!
Als Verbraucher sind Sie gesetzlich verpflichtet, gebrauchte Batterien und Akkus zur umweltgerechten Entsorgung
beim Handel oder entsprechenden Sammelstellen gemäß nationaler oder lokaler Bestimmungen abzugeben.
Die Bezeichnungen für enthaltene Schwermetalle sind: Cd=Cadmium, Hg=Quecksilber, Pb=Blei
Dieses Gerät ist entsprechend der EU-Richtlinie über die Entsorgung von Elektro- und Elektronik-Altgeräten
(WEEE) gekennzeichnet.
Dieses Produkt darf nicht mit dem Hausmüll entsorgt werden. Der Nutzer ist verpflichtet, das Altgerät zur umwelt-
gerechten Entsorgung bei einer ausgewiesenen Annahmestelle für die Entsorgung von Elektro- und Elektronikge-
räten abzugeben.
11. Technische Daten
Messbereich Temperatur -20°C…+200°C (-4…392°F)
Auflösung 1°C
Genauigkeit: ±1,5°C von -20…+150°C
±3°C von +150…+200°C
Ansprechzeit 6-7 Sekunden
Timer 99 h, 59 min
Spannungsversorgung 1 x 3 V CR2032 Knopfzell-Batterie
Größe 43 x 19 x 197 mm
Gewicht 51 g (nur das Gerät)
TFA Dostmann GmbH & Co. KG, Zum Ottersberg 12, D-97877 Wertheim, Deutschland
Diese Anleitung oder Auszüge daraus dürfen nur mit Zustimmung von TFA Dostmann veröffentlicht werden. Die technischen Daten entsprechen
dem Stand bei Drucklegung und können ohne vorherige Benachrichtigung geändert werden. Die neuesten technischen Daten und Informationen zu
Ihrem Produkt finden Sie auf unserer Homepage unter Eingabe der Artikel-Nummer in das Suchfeld.
www.tfa-dostmann.de 09/19
Bedienungsanleitung
Instruction manual
Mode d’emploi
Kat. Nr. 30.1062.01
A 9
A 11
A 12
A 10
A 7
A 6
A 4
A 1
A 5
A 8
A 2
A 3 A 13
Kat. Nr. 30.1062.01 Kat. Nr. 30.1062.01
Fig. 1 Fig. 2
TFA_No_30.1062_Anl_D_GB_F 13.09.2019 11:04 Uhr Seite 1

A 9
A 11
A 12
A 10
A 7
A 6
A 4
A 1
A 5
A 8
A 2
A 3
Fig. 1
Digital cooking thermometer - meat thermometer Thermomètre de cuisine - thermomètre de viande digital
7.3 After use
• Slide the ON/OFF switch to OFF.
• The instrument turns off.
• Clean the probe with a soft damp cloth.
• Put the protective cap over the probe.
7.4 Display change °C/°F
• Use the °C/°F switch to change between °C (Celsius) or °F (Fahrenheit) as temperature unit.
7.5 Count Down Timer
• Press H+ button to set the hours and M+ button to set the minutes. Press and hold the buttons for fast mode.
• Press the /START/STOP button to start the count up process. ":" starts to flash.
• With the /START/STOP button you can stop and restart the counting.
• When the timer counted down, the backlight will blink and a beeping alarm will sound.
• Press the /START/STOP button to stop the alarm.
• Press the H+ and M+ button at the same time to reset the timer.
7.6 Stopwatch
• Press the /START/STOP button to start the count up process. ":" starts to flash.
• With the /START/STOP button you can stop and restart the counting.
• Press the H+ and M+ button at the same time to reset the timer.
7.7 Backlight
• Press any button to temporarily activate the backlight.
8. Care and maintenance
• Clean the device with a soft damp cloth. Do not use solvents or scouring agents.
• Remove the battery if you do not use the device for a long period of time.
• Keep the device in a dry place.
8.1 Battery replacement
• Change the battery when the empty battery symbol appears on the display.
9. Troubleshooting
Problem Solution
No display ➜Switch on the instrument (ON)
➜Ensure that the battery polarity is correct (+pole above)
➜Change the battery
Incorrect indication ➜Check the position of the sensor
➜Change the battery
If your device fails to work despite these measures, contact the retailer where you purchased the product.
10. Waste disposal
This product has been manufactured using high-grade materials and components which can be recycled and reused.
Never dispose of empty batteries and rechargeable batteries in ordinary household waste. As a consumer, you are
required by law to take them to your retail store or to an appropriate collection site depending on national or local
regulations in order to protect the environment.
The symbols for the contained heavy metals are:
Cd = cadmium, Hg = mercury, Pb = lead
This product is labelled in accordance with the EU Waste Electrical and Electronic Equipment Directive (WEEE).
Please do not dispose of this product in ordinary household waste. As a consumer, you are required to take end-
of-life devices to a designated collection point for the disposal of electrical and electronic equipment, in order to
ensure environmentally-compatible disposal.
11. Specifications
Measuring range - temperature -20°C…+200°C (-4…392°F)
Resolution 1°C
Accuracy ±1.5°C from -20 °C…150°C
±3°C from +150 °C…200°C
Response time 6-7 seconds
Timer 99 h, 59 min
Power consumption Button cell battery CR2032
Dimensions 43 x 19 x 197 mm
Weight 51 g (device only)
TFA Dostmann GmbH & Co. KG, Zum Ottersberg 12, D-97877 Wertheim, Germany
No part of this manual may be reproduced without written consent of TFA Dostmann. The technical data are correct at the time of going to print and
may change without prior notice. The latest technical data and information about this product can be found in our homepage by simply entering the
product number in the search box
www.tfa-dostmann.de 09/19
Thermomètre de cuisine - thermomètre de viande digital
7.3 Après l'utilisation
• Poussez l'interrupteur ON/OFF sur ON.
• L'appareil s'arrête.
• Pour le nettoyage de la sonde, utilisez un chiffon doux et humide.
• Remettez la protection en plastique sur la sonde.
7.4 Commutation °C/°F
• Avec l'interrupteur °C/°F, vous pouvez sélectionner la température en °C (Celsius) ou en °F (Fahrenheit).
7.5 Minuteur de compte à rebours
• Réglez l'heure avec la touche H+ et les minutes avec la touche M+. Si vous maintenez les touches appuyées, vous passez en
déroulement rapide.
• Appuyez sur la touche /START/STOP et le minuteur commence à compter. " : " clignote.
• Appuyez sur la touche /START/STOP pour arrêter et redémarrer le minuteur.
• Une alarme retentit et l'éclairage de l’écran clignote dès que le temps s’est écoulé.
• Appuyez sur la touche /START/STOP pour couper l'alarme.
• Appuyez simultanément sur les touches H+ et M+ et l’affichage est remis.
7.6 Chronomètre
• Appuyez sur la touche /START/STOP et le chronomètre commence à compter. " : " clignote.
• Appuyez sur la touche /START/STOP pour arrêter et redémarrer le chronomètre.
• Appuyez simultanément sur les touches H+ et M+ et l’affichage est remis.
7.7 Éclairage
• Pour activer temporairement l'éclairage de fond, appuyez sur une touche de votre choix.
8. Entretien et maintenance
• Pour le nettoyage de votre appareil, utilisez un chiffon doux et humide. N’utilisez pas de solvants ou d'agents abrasifs !
• Retirez la pile si vous n'utilisez pas votre appareil pendant une durée prolongée.
• Conservez votre appareil dans un endroit sec.
8.1 Remplacement de la pile
• Si le symbole de pile vide apparaît sur l'écran, changez la pile.
9. Dépannage
Problème Solution
Aucun affichage ➜Mettez l’appareil en marche (ON)
➜Contrôlez la bonne polarité de la pile (polarité + vers le haut)
➜Changez la pile
Affichage incorrect ➜Vérifiez l'emplacement de la sonde de mesure
➜Changez la pile
Si votre appareil ne fonctionne toujours pas malgré ces mesures, adressez-vous au vendeur chez qui vous l'avez acheté.
10. Traitement des déchets
Ce produit a été fabriqué avec des matériaux de haute qualité qui peuvent être recyclés et réutilisés.
Les piles usagées ne doivent pas être jetées dans les détritus ménagers.
En tant qu'utilisateur, vous avez l'obligation légale de rapporter les piles et piles rechargeables usagées à votre
revendeur ou de les déposer dans une déchetterie proche de votre domicile conformément à la réglementation
nationale et locale.
Les métaux lourds sont désignés comme suit : Cd=cadmium, Hg=mercure, Pb=plomb.
Cet appareil est conforme aux normes de l'UE relatives au traitement des déchets électriques et électroniques
(WEEE).
L'appareil usagé ne doit pas être jeté dans les ordures ménagères. L’utilisateur s’engage, pour le respect de l’envi-
ronnement, à déposer l’appareil usagé dans un centre de traitement agréé pour les déchets électriques et électro-
niques.
11. Caractéristiques techniques
Plage de mesure température -20°C…+200°C (-4…392°F)
Résolution 1°C
Précision ±1,5°C de -20…+150°C
±3°C de +150…+200°C
Temps de réaction 6 - 7 secondes
Minuteur 99 h, 59 min
Alimentation Pile bouton 1 x CR2032
Dimensions du boîtier 43 x 19 x 197 mm
Poids 51 g (appareil seulement)
TFA Dostmann GmbH & Co. KG, Zum Ottersberg 12, D-97877 Wertheim, Allemagne
La reproduction, même partielle, du présent mode d'emploi est strictement interdite sans l'accord explicite de TFA Dostmann. Les caractéristiques
techniques de ce produit ont été actualisées au moment de l'impression et peuvent être modifiées sans avis préalable. Les dernières données tech-
niques et les informations concernant votre produit peuvent être consultées en entrant le numéro de l'article sur notre site Internet.
www.tfa-dostmann.de 09/19
Nous vous remercions d'avoir choisi l'appareil de la société TFA.
1. Avant d'utiliser votre appareil
•Veuillez lire attentivement le mode d'emploi.
•En respectant ce mode d'emploi, vous éviterez d'endommager votre appareil et de perdre vos droits légaux en cas de
défaut si celui-ci résulte d’une utilisation non-conforme. Nous n'assumons aucune responsabilité pour des dommages
qui auraient été causés par le non-respect du présent mode d'emploi. De même, nous n’assumons aucune responsabi-
lité pour des relevés incorrects et les conséquences qu’ils pourraient engendrer.
•Suivez bien toutes les consignes de sécurité !
•Conservez soigneusement le mode d'emploi !
2. Contenu de la livraison
• Thermomètre digital à sonde • Gaine de protection en plastique
• Pile 1x CR2032 • Mode d'emploi
3. Aperçu du domaine d'utilisation et de tous les avantages de votre nouvel appareil
• Pour le contrôle de la température des aliments et des boissons
• Idéal pour la mesure de la température à cœur de la viande
• Écran pliable en 3 étapes (90°)
• Sonde en acier inoxydable 118 mm
• Fonction HOLD
• Fonction minuteur et chronomètre
• Éclairage de fond
4. Pour votre sécurité
• Le produit est destiné uniquement à l'utilisation décrite ci-dessus. N'utilisez jamais l’appareil à d'autres fins que celles décri-
tes dans le présent mode d'emploi.
• Vous ne devez en aucun cas réparer, démonter ou modifier l'appareil par vous-même.
• Cet appareil ne convient pas à une utilisation médicale.
Attention !
Danger de blessure :
• Soyez prudent en utilisant la sonde ! Pour garder l'appareil, remettre le capuchon de protection en place.
• Gardez votre appareil et la pile hors de la portée des enfants.
• Les piles peuvent être mortelles dans le cas d’une ingestion. Si une pile a été avalée, elle peut entraîner des brûlures internes
graves ainsi que la mort dans l’espace de 2 heures. Si vous craignez qu’une pile ait pu être avalée ou ingérée d’une autre
manière, quelle qu’elle soit, contactez immédiatement un médecin d’urgence.
• Ne jetez jamais de piles dans le feu, ne les court-circuitez pas, ne les démontez pas et ne les rechargez pas. Risque d'explosion !
• Les piles contiennent des acides nocifs pour la santé. Une pile faible doit être remplacée le plus rapidement possible afin
d'éviter toute fuite.
• Pour manipuler des piles qui ont coulé, utilisez des gants de protection chimique spécialement adaptés et portez des lunettes
de protection !
Conseils importants de sécurité du produit !
• Évitez d’exposer l’appareil à des températures extrêmes, à des vibrations ou à des chocs.
• Seul le palpeur est résistant à une chaleur de 200 °C.
• Ne placez jamais la sonde directement sur le feu.
• N'utilisez jamais votre appareil dans un four à micro-ondes, un four ou un grill.
• Protégez-le contre l'humidité ! N'immergez pas l'appareil d'affichage dans l'eau car l'humidité pourrait pénétrer et causer un
dysfonctionnement. Votre instrument ne peut pas être lavé au lave-vaisselle.
5. Composants (Fig. 1 + 2)
A 1 : HOLD A 2 : Symbole de pile
A 3 : Temperature actuelle A 4 : Minuteur
A 5 : Touche HOLD A 6 : Touche /START/STOP
A 7 : Touche H+ heures A 8 : Touche M+ minutes
A 9 : Interrupteur ON/OFF A 10 : Interrupteur °C/°F
A 11 : Sonde A 12 : Compartiment à pile
A 13 : Écran pliable en 3 étapes (90°)
6. Mise en service
• Retirez le film de protection de l'affichage.
• Ouvrez le compartiment à pile en tournant le couvercle en direction de la flèche (aidez-vous d’une pièce de monnaie) et enle-
vez le film de protection de pile. Assurez-vous que la pile est insérée selon la bonne polarité (polarité + vers le haut). Refer-
mez le compartiment à pile.
• Enlevez le capuchon de protection.
• Poussez l'interrupteur ON/OFF sur ON.
• L´affichage vous indique la température actuelle.
• Le palpeur se trouve à la pointe de la sonde.
7. Utilisation
7.1 Mesure de la température à cœur de la viande
• Retirer la viande du four/gril.
• Insérez la sonde au minimum à 2 cm de profondeur dans la partie la plus épaisse de la viande, pour les volailles entre la car-
casse et la cuisse; la pointe ne doit pas être en contact avec les os ou avec le cartilage. Elle ne doit pas dépasser du morceau
de viande.
• La température à cœur actuelle est affichée sur l'écran.
• Régler l’angle selon votre désir.
7.2 Fonction HOLD
• Appuyez sur la touche HOLD.
• HOLD apparaît sur l'écran.
• La température mesurée est retenue.
• Appuyez encore une fois sur la touche HOLD afin de retourner au mode de mesure.
Bedienungsanleitung
Instruction manual
Mode d’emploi
Kat. Nr. 30.1062.01
A 13
Kat. Nr. 30.1062.01 Kat. Nr. 30.1062.01
Fig. 2
TFA_No_30.1062_Anl_D_GB_F 13.09.2019 11:04 Uhr Seite 2

A 9
A 11
A 12
A 10
A 7
A 6
A 4
A 1
A 5
A 8
A 2
A 3
Fig. 1
Termometro di cucina - termometro di carne digitale Termometro di cucina - termometro di carne digitale
Vi ringraziamo per aver scelto l'apparecchio della TFA.
1. Prima di utilizzare l'apparecchio
•Leggete attentamente le istruzioni per l'uso.
•Seguendo le istruzioni per l'uso, eviterete anche di danneggiare il prodotto e di pregiudicare, a causa di un utilizzo
scorretto, i diritti del consumatore che vi spettano per legge. Decliniamo ogni responsabilità per i danni derivanti dal
mancato rispetto delle presenti istruzioni per l'uso. Allo stesso modo, non siamo responsabili per eventuali misurazioni
errate e per le conseguenze che ne possono derivare.
•Prestate particolare attenzione alle misure di sicurezza!
•Conservate con cura queste istruzioni per l'uso.
2. La consegna include
• Termometro ad inserimento • Involucro di protezione in plastico
• Batteria 1 x CR2032 • Istruzioni per l'uso
3. Tutte le applicazioni e tutti i vantaggi del vostro nuovo apparecchio
• Per il controllo della temperatura di alimenti e bevande
• Ideale per misurare la temperatura interna della carne
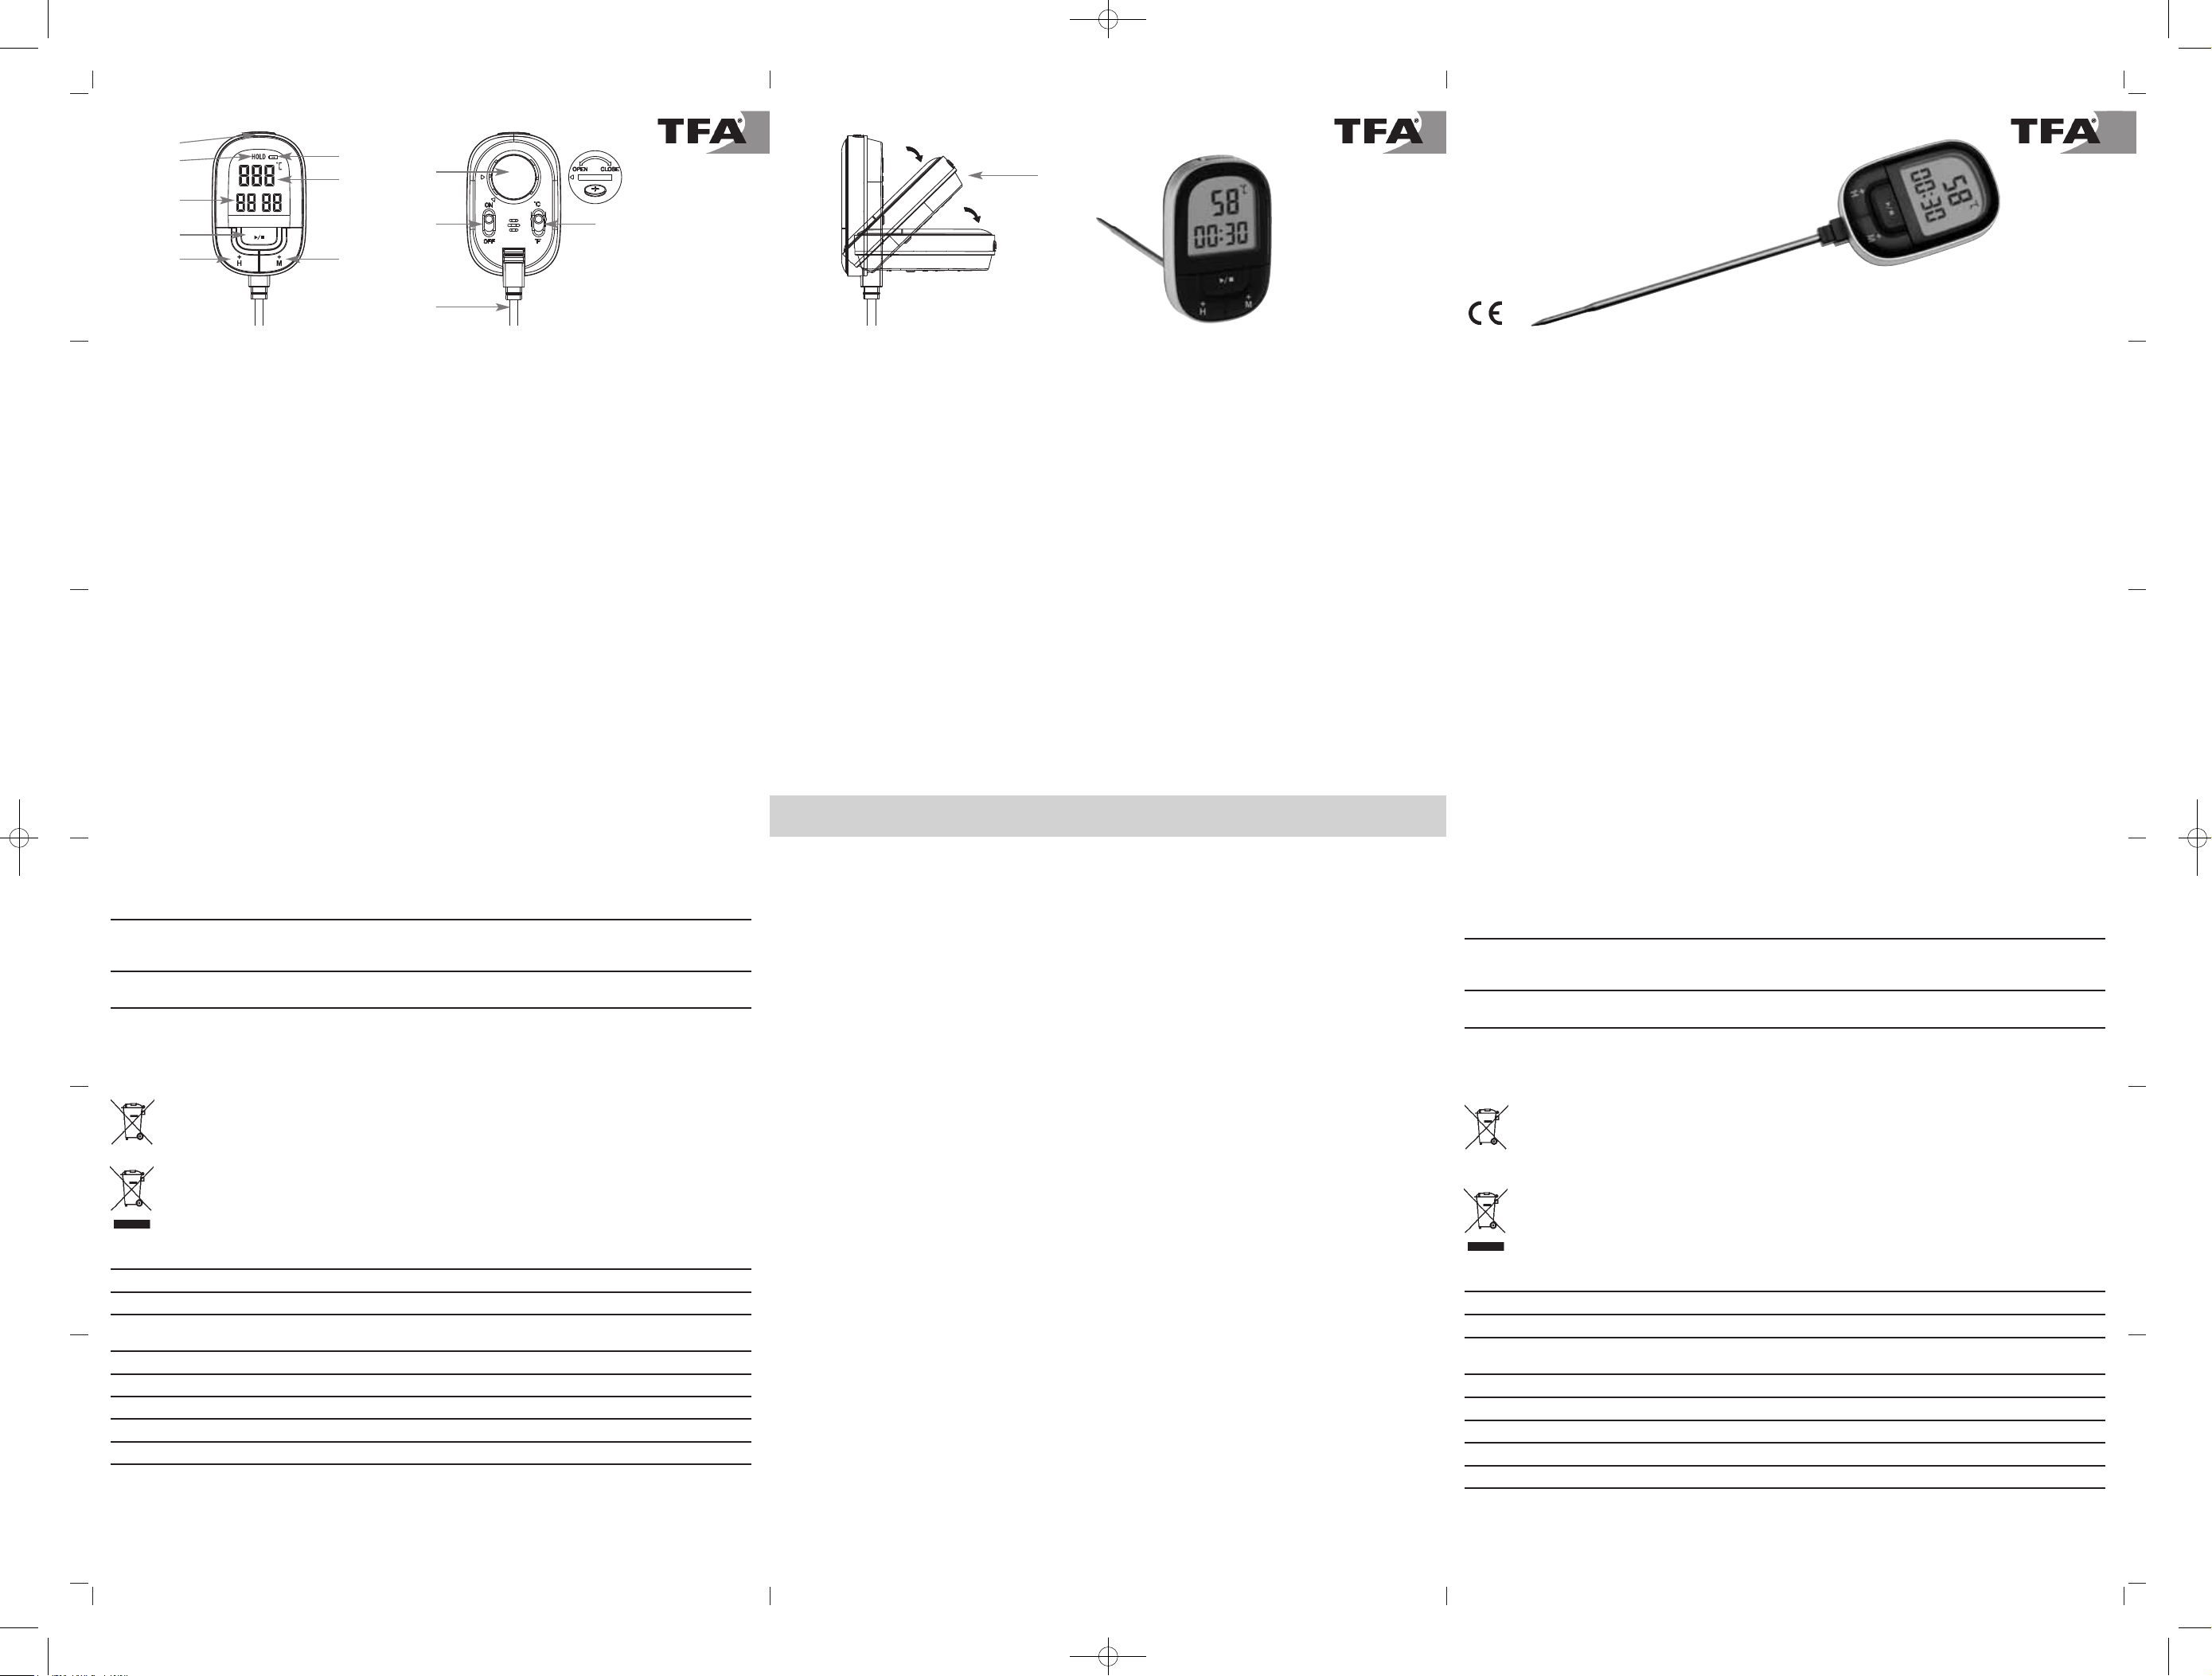
• Display pieghevole a 3 stadi (90°)
• Sonda a penetrazione 118 mm in acciaio inossidabile
• Funzione HOLD
• Funzione timer e cronometro
• Retroilluminazione
4. Per la vostra sicurezza
• Il prodotto è adatto esclusivamente agli utilizzi di cui sopra. Non utilizzate il prodotto in maniera diversa da quanto descritto
in queste istruzioni.
• Non sono consentite riparazioni, alterazioni o modifiche non autorizzate del dispositivo.
• Questo apparecchio non è adatto a scopi medici.
Attenzione!
Pericolo di lesioni:
• Maneggiare con attenzione la sonda. Tenete sempre la sonda ago nel cappuccio protettivo.
• Tenete il dispositivo e la batteria lontano dalla portata dei bambini.
• Se ingerite, le batterie possono essere mortali. Se una batteria venisse ingerita, potrebbe causare gravi ustioni e portare alla
morte nel giro di due ore. Se si sospetta che una batteria sia stata ingerita o inserita nel corpo in altra maniera, consultare
immediatamente un medico.
• Non gettare le batterie nel fuoco, non polarizzarle in maniera scorretta, non smontarle e non cercare di ricaricarle. Pericolo di
esplosione!
• Le batterie contengono acidi nocivi per la salute. Sostituite quanto prima le batterie quasi scariche, in modo da evitare che si
scarichino completamente.
• Quando si maneggiano batterie esaurite indossare sempre guanti resistenti alle sostanze chimiche e occhiali di protezione.
Avvertenze sulla sicurezza del prodotto!
• Non esporre l'apparecchio a temperature estreme, vibrazioni e urti.
• Solo il sensore è resistente alle alte temperature fino a 200 °C.
• Non tenere mai il sensore direttamente sopra la fiamma.
• Non utilizzare il dispositivo nel forno a microonde, nel forno o nella griglia.
• Proteggere dall’umidità! Non immergere l'unità di display in acqua: l’umidità può penetrare e causare errori di funzionamen-
to. Non adatto per lavastoviglie.
5. Componenti (Fig. 1 + 2)
A 1 : HOLD A 2 : Simbolo della batteria
A 3 : Temperatura attuale A 4 : Timer
A 5 : Tasto HOLD A 6 : Tasto /START/STOP
A 7 : Tasto H+ ore A 8 : Tasto M+ minuti
A 9 : Commutatore ON/OFF A 10 : Commutatore °C/°F
A 11 : Sonda A 12 : Vano batteria
A 13 : Display pieghevole a 3 stadi (90°)
6. Messa in funzione
• Rimuovete il foglio protettivo dal display.
• Aprire il vano batteria ruotando il coperchio con una moneta in direzione della freccia (OPEN) e togliere la striscia d´interru-
zione dalla batteria. Inserire la batteria con le polarità giuste (polo + verso l'alto). Richiudere il vano batteria.
• Rimuovere il cappuccio protettivo.
• Spingere l'interruttore ON/OFF verso ON.
• Su display vengono visualizzate la temperatura attuale.
• Il sensore si trova nella punta della sonda.
7. Uso
7.1 Per misurare la temperatura interna della carne
• Togliere la carne dal forno/dalla griglia.
• Inserire la sonda ad almeno 2 cm di profondità al centro della parte di carne più spessa, per il pollame tra il petto e le cosce;
la punta non deve toccare né le ossa né la cartilagine e non deve sporgere dall’arrosto.
• Sul display viene visualizzata la temperatura interna attuale.
• Impostare l'angolo di inclinazione a seconda delle necessità.
7.2 Funzione HOLD
• Premere il tasto HOLD.
• Sul display appare HOLD.
• Viene fissata la temperatura misurata.
• Premere il tasto HOLD per ritornare alla modalità di misurazione.
Digitale keukenthermometer-vleesthermometer
Hartelijk dank dat u voor dit apparaat van de firma TFA hebt gekozen.
1. Voordat u met het apparaat gaat werken
•Leest u a.u.b. de gebruiksaanwijzing aandachtig door.
•Door rekening te houden met wat er in de handleiding staat, vermijdt u ook beschadigingen van het product en riskeert
u niet dat uw wettelijke rechten door verkeerd gebruik niet meer gelden. Voor schade die wordt veroorzaakt doordat u
geen rekening houdt met de handleiding aanvaarden wij geen aansprakelijkheid. Ook zijn wij niet verantwoordelijk voor
verkeerde metingen en de mogelijke gevolgen die daaruit voortvloeien.
•Volg in elk geval de veiligheidsinstructies op!
•Deze gebruiksaanwijzing goed bewaren a.u.b.!
2. Levering
• Insteekbare thermometer • Beschermkap uit plastic
• Batterij 1 x CR 2032 • Gebruiksaanwijzing
3. Hoe u uw nieuw apparaat kunt gebruiken en alle voordelen ervan in één oogopslag
• Voor de temperatuurcontrole van voedsel en dranken
• Ideaal voor het meten van de kerntemperatuur van vlees
• Display klapbaar in 3 positie (90°)
• Sonde uit roestvrij staal 118 mm
• HOLD functie
• Timer en stopwatch functie
• Achtergrondverlichting
4. Voor uw veiligheid
• Het product is uitsluitend geschikt voor de hierboven beschreven doeleinden. Gebruik het product niet anders dan in deze
handleiding is aangegeven.
• Het eigenmachtig repareren, verbouwen of veranderen van het apparaat is niet toegestaan.
• Het apparaat is niet geschikt voor medische doeleinden.
Voorzichtig!
Kans op letsel:
• Wees erg voorzichtig met de meetvoeler om ongelukken te voorkomen. Bewaar de sonde altijd in de beschermkap.
• Bewaar het apparaat en de batterij buiten de reikwijdte van kinderen.
• Het inslikken van batterijen kan levensgevaarlijk zijn. Als een batterij wordt ingeslikt, kan dit binnen 2 uur tot ernstige interne
brandwonden en tot fataal letsel leiden. Als u denkt dat de batterijen zijn ingeslikt of in een willekeurig lichaamsdeel terecht
zijn gekomen, dient u onmiddellijk medische hulp te zoeken.
• Batterijen niet in het vuur gooien, niet kortsluiten, niet uit elkaar halen of opladen. Kans op explosie!
• Batterijen bevatten zuren die de gezondheid schaden. Zwakke batterijen moeten zo snel mogelijk worden vervangen om
lekkage van de batterijen te voorkomen.
• Draag handschoenen die bestand zijn tegen chemicaliën en een beschermbril wanneer u met uitgelopen batterijen hanteert!
Belangrijke informatie voor de productveiligheid!
• Stel het apparaat niet bloot aan extreme temperaturen, trillingen en schokken.
• Alleen de voeler is hittebestendig tot 200 °C.
• Houdt de voeler nooit vlak boven het vuur.
• Gebruik het apparaat niet in de magnetron, bakoven of grill.
• Tegen vocht beschermen! Dompel het afleeselement niet in water, anders kan er vocht binnendringen en dit tot functiestorin-
gen leiden. Niet geschikt voor de vaatwasser.
5. Onderdelen (Fig. 1 + 2)
A 1: HOLD A 2: Batterijsymbool
A 3: Momentane temperatuur A 4: Timer
A 5: HOLD toets A 6: /START/STOP toets
A 7: H+ uren toets A 8: M+ minuten toets
A 9: ON/OFF schuifschakelaar A 10: °C/°F schuifschakelaar
A 11: Sonde A 12: Batterijvak
A 13: Display klapbaar in 3 positie (90°)
6. Inbedrijfstelling
• De beschermfolie van het display aftrekken.
• Open het batterijvak met behulp van een muntstuk en draai het deksel in de richting van de pijl (OPEN), verwijder de batter-
ijstrip. Controleer of de poolrichting van den batterij correct is (+ pool naar boven). Sluit het batterijvak weer.
• Verwijder de beschermkap van de sonde.
• Schuif de ON/OFF schakelaar in positie ON.
• Het display toont u de huidig gemeten temperatuur.
• De sensor bevindt zich in het sondepunt.
7. Bediening
7.1 Meten van de kerntemperatuur van het vlees
• Haal het vlees uit de oven/van de gril.
• Steek de meetvoeler minstens 2 cm diep midden in het dikste gedeelte van het vlees, van het gevogelte tussen romp en
poten; botten of kraakbeen mogen er niet mee in aanraking komen, hij mag niet uit het vlees steken.
• De momentane kerntemperatuur verschijnt op het display.
• Pas de hellingshoek aan zoals nodig.
7.2 HOLD functie
• Druk op de HOLD toets.
• HOLD verschijnt op het display.
• De temperatuurmeting wordt vastgehouden.
• Druk nog eens op de HOLD toets om naar de meetmodus terug te keren.
7.3 Dopo l'uso
• Spingere l'interruttore ON/OFF verso OFF.
• L'apparecchio si spegne.
• Per pulire la sonda utilizzare un panno morbido leggermente inumidito.
• Mettere il cappuccio di plastica sulla sonda.
7.4 Commutazione °C/°F
• Con il commutatore °C/°F è possibile scegliere fra la visualizzazione della temperatura in °C (gradi Celsius) o °F (gradi
Fahrenheit) (°C predefinito).
7.5 Timer
• Impostare con il tasto H+ le ore e con il tasto M+ i minuti. Tenere premuti i tasti nella modalità impostazione per procedere
velocemente.
• Premere il tasto /START/STOP per avviare il conto. " : " lampeggia.
• Con il tasto /START/STOP si può arrestare o riavviare il conto.
• Trascorso il tempo, la retroilluminazione lampeggia e viene emesso un segnale di allarme.
• Premere il tasto /START/STOP per spegnere l’allarme.
• Premere contemporaneamente il tasto H+ e M+ per azzerare il display.
7.6 Cronometro
• Premere il tasto /START/STOP per avviare il conto. " : " lampeggia.
• Con il tasto /START/STOP si può arrestare o riavviare il conto.
• Premere contemporaneamente il tasto H+ e M+ per azzerare il display.
7.7 Illuminazione
• Per attivare temporaneamente la retroilluminazione, premere un tasto qualunque.
8. Cura e manutenzione
• Per pulire l'apparecchio utilizzare solo un panno morbido leggermente inumidito. Non usare solventi o abrasivi.
• Rimuovere la batteria, se non si utilizza l'apparecchio per un periodo prolungato.
• Collocare il dispositivo in un luogo asciutto.
8.1 Sostituzione della batteria
• Cambiare la batteria, se il simbolo della batteria appare sul display.
9. Guasti
Problema Risoluzione del problema
Nessuna indicazione ➜Accendere l'apparecchio (ON)
➜Inserire la batteria con le polarità giuste (polo + verso l'alto).
➜Sostituire la batteria
Indicazione non corretta ➜Controllare la sede del sensore
➜Sostituire la batteria
Qualora il vostro apparecchio continui a non funzionare nonostante queste procedure, rivolgetevi al rivenditore presso il quale
lo avete acquistato.
10. Smaltimento
Questo prodotto è stato realizzato utilizzando materiali e componenti di alta qualità che possono essere riciclati e riutilizzati.
È assolutamente vietato gettate le batterie tra i rifiuti domestici.
In qualità di consumatori, siete tenuti per legge a consegnare le batterie usate al negoziante o ad altri enti preposti
al riciclaggio in conformità alle vigenti disposizioni nazionali o locali, ai fini di uno smaltimento ecologico.
Le sigle dei metalli pesanti contenuti sono: Cd=cadmio, Hg=mercurio, Pb=piombo
Questo apparecchio è etichettato in conformità alla Direttiva UE sullo smaltimento delle apparecchiature elettriche
ed elettroniche (WEEE).
Questo prodotto non deve essere smaltito insieme ai rifiuti domestici. Il consumatore è tenuto a consegnare il
vecchio apparecchio presso un punto di raccolta per lo smaltimento di apparecchiature elettriche ed elettroniche
ai fini di uno smaltimento ecologico.
11. Dati tecnici
Campo di misura - temperatura -20°C…+200°C (-4…392°F)
Risoluzione 1°C
Precisione ±1,5°C di -20…+150°C
±3°C di +150…+200°C
Tempo di risposta 6-7 secondi
Timer 99 h, 59 min.
Alimentazione Pila a bottone 1 x CR2032
Dimensioni esterne 43 x 19 x 197 mm
Peso 51 g (solo apparecchio)
TFA Dostmann GmbH & Co. KG, Zum Ottersberg 12, D-97877 Wertheim, Germania
È vietata la pubblicazione delle presenti istruzioni o di parti di esse senza una precedente autorizzazione della TFA Dostmann. I dati tecnici corri-
spondono allo stato del prodotto al momento della stampa e possono cambiare senza preavviso. È possibile trovare dati tecnici e informazioni
aggiornate sul prodotto inserendo il numero di articolo sul nostro sito.
www.tfa-dostmann.de 09/19
Instrucciones de uso
Gebruiksaanwijzing
Istruzioni per l'uso
Kat. Nr. 30.1062.01
A 13
Kat. Nr. 30.1062.01 Kat. Nr. 30.1062.01
Fig. 2
TFA_No_30.1062_Anl_I_NL_E 13.09.2019 11:05 Uhr Seite 1

A 9
A 11
A 12
A 10
A 7
A 6
A 4
A 1
A 5
A 8
A 2
A 3
Fig. 1
Digitale keukenthermometer-vleesthermometer Termómetro de cocina - termómetro de carne digital
7.3 Na gebruik
• Stel de ON/OFF schuifschakelaar in de positie OFF.
• Het apparaat schakelt zich uit.
• Maak de sonde met een zachte, enigszins vochtige doek schoon.
• Zet de beschermkap op de sonde.
7.4 Overschakelen °C/°F
• Met de °C/°F schuifschakelaar kunt u tussen de weergave van de temperatuur in °C (graden Celsius) of °F (graden Fahren-
heit) kiezen.
7.5 Count Down Timer
• Met de H+ toets stelt u de uren in, met de M+ toets de minuten. Houdt de toetsen ingedrukt en u komt in de snelloop.
• Druk op de /START/STOP toets om de telling te laten beginnen. " : " knippert.
• Met de /START/STOP toets kunt u de telling ook laten stoppen of opnieuw laten beginnen.
• Na afloop van de ingestelde tijd, knippert de displayverlichting en weerklinkt een alarmsignaal.
• Druk op de /START/STOP toets en u kunt het alarm beëindigen.
• Door op de H+ en M+ toetsen gelijktijdig te drukken, kunt u de gezette tijd verwijderen.
7.6 Stopwatch
• Druk op de /START/STOP toets om de telling te laten beginnen. " : " knippert.
• Met de /START/STOP toets kunt u de telling ook laten stoppen of opnieuw laten beginnen.
• Door op de H+ en M+ toetsen gelijktijdig te drukken, kunt u de gezette tijd verwijderen.
7.7 Achtergrondverlichting
• Druk op een willekeurige toets en de achtergrondverlichting gaat kort aan.
8. Schoonmaken en onderhoud
• Maak het apparaat met een zachte, enigszins vochtige doek schoon. Geen schuur- of oplosmiddelen gebruiken!
• Verwijder de batterij, als u het apparaat langere tijd niet gebruikt.
• Bewaar het apparaat op een droge plaats.
8.1 Batterijwissel
• Vervang de batterij als het batterijsymbool op het display verschijnt.
9. Storingswijzer
Probleem Oplossing
Geen indicatie ➜Apparaat inschakelen (ON)
➜Batterij met de juiste poolrichting plaatsen (+ pool naar boven)
➜Batterij vervangen
Geen correcte indicatie ➜Controleren of de sonde goed zit
➜Batterij vervangen
Neem contact op met de dealer bij wie u dit product gekocht heeft als uw apparaat ondanks deze maatregelen nog steeds niet
werkt.
10. Verwijderen
Dit product is vervaardigd van hoogwaardige materialen en onderdelen, die kunnen worden gerecycled en hergebruikt.
Batterijen en accu's mogen niet met het huisvuil worden weggegooid. Als consument bent u wettelijk verplicht om
gebruikte batterijen en accu's bij uw dealer af te geven of naar de daarvoor bestemde containers volgens de natio-
nale of lokale bepalingen te brengen om een milieuvriendelijk verwijderen te garanderen.
De benamingen van de zware metalen zijn: Cd=cadmium, Hg=kwikzilver, Pb=lood
Dit apparaat is gemarkeerd in overeenstemming met de EU-richtlijn (WEEE) over het verwijderen van elektrisch en
elektronisch afval.
Dit product mag niet met het huisvuil worden weggegooid. De gebruiker is verplicht om de apparatuur af te geven
bij een als zodanig erkende plek van afgifte voor het verwijderen van elektrische en elektronische apparatuur om
een milieuvriendelijk verwijderen te garanderen.
11. Technische gegevens
Meetbereik temperatuur -20°C…+200°C (-4…392°F)
Resolutie 1°C
Precisie ±1,5°C van -20…+150°C
±3°C van +150…+200°C
Aanspreektijd 6 – 7 seconden
Timer 99 h, 59 min
Spanningsvoorziening Batterij: 1 x 3 V knoopcel CR 2032
Afmetingen 43 x 19 x 197 mm
Gewicht 51 g (alleen het apparaat)
TFA Dostmann GmbH & Co. KG, Zum Ottersberg 12, D-97877 Wertheim, Duitsland
Deze gebruiksaanwijzing of gedeelten eruit mogen alleen met toestemming van TFA Dostmann worden gepubliceerd. De technische gegevens van
dit apparaat zijn actueel bij het ter perse gaan en kunnen zonder voorafgaande informatie worden gewijzigd. De nieuwste technische gegevens en
informatie over uw product kunt u vinden door het invoeren van het artikelnummer op onze homepage.
www.tfa-dostmann.de 09/19
Termómetro de cocina - termómetro de carne digital
7.3 Después de uso
• Deslice el interruptor deslizante para ON/OFF a la posición OFF.
• El dispositivo se desconecta.
• Limpie la sonda con un paño suave, ligeramente humedecido.
• Coloque la sonda en la caperuza de protección.
7.4 Conmutación °C/°F
• Con el interruptor °C/°F puede seleccionar entre la indicación de la temperatura en °C (grados Celsius) o °F (grados Fahren-
heit).
7.5 Count Down Timer
• Ajuste las horas a través de la tecla H+ y los minutos a través de la tecla M+. Si mantiene las teclas pulsadas, accederá al
modo rápido.
• Pulse la tecla /START/STOP para comenzar el conteo. " : " parpadea.
• Con la tecla /START/STOP puede detener y reiniciar el conteo.
• Después de haber transcurrido el tiempo la iluminación de la pantalla parpadea y suena una señal de alarma.
• Pulse la tecla /START/STOP para finalizar la señal de alarma.
• Pulsando al mismo tiempo la tecla H+ y M+, se borrara la pantalla.
7.6 Cronómetro
• Pulse la tecla /START/STOP para comenzar el conteo. " : " parpadea.
• Con la tecla /START/STOP puede detener y reiniciar el conteo.
• Pulsando al mismo tiempo la tecla H+ y M+, se borrara la pantalla.
7.7 Iluminación
• Para activar brevemente la iluminación de fondo pulse una tecla cualquiera.
8. Cuidado y mantenimiento
• Limpie el dispositivo con un paño suave, ligeramente humedecido. No utilice productos abrasivos o disolventes!
• Extraiga la pila si no va a usar el dispositivo por un largo período de tiempo.
• Mantenga el dispositivo en un lugar seco.
8.1 Cambio de la pila
• Cuando aparezca en el display el símbolo de pila, cambie la pila.
9. Averías
Problema Solución de averías
Ninguna indicación ➜Activar el dispositivo (ON)
➜Introducir la pila correcta (polo + hacia arriba)
➜Cambiar la pila
Indicación incorrecta ➜Comprobar la colocación de la sonda
➜Cambiar la pila
Si a pesar de haber seguido estos pasos, el dispositivo no funciona, diríjase al establecimiento donde adquirió el producto.
10. Eliminación
Este producto ha sido fabricado usando materiales y componentes que pueden ser reciclados y reusados.
Las pilas y baterías no pueden desecharse en ningún caso junto con la basura doméstica.
Como consumidor, está obligado legalmente a depositar las pilas y baterías usadas de manera respetuosa con el
medio ambiente en el comercio especializado o bien en los centros de recogida y reciclaje previstos para ello
según el reglamento nacional o local.
Las denominaciones de los metales pesados que contienen son: Cd=cadmio, Hg=mercurio, Pb=plomo
Este dispositivo está identificado conforme a la Directiva de la UE sobre residuos de aparatos eléctricos y electró-
nicos (WEEE).
No deseche este producto junto con la basura doméstica. El usuario está obligado a llevar el dispositivo usado a
un punto de recogida de aparatos eléctricos y electrónicos acreditado para que sea eliminado de manera respe-
tuosa con el medio ambiente.
11. Datos técnicos
Gama de medición temperatura -20°C…+200°C (-4…392°F)
Resolución 1°C
Precisión ±1,5°C a -20…+150°C
±3°C a +150…+200°C
Tiempo de reacción 6-7 segundos
Timer 99 h, 59 min
Alimentación de tensión 1 x 3V pila de botón CR 2032
Dimensiones del cuerpo 43 x 19 x 197 mm
Peso 51 g (solo dispositivo)
TFA Dostmann GmbH & Co. KG, Zum Ottersberg 12, D-97877 Wertheim, Alemania
Estas instrucciones o extractos de las mismas no pueden ser publicados sin la autorización de la TFA Dostmann. Los datos técnicos de este pro-
ducto corresponden al estado en el momento de la impresión y pueden ser modificados sin previo aviso. Los actuales datos técnicos e informacio-
nes sobre su producto los puede encontrar bajo el número de artículo en nuestra página web.
www.tfa-dostmann.de 09/19
Muchas gracias por haber adquirido este dispositivo de TFA.
1. Antes de utilizar el dispositivo
•Lea detenidamente las instrucciones de uso.
•Si sigue las instrucciones de uso, evitará que se produzcan daños en el dispositivo y no comprometerá a sus derechos
por vicios, previstos legalmente debido a un uso incorrecto. No asumimos responsabilidad alguna por los daños origi-
nados por el incumplimiento de estas instrucciones de uso. Del mismo modo, no nos hacemos responsables por cual-
quier lectura incorrecta y de las consecuencias que pueden derivarse de tales.
•Tenga en cuenta ante todo las advertencias de seguridad.
•Guarde estas instrucciones de uso en un sitio seguro.
2. Entrega
• Termómetro de sonda • Caperuza protectora de plástico
• Pila: 1 x CR 2032 • Instrucciones de uso
3. Ámbito de aplicación y ventajas de su nuevo dispositivo
• Para controlar la temperatura de los alimentos y bebidas
• Ideal para medir la temperatura interna de la carne
• Display plegable de 3 etapas (90°)
• Sonda de inserción de acero inoxidable 118 mm
• Función HOLD
• Función timer y cronómetro
• Iluminación de fondo
4. Para su seguridad
• El producto solo es adecuado para el ámbito de aplicación descrito anteriormente. No emplee el dispositivo de modo distinto
al especificado en estas instrucciones.
• No está permitido realizar reparaciones, transformaciones o modificaciones por cuenta propia en el dispositivo.
• Este dispositivo no está indicado para fines médicos.
¡Precaución!
Riesgo de lesiones:
• Tenga cuidado al utilizar la sonda de inserción. Mantenga siempre la sonda de aguja en la caperuza de protección.
• Mantenga el dispositivo y la pila fuera del alcance de los niños.
• Las pilas pueden ser peligrosas si se ingieren. Si se ingiere una pila le puede causar dentro de 2 horas, quemaduras internas
y llegar a la muerte. Si sospecha que se ha ingerido una pila o ha entrado en el cuerpo de otro modo, busque inmediatamen-
te ayuda médica.
• No tire las pilas al fuego, no las cortocircuite, desmonte ni recargue, ya que existe riesgo de explosión.
• Las pilas contienen ácidos nocivos para la salud. Las pilas con un estado de carga bajo deben cambiarse lo antes posible
para evitar fugas.
• ¡Utilice guantes protectores resistentes a productos químicos y gafas protectoras si manipula pilas con fugas de líquido!
¡Advertencias importantes sobre la seguridad del producto!
• No exponga el dispositivo a temperaturas extremas, vibraciones ni sacudidas extremas.
• Solamente la sonda es resistente al calor hasta 200 °C.
• Nunca mantenga la sonda directamente sobre el fuego.
• No utilice el dispositivo en el microondas, horno o parrilla.
• Protegerlo de la humedad! No sumerja el elemento de indicación en agua, pues podría introducirse humedad y inducir fun-
ciones erróneas. No limpiar en el lavavajillas.
5. Componentes (Fig. 1 + 2)
A 1 : HOLD A 2 : Símbolo de pila
A 3 : Temperatura actual A 4 : Timer
A 5 : Tecla HOLD A 6 : Tecla /START/STOP
A 7 : Tecla H+ horas A 8 : Tecla M+ minutos
A 9 : Interruptor deslizante ON/OFF A 10 : Interruptor deslizante °C/°F
A 11 : Sonda A 12 : Compartimento de la pila
A 13 : Display plegable de 3 etapas (90°)
6. Puesta en marcha
• Despegue la película protectora de la pantalla.
• Abra el compartimento de la pila, gire la tapa con la ayuda de una moneda en dirección de la flecha y quite la tira de interrup-
ción de la pila. Asegúrese que la pila está colocada con la polaridad correcta (polo "+” hacia arriba). Cierre de nuevo el com-
partimento de la pila.
• Retire la caperuza de protección.
• Deslice el interruptor deslizante para ON/OFF a la posición ON.
• La pantalla le indicará la temperatura medida actual.
• El sensor se encuentra en la punta de la sonda.
7. Manejo
7.1 Medición de la temperatura interna de la carne
• Retire la carne del horno/de la parrilla.
• Introduzca la sonda a una profundidad de al menos 2 cm en el centro de la parte más gruesa de la carne; en caso de carne de
ave, entre la pechuga y el muslo; no debe tocar hueso ni cartílago ni sobresalir de la carne.
• La temperatura interna actual se muestra en la pantalla.
• Ajuste el ángulo de inclinación según sea necesario.
7.2 Función HOLD
• Pulse la tecla HOLD.
• En la pantalla aparece HOLD.
• La última temperatura medida permanecerá en el display.
• Pulse nuevamente la tecla HOLD para volver al modo de medición.
Instrucciones de uso
Gebruiksaanwijzing
Istruzioni per l'uso
Kat. Nr. 30.1062.01
A 13
Kat. Nr. 30.1062.01 Kat. Nr. 30.1062.01
Fig. 2
TFA_No_30.1062_Anl_I_NL_E 13.09.2019 11:05 Uhr Seite 2
Other TFA Thermometer manuals