V-TAC VT-ST42 User manual

INSTALLATION INSTRUCTION
WEEE Number: 80133970
LED SOLAR STREETLIGHT
INTRODUCTION & WARRANTY
Thank you for selecting and buying V-TAC product. V-TAC will serve you the best. Please
read these instructions carefully before starting the installation and keep this manual handy
for future reference. If you have any another query, please contact our dealer or local
vendor from whom you have purchased the product. They are trained and ready to serve
you at the best. The warranty is valid for 3 years from the date of purchase. The warranty
does not apply to damage caused by incorrect installation or abnormal wear and tear. The
company gives no warranty against damage to any surface due to incorrect removal and
installation of the product. This product is warranted for manufacturing defects only.
WARNING
1
before starting the installation.
2. The light source of this luminaire is not
replaceable, when the light source reaches
its end of life the whole luminaire should
be replaced.
3. Installation must be performed by a
This marking indicates that this
product should not be disposed
of with other household wastes.
TECHNICAL DATA:
3
YEA RS
WARRANTY *
Model VT-ST42
40W
4800LM
LED Chip SMD2835*90PCS
Solar Panel
32700 / 9.6V / 12000mAh, replaceable
IP65
140 x 70°-TPIII
120°
706.1 x 289.7 x 73.6mm
MULTI-LANGUAGE
MANUAL QR CODE
Please scan the QR code
to access the manual in
multiple languages.
21W / 13.5V , Mono-crystalline silicone
material
8 - 12 Meters
3 - 6 Meters
35,000 Hours

FEATURES:
WORKING MODES:
Solar Powered
Light on/o
Automatically
IP65 Waterproof
Cordless
ZERO Electricity
Cost
DIY Working
Modes
Battery
Replaceable
in Brackets
Long Lighting
Time
Multifunctional
Safe DIY
BUTTON CONTROL:
Please press the button on the lamp to select working
modes.
Press 1st time for Mode A.
Press 2nd time for Mode B.
REMOTE CONTROL:
activate the lamp and then use the remote control to
adjust the working modes.
Lamp Button
MODE A: CONSTANT LIGHTING MODE
MODE B: SENSOR MODE
Press button on the lamp 1st time or on the remote control, the lamp will automatically
turn on at night and keep 60% brightness constantly for 4 hours(induction is invalid), then
it turns to Sensor Mode.
After 4 hours working
120°
120°
120°120°
Press button on the lamp 2nd time or on
the remote control, the lamp will automatically
turn on with 100% full brightness when motion
to 30% brightness in 20 seconds of no motion.
LED SOLAR STREETLIGHT
EN
AUTO

REMIND
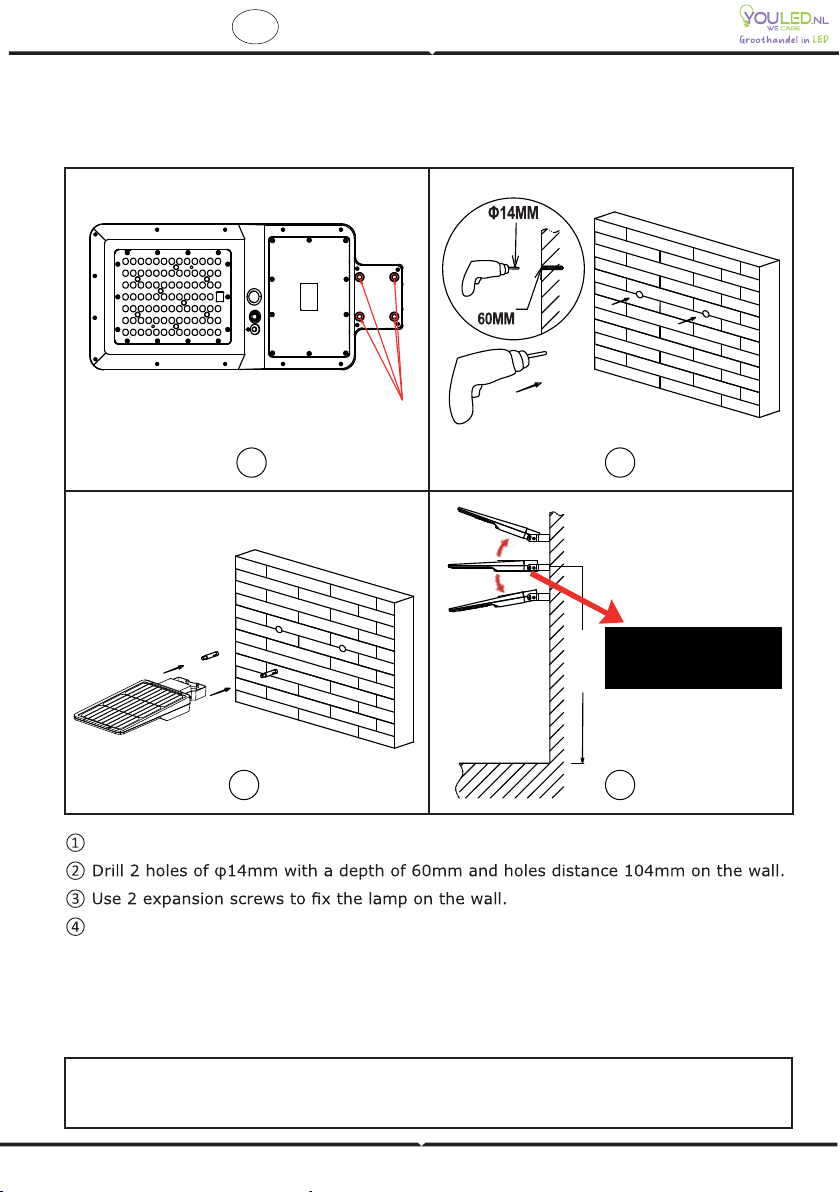
1. Above working modes are factory default settings, user can re-set it to: press button on
the lamp 1st time for mode B and press 2nd time for mode A, meanwhile also can select
become the latest default working mode.
2. Mode A and Mode B cannot be set to the Constant Lighting Mode at the same time, nor
can they be set to the Sensor Mode at the same time.
3. The lamp has memory function. After lamp restarted, it will continue to work in the latest
default working mode.
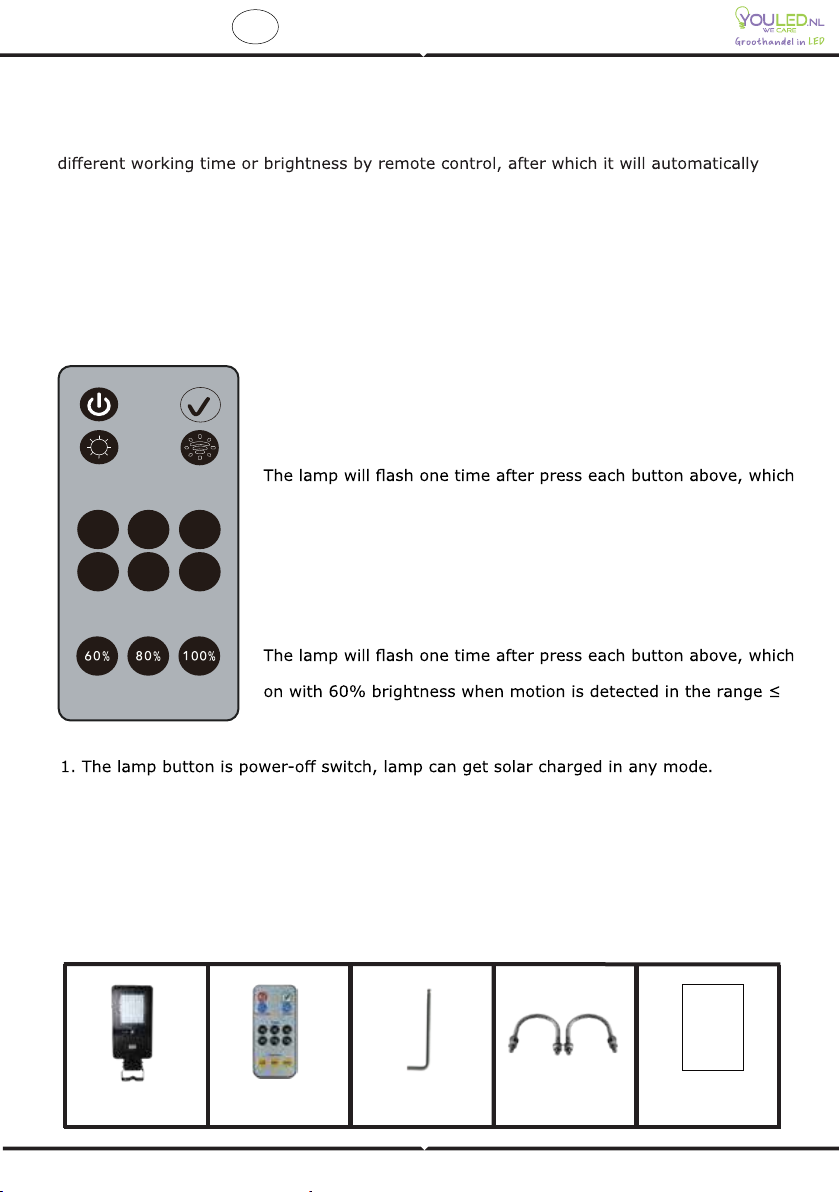
DIY WORKING TIME AND BRIGHTNESS BY REMOTE CONTROL
Remote Control Distance: 12 Meters
2H 6H4H
8H 12H10H
Time
Brightness
ON /OFFSwitch Confirm
Constant Lighting ModeSensor Mode
Mode A (Constant Lighting Mode): time and brightness are
both adjustable.
FOR EXAMPLE:
①Press button “ Constant Lighting Mode ”;
②Press button “ Time 2H ”.
③Press button “ Brightness 60% ”.
indicates it’s set successfully as below: Lamp automatically turns
on at night and keep 60% brightness for 2hrs, then it turns to
Sensor Mode.
Mode B (Senor Mode): only brightness(when activated by
induction) is adjustable.
FOR EXAMPLE:
①Press button “ Sensor Mode ”;
②Press button “ Brightness 60% ”.
indicates it’s set successfully as below: Lamp automatically turns
12mtrs, then turns to weak brightness (30% of 60% brightness)
in 20 seconds of no motion.
PACKAGE CONTENT
NOTICE
2. This is a solar powered lamp, please install it in a location where can get enough
sunshine.
3. Please note the lighting time depends on the sunshine duration & weather.
4. Built-in intelligent IC is with over-charge, over-discharge and over-voltage protection.
5. The lamp gets solar charged at day time, and lights up automatically at dusk.
6. The lamp is equipped with an internal battery pack, which is replaceable. If any need,
please contact seller for correct new battery pack.
7. Non-professionals please do not disassemble the lamp.
8. Please do not dispose the battery with household garbage to avoid explosion.
SOLAR PANEL REMOTE CONTROL ALLEN WRENCH U SHAPE BRACKET MANUAL
INSTRUCTION
MANUAL
LED SOLAR STREETLIGHT
EN

1
3
2
4
20°
10°
Loosen the screws
here to adjust angles.
Before starting the installation, ensure the 4 bottom screws are tightened.
Remove the gaskets of small U-shaped brackets, then insert them to lamp bracket
across the straight pole.
To adjust the angle of the lamp, loosen the screws from both sides of lamp (as shown
in the above image)
and adjust the lamp angle, adjustable by upwards 20° and downwards 10°. Then tighten
the screws of the lamp.
INSTALLATION A: STRAIGHT POLE
(Default installation method, accessories included)
LED SOLAR STREETLIGHT
EN

1
43
2
Loosen the screws and remove the big U-shaped bracket.
Loosen the bottom screws to match the pole.
Install the lamp on the pole .
Adjust the lamp and balance it, tighten the four screws to lock the lamp.
INSTALLATION B: CURVED POLE
(Default installation method, accessories included)
LED SOLAR STREETLIGHT
EN

In case of any query/issue with the product, please reach out to us at: support@v-tac.eu
For More products range, inquiry please contact our distributor or nearest dealers.
V-TAC EUROPE LTD. Bulgaria, Plovdiv 4000, bul.L.Karavelow 9B
1
43
2
Loosen the screws
here to adjust angles.
3-6M
20°
10°
Depth
Before starting the installation, ensure the 4 bottom screws are tightened.
To adjust the angle of the lamp, loosen the screws from both sides of lamp (as
shown in the above image) and adjust the lamp angle, adjustable by upwards 20° and
downwards 10°. Then tighten the screws of the lamp.
INSTALLATION C: WALL MOUNTED (OPTIONAL)
(Requirements for wall mounted installation: 2 pcs expansion screws M10*60mm
(NOT Included in the packaging))
LED SOLAR STREETLIGHT
EN

[FR ] INTRODUCTION & GARANTIE
produit. Ils sont formés et prêts à vous servir au mieux. La garantie est valable pour une
période de 3 ans à compter de la date d’achat. La garantie ne s’applique pas à des
dommages causés par une installation incorrecte ou une usure anormale. La société ne
donne aucune garantie pour des dommages causés à une surface en raison d’un enlève -
ment et d’une installation incorrects du produit. Ce produit est couvert par une garantie
pour des défauts de fabrication seulement.
AVERTISSEMENT
MODES DE TRAVAIL :
COMMANDE PAR BOUTON :
-
ment.
TÉLÉCOMMANDE :
télécommande pour régler les modes de fonctionnement.
MODE A : MODE D'ÉCLAIRAGE CONSTANT
capteur.
MODE B : MODE CAPTEUR
RAPPEL
automatiquement le dernier mode de travail par défaut.
même temps, ni en mode capteur en même temps.
3. La lampe a une fonction de mémoire. Après le redémarrage de la lampe, elle continuera
à fonctionner dans le dernier mode de fonctionnement par défaut.
Temps de travail et luminosité du bricolage par télécommande
Distance de contrôle à distance : 12 mètres
LAMPADAIRE SOLAIRE À LED
FR

Mode A (mode d'éclairage constant):
Par exemple :
①②③La lampe clignote une fois après avoir appuyé sur chaque bouton ci-dessus, ce qui indique
conserve une luminosité de 60 % pendant 2 heures, puis elle passe en mode capteur.
Mode B (Mode capteur) :
réglable.
Par exemple :
①②La lampe clignote une fois après avoir appuyé sur chaque bouton ci-dessus, ce qui indique
-
ment.
AVIS
décharges excessives et les surtensions.
au crépuscule.
7. Les non-professionnels sont priés de ne pas démonter la lampe.
Installation A: Pôle droit
①②travers du poteau droit.
③④Installation B: Pôle courbe
①Desserrer les vis et retirer le grand support en forme de U.
②③④Installation C : montage mural (facultatif)
①②mur.
③④LAMPADAIRE SOLAIRE À LED
FR

[DE] EINFÜHRUNG UND GEBRAUCHSANWEISUNG
Wir danken Ihnen, dass Sie ein V-TAC ausgesucht und gekauft haben. V-TAC wird Ihnen die
besten Dienste erweisen. Lesen Sie, bitte, diese Gebrauchsanweisung vor der Montage
aufmerksam durch und halten Sie sie für Auskünfte in der Zukunft parat. Sollten Sie
weitere Fragen haben, kontaktieren Sie, bitte, unseren lokalen Händler oderVerkäufer, von
dem Sie das Produkt gekauft haben. Sie sind ausgebildet und bereit Sie auf die bestmögli -
-
tung gilt nur für Herstellungsmängel.
WARNUNG
1. Stellen Sie sicher, dass die Stromversorgung ausgeschaltet ist, bevor Sie mit der
Installation beginnen.
2. Die Lichtquelle dieser Leuchte ist nicht austauschbar. Wenn sie das Ende ihrer Lebens -
dauer erreicht, wird die gesamte Leuchte ausgetauscht.
BETRIEBSARTEN:
TASTENSTEUERUNG:
• Drücken Sie einmal für Modus A.
• Zum Ausschalten ein drittes Mal drücken.
FERNBEDIENUNG:
mit der Fernbedienung die Betriebsarten ein.
MODUS A: DAUERLICHTMODUS
• Drücken Sie einmal die Lampentaste oder ( x ) auf der Fernbedienung. Die Lampe
schaltet sich nachts automatisch ein und behält 4 Stunden lang (ohne Induktion) eine
MODUS B: SENSORMODUS
Die Lampe schaltet sich automatisch mit 100% voller Helligkeit ein, wenn eine Bewegung
Bewegung auf 30% Helligkeit.
BITTE BEACHTEN
-
Standardbetriebsart.
-
3. Die Lampe hat eine Speicherfunktion. Nach dem Neustart der Lampe funktioniert sie in
der neuesten Standardbetriebsart weiter.
Fernbedienungsentfernung: 12 Meter
DE

Modus A (Dauerlichtmodus): Zeit und Helligkeit sind einstellbar.
Zum Beispiel:
①Drücken Sie die Taste “Constant Lighting Mode” für den Dauerlichtmodus;
②Drücken Sie die Taste “Time 2H” für 2 Stunden Beleuchtung.
③Drücken Sie die Taste “Brightness 60%” für Einstellung des Helligkeitswertes.
Die Lampe blinkt einmal nach Drücken jeder obigen Taste, was darauf hinweist, dass sie
wie folgt erfolgreich eingestellt wurde: Die Lampe schaltet sich nachts automatisch ein und
Sensormodus.
Modus B (Senor-Modus): Nur die Helligkeit (bei Aktivierung durch Induktion) ist einstellbar.
Zum Beispiel:
①Drücken Sie die Taste“Sensormodus”;
②Drücken Sie die Taste “Brightness 60%”.
Die Lampe blinkt einmal nach Drücken jeder Taste oben, was auf eine erfolgreiche Einstel -
lung hinweist: Die Lampe schaltet sich automatisch mit 60% Helligkeit ein, wenn eine
niedrige Helligkeit (30% von 60% Helligkeit) um, wenn innerhalb von 20 Sekunden keine
Bewegung erkannt wird.
Hinweis
2. Dies ist eine solarbetriebene Lampe. Installieren Sie sie an einem Ort, an dem genügend
Sonnenlicht vorhanden ist.
Wetter abhängt.
4. Der eingebaute intelligente Integrierter Schaltkreis verfügt über einen Überlade-,
5. Die Lampe wird tagsüber solar aufgeladen und leuchtet in der Dämmerung automatisch
auf.
6. ie Lampe ist mit einem internen Batteriepack ausgestattet, das austauschbar ist.
erhalten.
Installation A: Gerade Stange
(Standardmontagemethode, inklusive Zubehör)
①sind.
②die Lampenhalterung über der geraden Stange ein.
③④nach oben und um 10° nach unten einstellbar ist. Ziehen Sie dann die Schrauben der
Lampe fest.
Installation B: Gebogene Stange
(Standardmontagemethode, inklusive Zubehör)
①②③④Stellen Sie die Lampe ein und balancieren Sie sie aus. Ziehen Sie die vier Schrauben fest,
Installation C: Wandmontage (optional)
der Verpackung enthalten))
①sind.
②Bohren Sie 2 Löcher mit Durchmesser von 14 mm mit Tiefe von 60 mm und Lochabstand
von 104 mm an der Wand.
③Befestigen Sie die Lampe mit 2 Dehnschrauben an der Wand.
④nach oben und um 10° nach unten einstellbar ist. Ziehen Sie dann die Schrauben der
Lampe fest.
DE

[BG]
BG

①②③①②①②③④①②③④①②③④
BG

[HR] UVOD I JAMSTVO
UPOZORENJE
UPRAVLJANJE GUMBIMA:
SENZOR POKRETA
ZAPAMTI
HR

podesiti.
Na primjer:
①②③indukcijom).
Na primjer:
①②--
pokret.
BILJEŠKA
2. Ovo je funkcionalna svjetiljka na solarni pogon, instalirajte je na mjesto gdje ima
vremenskim prilikama.
punjenja i prenapona.
5. Svjetiljka tijekom dana puni svoje solarne baterije i svijetli automatski u sumraku.
①②stup.
③mm).
④svjetiljke.
①②③④①①②104 mm
③④④vijke svjetiljke.
HR

[PT ] INTRODUÇÃO E GARANTIA
Agradecemos que escolheu e adquiriu o produto da V-TAC. A V-TAC irá servir-lhe da melhor
mantenha este manual para referência no futuro. Se tiver outras dúvidas, entre em
contacto com o nosso revendedor ou comerciante local de quem adquiriu o produto. Eles
AVISO
MODOS DE OPERAÇÃO:
CONTROLO DE BOTÕES:
CONTROLO REMOTO:
MODO A: MODO DE BRILHO CONSTANTE
automaticamente à noite e mantém um brilho constante de 60% por 4 horas (sem
MODO B: MODO DE SENSOR
metros e depois muda para 30% de brilho se nenhum movimento for detetado dentro de
20 segundos.
LEMBRAR
-
LÂMPADA SOLAR LED DE RUA
PT

Modo A (modo de brilho constante): o tempo e o brilho podem ser ajustados.
Por exemplo:
①②③por 2 horas, depois passa para o modo de sensor.
Por exemplo:
①②brilho) se nenhum movimento for detectado dentro de 20 segundos.
NOTA
em todos os modos.
clima.
anoitecer.
entre em contato com o distribuidor para obter uma nova bateria adequada.
①②③50-60mm).
④①Solte os parafusos e retire o suporte grande em forma de U.
②Solte os parafusos na parte inferior para se adaptar ao poste.
③④-
gem))
①②de 104mm na parede.
③④LÂMPADA SOLAR LED DE RUA
PT

[ES ] INTRODUCCIÓN Y GARANTÍA
Le agradecemos que ha elegido y adquirido la V-TAC. V-TAC le servirá del mejor modo
más cercano de quien ha comprado el producto. Él será debidamente instruido y dispuesto
-
-
ADVERTENCIA
MODOS DE FUNCIONAMIENTO:
CONTROL DE BOTONES:
CONTROL REMOTO:
ajustar los modos de funcionamiento.
MODO A: MODO DE BRILLO CONSTANTE
enciende automáticamente por la noche y mantiene un brillo constante de 60% durante 4
MODO B: MODO DE SENSOR
se enciende automáticamente al 100% de brillo cuando se detecta movimiento en el rango
segundos.
RECORDAR
1. Los modos de funcionamiento anteriores son los ajustes de fábrica por defecto; el
remoto se puede seleccionar un tiempo de funcionamiento o brillo diferente, y los valores
DIY - Establecer el tiempo de funcionamiento y el brillo desde el control remoto
Distancia de funcionamiento del control remoto: 12 metros
FAROLA SOLAR LED
ES

Modo A (Modo de brillo constante): el tiempo y el brillo pueden ser ajustados.
Por ejemplo:
①②③exitoso: la lámpara se enciende automáticamente por la noche y mantiene un brillo del
60% durante 2 horas, luego cambia al modo de sensor.
Modo B (Modo de sensor):
Por ejemplo:
①②exitoso: la lámpara se enciende automáticamente con un brillo del 60% cuando detecta
60%), si no se detecta movimiento en 20 segundos.
NOTICE
cargar sus baterías solares en todos los modos.
2. Esta es una lámpara que funciona con energía solar, instálela en un lugar donde haya
clima.
4. El incorporado circuito integrado inteligente está protegido contra sobrecarga, descarga
5. La lámpara carga sus baterías solares durante el día y se enciende automáticamente al
anochecer.
7. No permita que personas no profesionales desmonten la lámpara.
8. No deseche la batería con la basura doméstica para evitar explosiones.
INSTALACIÓN A: En poste recto
①②de la lámpara en el poste recto.
③mm).
④INSTALACIÓN B: En poste curvado
①②③④Ajuste y equilibre la lámpara, apriete los cuatro tornillos para bloquearla.
INSTALACIÓN C: En pared (Opcional)
(Requisitos para el montaje en la pared: 2 tacos M10 * 60 mm (NO incluidos en el embala -
je))
①②agujeros de 104 mm en la pared.
③Fije la lámpara a la pared con 2 tacos.
④FAROLA SOLAR LED
ES

[HU] BEVEZETÉS ÉS GARANCIA
károkra. A cég nem vállal semmilyen garanciát a felület károsodásáért, a termék helytelen
Ez a termék garanciája csak a gyártási hibákra vonatkozik.
FIGYELMEZTETÉS
3. A telepítést hivatalos személynek kell elvégeznie.
MUNKA ÜZEMMÓDOK:
GOMB VEZÉRLÉS:
• Nyomja meg harmadik alkalommal a kikapcsoláshoz.
TÁVIRÁNYÍTÓ:
A. ÜZEMMÓD: ÁLLANDÓ VILÁGÍTÁSI MÓD
LED NAPFÉNY UTCAI LÁMPA
HU

Például:
①②③Például:
①②MEGJEGYZÉS
napfény van.
①②-
③④①②③④csomagolást))
①②③LED NAPFÉNY UTCAI LÁMPA
HU
Other manuals for VT-ST42
1
This manual suits for next models
1
Table of contents
Other V-TAC Lighting Equipment manuals

V-TAC
V-TAC VT-781 RD User manual

V-TAC
V-TAC VT-4225 User manual

V-TAC
V-TAC VT-511S User manual

V-TAC
V-TAC VT-7573 User manual

V-TAC
V-TAC VT-4121 User manual

V-TAC
V-TAC VT-5167 User manual

V-TAC
V-TAC VT-519-S User manual

V-TAC
V-TAC VT-13 User manual

V-TAC
V-TAC VT-1230 User manual

V-TAC
V-TAC VT-768 User manual