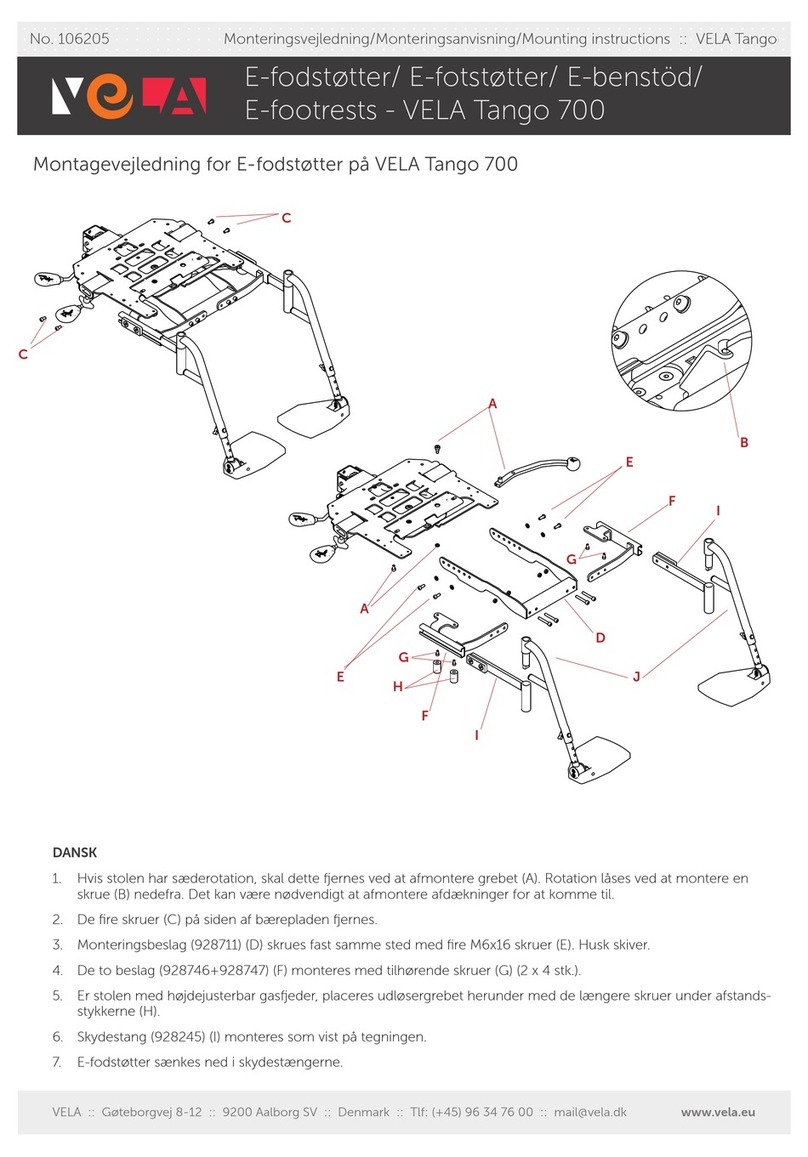
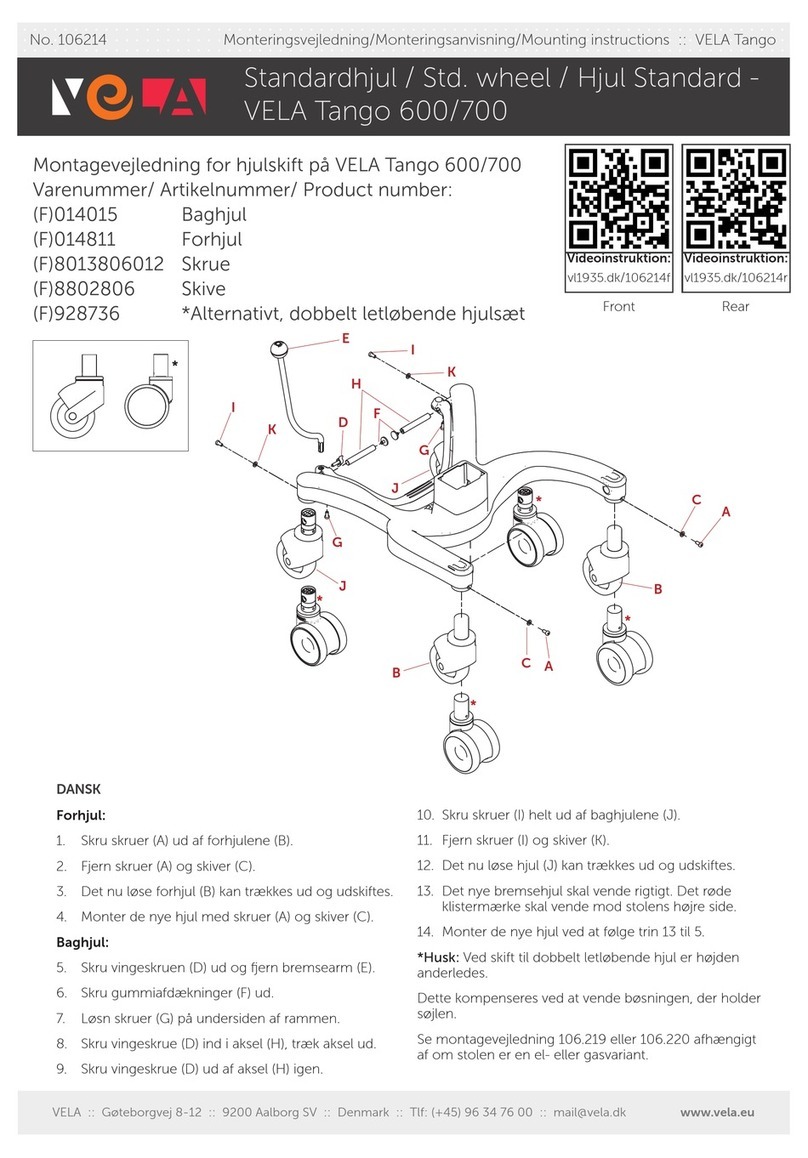
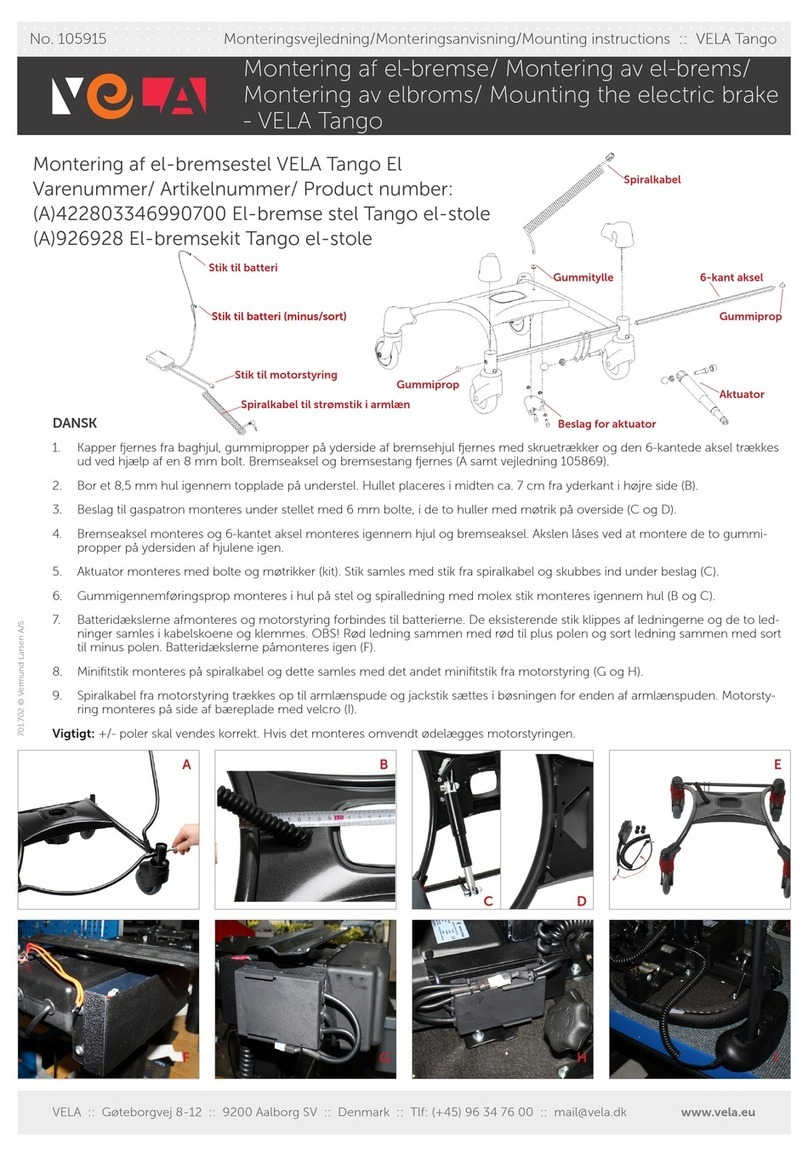
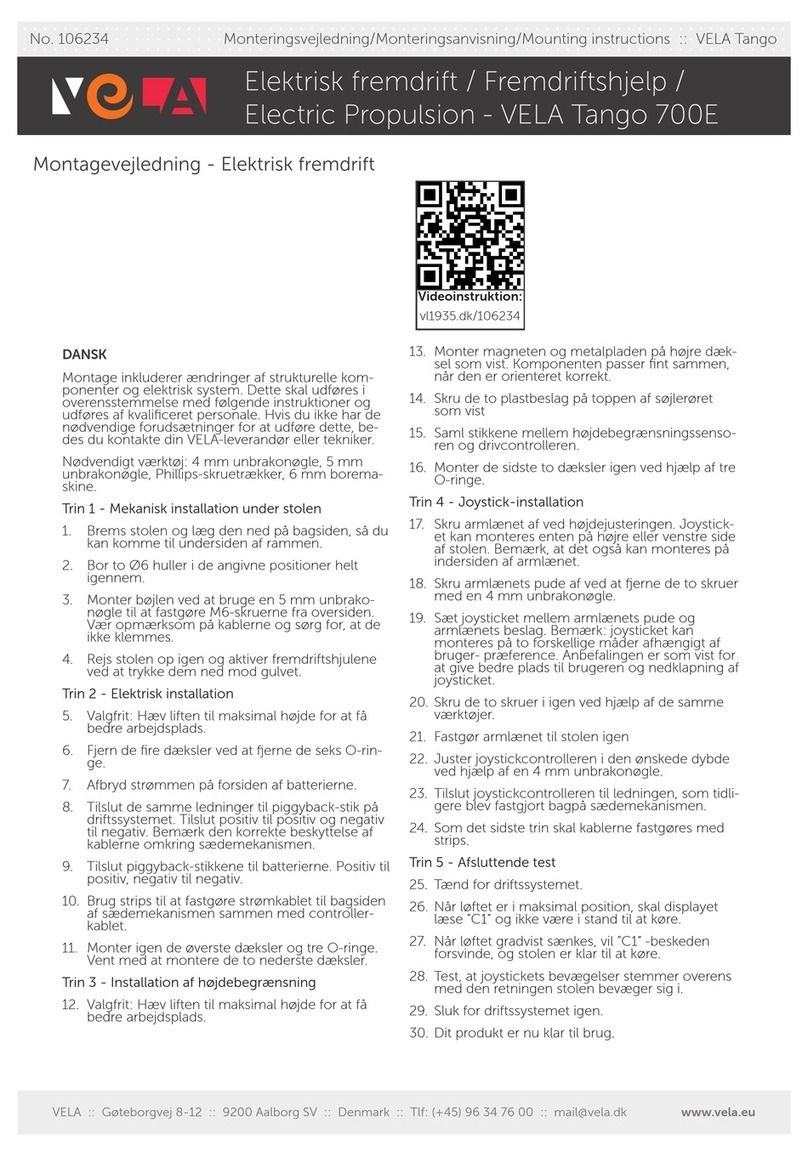
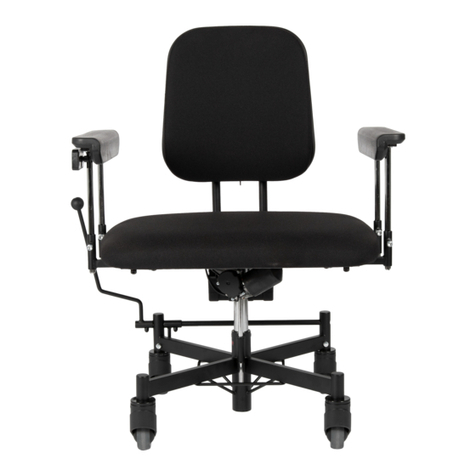
Vela Meywalk 4 Micro User manual

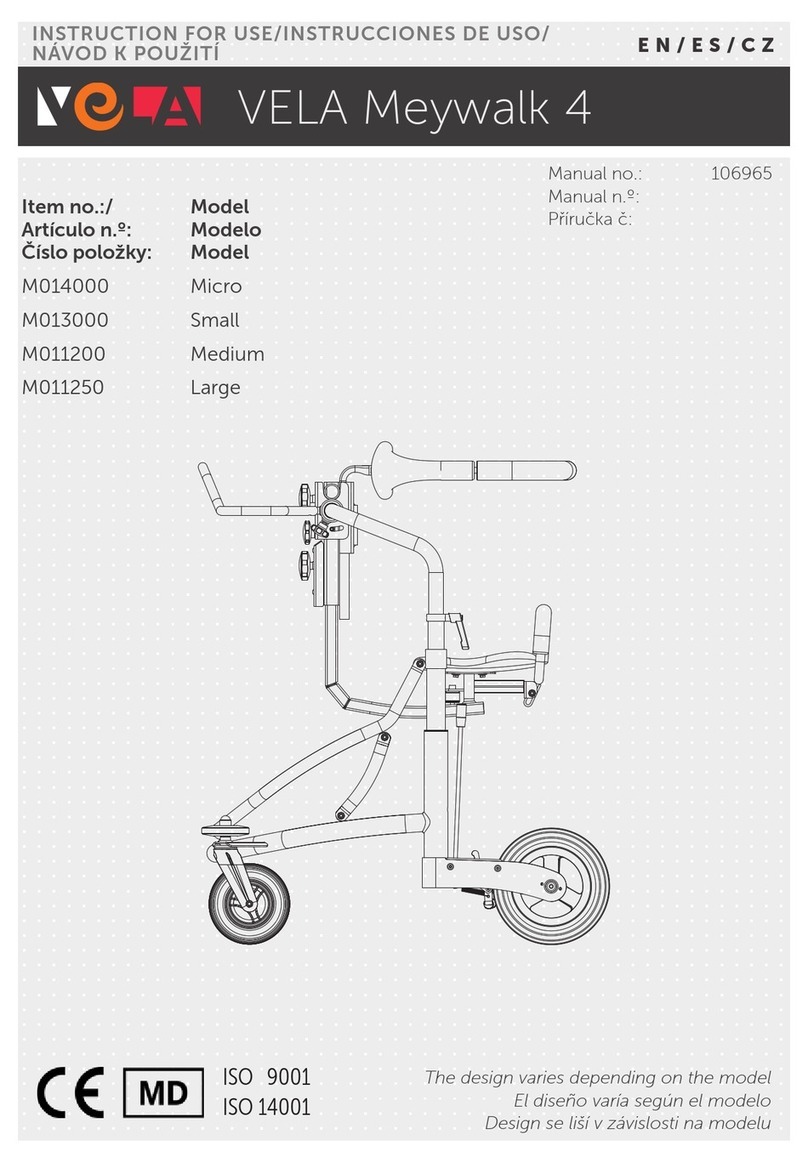
VELA Meywalk 4
INSTRUCTION FOR USE/BENUTZERHANDBUCH/
MANUEL DE L’UTILISATION EN/DE/FR
Manual no.: 106951
Manual nr.:
Numéro de manuel:
Item no.:/
Artikelnummer:/
Numéro d’article
Model
Modell
Modèle
014000 Micro
013000 Small
011200 Medium
011250 Large
The design varies depending on the model
Das Design variiert je nach Modell
Le design varie en fonction du modèle


VELA Meywalk 4
TABLE OF CONTENTS / INHALTSVERZEICHNIS / TABLE DES MATIÈRES
ENGLISH 4
DEUTSCHE 16
FRANÇAIS 28
EN/DE/FR

TABLE OF CONTENTS
1.0. INTRODUCTION 5
1.1. WARNINGS 6
1.2. TROUBLESHOOTING 7
1.3. LABELS USED ON THE GAIT TRAINER 8
1.4. SAFETY 9
1.4.1. Aplication 9
1.4.2. Transport 9
1.5. WARRANTY 9
1.6. UNPACKING THE GAIT TRAINER 10
1.7. MAINTENANCE 10
1.7.1. Wheels 10
1.7.2. Frame 10
1.7.3. Padding 10
1.7.4. Recycling guide 10
1.8. RECYCLING AND DISPOSAL 11
2.0. USER MANUAL 12
2.0.1. Assembly of upper part and base 12
2.0.2. Assembly and Replacement of springs 12
2.0.3. Assembly and Replacement of springs (Micro) 12
2.0.4. Height adjustment 12
2.0.5. Brake 13
2.0.6. Seat height adjustment 13
2.0.7. Adjusting the height of the trunk support 13
2.0.8. Tilt function 13
2.0.9. Trunk support 14
2.0.10. Entry and exit 14
2.0.11. Adjusting the Handle 14
2.0.12. Using the rear stop 14
2.0.13. Adjusting the rear stop 15
2.0.14. Walking resistance brake 15
2.0.15. Backstop 15
2.0.16. Direction lock 15

5
1.0. INTRODUCTION
DEAR CUSTOMER
Congratulations on your new VELA gait trainer! We are
sure this gait trainer will give you daily pleasure. This
user manual provides useful information on adjusting,
operating and maintaining your gait trainer.
Important
Please read this user manual carefully and keep it safe
for when you need to refer to it. This manual is also
available on VELA’s website: www.vela.eu, where you
can also find other relevant information.
If you have questions, experience errors or adverse
events, please contact your VELA supplier
We reserve the right to make changes.
VELA
Gøteborgvej 8-12
DK-9200 Aalborg SV
Denmark
www.vela.eu
EN

6
1.1. WARNINGS
Use Only use original spare parts from VELA.
Use Do not make any changes to the accessories that come with the gait trainer.
Use Only use the gait trainer for the intended purpose.
Use Before using it, make sure that all parts of the gait trainer are securely fastened.
Use The gait trainer may only be used under supervision. The wheels roll very easily, so it is
important to be aware of the surroundings and any dangers that the user may encounter.
Use Always activate the brake before you enter or exit the gait trainer.
Use The tilt bar must always be raised and lowered by hand - avoid stepping on the tilt bar.
Use On the sizes: Small, Medium and Large, there is a tilting bar that raises and lowers the
gait trainer when getting in and out. Be prepared for an upward force that grows gradu-
ally as the tilt bar raises. Never let go of the tilt bar in the middle of a raising or lowering
movement, as it can injure the user and helper.
Use Only use the gait trainer on solid surfaces. Avoid using it on sloping, uneven, loose, wet
or icy surfaces, or on surfaces with level dierences, as it may cause tipping risk.
Use The spring system can pose a risk if the gait trainer is used by a very restless user. VELA
Meywalk 4 must never be used without springs.
Use Do not use the gait trainer during adjustments, to avoid pinches from moving parts.
Use VELA Meywalk and its accessories are designed for your safety. Removing parts of the
equipment can result in open pipe ends that can be sharp and cause damage. These
open pipe ends must be closed with plastic plugs - do not touch open pipe ends with
fingers or other body parts.
Use Maintenance other than cleaning should always be performed by a professional.
Use Never service the gait trainer while in use
Use Always follow the recommended maintenance and cleaning instructions
Use Protect the gait trainer’s padded surfaces from direct sunlight, or cover the surfaces as they
can become very hot and cause damage to the skin.

7
1.2. TROUBLESHOOTING
Mistake Possible cause and solution
The gait trainer cannot turn Direction lock may be activated. See section 2.0.16.
Brake function does not work The brake is not activated. See section 2.0.5.
Upper part hangs skewed to one side Check that both springs are fitted correctly. See section
2.0.2. or 2.0.3.
Upper part is stuck Check that both springs are fitted correctly. See section
2.0.2. or 2.0.3.
The gait trainer rolls badly Wheels are blocked. Clean the wheels for wire residue
and the like.
The walking resistance brake may be activated. See
section 2.0.14.
The gait trainer cannot be walked backwards The backstop may be activated. See section 2.0.15.
The handle is loose Tighten the handles
The seat bracket is loose Tighten the handle
The seat height and gait height are lower than before Loosen the handle, move the upper part up to the
desired height and tighten the handle again. See
section 2.0.4.
Trunk support and riser are loose Tighten the handle
The seat height is lower than before The tilt bar is folded down. See section 2.0.10.
If the above does not solve your problem, you should contact your VELA
supplier.
EN

8
1.3. LABELS USED ON THE GAIT TRAINER
Labels 60 x 22,5 mm
Labels on the gait trainer should be read at a distance of approx. 40 cm under
normal daylight conditions.
For labels related to the operation of the gait trainer, please refer to section
2.0.
UDI:
<Model name>
<Model ref. no.>
<Manufacturer>
<Adress>
<Webpage>
<Safe working load>
<Production date/order no.>
(XX) XXXXXXXXXXXXXX (XX) XXXXXX
MEDICO

9
1.4. SAFETY
This gait trainer is CE marked and
complies with applicable EU regula-
tions.
The gait trainer is manufactured by:
VELA, Mads Clausens Vej 1, 9800
Hjørring, Danmark.
1.4.1. APPLICATION
This gait trainer is intended for indo-
or use.
:: Always activate the brake when
you enter or exit the gait trainer.
:: The gait trainer may only be used
under supervision. The wheels roll
very easily, so it is important to
be aware of the surroundings and
any dangers that the user may
encounter.
The VELA Meywalk gait trainers
are tested and approved for the
following maximum load:
:: VELA Meywalk 4 Micro: 60 kg.
:: VELA Meywalk 4 Small: 100 kg.
:: VELA Meywalk 4 Medium: 130 kg.
:: VELA Meywalk 4 Large: 130 kg.
1.4.2. TRANSPORT
When transporting the gait trainer by
car, airplane or any other means of
transport, always use the brake. The
gait trainer is not approved for use
as a passenger seat in any means of
transportation and may not be used
as such.
The gait trainer is designed to be
transported under the following
environmental conditions:
Temperature: - 20°C to + 60°C
Humidity: 15-95%
1.5. WARRANTY
VELA grants a right of claim under
applicable law in the country where
the gait trainer is acquired. The right
of complaint applies only when
using original spare parts and ac-
cessories, as well as customisations
made by professionals.
Note: if an exclusive contractual
agreement has been made directly
with VELA, this applies!
VELA assumes no liability for da-
mages to the product or the user
caused by:
:: Transportation
:: Misuse
:: Normal wear and tear
:: Wrong use
:: Use of spare parts and acces-
sories that are not original VELA
products
:: Adjustments made by unauthori-
sed service technicians
IN GENERAL EN

10
1.6. UNPACKING THE GAIT
TRAINER
The gait trainer comes in
environmentally friendly and
recyclable packaging.
In case of defects or transport
damage to the gait trainer, please
contact your VELA supplier right
away. In such cases, do not attempt
to use the gait trainer or to fix it
yourself.
On delivery you have received:
:: VELA Meywalk 4 gait trainer
:: Trunk support and springs for the
gait trainer. Comes packed in a
separate box together with instal-
lation instructions. Note: Must
be mounted on the gait trainer
before use!
:: Instructions for use
1.7. MAINTENANCE
We recommend an annual inspec-
tion of the gait trainer to identify any
defective or worn parts. All remova-
ble parts should be tightened regu-
larly. You can find various guides on
www.vela.eu.
1.7.1. WHEELS
We recommended you regularly
check the wheels and remove any
residual threads, etc.
1.7.2. FRAME
Clean with lukewarm water and if
necessary, add some pH-neutral
detergent. Desinfection is possible,
but never use solvent-based clean-
ers (such as Turpentine).
1.7.3. PADDING
Synthetic fabric or leather: Clean
with water or mild soap using a hard-
wrung cloth.
Polyuretan foam: Upholstery on
trunk support, handle and rear stop
is easily wiped o with a disinfectant
cloth.
Note: On www.vela.eu you can
find cleaning instructions for all our
standard upholstery types.
1.7.4. RECYCLING GUIDE
Your VELA Meywalk 4 can be re-
used by another person when you
no longer need it as long as the gait
trainer is serviced by a technician
beforehand.
The life expectancy of the gait trainer
is five years for regular and proper use
as long as VELA, your VELA supplier
or a trained professional perform an
annual inspection with replacement
of worn parts.
11
1.8. RECYCLING AND DISPOSAL
This product contains recyclable materials. Therefore, the product must be
disposed of in accordance with local regulations and not together with ordinary
household waste. Proper disposal and recycling will help prevent negative eects
on the environment and people.
1.9. PRODUCT OVERVIEW
VELA Meywalk 4 consists of:
1. Handle bar.
2. Hand screw for adjusting trunk support
height.
3. Trunk support.
4. Hand screw for setting the tilt function.
5. Hand screw for adjusting the handle bar.
6. Hand screw for adjusting the seat height.
7. Seat.
8. Rear stop.
9. Allen keys for adjusting the gait trainer.
10. Grip for adjusting the upper part.
11. Tilt bar (not available on Micro).
12. Brake.
13. Backstop and walking resistance brake.
14. Fender wheels.
15. Rear wheels.
16. Direction lock.
17. Front wheels.
VELA Meywalk 4 has a wide range of accessories, which makes it possible
to adapt the gait trainer to the needs of the individual user. The selection of
accessories for VELA Meywalk 4 can be found at www.vela.eu.
1 32
4
5
8
9
10
12
13
14
11
15
16
17
7
6
EN

MICRO
SMALL,
MEDIUM
& LARGE
12
2.0.3. ASSEMBLY AND REPLACEMENT OF SPRINGS MICRO
Lift the upper part of the gait trainer (see section 2.0.1.). The
springs can now be mounted/replaced.
2.0.4. HEIGHT ADJUSTMENT
Loosen the handles on both sides and adjust the frame to the
desired height. It is important that the height is adjusted equally
on both sides of the frame. Tighten the handles again on both
sides. Note: Never perform height adjustment while the gait
trainer is in use.
2.0.2. ASSEMBLY AND REPLACEMENT OF SPRINGS
Release the tilt bar and raise it to the upper position so the
lower risers appear in front of the rear wheels. Push and turn
the black plug at the bottom to remove it, so the springs will
appear. Fit/replace the spring and slide the plug up into the
groove and turn in place until it locks.
2.0. USER MANUAL
2.0.1. ASSEMBLY OF UPPER PART AND BASE
The upper part is placed in the risers on the chassis. The upper
part is lowered into place in the two risers.
Note: The handle must face the swivel front wheels.

13
2.0.7. ADJUSTING THE HEIGHT OF THE TRUNK SUPPORT
Loosen the upper hand screw (push-and-turn) on the front of
the gait trainer. Adjust the trunk support to the desired height
and retighten the hand screw. Correct height depends on the
user’s physique and need for free movement. Loosen the two
Allen screws on the front of the trunk support to replace it. Note:
Never replace the trunk support while the gait trainer is in use.
2.0.8. TILT FUNCTION
Turn the center hand screw on the front of the gait trainer
to tilt. Turning the hand screw modifies the angle of the
trunk support and seat so the user’s posture changes. The tilt
function is stepless. Note: Never adjust the tilt while the gait
trainer is in use.
2.0.5. BRAKE
The brake rods are located in front of the rear wheels. Move
both brake rods backwards to activate the brake function on
both sides. The brakes are deactivated by moving both brake
rods forward again. Note: The brake must always be locked
when getting in and out of the gait trainer.
2.0.6. SEAT HEIGHT ADJUSTMENT
Loosen the lower hand screw (push-and-turn) on the front of the
gait trainer. The seat can now be adjusted up and down. A hand
under the seat bracket makes the seat slide easy. Adjust the seat
height to the user’s stride length and retighten the hand screw so
that the seat bracket locks are in place. Note: Never adjust the
height of the seat while the gait trainer is in use.
EN

SMALL,
MEDIUM &
LARGE
14
2.0.11. ADJUSTING THE HANDLE
The angle of the handle is adjusted using two hand screws.
Turn the hand screws counterclockwise so that the handle
can rotate. There are three default settings of the handle.
Remember to tighten the hand screws again.
Note: The handle can be angled in a vertical position, so the
user has free access to e.g. a work table and kitchen table.
2.0.10. ENTRY AND EXIT
Grab the front of the tilt bar* with both hands and tilt it. This
lowers the seat unit, which facilitates entry and exit (Micro
cannot be tilted). The seat unit is raised again by pressing down
the tilt bar until it locks in the click hook with an audible click.
Note: Close the trunk support (see section 2.0.9.) and rear stop
(section 2.0.12.) when the gait trainer is in use.
2.0.9. TRUNK SUPPORT
The trunk support is opened by moving the outer handles (on
the back) upwards. The trunk support is closed by sliding the
handles down again so that the opening is smaller. Note: The
trunk support must always be closed when the gait trainer is in
use.
2.0.12. USING THE REAR STOP
The rear stop should always be locked up when the gait trainer
is in use. Swing the rear stop up so that it rests against the seat
and locks. Lift the rear stop up and swing it down to reopen
the rear stop when exiting the gait trainer.
*Never let go of the tilt bar when raising or lowering it.

15
2.0.15. BACKSTOP
By activating the backstop on both rear wheels, the gait trainer
can only be walked forward. Activate by lifting up the silver
button and deactivate by pressing the black return button.
Note: Always activate/deactivate the backstop on both sides.
2.0.16. DIRECTION LOCK
By activating the direction lock, the gait trainer can only move
in a straight line. Turn the snap lock while the wheel is straight
on the frame so the locking pawl hits the hole in the wheel
fork. Pull the snap lock backwards and turn it to locked position
to deactivate - so that the wheel can rotate freely.
Note: Always activate/deactivate the lock on both sides.
2.0.13. ADJUSTING THE REAR STOP
Lower the rear stop to find an Allen screw inside the square
profile. Loosen the screw and set the longitudinal direction to the
desired position. remember to retighten the Allen screw.
2.0.14. WALKING RESISTANCE BRAKE
By activating the walking resistance brake the walking resistance
increases. This can both reduce speed (both sides) and correct
for skewed gait (one side). Loosen the nut at the bottom of
the screw and adjust the screw until the desired resistance is
achieved. Tighten the nut again. Note: The walking resistance
brake is set individually on both sides.
EN

16
INHALTSVERZEICHNIS
1.0. EINFÜHRUNG 17
1.1. WARNHINWEISE 18
1.2. FEHLERBEHEBUNG 19
1.3. KENNZEICHEN AUF DEM GANGTRAINER 20
1.4. SICHERHEIT 21
1.4.1. Anwendung 21
1.4.2. Transport 21
1.5. GARANTIE 21
1.6. AUSPACKEN DES GANGTRAINERS 22
1.7. INSTANDHALTUNG 22
1.7.1. Räder 22
1.7.2. Rahmen 22
1.7.3. Polsterung 22
1.7.4. Recycling-leitfaden 22
1.8. RECYCLING UND ENTSORGUNG 23
2.0. BENUTZERHANDBUCH 24
2.0.1. Montage von oberem teil und sockel 24
2.0.2. Montage und austausch der federn 24
2.0.3. Montage und austausch der federn (micro) 24
2.0.4. Höhenanpassung 24
2.0.5. Bremse 25
2.0.6. Einstellung der sitzhöhe 25
2.0.7. Einstellung der höhe der rumpfstütze 25
2.0.8. Neigungsfunktion 25
2.0.9. Rumpfstütze 26
2.0.10. Einstieg und ausstieg 26
2.0.11. Gri einstellen 26
2.0.12. Die rückensicherung nutzen 26
2.0.13. Die rückensicherung anpassen 27
2.0.14. Gehwiderstandsbremse 27
2.0.15. Rücklaufsperre 27
2.0.16. Richtungssperre 27

17
1.0. EINFÜHRUNG
SEHR GEEHRTER KUNDE
Herzlichen Glückwunsch zu Ihrem neuen VELA
Gangtrainer! Wir sind sicher, dass er Ihnen täglich
Freude bereiten wird. Dieses Benutzerhandbuch
enthält nützliche Informationen zum Einstellen,
Bedienen und Warten Ihres Gangtrainers.
Wichtig
Bitte lesen Sie dieses Benutzerhandbuch sorgfältig
durch und bewahren Sie es sicher auf, falls Sie darauf
zurückgreifen müssen. Das Handbuch ist auch auf
der Webseite von VELA verfügbar: www.vela.eu. Dort
finden Sie auch weitere relevante Informationen.
Bei Fragen, Fehlern oder unerwünschten Ereignissen
wenden Sie sich bitte an Ihren VELA-Händler.
Wir behalten uns das Recht vor, Änderungen
vorzunehmen.
VELA
Gøteborgvej 8-12
DK-9200 Aalborg SV
Dänemark
www.vela.eu
DE

18
1.1. WARNHINWEISE
Nutzung Verwenden Sie nur originale Ersatzteile von VELA.
Nutzung Nehmen Sie keine Änderungen am Zubehör vor, das mit dem Gangtrainer geliefert wird.
Nutzung Nutzen Sie den Gangtrainer ausschließlich für den vorgesehenen Zweck.
Nutzung Stellen Sie vor der Nutzung sicher, dass alle Teile des Gangtrainers sicher befestigt sind.
Nutzung Der Gangtrainer darf nur unter Aufsicht eingesetzt werden. Die Räder rollen sehr leicht.
Deshalb ist es wichtig, sich der Umgebung und potenzieller Gefahrenquellen bewusst
zu sein.
Nutzung Aktivieren Sie immer die Bremse, wenn Sie in den Gangtrainer einsteigen oder aus ihm
aussteigen.
Nutzung Der Kippbügel muss immer von Hand angehoben und gesenkt werden. Vermeiden Sie
es, auf den Kippbügel zu treten.
Nutzung Bei Modellen in den Größen Small, Medium und Large gibt es einen Kippbügel, der den
Gangtrainer beim Einsteigen und Verlassen hebt oder senkt. Seien Sie daraufvorbe-
reitet, dass eine Kraft nach oben drückt, wenn sich der Kippbügel hebt. Lassen Sie den
Kippbügel niemals während der Anpassung der Höhe los, da er den Benutzer und den
Helfer verletzen kann.
Nutzung Verwenden Sie den Gangtrainer ausschließlich auf festem Untergrund. Vermeiden Sie
abfallende, unebene, lockere, nasse oder vereiste Oberflächen oder Ebenen mit Höhe-
nunterschieden, da das Risiko besteht, dass der Gangtrainer kippt.
Nutzung Das Federsystem kann ein Risiko darstellen, wenn der Gangtrainer von einem sehr
unruhigen Anwender genutzt wird. Der VELA Meywalk 4 darf niemals ohne Federn
verwendet werden.
Nutzung Verwenden Sie den Gangtrainer nicht während derÄnderung der Einstellungen, um
Quetschungen durch bewegliche Teile zu vermeiden.
Nutzung Der VELA Meywalk und sein Zubehör sind mit Ihrer Sicherheit im Blick entwickelt wor-
den. Das Entfernen von Teilen kann zu oenen Rohrenden führen, die scharf sein und
Schäden verursachen können. Diese müssen mit Kunststokappen verschlossen werden.
Berühren Sie die oenen Rohrenden nicht mit Ihren Fingern oder anderen Körperteilen.
Nutzung Die Wartung, abgesehen von der Reinigung, sollte immer von einer Fachperson durch-
geführt werden.
Nutzung Warten Sie den Gangtrainer niemals während der Nutzung.
Nutzung Folgen Sie immer den empfohlenen Anweisungen zu Wartung und Reinigung.
Nutzung Schützen Sie die gepolsterten Oberflächen des Gangtrainers vor direktem Sonnenlicht oder
decken Sie sie ab, da diese sehr heiß werden und zu Hautverletzungen führen können.

19
1.2. FEHLERBEHEBUNG
Fehler Mögliche Ursache und Lösung
Der Gangtrainer lässt sich nicht lenken Die Richtungssperre ist möglicherweise aktiviert. Siehe
Abschnitt 2.0.16.
Die Bremsfunktion funktioniert nicht Die Bremse ist nicht aktiviert. Siehe Abschnitt 2.0.5.
Der obere Teil hängt schief zur Seite Überprüfen Sie, ob beide Federn richtig montiert sind.
Siehe Abschnitt 2.0.2 oder 2.0.3.
Der obere Teil klemmt Überprüfen Sie, ob beide Federn richtig montiert sind.
Siehe Abschnitt 2.0.2 oder 2.0.3.
Der Gangtrainer rollt nur schwer Die Räder sind blockiert. Reinigen Sie die Räder von
Drahtrückständen und dergleichen. Zudem kann die
Gehwiderstandsbremse aktiviert sein. Siehe Abschnitt
2.0.14.
Der Gangtrainer lässt sich nicht rückwärts laufen Die Rücklaufsperre ist möglicherweise aktiviert. Siehe
Abschnitt 2.0.15.
Der Gri ist locker Ziehen Sie den Gri fest.
Die Sitzhalterung ist locker Ziehen Sie den Gri fest.
Die Sitzhöhe und Ganghöhe sind niedriger als zuvor Lockern Sie den Gri, bewegen Sie den oberen Teil auf
die gewünschte Höhe und ziehen Sie den Gri wieder
fest. Siehe Abschnitt 2.0.4.
Die Rumpfstütze und die Steigrohre sind locker Ziehen Sie den Gri fest.
Die Sitzhöhe ist niedriger als zuvor Der Kippbügel ist umgeklappt. Siehe Abschnitt 2.0.10.
Wenn das oben Genannte Ihr Problem nicht löst, kontaktieren Sie bitte Ihren
VELA-Händler.
DE

20
1.3. KENNZEICHEN AUF DEM GANGTRAINER
Etiketten 60 x 22,5 mm
Die Kennzeichen auf dem Gangtrainer sollten aus einer Entfernung von etwa
40 Zentimetern bei normalen Tageslichtkonditionen gelesen werden.
Für Kennzeichen in Verbindung mit der Bedienung des Gangtrainers: siehe
Abschnitt 2.0
UDI:
<Model name>
<Model ref. no.>
<Manufacturer>
<Adress>
<Webpage>
<Safe working load>
<Production date/order no.>
(XX) XXXXXXXXXXXXXX (XX) XXXXXX
MEDICO
This manual suits for next models
7
Table of contents
Languages:
Other Vela Mobility Aid manuals

Vela
Vela 011101 User manual

Vela
Vela Meywalk 4 Medium User manual

Vela
Vela Miniwalk M106061 User manual

Vela
Vela Meywalk 4 Medium User manual

Vela
Vela 104260 User manual

Vela
Vela 013130 User manual

Vela
Vela 928850 User manual

Vela
Vela Tango 700 User manual

Vela
Vela Tango User manual

Vela
Vela Blues 100 User manual