manuals.online logo
Brands
  1. Home
  2. •
  3. Brands
  4. •
  5. VeriFone
  6. •
  7. Touch Terminal
  8. •
  9. VeriFone VX 680 User manual

VeriFone VX 680 User manual

VX680-QRG-2016-08-20 (English)
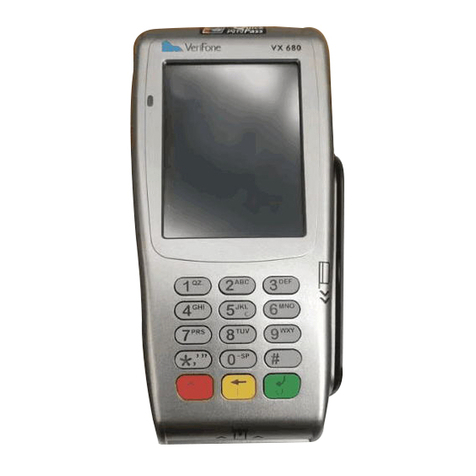
VeriFone VX 680
Use this function to delete a transaction that isin the current batch.
CORRECTIONS (Voids) REPORTS and BALANCING
Touch SETTLEMENT.
Touch Yes.
TIME
PURCHASE
REFUND
SETTLEMENT
CORRECTION
TIME
PURCHASE
REFUND
SETTLEMENT
CORRECTION
REPORTS
TOTALS REPORT
DETAIL REPORT
SERVER REPORTS
PREAUTH REPORT
SETTLEMENT
TOTAL: $0.00
CORRECTION
INV #
ACCT#
RETRIEVE BY:
TIME
PURCHASE
REFUND
SETTLEMENT
CORRECTION
CORRECTION
TEAR RECEIPT
PRESS OK
TIME
PURCHASE
REFUND
SETTLEMENT
CORRECTION
The Quick Reference Guide provides step-by-step instructions of daily terminal operations.
PRE-AUTHORIZATION (Completion)
Touch Complete.
COMPLETE
CLRK
AMT
ACCT
RETRIEVE BY: INV#
COMPLETE
AMOUNT $0.00
NEW AMOUNT $0.00
COMPLETE
INVOICE NUMBER:
PREAUTH - COMPLETE
TEAR RECEIPT
PRESS OK
COMPLETE
COMP
PREV
NEXT
INVOICE #: EXIT
FORCE
PREAUTH/COMPLTE
SERVER SETUP
OTHER SETUP
PREAUTH/COMPLTE
PREAUTH
COMPLETE
DELETE PREAUTH
PREAUTH REPORT
CORRECTION
INVOICE NUMBER:
CORRECTION
YES
NO
TOTAL: $0.00
CORRECTION
YES
NO
NEXT
INV #
Touch
Touch
Quick Reference Guide
The completion of an approved PREAUTH must be done within 10 days
of obtaining a PREAUTH transaction. Refer to your Card Acceptance
Agreement formore information regarding pre-authorizations.
In restaurantenvironments, pre-authorizations should not be
processed when CHIP cards are presented by the cardholder. CHIP
cards in arestaurant environment should be processed as PURCHASE
transactions. TIP entryis available at the time of the PURCHASE for CHIP
and debitcards.
TIME
PURCHASE
REFUND
SETTLEMENT
CORRECTION
Select a report or
touch to move
through additional
reports. The report
will print. Press
CANCEL to return to
the main menu.
Touch the desired
search method:
Clerk, Amount,
Account Number or
Invoice Number
For example, enter
the invoice number.
The leading zeros in
an invoice are not
required.
If the correct
transaction is shown,
touch COMP. If you
touch PREV or NEXT,
you will move to the
previous or next
open pre-auth
transaction in the
batch.
Enter the new
transaction amount,
including tips and/or
adjustments. Press
the green OK key.
Touch PreAuth/
Complete
If you want to
correct the last
transaction, touch
YES. If you want to
correct a different
transaction, touch
NO.
CORRECTION
NO
CORRECT LAST?
YES
Touch applicable
choice to continue or
press CLEAR to go
back.
Touch INV# to
search for
transactions by
invoice number or
ACCT# to search by
account number.
Enter the INV# (or
the last four digits of
the ACCT#) to find
the transaction and
press the green OK
key to continue.
The CORRECTION
will reverse the
transaction and
update the batch.
Tear the merchant
copy and then press
the green OK key to
print the customer
copy.
Touch CORRECTION.
Enter the total of the
batch from your
TOTALS or DETAILED
Report and press the
green OK key.
The batch will settle
at the Host, the
current batch is then
deleted from the
terminal and the
transaction menu
appear.
Reports and Balancing will process all sales and credits that have been
entered since the last time the terminal was balanced. It will ensure
that any charges/credits are applied to the customer’s card and that
any funds due to you are sent to your account. As part of the balance
process, you should print a TOTALS or DETAIL Report to confirm your
batch totals. You should balance daily in order to receive timely
deposits of your funds.
Tear the merchant
copy and then press
the green OK key to
print the customer
copy.
Additional prompts
may appear as
options vary from
report to report.
© 2016 First Data Canada Ltd. is a registered ISO of Wells Fargo Bank, N.A.,
Canadian Branch, Toronto, ON, Canada. All trademarks, service marks and
trade names used in this material are the property of their respective
owners.
www.firstdata.ca
Use REPRINT to print a copy of a transaction made since the last balance.
REPRINT
REFUND
TERMINAL START-UP
Touch PURCHASE.
Touch REFUND.
Touch SOFTPAY-FDCC.
Touch PREAUTH/
COMPLETE.
Touch PREAUTH.
PURCHASES PRE AUTHORIZATION
The Quick Reference Guide provides step-by-step instructions of daily terminal operations.
Touch
Touch
PURCHASE
AMOUNT: $0.00
PURCHASE
TOTAL: $0.00
TAP/INSERT/SWIPE
TAP/INSERER/GLISSER
PURCHASE
YES
NO
TOTAL: $0.00
TIME
PURCHASE
REFUND
SETTLEMENT
CORRECTION
PURCHASE
CHQ
SAV
SELECT ACCNT
PURCHASE
TOTAL: $0.00
ENTER PIN
PURCHASE
TEAR RECEIPT
PRESS OK KEY
PURCHASE
APPROVED
REMOVE CARD
DATE
TIME
COMMSERVER
SOFTPAY-FDCC
[OPTIONAL]
TIME
PURCHASE
REFUND
SETTLEMENT
CORRECTION
REFUND
AMOUNT: $0.00
REFUND
TOTAL: $0.00
TAP/INSERT/SWIPE
TAP/INSERER/GLISSER
REFUND
APPROVED
REMOVE CARD
REFUND
TEAR RECEIPT
PRESS OK KEY
PREAUTH
TOTAL $0.00
ENTER PIN
PREAUTH
APPROVED
REMOVE CARD
TEAR RECEIPT
PRESS OK KEY
PREAUTH
AMOUNT: $0.00
PREAUTH
TOTAL: $ 0.00
TAP/INSERT/SWIPE
TAP/INSERER/GLISSER
PREAUTH
YES
NO
TOTAL: $0.00
TIME
PURCHASE
REFUND
SETTLEMENT
CORRECTION
FORCE
PREAUTH/COMPLETE
SERVER SETUP
OTHER SETUP
PREAUTH/COMPLTE
PREAUTH
COMPLETE
HTUAERPETELED
PREAUTH REPORT
TIME
PURCHASE
REFUND
SETTLEMENT
CORRECTION
REPRINT
LAST RECEIPT
ANY RECEIPT
REPRINT ANY RCPT
INVOICE NUMBER:
Enter the amount of
the sale/purchase
using the keypad.
Press the green OK
key when finished.
Verify the amount.
Tap, Insert, Swipe or
manually key the
account number and
press the green OK
key when finished.
In the case of a
DEBIT transaction,
the customer
selects the account.
The customer keys
in the PIN number
and presses the
green OK key.
Tear the merchant
copy and then press
the green OK key to
print the customer
copy.
Enter the amount
using the keypad.
Press the green OK
key.
Verify the amount.
Tap, Insert, Swipe or
manually key
account number and
press the green OK
key when finished.
The screen will
display status and a
merchant receipt will
print.
Tear the merchant
copy and then press
the green OK key to
print the customer
copy.
Magnetic stripe credit cards may be swiped or keyed, but if you key
in a credit card, you must obtain a manual imprint of the card to prove
that the card was presented. Failure to do so could result in a charge-
back. CHIP cards are inserted by the card holder into the card reader
and must remain inserted for the duration of the transaction. CHIP
cards may not be embossed for imprinting and should only be
swiped if the terminal prompts you to do so. NOTE: For DEBIT and
CHIP card transactions, you will be prompted to pass the terminal to
the customer who will confirm the amount and enter their PIN to
process the transaction.
A Refund provides funds back to the customer when:
- The customer returns purchased goods.
- You want to reverse an incorrect sale and the sale took place
before the terminal was last balanced.
Touch LAST RECEIPT
to print the last
receipt or touch ANY
RECEIPT to print any
other transaction in
the open batch.
Enter the invoice
number for the
transaction you
would like to reprint
and press the green
OK key.
The pre-authorization of a credit card provides you with an approval
code confirming that funds are available to the cardholder. It does not
charge the card. The customer is charged the transaction amount only
upon completion of the pre-authorization transaction. Pre-authorizing
a card places a hold on the funds for a period of 10 days. If you do not
complete the pre-authorization within this period, the hold will be
released. CHIP cards being used for a Pre-Auth will require the
cardholder to be present for PIN entry. In restaurant environments,
pre-authorizations should not be done when CHIP cards are presented
by the cardholder. CHIP cards in a restaurant environment should be
processed as PURCHASE transactions.
Enter the amount of
the pre-auth using
the keypad. Press
the green OK key.
Verify the amount.
Tap, Insert, Swipe or
manually key
account number and
press the green OK
key when finished.
Touch YES to confirm
the amount. If the
amount is incorrect,
press NO to decline
the amount and stop
the transaction.
Key PIN number and
press the green OK
key.
Tear the merchant
copy and then press
the green OK key to
print the customer
copy.
The screen will
display status and a
merchant receipt will
print.
Touch YES to
confirm the
amount. Press NO
to decline the
amount and stop
the transaction.
Touch YES to
confirm the
amount. If
incorrect, press
NO to decline the
amount and stop
the transaction.
The screen will
display the status
and a merchant
receipt will print.
When the terminal is first started up, whether at Initial Installation or
when electrical power has been removed and then reapplied, the
following screen will display.
YES
NO
TOTAL: $0.00
REFUND
Other manuals for VX 680

7

Other VeriFone Touch Terminal manuals

VeriFone VX-670 series User manual

VeriFone

VeriFone VX-670 series User manual

VeriFone UX700 ML User manual

VeriFone

VeriFone UX700 ML User manual

VeriFone VX570 User manual

VeriFone

VeriFone VX570 User manual

VeriFone NURIT 8000 User manual

VeriFone

VeriFone NURIT 8000 User manual

VeriFone Tranz Series User manual

VeriFone

VeriFone Tranz Series User manual

VeriFone UX410 User manual

VeriFone

VeriFone UX410 User manual

VeriFone ruby2 User manual

VeriFone

VeriFone ruby2 User manual

VeriFone MX 900 Series User manual

VeriFone

VeriFone MX 900 Series User manual

VeriFone VX 520 Series User manual

VeriFone

VeriFone VX 520 Series User manual

VeriFone IX90 T650p User manual

VeriFone

VeriFone IX90 T650p User manual

VeriFone P200 User manual

VeriFone

VeriFone P200 User manual

VeriFone M440 User manual

VeriFone

VeriFone M440 User manual

VeriFone VX-670 series User manual

VeriFone

VeriFone VX-670 series User manual

VeriFone UX700 User manual

VeriFone

VeriFone UX700 User manual

VeriFone Topaz XL Setup guide

VeriFone

VeriFone Topaz XL Setup guide

VeriFone T650T User manual

VeriFone

VeriFone T650T User manual

VeriFone P200 User manual

VeriFone

VeriFone P200 User manual

VeriFone e280 User manual

VeriFone

VeriFone e280 User manual

VeriFone e335 User manual

VeriFone

VeriFone e335 User manual

VeriFone V400m User manual

VeriFone

VeriFone V400m User manual

VeriFone T650p User manual

VeriFone

VeriFone T650p User manual

VeriFone VX 520 User manual

VeriFone

VeriFone VX 520 User manual

VeriFone V200c User manual

VeriFone

VeriFone V200c User manual

VeriFone PP1000se User manual

VeriFone

VeriFone PP1000se User manual

Popular Touch Terminal manuals by other brands

Omnicom Profi Wi-Fi 3.0 manual

Omnicom

Omnicom Profi Wi-Fi 3.0 manual

Clover Station Pro quick start guide

Clover

Clover Station Pro quick start guide

Omron ns series Setup manual

Omron

Omron ns series Setup manual

Huawei EchoLife HG8245T Product description

Huawei

Huawei EchoLife HG8245T Product description

Omron NV3W Series Connection manual

Omron

Omron NV3W Series Connection manual

Firich Enterprise RichPOS 3600 user manual

Firich Enterprise

Firich Enterprise RichPOS 3600 user manual

MEI CONLUX MCM5 installation guide

MEI

MEI CONLUX MCM5 installation guide

Jobsite V-T4M datasheet

Jobsite

Jobsite V-T4M datasheet

HP Engage Go Mobile System Product End-of-Life Disassembly Instructions

HP

HP Engage Go Mobile System Product End-of-Life Disassembly Instructions

DIEBOLD NIXDORF BEETLE /iSCAN EASY eXpress+ user guide

DIEBOLD NIXDORF

DIEBOLD NIXDORF BEETLE /iSCAN EASY eXpress+ user guide

Teraoka MT-3000 user manual

Teraoka

Teraoka MT-3000 user manual

Custom Audio Electronics TWENTYFIVE Short guide

Custom Audio Electronics

Custom Audio Electronics TWENTYFIVE Short guide

Simons Voss Technologies TRANSPONDER TERMINAL manual

Simons Voss Technologies

Simons Voss Technologies TRANSPONDER TERMINAL manual

Immarsat FB500 Service manual

Immarsat

Immarsat FB500 Service manual

PIONEERPOS StealthTouch M5 Specifications

PIONEERPOS

PIONEERPOS StealthTouch M5 Specifications

NCR RealPOS 70 user guide

NCR

NCR RealPOS 70 user guide

CommonwealthBank Emmy Quick operator's guide

CommonwealthBank

CommonwealthBank Emmy Quick operator's guide

Longshine 15IW Series user manual

Longshine

Longshine 15IW Series user manual

manuals.online logo
manuals.online logoBrands
  • About & Mission
  • Contact us
  • Privacy Policy
  • Terms and Conditions

Copyright 2025 Manuals.Online. All Rights Reserved.