manuals.online logo
Brands
  1. Home
  2. •
  3. Brands
  4. •
  5. Viega
  6. •
  7. Control Unit
  8. •
  9. Viega PureFlow 2842.3ZL Instruction sheet

Viega PureFlow 2842.3ZL Instruction sheet

Viega LLC
585 Interlocken Blvd.
Broomfield, CO 80021
Phone (800) 976-9819
www.viega.us
Product Instructions
Viega PureFlow® Press by
Compression Valve
PI-PF 560575 0621 PureFlow Press x Compression Valves (EN ES FR)
Models 2842.3ZL, 2842.4ZL
EN Product Instructions
Viega PureFlow Press by
Compression Valve
This document is subject to updates. For the most current Viega
technical literature please visit www.viega.us.
6
1 6
7
2
8
3 4 5
EN
Viega PureFlow Press Zero Lead
by Compression Straight and Angled Stop
Valves
Viega products are designed to be
installed by licensed and trained plumbing
and mechanical professionals who are
familiar with Viega products and their installation.
Installation by non-professionals may void
Viega LLC’s warranty.
Zero lead identifies Viega products meeting
the lead free requirements of NSF 61-G
through testing under NSF/ANSI 372
(0.25% or less maximum weighted average lead
content).
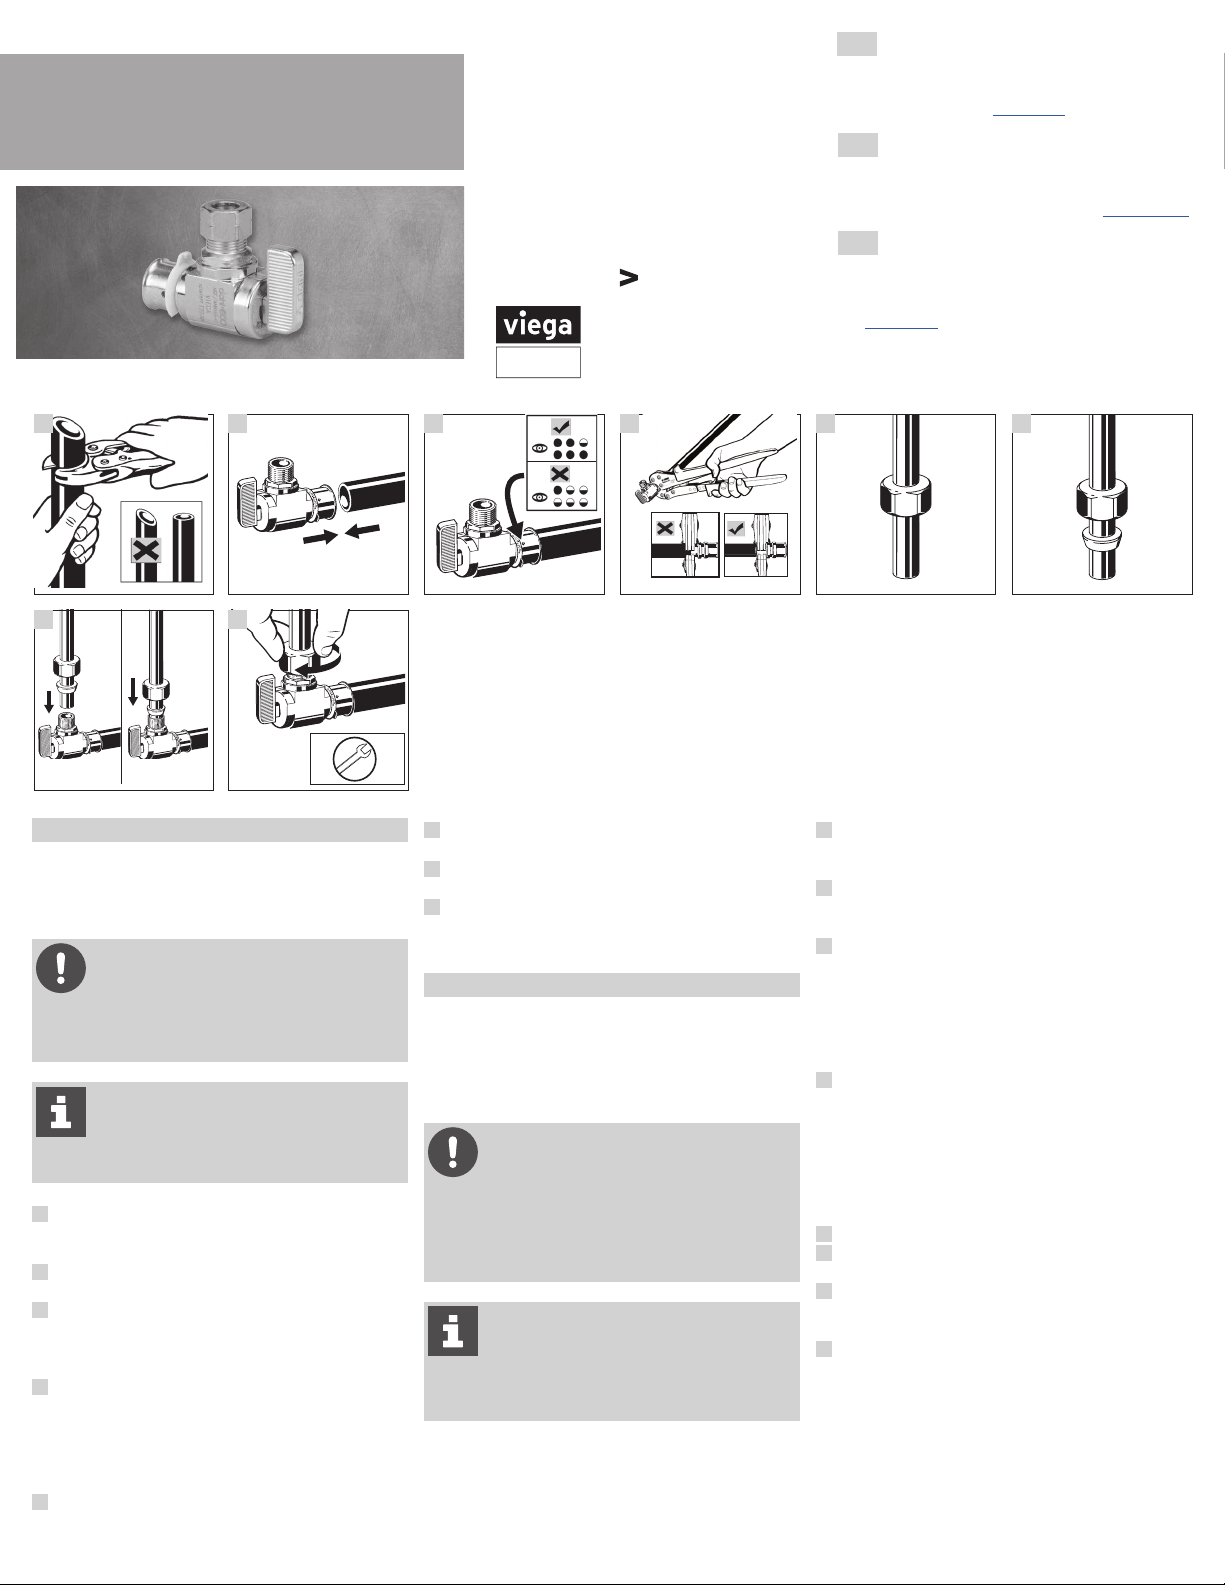
1 Square off tubing to proper length. Uneven,
jagged, or irregular cuts will produce unsatisfactory
connections.
2 Insert PureFlow Press fitting with attached sleeve
into tubing and engage fully.
3 Ensure full tubing insertion at view holes in
attached press sleeve. Full insertion means tubing
must be completely visible in at least two view
holes and partially visible in the one.
4 Position the PureFlow press tool perpendicular
over the press sleeve, resting it against the tool
locator ring. For 1" tool, close tool jaws to engage
ratchet (ensure that thumb grip is returned fully
forward before closing jaws). Make sure the
PureFlow press tool is properly aligned.
5 Slide compression nut onto tubing.
x1
+
6 Slide ferrule onto tubing ensuring that the tapered
side is towards the opening of the tube.
7 Insert tubing into the fitting until it bottoms out,
then slide ferrule up to the fitting.
8 Thread the compression nut onto the fitting, then
tighten one turn with a wrench.
ES Instrucciones del producto
Prensa Viega PureFlow por válvula
de compresión
Este documento está sujeto a actualizaciones. Para obtener la
documentación técnica más reciente de Viega, visite www.viega.us/es.
ES
Prensa Viega PureFlow Zero Lead
(sin plomo)
por válvulas de corte de compresión rectas
y acodadas
Los productos de Viega están diseñados
para ser instalados por plomeros y
mecánicos profesionales, capacitados
y certificados, que estén familiarizados con los
productos de Viega y su instalación.
La instalación realizada por personal no
profesional puede anular la garantía de
Viega LLC.
Zero lead identifica a los productos Viega
que cumplen los requerimientos de cero
contenido de plomo de la NSF 61-G
mediante la realización de pruebas de acuerdo
a NSF/ANSI 372 (contenido de plomo promedio
ponderado máximo de 0.25 % o menos).
1 Corte la tubería en ángulo recto, a la longitud
correcta. Los cortes desiguales, serrados o
irregulares producirán conexiones incorrectas.
2 Inserte el accesorio PureFlow Press en la tubería,
con la manga de prensar incorporada, y encájelo
por completo.
3 Asegúrese de que la tubería quede
completamente insertada mediante los orificios
de inspección situados en la manga de prensar
incorporada. Una inserción completa significa
que la tubería debe quedar completamente
visible al menos en dos orificios de inspección
y parcialmente visible en el otro.
4 Coloque la herramienta de prensado PureFlow
perpendicular a la manga de prensar, apoyándola
contra el anillo localizador de la herramienta. Para
la herramienta de 1", cierre las mordazas para
encajar el trinquete (antes de cerrar las mordazas
asegúrese que el cursor esté completamente
regresado). Asegúrese que la herramienta de
prensado PureFlow esté alineada adecuadamente.
5 Deslice la tuerca de compresión en la tubería.
6 Deslice el casquillo en la tubería asegurándose
que el lado cónico esté hacia la abertura del tubo.
7 Inserte la tubería en el accesorio hasta que salga
por la parte inferior, entonces deslice el casquillo
hacia arriba hasta el accesorio.
8 Enrosque la tuerca de compresión en el accesorio,
después apriete una vuelta con una llave.
FR Instructions produit
Viega PureFlow Press par vanne de
compression
Le présent document est soumis à des mises à jour. Pour consulter
les manuels techniques Viega les plus récents, reportez-vous au site
Web www.viega.ca.
FR
Viega PureFlow Press Zero Lead
par vannes d'arrêt à compression droites
et à angle
Les produits Viega sont conçus pour
être installés par des professionnels de
plomberie et de mécanique agréés et
dûment formés, familiarisés avec l'utilisation et
l'installation appropriées des produits Viega.
Toute installation réalisée par des non-
professionnels est susceptible d'entraîner
l'annulation des modalités de Viega LLC.
La mention « Zero Lead » identifie les
produits Viega, qui répondent aux
exigences des normes relatives à l'absence
de plomb selon l'annexe G de la norme NSF 61,
tels que testés et homologués selon NSF/ANSI 372
(teneur moyenne pondérée maximale en plomb
de 0,25 % ou moins).
1 Équarrissez le tuyau à la bonne longueur.
Les coupes inégales, dentelées ou irrégulières
causeront de mauvais raccordements.
2 Insérez le raccord serti PureFlow Press avec
le manchon fourni dans le tuyau et enfoncez-le
complètement.
3 Assurez-vous que le tuyau est complètement
inséré en vérifiant par les trous situés sur le
manchon serti. Une insertion complète nécessite
que les tuyaux soient entièrement visibles dans au
moins deux trous de vue et partiellement visibles
dans un trou de vue.
4 Positionnez l'outil de sertissage PureFlow
perpendiculairement sur le manchon serti, en le
reposant contre l'anneau de repérage d'outil.
Pour un outil de 1", refermez les mâchoires de
l'outil pour engager le cliquet (assurez-vous de
remettre le cran entièrement vers le haut avant
de fermer la mâchoire de la pince). Assurez-vous
que l'outil de sertissage PureFlow est bien aligné.
5 Faites coulisser l'écrou de compression sur
le tuyau.
6 Faites coulisser la virole sur le tuyau en veillant
à maintenir le côté effilé orienté vers l'ouverture
du tube.
7 Insérez le tuyau dans le raccord jusqu'à ce qu'il
touche le fond, puis faites glisser la virole vers
le haut jusqu'au raccord.
8 Vissez l'écrou de compression sur le raccord,
puis serrez d'un tour à l'aide d'une clé.

This manual suits for next models

1

Other Viega Control Unit manuals

Viega Easytop 2170 User manual

Viega

Viega Easytop 2170 User manual

Viega 2243.10 User manual

Viega

Viega 2243.10 User manual

Viega Easytop XL Series User manual

Viega

Viega Easytop XL Series User manual

Viega Grundfix 4987 User manual

Viega

Viega Grundfix 4987 User manual

Viega ManaBloc Instruction sheet

Viega

Viega ManaBloc Instruction sheet

Viega ProPress 304 Stainless User manual

Viega

Viega ProPress 304 Stainless User manual

Viega 2235.2 User manual

Viega

Viega 2235.2 User manual

Viega ProPress 22074 Instruction sheet

Viega

Viega ProPress 22074 Instruction sheet

Viega 1252.1 User manual

Viega

Viega 1252.1 User manual

Viega 56160 Instruction sheet

Viega

Viega 56160 Instruction sheet

Viega 8655.11 User manual

Viega

Viega 8655.11 User manual

Viega G2101 User manual

Viega

Viega G2101 User manual

Viega 8133.3 User manual

Viega

Viega 8133.3 User manual

Viega Easytop 2275.10 User manual

Viega

Viega Easytop 2275.10 User manual

Viega PureFlow Crimp Zero Lead Instruction sheet

Viega

Viega PureFlow Crimp Zero Lead Instruction sheet

Viega 1247.4 User manual

Viega

Viega 1247.4 User manual

Viega 8127.3 User manual

Viega

Viega 8127.3 User manual

Viega 8310.0 User manual

Viega

Viega 8310.0 User manual

Viega PureFlow Crimp Instruction sheet

Viega

Viega PureFlow Crimp Instruction sheet

Viega 8332.3 User manual

Viega

Viega 8332.3 User manual

Viega 2337.5 User manual

Viega

Viega 2337.5 User manual

Viega 9690TW User manual

Viega

Viega 9690TW User manual

Viega Grundfix Plus-Control User manual

Viega

Viega Grundfix Plus-Control User manual

Viega 2281.7 User manual

Viega

Viega 2281.7 User manual

Popular Control Unit manuals by other brands

Weinmann OXYWAY Instructions for use

Weinmann

Weinmann OXYWAY Instructions for use

Burkert 2030 quick start

Burkert

Burkert 2030 quick start

Rockwell Automation Allen-Bradley 1734-232ASC Original instructions

Rockwell Automation

Rockwell Automation Allen-Bradley 1734-232ASC Original instructions

Econ DH860 manual

Econ

Econ DH860 manual

Grundfos CU 361 manual

Grundfos

Grundfos CU 361 manual

Microchip Technology MCP19035 user guide

Microchip Technology

Microchip Technology MCP19035 user guide

TECSYSTEM VRT200 instruction manual

TECSYSTEM

TECSYSTEM VRT200 instruction manual

FAAC E045 quick guide

FAAC

FAAC E045 quick guide

Malossi FORCE MASTER 2.1 Assembly instructions

Malossi

Malossi FORCE MASTER 2.1 Assembly instructions

LEGRAND AU7004 installation instructions

LEGRAND

LEGRAND AU7004 installation instructions

Griswold FlowCon EDP Installation and operation instruction

Griswold

Griswold FlowCon EDP Installation and operation instruction

Texas Instruments bq20z70EVM-001 user guide

Texas Instruments

Texas Instruments bq20z70EVM-001 user guide

Listen Technologies ListenPoint quick reference

Listen Technologies

Listen Technologies ListenPoint quick reference

Illuminous EV-12V-4000-60D installation instructions

Illuminous

Illuminous EV-12V-4000-60D installation instructions

BFT SUPER MA instruction manual

BFT

BFT SUPER MA instruction manual

INOXPA INNOVA F Installation, service and maintenance instructions

INOXPA

INOXPA INNOVA F Installation, service and maintenance instructions

Vimar ELVOX SL230.T Connection and operating manual

Vimar

Vimar ELVOX SL230.T Connection and operating manual

Overkiz Hattara DIN Rail PSU quick start guide

Overkiz

Overkiz Hattara DIN Rail PSU quick start guide

manuals.online logo
manuals.online logoBrands
  • About & Mission
  • Contact us
  • Privacy Policy
  • Terms and Conditions

Copyright 2025 Manuals.Online. All Rights Reserved.