WIKA mensor CPG2500 User manual

Operating Instructions
Vacuum Calibrator
Vacuum Calibrator CPG2500 PN 0018906001• 10/2019
CPG2500

2 Operating Instructions - CPG2500 Vacuum Calibrator
Vacuum Calibrator
CPG2500
Warning
!
This Warning symbol indicates that danger of injury for
persons and the environment and/or considerable damage
(mortal danger, danger of injury) will occur if the respective
safety precautions are not taken.
!
Caution
This Caution symbol indicates danger for the system and
material if the respective safety precautions are not taken.
i
Notice
This Notice symbol does not indicate safety notices but
information for a better understanding of the facts.

Operating Instructions - CPG2500 Vacuum Calibrator 3
Vacuum Calibrator
CPG2500
1. General Information 6
1.1 Warranty 6
1.2 Important Notice 6
1.3 FCC Radio Frequency Emission Notice 6
1.4 Trademarks and Copyrights 7
1.5 Software License Agreement 7
1.6 Mensor Service Plus 7
1.6.1 After the Warranty 7
1.6.2 Calibration Services 7
1.6.3 Certications and Accreditations 7
1.7 Packaging for Shipment 7
2. Safety 9
2.1 User Responsibilities 9
2.2 General Safety Notices 9
2.3 Warnings and Caution Notices 10
3. General Description 11
3.1 Features 11
3.2 Turning On 12
3.3 Front Panel 12
3.4 Display 13
3.5 Chassis Assembly 13
4. Specications 14
4.1 Transducer Specication 14
4.1.1 Measurement & General Specications 14
5. Installation 16
5.1 Unpacking the Instrument 16
5.2 Dimensions (inches) 17
5.3 Mounting 18
5.4 Rear Panel 18
5.4.1 Pressure/Vacuum Port 18
5.5 Remote Communication Connections 19
5.5.1 Remote Transducer Port 19
5.6 Power Up 19
5.7 Vacuum Pump Accessory Kit Connections 19
6. Local Operation and Setup 21
6.1 General Operation 21
6.1.1 Setup Applications 21
Table of Contents

4 Operating Instructions - CPG2500 Vacuum Calibrator
Vacuum Calibrator
CPG2500
6.1.2 Display Screen Features 21
6.2 Initial Setup 22
6.2.1 Contact and Version Information Application 22
6.2.2 Language Selection 22
6.3 Application Selection and parameter inputs 23
6.4 Applications: 24
6.4.1 Measure Application 24
6.4.1.1 Auxiliary Displays 25
6.4.1.2 Zero Button 25
6.4.2 Settings Application 27
6.4.2.1 Languages 27
6.4.2.2 Brightness 28
6.4.2.3 Volume 28
6.4.2.4 User base units / Base units multiplier 29
6.4.2.5 Barometer Units 29
6.4.2.6 Conguration 29
6.4.3 Transducer Application 31
6.4.3.1 Transducer Filter 31
6.4.3.2 Transducer Resolution 32
6.4.3.3 Auxiliary Displays 33
6.4.4 Remote Application 34
6.4.4.1 Remote Command Set 34
6.4.4.2 Remote Communication Settings 35
6.4.5 Info Application 36
6.4.6 Leak Test Application 37
6.4.7 Troubleshooting Application 37
6.4.8 Logging Application 38
6.4.8.1 Remote Logging 38
6.4.8.2 Pressure Logging 39
6.4.9 Service Application 40
6.4.10 Unlocked Service Application 41
7. Remote Operation 42
7.1 Command Set 42
7.2 IEEE-488 42
7.2.1 IEEE-488.2 Commands 42
7.3 Ethernet 43
7.4 Serial 44
7.4.1 Serial Cable Requirements 44

Operating Instructions - CPG2500 Vacuum Calibrator 5
Vacuum Calibrator
CPG2500
7.5 Mensor Command Set 45
7.6 Command and Query Format 45
7.7 Command Set Denitions 45
7.8 Output Formats 46
7.9 CPG2500 Commands and Queries 46
7.9.1 Units Command Syntax for Measurement Units 52
7.9.2 CPG2500 Error Codes 53
7.9.3 GPIB Capability Codes 53
7.9.4 Interface Functions 53
8. Accessories 54
8.1 External Pressure Sensor Connection Cable 54
8.2 Vacuum Pump Accessory Kit 54
9. Maintenance 55
9.1 Beyond the Warranty 55
10. Calibration 56
10.1 Environment 56
10.2 Pressure Standards 56
10.3 Media 56
10.4 Service Application 57
10.4.1 Service Application (unlocked) 58
10.5 Calibration Data 59
10.6 One Point Cal Application 59
10.7 Two Point Cal Application 59
10.8 Linearization 60
10.9 Head Pressure 61
11. Appendix 62
11.1 Conversion Factors, PSI 63
11.2 Conversion Factors, Millitorr 64
11.3 Conversion Factors, Pascal 66

6 Operating Instructions - CPG2500 Vacuum Calibrator
Vacuum Calibrator
CPG2500
1 General Information
1.1 Warranty
All products manufactured by Mensor are warranted to be free of defects in workmanship and materials for
a period of two years from the date of shipment. No other express warranty is given, and no armation of
Seller, by words or actions, shall constitute a warranty. SELLER DISCLAIMS ANY IMPLIED WARRANTIES
OF MERCHANTABILITY OR FITNESS FOR ANY PARTICULAR PURPOSES WHATSOEVER. If any
defect in workmanship or material should develop under conditions of normal use and service within the
warranty period, repairs will be made at no charge to the original purchaser, upon delivery of the product(s)
to the factory, shipping charges prepaid. If inspection by Mensor or its authorized representative reveals
that the product was damaged by accident, alteration, misuse, abuse, faulty installation or other causes
beyond the control of Mensor, this warranty does not apply. The judgment of Mensor will be nal as to all
matters concerning condition of the product, the cause and nature of a defect, and the necessity or manner
of repair. Service, repairs or disassembly of the product in any manner, performed without specic factory
permission, voids this warranty.
MENSOR MAKES NO WARRANTY OF ANY KIND WITH REGARD TO THIS MANUAL, INCLUDING,
BUT NOT LIMITED TO, THE IMPLIED WARRANTIES OF MERCHANTABILITY AND FITNESS FOR
A PARTICULAR PURPOSE. Mensor shall not be liable for errors contained herein or for incidental or
consequential damages in connection with the furnishing, performance, or use of this material.
1.2 Important Notice
The product specications and other information contained in this manual are subject to change without
notice.
Mensor has made a concerted eort to provide complete and current information for the proper use of
the equipment. If there are questions regarding this manual or the proper use of the equipment, contact
Mensor at:
Mensor WIKA Alexander Wiegand SE & Co. KG
201 Barnes Drive Alexander-Wiegand-Straße 30
San Marcos, Tx 78666 D-63911 Klingenberg / Germany
Tel: 1.512.396.4200 Tel: (+49) 93 72/132-9986
1.800.984.4200 (USA only) web site: www.wika.de
web site: www.mensor.com fax: (+49) 93 72/132-8767
e-mail: sales@mensor.com
tech.support@mensor.com
1.3 FCC Radio Frequency Emission Notice
This equipment has been tested and found to comply with the limits for a Class A digital device,
pursuant to part 15 of the FCC Rules. These limits are designed to provide reasonable protection against
harmful interference when the equipment is operated in a commercial environment. This equipment
generates, uses, and can radiate radio frequency energy and, if not installed and used in accordance
with the instruction manual, may cause harmful interference to radio communications. Operation of
this equipment in a residential area is likely to cause harmful interference in which case the user will be
required to correct the interference at his or her own expense.
USE SHIELDED CABLES TO CONNECT EXTERNAL DEVICES TO THIS INSTRUMENT TO MINIMIZE
RF RADIATION.

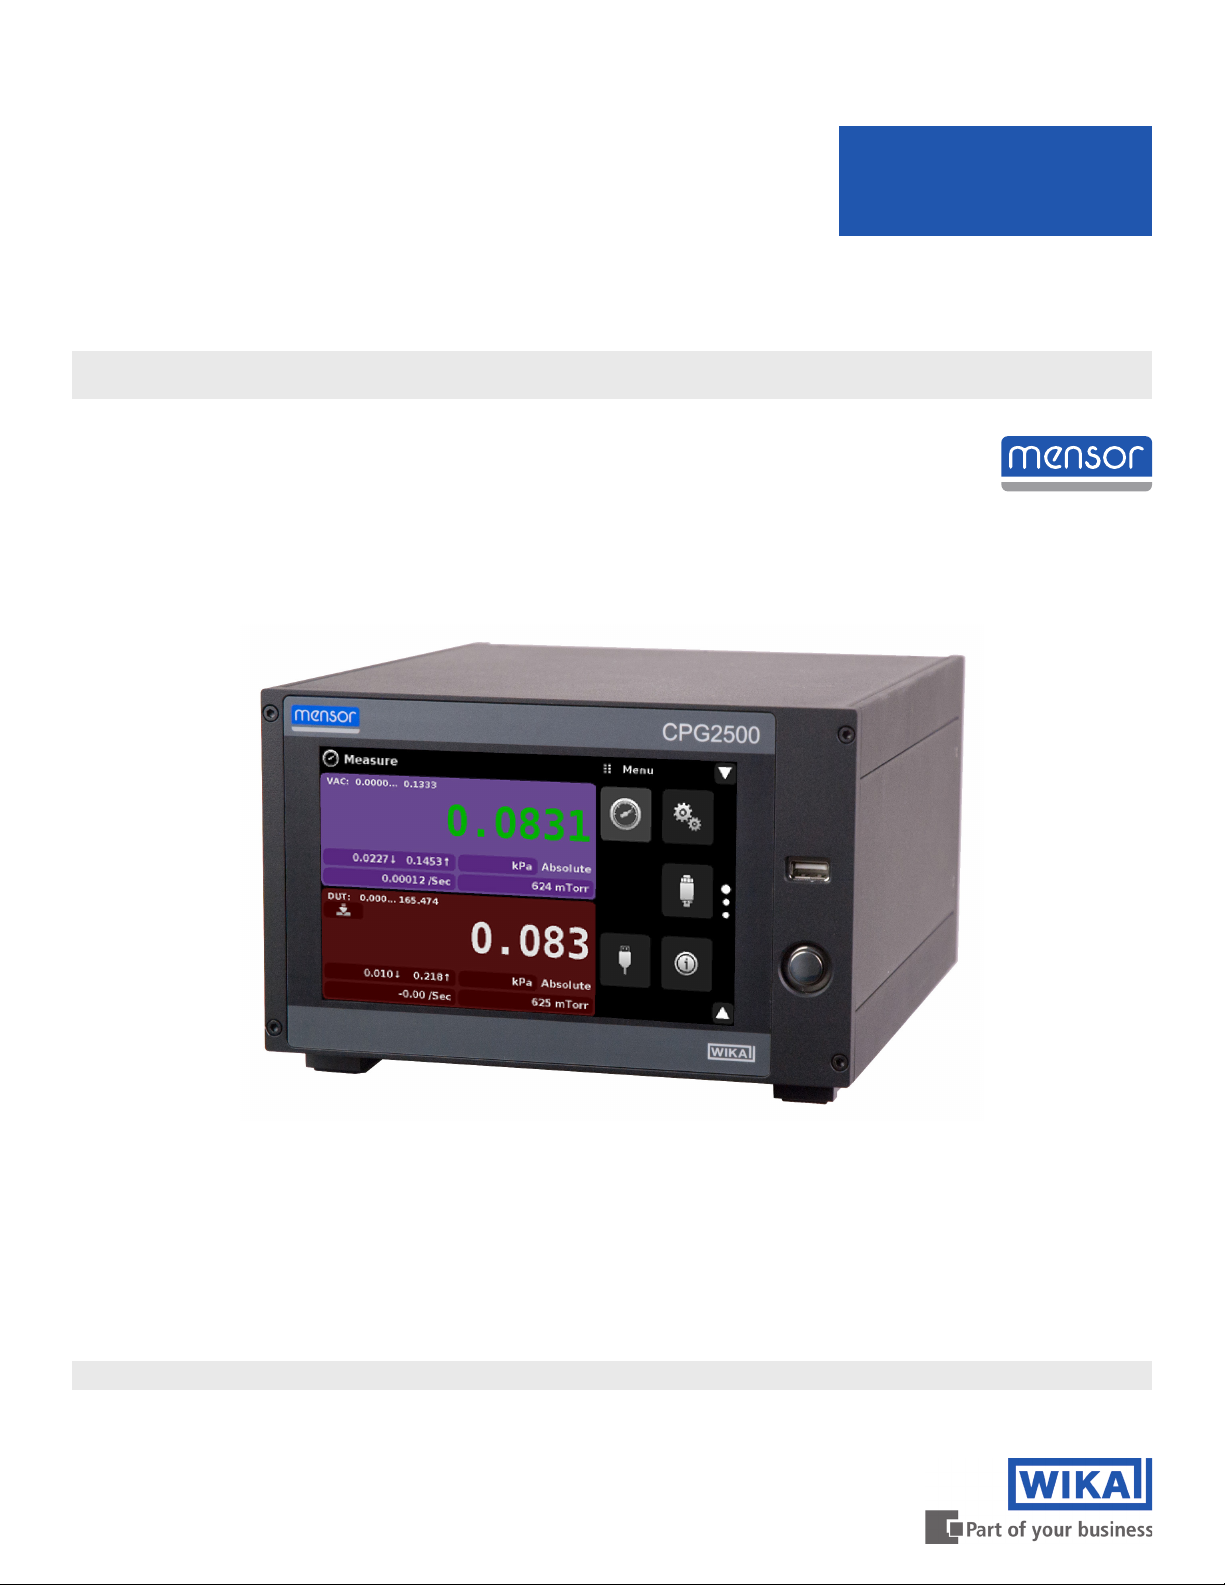
Operating Instructions - CPG2500 Vacuum Calibrator 7
Vacuum Calibrator
CPG2500
1.4 Trademarks and Copyrights
Mensor is a registered trademark of Mensor, LP. All other brand and product names are trademarks or
registered trademarks of their respective companies. ©2007, Mensor, LP. All rights reserved.
1.5 Software License Agreement
This product contains intellectual property, i.e., software programs, that are licensed for use by the end
user/customer (hereinafter “end user”).
This is not a sale of such intellectual property.
The end user shall not copy, disassemble or reverse compile the software program.
i
Notice
The software programs are provided to the end user “as is” without warranty
of any kind, either express or implied, including, but not limited to, warranties
ofmerchantabilityandtnessforaparticularpurpose.Theentireriskofthe
quality and performance of the software program is with the end user.
Mensor and its suppliers shall not be held to any liability for any damages suered or incurred by the
end user (including, but not limited to, general, special, consequential or incidental damages including
damages for loss of business prots, business interruption, loss of business information and the like),
arising from or in connection with the delivery, use or performance of the software program.
1.6 Mensor Service Plus
If you have problems and you don’t nd the answer in this manual, contact Mensor at 1.800.984.4200
(USA only) or 1.512.396.4200 for personal assistance, or at any of the contact addresses listed on the
rear cover of this manual. We are ready to help.
1.6.1 After the Warranty
Mensor’s concern with the performance of this instrument is not limited to the warranty period. We
provide complete repair, calibration and certication services after the warranty for a nominal fee.
1.6.2 Calibration Services
In addition to servicing our own products Mensor can perform a complete pressure calibration service,
up to 30,000 psi, for all of your pressure instruments.This service includes an accredited calibration.
1.6.3 CerticationsandAccreditations
Mensor is registered to ISO 9001:2015.The calibration program at Mensor is accredited by A2LA, as
complying with both the ISO/IEC 17025:2017 and the ANSI/NCSL Z540-1-1994 standards.
1.7 Packaging for Shipment
If the product must be shipped to a dierent location or returned to Mensor for any reason through a
common carrier it must be packaged properly to minimize the risk of damage.
The recommended method of packing is to place the instrument in a container, surrounded on all sides
with at least four inches of shock attenuation material such as styrofoam peanuts.
Strictly observe the following when shipping the instrument:
All instruments delivered to WIKA or Mensor must be free from any kind of hazardous substances (acids, bases, solutions, etc.)
and must be cleaned before being returned.

8 Operating Instructions - CPG2500 Vacuum Calibrator
Vacuum Calibrator
CPG2500
WARNING!
Physical injuries and damage to property and the environment through residual media
Residual media in the dismounted instrument can result in a risk to persons, the environment and equipment.
With hazardous substances, include the material safety data sheet for the corresponding medium.
When returning the instrument, use the original packaging or a suitable transport packaging.
To avoid damage:
Wrap the instrument in an anti-static plastic film.
Place the instrument along with shock-absorbent material in the packaging.
Place shock-absorbent material evenly on all sides of the transport packaging.
If possible, place a bag containing a desiccant inside the packaging.
Label the shipment as a highly sensitive measuring instrument.
Instruments with lithium ion rechargeable batteries or lithium metal batteries
The included lithium ion rechargeable batteries or lithium metal batteries are subject to the requirements of the dangerous
Goods Act. For shipping, special packaging and labelling requirements must be observed. A dangerous goods expert must be
consulted when preparing the item to be shipped. Do not send any damaged or defective rechargeable batteries. Cover open
contacts with adhesive tape and package the rechargeable battery such that it cannot move inside the package and short
circuits are prevented. The different requirements of the relevant transport carriers as regard to the Dangerous Goods Act and
also additional national regulations must be observed.
Information on returns can be found under the heading “Service” on our local website.

Operating Instructions - CPG2500 Vacuum Calibrator 9
Vacuum Calibrator
CPG2500
2 Safety
2.1 User Responsibilities
To ensure safety, the user must make sure that:
• The system is used properly, no dangerous media are used and that all technical specications are
observed.
• The system is operated in perfect operating condition.
• This operation manual is legible and accessible to the user at the system’s location.
• The system is operated, serviced and repaired only by authorized and qualied personnel.
• The operator receives instruction on industrial safety and environmental protection, and is
knowledgeable of the operating instructions and the safety notices contained therein.
2.2 General Safety Notices
i
Notice
The system should only be operated by trained personnel who are familiar with
this manual and the operation of the instrument.
Warning
!
WARNING: A condition for trouble-free and safe operation of this system is proper
transport, proper storage, installation, assembly and proper use as well as careful
operation and maintenance.
Any operation not described in the following instructions should be prohibited.
The system must be handled with care required for an electronic precision
instrument(protectfromhumidity,impacts,strongmagneticelds,static
electricity and extreme temperatures). Do not insert any objects into the
instrument.
The system is powered via the power cable with a voltage that can cause physical
injury. Even after disconnecting the system from the power supply, dangerous
voltages can temporarily occur due to capacitance.
Extreme care must be taken with pressure connections when using hazardous or
toxic media.
Repairs must only be performed by authorized service personnel.
i
Notice
Additional safety notices are found throughout this manual.

10 Operating Instructions - CPG2500 Vacuum Calibrator
Vacuum Calibrator
CPG2500
2.3 Warnings and Caution Notices
Warning
!WARNING: NOT EXPLOSION PROOF! Installation of this instrument in an area
requiring devices rated as intrinsically safe is not recommended.
Warning
!
WARNING: POSSIBLE INJURY! The tubing, valves, and other apparatus attached
to the gauge must be adequate for the maximum pressure which will be applied,
otherwise physical injury to the operator or bystanders is possible.
!
Caution
CAUTION: USE THE PROPER PRESSURE MEDIUM! Use only clean, dry, non-
corrosivegasesunlessotherwisespeciedbyMensor.Thisinstrumentisnot
designed for oxygen use.
!
Caution
CAUTION: As with most sensitive electronic equipment, switch the power switch
obeforeconnectingordisconnectingtoapowersourcetopreventdataloss.Do
notpositiontheequipmentsothatitisdiculttodisconnecttheDCpowerjack.
CAUTION: ESD PROTECTION REQUIRED. The proper use of grounded work
surfaces and personal wrist straps are required when coming into contact with
exposed circuits (printed circuit boards) to prevent static discharge to sensitive
electronic components.
Additional Warning and Caution notices are found throughout this manual.

Operating Instructions - CPG2500 Vacuum Calibrator 11
Vacuum Calibrator
CPG2500
3 General Description
The CPG2500 Vacuum Calibrator is a precision vacuum indicator and calibrator designed to test
and calibrate absolute pressure transducers and indicators. The CPG2500 has a precision vacuum
transducer capable of measuring vacuum pressure with 1 mTorr accuracy.
Figure 3.1 - CPG2500 Vacuum Calibrator
3.1 Features
Here is a short list of signicant features designed into the CPG2500:
• One internal highly stable vaccuum transducer, connection for device under test through RS-232 port.
• Storage of calibration data for up to 32 device under tests.
• Automatic detection of device information upon connection.
• 7” Color LCD with touch screen with dual display for vacuum transducer and device under test.
• One button Zero function when a DUT is installed
• Multiple languages; change the language for on-screen text and number/date formats by simply
touching one of the “national ag” icons available in the setup screen.
• Local Operation, or command and read remotely through RS-232, USB, Ethernet and IEEE-488.

12 Operating Instructions - CPG2500 Vacuum Calibrator
Vacuum Calibrator
CPG2500
3.2 Turning On
You can conrm that your CPG2500 is operational right now. Apply power to the power connector on
the rear of the instrument with the included power adapter, remove any plastic plugs from the rear panel
pressure ports, and press the power switch to ON. The system will go through an initialization process,
which takes about 45 seconds, and then a display will appear similar to the screen shown below.
Power Switch
ON/OFF
To see information about the conguration of your new CPG2500, touch the Information Application
(App) icon on the menu and a window will appear listing the Mensor customer service contact, model
number and the internal transducer that are installed. Press the Measure App [ ] to return to the main
screen.
Information Application
3.3 Front Panel
The CPG2500 front panel includes a 7” color LCD with touch screen. Operator input is accomplished by
pressing the words or App icons presented on the display. There is a single discrete on/o button and a
USB on the right hand side.The front panel also shows the model number designation and brand logos.

Operating Instructions - CPG2500 Vacuum Calibrator 13
Vacuum Calibrator
CPG2500
3.4 Display
The display is made up of two sections. In the main screen (“Measure Application”), the left two thirds
shows the internal and DUT channels, along with the pressure reading, units, mode (absolute), channel
label, an auto zero button (only on DUT channel) and any auxiliary indications that have been chosen.
The right one third of the screen has Application Icons (“Apps”) for setting viewing options, sensor
settings, communication settings plus a “Page Down” button [ ] that, when pressed, shows a second
and third page of icons for calibration, remote communication and error checking.
Transducer and DUT channels Settings Apps
Channel label
and range
Reading
Units and Mode
Auxiliary Indications
DUT range
Auto Zero
DUT reading
Page Down
Buttons, Labels and Windows: The CPG2500 touch screen has many buttons with relevant graphic
icons or text which, when pressed, will open a related window where changes can be made or
information viewed. Some of these buttons will toggle from one state to another, others present choices
or display a numerical data entry screen. Text or icons that are displayed, but do not respond to being
touched, are called labels or windows. Operators will quickly become accustomed to the particular
characteristics of the frequently used buttons.
Main Screen: The main screen or “Measure Application”, appears after power-up. This screen contains
the channel frames and settings button. It will remain as congured after a power cycle.
Transducer/DUT Channel Frame(s): The transducer channel frames (left 2/3 of the screen) contain
information specic to a channel. The channel frames are color coded with internal vacuum channel -
lavender and remote DUT channel - red. The channel frame contains the pressure reading, units, and
mode(absolute) plus any auxiliary displays that have been chosen.
3.5 Chassis Assembly
The chassis assembly is the housing for the system and the internal transducer. The system has no
user-serviceable parts, and therefore the chassis should not be opened except by qualied repair
personnel at Mensor or certied service locations for any reason except to change the removable
transducers.

14 Operating Instructions - CPG2500 Vacuum Calibrator
Vacuum Calibrator
CPG2500
4 Specications
Accuracy specications presented herein are obtained by comparison with primary standards traceable
to a national metrology institute or recognized international standard organization. These specications
are obtained in accordance with the ISO Guide to the Expression of Uncertainty in Measurement (GUM).
The calibration program at Mensor is accredited by the American Association of Laboratory Accreditation
(A2LA) as complying with both the ISO/IEC 17025:2017 and the ANSI/NCSL Z540-1-1994 standards.
If there is an exception to the requirements and recommendations of Z540 during a calibration the
exception is noted on the individual calibration certicate.
Mensor reserves the right to change specications without notice.
4.1 TransducerSpecication
Vacuum Transducer
Accuracy(1) 4 mTorr or less
Pressure range 100 ... 1,000 mTorr
Pressure type Absolute
Calibration interval 365 days
Pressure media Clean dry air or Nitrogen (ISO 8573-1:2010 class 5.5.4 or better)
Reading rate 33 readings/second
Calibration orientation Horizontal
(1) It is dened by the total measurement uncertainty, with the coverage factor (k = 2) and includes the intrinsic performance of the instrument, the measurement uncertainty of the reference
instrument, long-term stability, inuence of ambient conditions, drift and temperature eects over the compensated range.
4.1.1 Measurement&GeneralSpecications
Basic Instrument
Instrument
Instrument version Table top with tilt feet
Dimensions See technical drawing
Weight 12.5 lbs./ 5.7 kg (with all internal options)
Warm-up time Approximately 15 minutes
Display
Screen 7” color LCD
Resolution Selectable from 4 to 7 digits
Data entry Touch screen keypad
Languages English, German, Spanish, French, Italian, Portuguese, Polish, Russian, Chinese,
Japanese, Korean
Connections
Pressure connection 1/4” NPT female
Pressure adaptors Standard: 1/4” NPT male to 8 mm tube adaptor
Overpressure limits 4 psi max
Voltage supply
Power input requirements AC 100 ... 120 V, 50/60 Hz; AC 220 ... 240 V, 50/60 Hz

Operating Instructions - CPG2500 Vacuum Calibrator 15
Vacuum Calibrator
CPG2500
Switching power supply Output: 12 VDC, 1.7 A (includes 4 region specic plugs adapters)
Permissible ambient conditions
Storage temperature range 0 to 70 deg C
Operating environment 0 ... 95 % RH (relative humidity, non-condensing)
Operating temperature range 15 ... 40 deg C
Communications
Remote interface IEEE 488, RS-232, USB and Ethernet
Communication to DUT RS-232 through Remote Transducer port
Command sets Mensor
Optional Vacuum Pump
Flow rate 6 CFM
Max Vacuum 10 micron
Power input requirements AC 100 ... 120 V, 50/60 Hz; AC 220 ... 240 V, 50/60 Hz
Stages Two
CE conformity and certicates
CE compliance EN61326-1:2013 electromagnetic compliance
EN61010-1:2010 safety/CB scheme
RoHS directive 2011/65/EU, aticle 4
Calibration Calibration certicate per ISO/IEC 17025:2017. Accreditation is by the American
Association for Laboratory Accreditation (A2LA).

16 Operating Instructions - CPG2500 Vacuum Calibrator
Vacuum Calibrator
CPG2500
5 Installation
5.1 Unpacking the Instrument
In addition to functional testing, each unit is inspected for appearance prior to leaving the factory. Upon
receipt, please examine the instrument for shipping damage. Report any apparent damage to the carrier
immediately.
In addition to this manual you should have:
• CPG2500 Vacuum Calibrator;
• Power Supply;
• DB-9 connector cable for DUT communication,
• Fitting adapters ordered;
• Any accessories ordered (vacuum pump, pressure hoses, needle valve);
• An envelope containing the calibration certicate.

Operating Instructions - CPG2500 Vacuum Calibrator 17
Vacuum Calibrator
CPG2500
5.2 Dimensions (inches)
Front view Side view
Desk top case
Rear Panel
DUT/
Remote Transducer
connection
RS-232
USB (device)
USB (host)
Ethernet port
IEEE-488
Power
Measure port
(vacuum calibrator)
1/4” NPT female

18 Operating Instructions - CPG2500 Vacuum Calibrator
Vacuum Calibrator
CPG2500
5.3 Mounting
The instrument is set up on a desk top.
The vacuum transducer built in the CPG2500 is sensitive to vibration, to further assure stability and
accuracy, avoid mounting the instrument on surfaces subject to excessive motor or machinery vibration.
5.4 Rear Panel
The measure port for the vacuum calibrator is located at the rear panel of the CPG2500. Positioned
on the left side is the remote transducer connection which can , the RS-232, Ethernet, IEEE-488, USB
device connections for communication, the USB host connection and the 12 VDC power input.
Figure 5.4 - Rear panel
5.4.1 Pressure/Vacuum Port
The CPG2500 will precisely measure the pressure/vacuum connected to the pressure port with a 1/4”
female NPT tting (optional adapter: 1/4” NPT male to 8 mm tube) up to the maximum range of the
internal transducer.
!
Caution
CAUTION: The CPG2500 Vacuum Calibrator requires a stable and regulated
vacuum source for optimal performance of the internal vacuum transducer.

Operating Instructions - CPG2500 Vacuum Calibrator 19
Vacuum Calibrator
CPG2500
5.5 Remote Communication Connections
See Section 7, Remote Operation, for connections and commands for operation over IEEE-488,
Ethernet, USB or RS-232 ports.
5.5.1 Remote Transducer Port
The Remote Transducer Port is used to connect the Device Under Test (DUT) to the CPG2500 Vacuum
Calibrator. This is a RS-232 port at the top left of the chassis and connects to the corresponding DB-9
connection on the DUT (Eg: CPT6100).Once connected, the CPG2500 reads and communicates with
the CPT6100 seamlessly.
!
Caution
CAUTION:The CPG2500 Vacuum Calibrator only supports remote communication
with the DUT when the DUT is having a baud rate of 57600. Follow instructions in
DUT operating manual to set this baud rate prior to connection.
5.6 Power Up
Apply power to the power connector on the rear of the instrument using the power adaptor included,
and switch the power switch on the front of the unit ON. The instrument will go through an initialization
process and system check. As soon as the system check is completed the system will default to a screen
similar to the one shown in Section 6.1.2 - Display Screen Features. The main measurement screen may
be congured in many dierent ways but initially it will be in a default conguration. Subsequently, the unit
will power up in the conguration that it was in when last powered o. Allow at least 15 minutes of warm
up before performing critical pressure measurements.
5.7 Vacuum Pump Accessory Kit Connections
Connect the optional vacuum pump accessory kit including the pressure hoses and needle valve to the
CPG2500 vacuum calibrator and the DUT. The steps below detail the process of installation:
• Ensure the needle valve is connected to the vacuum pump.
• Connect both of the 8 mm tubes provided as part of the kit to either end of the 8 mm T-tting on the
vacuum pump as shown in Figure 5.7-A.
• Connect the other end of one of the tubes to the Measure Port of the CPG2500 vacuum calibrator with
the 1/4” MNPT Male to 8 mm tube adaptor.
• Connect the other end of the second tube to the Pressure Port of the DUT (Absolute CPT6100).
• Ensure all connections are secure before powering on the vacuum pump (Figure 5.7-B).

20 Operating Instructions - CPG2500 Vacuum Calibrator
Vacuum Calibrator
CPG2500
Figure 5.7-A T-tting on Vacuum Pump
8 mm pressure tube
connecting DUT
pressure port to the
vacuum pump
8 mm pressure
tube con-
necting Mea-
sure port on
CPG2500 with
vacuum pump
CPG2500 DUT (Absolute CPT6100) con-
nected with the Remote Port of
the CPG2500 using a RS-232
DB-9 connector.
Needle valve to
regulate vacu-
um supply
T shaped
connection to
source vacuum
supply to DUT
and CPG2500
Vacuum pump
Figure 5.7-B Installation Setup with Vacuum Pump Accessory Kit and DUT
Table of contents
Other WIKA Test Equipment manuals

WIKA
WIKA PG28 User manual

WIKA
WIKA CPH6600 User manual

WIKA
WIKA CPP 3000-X User manual

WIKA
WIKA CTD9350 User manual

WIKA
WIKA PASCAL ET-P User manual

WIKA
WIKA Pascal ET User manual

WIKA
WIKA Wally Box III CPH7600 User manual

WIKA
WIKA NETRIS 3 User manual

WIKA
WIKA CPB3800 User manual

WIKA
WIKA CPB 5000 DP User manual