WOOSIM PORTI-AP60 User manual

http://www.woosim.com
MODEL
PORTI-AP60
WOOSIM SYSTEMS Inc.
#501, Daerung Technotown 3th, 448,
Gasan-Dong, GeumChun-Ku, Seoul,
Korea
Tel : +82-2-2107-3700
Fax : +82-2-2107-3707
URL: http://www.woosim.com
(Panel Printer)
Rev. 2.0
All specifications are subjected to change without notice

Porti-AP60 Rev. 2.0
http://woosim.com 2
¦
Copyright
PORTI-AP60 panel printer operator’s manual.
Copyright ⓒ2007 by Woosim Systems Inc.
All rights reserved.
The information contained in this manual is the property of Woosim
Systems Inc. and may not be reproduced in whole or in part without
the prior written permission of Woosim Systems Inc.
¦
Trademark
a registered trademark of Woosim Systems Inc.
All other trademark are the properties of their respective companies.
¦
Caution
Some semiconductor devices are easily damaged by static electricity. You should
turn the printer “OFF”, before you connect or removed the cable on the rear side, in
order to guard the printer against the static electricity.
If the printer is damaged by the static electricity, you should turn the printer “OFF”
¦
Notice
The contents of this manual are subject to change without notice.

Porti-AP60 Rev. 2.0
http://woosim.com 3
¦
Introduction
The Porti-AP60 is the ideal solution for taxi receipt printer, receipt printer,
Medical analyzer, industrial instrument, recorder, geological analyzer,
underground analyzer, chemical analyzer, metallic analyzer, etc.
The general features of Porti-AP60 printer are as follows:
uUltra small size rack mount printer.
uVery silent printing thru direct thermal printing method.
uHigh speed(50mm/sec, MAX)
uHigh resolution(203dpi : 8dots/mm).
uUART(RS-232C), RS-485, Parallel interface
uIntuitive LED’s indicate Power(on/off),Error status
uSupport text and graphic printing.
uEasier paper roll loading by CLAMSHELL design.
uAuto cutting.
uEasier maintenance with self-diagnostics.
uIn field programming – Update Firmware, Download Fonts and Logos
uFlow control : Software (XON/XOFF)
※Hardware flow control not supported in printer.
uAgency Approvals

Porti-AP60 Rev. 2.0
http://woosim.com 4
¦
Operating Precautions
Please follow the precautions below to enjoy and maintain the full performance of
the printer.
u
Using the Printer
● Be careful not to drop or bump the printer on a hard surface.
● Do not install the printer in direct sunlight or such areas.
Suitable environment for the use of the printer is as follows:
◆Operating temperature :-10°C to 50°C
◆Relative humidity : 10% to 90% (No condensation)
● Do not install the printer near devices that generate strong
electromagnetic fields such as a copy machine.
● Do not open the platen cover during printing .
● Do not remove or reinstall the communication cable during printing
or transmission.
● Do not touch the connectors of the communication during printing.
● Switch the POWER OFF when not in use.
● Do not use alcohol or other solvent.
●The AC adapter, the battery charger and the battery pack may
become warm when in use. This is normal and is not a malfunction.
● When the battery pack is used at low temperature, the length of time
the printer can be used may be shortened.
uThermal Paper Handling
● Store the thermal paper in a cool, dry and dark place.
● Do not rub the paper with hard object.
● Do not leave the paper with hard object.
● Do not allow plastic film, erasers, or adhesive tape to touch the paper
for long periods.
● Do not stack the thermal paper with diazo copies immediately
after copying or wet-type copies.
● Do not use chemical glue.
●Always use the clean thermal paper.

Porti-AP60 Rev. 2.0
http://woosim.com 5
¦
Note
This equipment has been tested and found to comply with the limits for a Class B digital
device, pursuant to Part 15 the FCC Rules.
These limits are designed to provide reasonable protection against harmful
interference in a residential installation.
These equipment generates, uses and can radiate radio frequency energy and, if not
installed and used in accordance with the instructions, may cause harmful interference
to radio communications.
However, there is no guarantee that interference will not occur in a particular installation.
If this equipment does cause harmful interference to radio or television reception , which can
be determined by turning the equipment off and on, the user is encouraged to try to correct the
interference by one or more of the following measures:
--Reorient or relocate the receiving antenna.
--Increase the separation between the equipment and receiver.
--Connect the equipment into an outlet on a circuit different from that to which the
receiver is connected.
--Consult the dealer or an experienced radio/TV technician for help.

Porti-AP60 Rev. 2.0
http://woosim.com 6
CONTENTS
1. Outline ............................................................................................................................................7
1.1. Model classifications..............................................................................................................7
1.2. Product Part Number System .................................................................................................7
1.3. Specifications .........................................................................................................................8
2. Setting up the printer ....................................................................................................................9
2.1. Printer & Accessories.............................................................................................................9
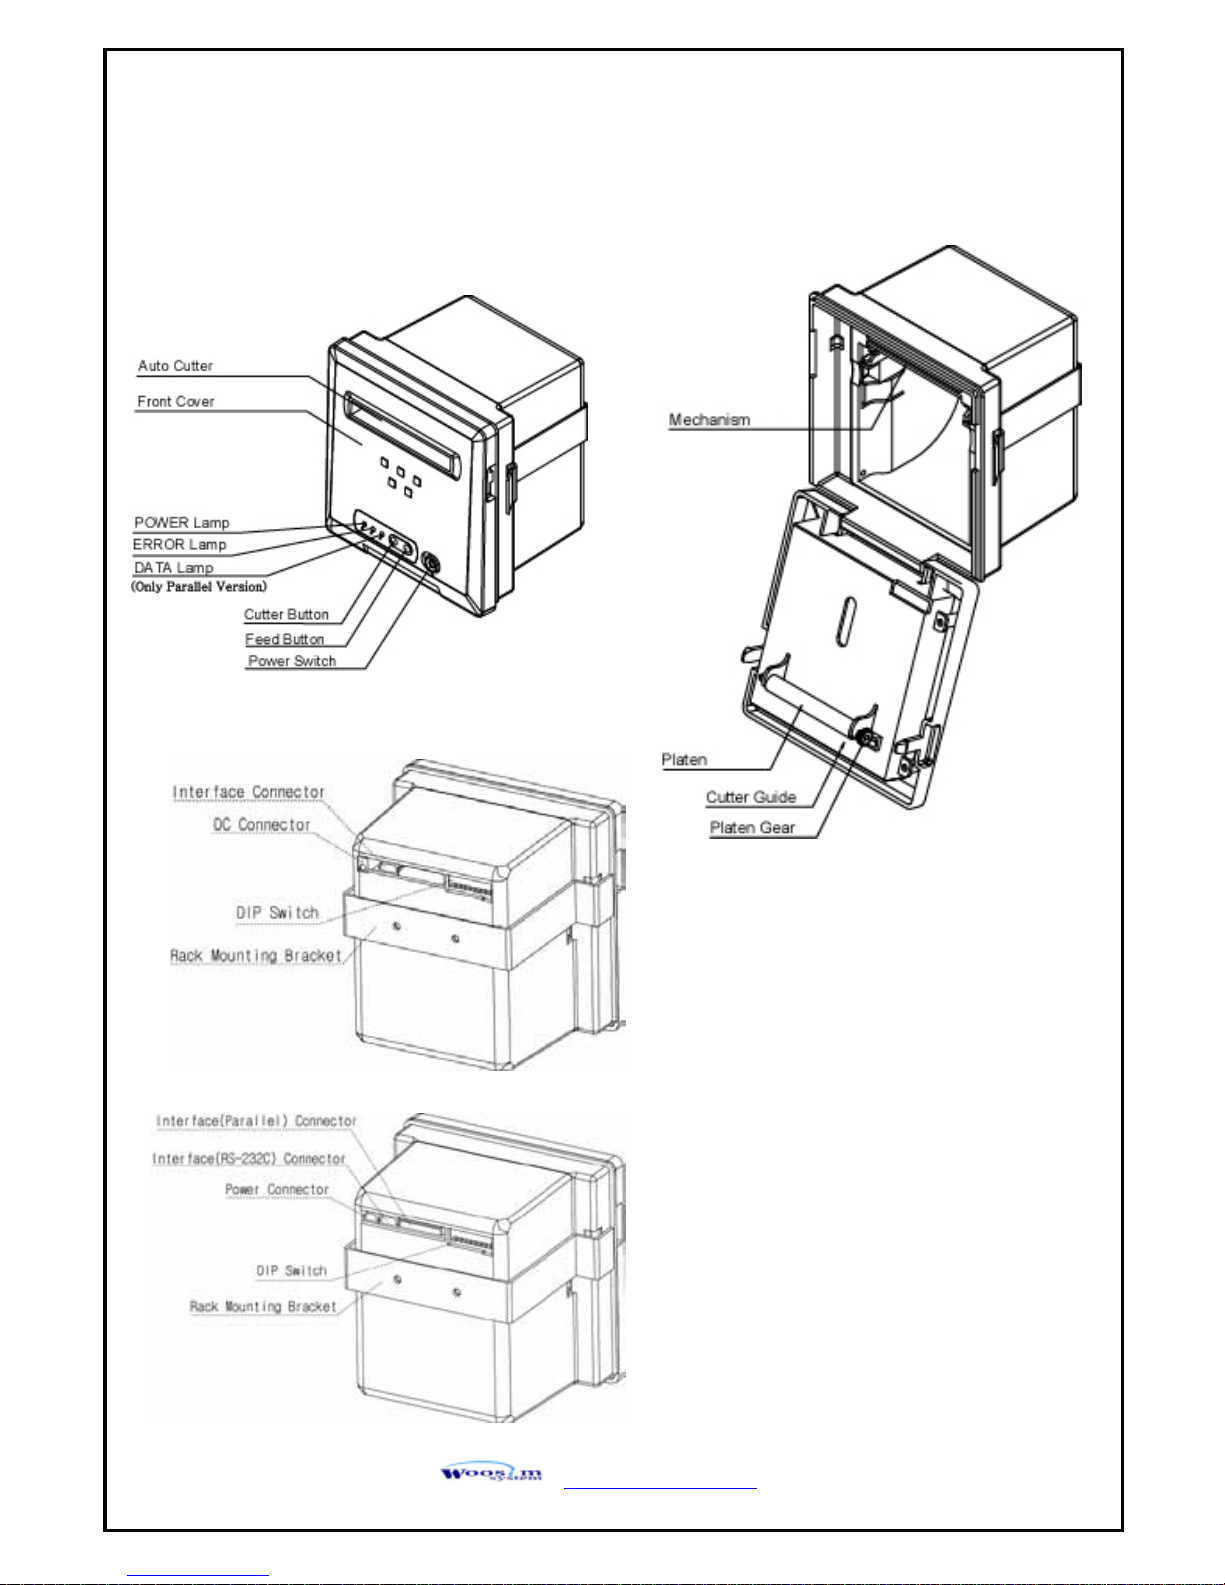
2.2. Printer Features.....................................................................................................................10
2.2.1. Part name ....................................................................................................................10
2.2.2. Dimensions .................................................................................................................11
2.2.3. Installation...................................................................................................................12
2.3. Replacing paper roll .............................................................................................................13
2.4. Specified power supply........................................................................................................14
3. Interface........................................................................................................................................15
3.1. 9V version : UART(RS-232C) or RS-485............................................................................15
3.2. 12~24V version : UART(RS-232C) and Parallel .................................................................16
3.3. Set Operation Mode..............................................................................................................18
4. Using the printer..........................................................................................................................19
4.1. Control panel........................................................................................................................19
4.2. The self test ..........................................................................................................................19
5. Consumable Parts........................................................................................................................20
5.1. Recommended paper............................................................................................................20
5.2. Printing position ...................................................................................................................20

Porti-AP60 Rev. 2.0
http://woosim.com 7
1
1.
.
O
Ou
ut
tl
li
in
ne
e
1
1.
.1
1.
.
M
Mo
od
de
el
l
c
cl
la
as
ss
si
if
fi
ic
ca
at
ti
io
on
ns
s
1
1.
.2
2.
.
P
Pr
ro
od
du
uc
ct
t
P
Pa
ar
rt
t
N
Nu
um
mb
be
er
r
S
Sy
ys
st
te
em
m
PORTI–AP60 ( ) ( )
Model name
Interface
None: UART
A : RS-485
P UART/Parallel
(only 12~24V)
Power
9V : DC 9V
12V : DC12~24V
Model name / Interface Spec.
Example) 1. Porti-S40 Serial/Bluetooth Part No. ⇒S40/A1
2. Porti-SC30 Bluetooth Only Part No. ⇒SC30/Z1
S40
SC30
W25
.
.
.
Wired Wireless
A RS-232C 1 Bluetooth
B TTL 2 IrDA
C USB 0 None
D RS-485
E Parallel
Z None

Porti-AP60 Rev. 2.0
http://woosim.com 8
1
1.
.3
3.
.
S
Sp
pe
ec
ci
if
fi
ic
ca
at
ti
io
on
ns
s
Item Specification
Printing method Direct thermal line printing
Characters per line 42cpl (MAX)
Character size Eng. :9*24dots, 12*24dots Kor. : 16*24dots, [24*24dots]
Optional Characters Simplified/Traditional Chinese, Arabic, Cyrillic, Russian, Tukish,
Greek, Japanese, Persian, Latin9 and Others upon request.
Resolution 203dpi, 8dots/mm
Print width 2-inch (48mm, 384dots)
Printing speed 50mm / sec (MAX)
Dimensions 107.2 * 109.1 * 90.6 mm
Weight 451g (including roll paper )
Interface UART(RS-232C), RS-485, Parallel
Paper supplied Thermal roll paper (57mm wide, 60ø)
Barcode supplied
1-
dimension : Code128, Code39, I2/5, Code93 UPC, EAN, KAN,
JAN, CODABAR
2-dimension : PDF417, QR Code, DATA Matrix
H/W Spec MCU : 32bits RISC, FLASH : 4Mbytes, RAM : 8Mbytes
Receive buffer size 1M bytes
Input Power 9VDC, Stand by 80mA and Max 3A (Standard)
12~24VDC, Stand by 80mA and Max 3A (Parallel)
Environment
conditions
Temperature -10°C ~ 50°C (operating)
-10°C ~ 70°C (storage)
Humidity 30% - 80% (operating)
10% - 90% (storage)
MCBF (Mean Cycle
Between failure)
Mechanical 37,000,000 lines
Head Approximately 50 Km
< Table1 1 >

Porti-AP60 Rev. 2.0
http://woosim.com 9
2
2.
.
S
Se
et
tt
ti
in
ng
g
u
up
p
t
th
he
e
p
pr
ri
in
nt
te
er
r
2
2.
.1
1.
.
P
Pr
ri
in
nt
te
er
r
&
&
A
Ac
cc
ce
es
ss
so
or
ri
ie
es
s
Your printer box should include these items. If any items are damaged or missing,
please contact your dealer for assistance.
Thermal Roll Paper
PORTI-AP60

Porti-AP60 Rev. 2.0
http://woosim.com 10
2
2.
.2
2.
.
P
Pr
ri
in
nt
te
er
r
F
Fe
ea
at
tu
ur
re
es
s
2
2.
.2
2.
.1
1.
.
P
Pa
ar
rt
t
n
na
am
me
e
9V Version
12V Version

Porti-AP60 Rev. 2.0
http://woosim.com 11
2
2.
.2
2.
.2
2.
.
D
Di
im
me
en
ns
si
io
on
ns
s

Porti-AP60 Rev. 2.0
http://woosim.com 12
2
2.
.2
2.
.3
3.
.
I
In
ns
st
ta
al
ll
la
at
ti
io
on
n
1) Put the main body into the rack
as shown in the following
drawing.
2) Hold the main body from rear
side with mounting bracket,
fasten the screws to fix the
main body.
3) After mounting, make sure that
front cover open/close properly
4) In fasten screws, do not fasten
the screws until the main body
is deformed.
This may be abnormal force
onto the main body as well as
well as be an cause of
breakage.
5) Thickness of rack panel to fix
the main body is to be approx.
1~3 mm.

Porti-AP60 Rev. 2.0
http://woosim.com 13
2
2.
.3
3.
.
R
Re
ep
pl
la
ac
ci
in
ng
g
p
pa
ap
pe
er
r
r
ro
ol
ll
l
1. Make sure that the printer is not receiving data; otherwise, data may be lost.
2. Open the paper roll cover by applying your finger on both side of printer, push it up when the
lock is released as shown in the drawing.
3. Remove the used paper roll core if there is one.
4. Insert the paper roll as shown.
(Be sure to note the correct direction that the paper comes off the roll)
Note : Be sure to use paper rolls that meet the specifications.
Do not use paper rolls that have the paper glued to the core because
the printer can not detect the paper end correctly.

Porti-AP60 Rev. 2.0
http://woosim.com 14
2
2.
.4
4.
.
S
Sp
pe
ec
ci
if
fi
ie
ed
d
p
po
ow
we
er
r
s
su
up
pp
pl
ly
y
5. Tear the excess paper off using the edge of paper door as a tear bar.
The following specifications are requested for Power supply.
INPUT : DC 9V, MAX 3A ( Standard model )
DC 12~24V, MAX 3A (Serial & Parallel)
Avoid using power supply which its power capacity of power current is extremely high.

Porti-AP60 Rev. 2.0
http://woosim.com 15
3
3.
.
I
In
nt
te
er
rf
fa
ac
ce
e
3
3.
.1
1.
.
9
9V
V
v
ve
er
rs
si
io
on
n
:
:
U
UA
AR
RT
T(
(R
RS
S-
-2
23
32
2C
C)
)
o
or
r
R
RS
S-
-4
48
85
5
The Porti-AP60 printer has UART(RS-232C) or RS-485 interface is connected by means of
a 3 pin female connector. In the following table, the signals present on the connector are listed:
<CN11 : Serial Pin Description>
Pin No. Signal Name Direction Function
1 GND Ground
2 RxD Input Receive Data
3 TxD Output Transmit Data

Porti-AP60 Rev. 2.0
http://woosim.com 16
3
3.
.2
2.
.
1
12
2~
~2
24
4V
V
v
ve
er
rs
si
io
on
n
:
:
U
UA
AR
RT
T(
(R
RS
S-
-2
23
32
2C
C)
)
a
an
nd
d
P
Pa
ar
ra
al
ll
le
el
l
The Porti-AP60 printer has a UART(RS232C) and Parallel interfaces and is connected by means of
a 15 pin male connector. In the following table, the signals present on the connector are listed:

Porti-AP60 Rev. 2.0
http://woosim.com 17
Pin NO Name Description
1 INPUT DC12~24V, 3A
2 GND Ground
Pin No. Name Direction Description
1 STB Output STROBE
2 D0 "DATA BIT 0
3 D1 "DATA BIT 1
4 D2 "DATA BIT 2
5 D3 "DATA BIT 3
6 D4 "DATA BIT 4
7 D5 "DATA BIT 5
8 D6 "DATA BIT 6
9 D7 "DATA BIT 7
10 ACK Input Acknowledge
11 BUSY "BUSY
12 P/E "P.END
13 ERR "ERROR
14 INIT Output Initialize Printer
15 GND - Ground
Pin No. Name Direction Description
1 GND - Ground
2 RXD Input Receive Data
3 TXD Output Transmit Data
①
POWER<CN7>
②
SERIAL<CN12>
③
PARALLEL<CN6>

Porti-AP60 Rev. 2.0
http://woosim.com 18
3
3.
.3
3.
.
S
Se
et
t
O
Op
pe
er
ra
at
ti
io
on
n
M
Mo
od
de
e
No
DIP SWITCH No.
1
1
2
Off
Off
Density High
Off
On
Density Medium
On Off Density High
On
On
Density Low
2
3
4
5
Off
Off
Off
115200 Baud Rate
On Off Off 57600 Baud Rate
Off On Off 38400 Baud Rate
On On Off 19200 Baud Rate
Off Off On 9600 Baud Rate
On Off On 4800 Baud Rate
Off On On 2400 Baud Rate
On On On 1200 Baud Rate
3
6
Off PROTOCOL RS232
On RS232C
4
7
8
Off Off Odd Parity, 1 Stop Bit
Off
On
Even Parity, 1Stop Bit
On Off Odd Parity, 1 Stop Bit
On
On
No Parity, 1 Stop Bit
<DIP SWITCH SPECIFICATION>

Porti-AP60 Rev. 2.0
http://woosim.com 19
4
4.
.
U
Us
si
in
ng
g
t
th
he
e
p
pr
ri
in
nt
te
er
r
4
4.
.1
1.
.
C
Co
on
nt
tr
ro
ol
l
p
pa
an
ne
el
l
4
4.
.2
2.
.
T
Th
he
e
s
se
el
lf
f
t
te
es
st
t
u
Button
- FEED :
When the printer is on, paper can be feed manually by pressing and holding the
FEED button for more than one second.
uPanel Lamp
- POWER : Printer is ON and ready to receive data.
-ERROR : Indicates a fault condition or a printer error.
(i.e : no paper, paper cover opened. etc.)
-DATA : The DATA lamp is on whenever the printer receives data.
The self test procedure will check most of the printer functions. For self test, turn on
the power while holding down the FEED Button. The Self-Test checks the following :
1) Make sure paper roll has been installed properly.
2) The Self-Test prints the current printer status, which provides the control
ROM version and the communication method setting.
3) After printing the current printer status, Self-Test will print a pattern using the
built-in character set.
4) The Self-Test automatically ends.
The printer is ready to receive data as soon as it completed the self test.

Porti-AP60 Rev. 2.0
http://woosim.com 20
5
5.
.
C
Co
on
ns
su
um
ma
ab
bl
le
e
P
Pa
ar
rt
ts
s
5
5.
.1
1.
.
R
Re
ec
co
om
mm
me
en
nd
de
ed
d
p
pa
ap
pe
er
r
5
5.
.2
2.
.
P
Pr
ri
in
nt
ti
in
ng
g
p
po
os
si
it
ti
io
on
n
Type : Thermal Paper
Paper width : 57mm
Paper thickness : 60±5 ㎛
Outer diameter : Ø60mm or less
Recording side : Outside of roll
Cautions
1. Do not paste the paper to the core. And the roll paper which has
near end mark printing on its near end is recommended.
2. Chemicals or oil may change the color of paper, or printed
characters may fade.
3. Change of paper color starts from approx. 70°C.
Pay attention to heat, humidity and sun light.
4. Color of paper may be changed by being scratched by nail or hard metal, etc.
Table of contents
Other WOOSIM Printer manuals

WOOSIM
WOOSIM WSP-i450 User manual

WOOSIM
WOOSIM WSP-DM360 User manual

WOOSIM
WOOSIM WSP-W40 User manual

WOOSIM
WOOSIM PORTI-W40 User manual

WOOSIM
WOOSIM WSP-i250 User manual

WOOSIM
WOOSIM Porti-M200H User manual

WOOSIM
WOOSIM PORTI-W40 User manual

WOOSIM
WOOSIM PORTI-W40 User manual

WOOSIM
WOOSIM WSP-CP User manual

WOOSIM
WOOSIM WSP-R242 User manual

WOOSIM
WOOSIM WSP-i450 User manual

WOOSIM
WOOSIM WSP-R341 User manual

WOOSIM
WOOSIM WSP-i350 User manual

WOOSIM
WOOSIM PORTI-SWC40 User manual

WOOSIM
WOOSIM WSP-R350 User manual

WOOSIM
WOOSIM PORTI-S30 User manual

WOOSIM
WOOSIM PORTI-PC40 User manual

WOOSIM
WOOSIM WSP-R241 User manual

WOOSIM
WOOSIM PORTI-P440 User manual

WOOSIM
WOOSIM WSP-T280 User manual