ACS Alert J5 User manual
Instruction manual
EVIDENTIAL BREATH ALCOHOL TESTER

The ALERT J5 personal breath alcohol tester has met the requirements of EN55011
and EN61326-1.
Under the ACMA regulations for EMC requirements, the ALERT J5 personal breath
alcohol tester has been classied as a low-risk device, since it is only powered through
a battery.
Federal Communications Commission (FCC) Disclaimer
Changes or modications not expressly approved by the party responsible for compliance could
void the user’s authority to operate the equipment.
This device complies with Part 15 of the FCC rules. Operations are subject to the following 2
conditions:
1. This device may not cause harmful interference.
2. This device must accept any interference received, including interference that may cause
undesired operations.
Industry Canada
This device complies with Industry Canada licence-exempt RSS standard(s). Operation is subject
to the following two conditions:
1. This device may not cause interference, and
2. This device must accept any interference, including interference that may cause undesired
operation of the device.
Industrie Canada
Le présent appareil est conforme aux CNR d’Industrie Canada applicables aux appareils radio
exempts de licence. L’exploitation est autorisée aux deux conditions suivantes :
1. L’appareil ne doit pas produire de brouillage, et
2. L’appareil doit accepter tout brouillage radioélectrique subi, même si le brouillage est
susceptible d’en compromettre le fonctionnement.
Certication
The ALERT J5 evidential breath alcohol tester and other breath alcohol testing products of Alcohol
Countermeasure Systems (ACS) comply with international standards for function and safety. For
more details, contact ACS.

Manufactured by:
Alcohol Countermeasure Systems Corp
60 International Boulevard
Toronto, Ontario M9W 6J2 CANADA
T +1 416 619 3500
F +1 416 619 3501
acs-corp.com
ACS, ALCOHOL COUNTERMEASURE SYSTEMS, ALCOSIM, ALERT and the “Molly” are
trademarks of Alcohol Countermeasure Systems (International) Inc. and are used under license.
Alcohol Countermeasure Systems is the trading style of Alcohol Countermeasure Systems
(International) Inc.
© 2015 Alcohol Countermeasure Systems
The information disclosed in this document is the valuable property of Alcohol Countermeasure
Systems and all copyright and other proprietary rights to this document are reserved. No
reproduction of this document is permitted without the prior written consent of Alcohol
Countermeasure Systems.
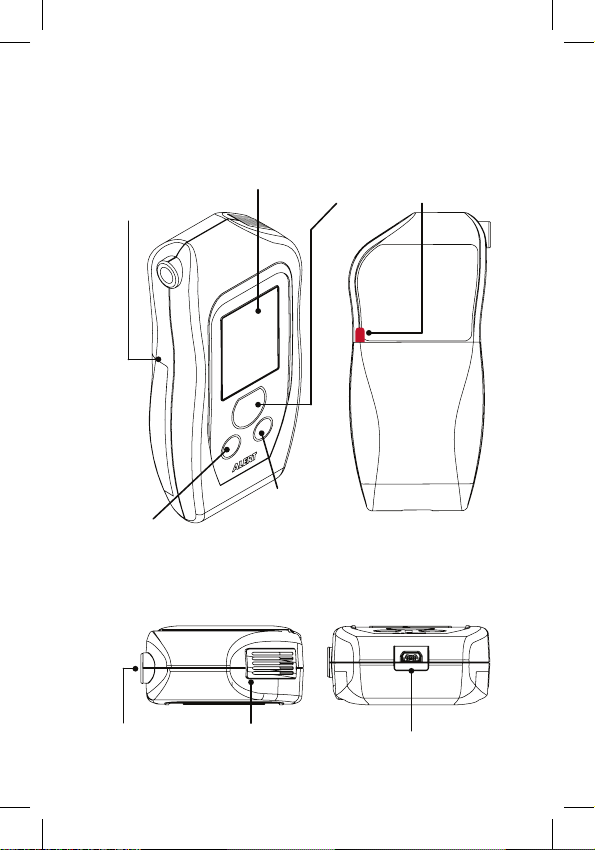
ALERT J5 COMPONENTS
FRONT VIEW BACK VIEW
Left
navigational
button
Right
navigational
button
Red
plastic tab
Battery
cover
Main
button
Exhaust grid
BOTTOM VIEWTOP VIEW
USB port
Mouthpiece
port
Graphic display

TABLE OF CONTENTS
Safety and precautions...................................................................... 1
Disclaimer ........................................................................................... 2
Introduction......................................................................................... 2
Warranty...................................................................................... 2
Maintenance................................................................................ 2
Getting started.................................................................................... 3
Operation............................................................................................. 3
Display................................................................................................. 4
Menu icons — main menu .......................................................... 5
Breath test........................................................................................... 5
Passive test......................................................................................... 6
Signicance of breath test results.................................................... 7
History menu....................................................................................... 8
Settings menu..................................................................................... 9
Troubleshooting menu..................................................................... 14
Diagnostics................................................................................ 14
Advanced .................................................................................. 15
Battery strength indicator................................................................ 15
Printing.............................................................................................. 16
Printing via Bluetooth ................................................................ 16
Printing via USB cable .............................................................. 16
Printing operations .................................................................... 16
Inserting the battery .................................................................. 17
Loading the paper roll ............................................................... 17
Maintenance and troubleshooting.................................................. 18
Calibration ................................................................................. 18
Disposal at the end of service life ............................................. 18
Replacement parts .................................................................... 18
Index .................................................................................................. 19

ALERT J5
1
SAFETY AND PRECAUTIONS
• Use the ALERT J5 tester for its intended purpose only
• Do not blow smoke or spit into the mouthpiece; it may damage the
sensor
• Always use a clean mouthpiece when blowing into the tester
• Do not cover the exhaust grid (the top-right side of the tester)
while providing a breath sample
• Do not store the tester in extreme heat or cold and avoid exposing
it to direct sunlight for extended periods of time
• Use the tester within the ambient temperature range of -20 to
65 °C
• Use the power adaptor provided for ambient temperatures lower
than 10 °C
• Only use AA alkaline batteries
• Turn the tester off before removing the batteries
• Do not disassemble the tester, as this may cause injury and void
the warranty
• Keep magnets or radio frequency (RF) devices away from the
tester to minimize the potential for electromagnetic interference
• Wait 10 minutes after drinking, eating or smoking before providing
a breath sample
• Drinking alcohol and eating foods containing alcohol will result in
a warning, including: medicines, menthol drops, smoking, using
mouthwash or mouth spray
• Rinse the mouth with water after using mouthwash or mouth spray
to remove alcohol
• Do not spray air fresheners, disinfectants, cologne or perfume
prior to a test, as these may also contain alcohol
NOTE: There are additional factors that may affect the results of a
breath test. Follow this manual carefully to avoid false readings.

INSTRUCTION MANUAL
2
DISCLAIMER
Sale of the ALERT J5 evidential breath alcohol tester is under the
strict condition that neither the manufacturer nor the vendor of the
device shall be held responsible for the accuracy of any breath test
nor is responsible for any loss, damage, injury or other consequence
resulting—directly or indirectly—from the use thereof.
INTRODUCTION
Thank you for purchasing the ALERT J5 evidential breath alcohol
tester, a device designed for the industrial and trafc safety sectors.
The ALERT J5 tester accurately measures breath alcohol
concentration (BrAC).
Alcohol tolerance differs from person to person; impairment may occur
below the legal limit. It may take up to 60 minutes to reach the highest
BrAC after the consumption of alcohol.
WARRANTY
All ACS products are warranted to be free of defects in workmanship
and materials for one year from the date of shipment.
ACS agrees to replace or repair any defective ALERT J5 device,
provided the defect was not caused by misuse or mishandling.
Any ALERT J5 device being returned for warranty repair must be
properly packaged and shipped prepaid to the authorized dealer’s
facility.
MAINTENANCE
The ALERT J5 evidential breath alcohol tester is manufactured for eld
use and is susceptible to dirt and debris. Clean with a damp cloth and
mild soap. Do not use abrasive cleaners or solvents.
Periodic maintenance and calibration is required. Contact your dealer
for more information.

ALERT J5
3
GETTING STARTED
The ALERT J5 evidential breath alcohol tester is simple to use. It
measures breath alcohol concentration (BrAC), which is in direct
proportion to blood alcohol concentration (BAC). The readout is
provided on the display.
The ALERT J5 tester is well suited for the industrial and trafc safety
sectors, with a three button control and the choice of battery or power
adaptor operation.
NOTE: A red plastic tab is inserted between the battery and the
electrical connection to conserve battery power during shipment
and storage. To operate the tester for the rst time, pull the
plastic tab from the battery compartment, which is accessible at
the back of the tester. You do not need to open the back cover to
remove the tab.
OPERATION
TURNING THE TESTER ON
Press the main button once to power ON the ALERT J5 evidential
breath alcohol tester. The ACS logo is displayed during the start-up
sequence.
READY FOR A BREATH TEST
READY appears on the display when the ALERT J5 tester is ready for
use.
TURNING THE TESTER OFF
The ALERT J5 evidential breath alcohol tester will power down
automatically after 3 minutes of inactivity. Press and hold the main
button or select the Shutdown icon to turn off the ALERT J5 tester.
INSTRUCTION MANUAL
4
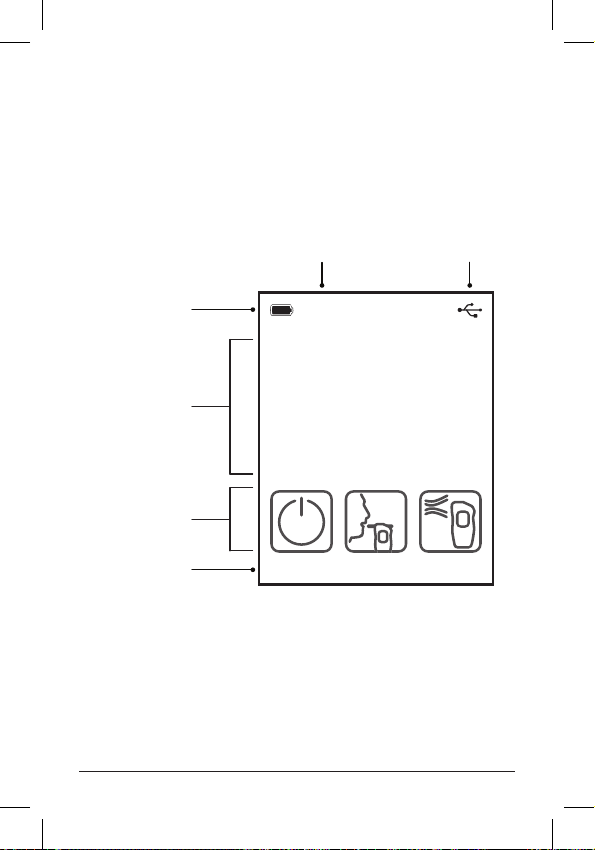
DISPLAY
The ALERT J5 evidential breath alcohol display provides the readout
of BrAC with the unit of measurement, battery levels, date and time,
error messages, abort messages and all the indicators necessary for a
clear and comprehensive user interface.
USB connectionCurrent date & time
Current activity
Battery indicator
Menu icon name
Menu icons
PREPARING
FOR TEST
Breath Test
2013.11.22 12:12 PM
ALERT J5
5
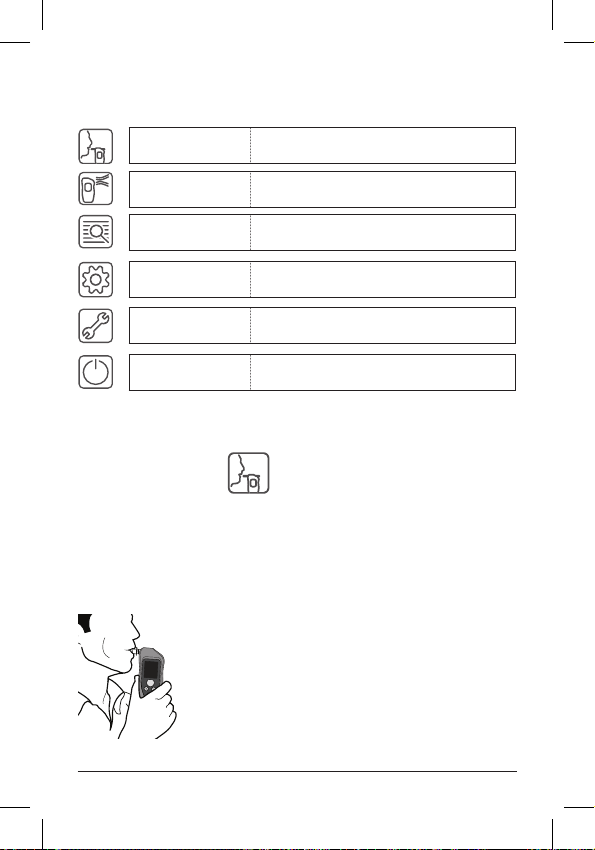
MENU ICONS — MAIN MENU
Breath Test To take a test with a mouthpiece.
Passive Test To take a test of the surrounding
environment.
History To review the log with a printing option.
Settings Time/date, language, volume, brightness
and Bluetooth pairings.
Troubleshooting Error codes, diagnostics and advanced
options.
Shutdown To turn the unit off.
In the Main Menu, use the navigational buttons to move to the desired
function and press the main button to select.
BREATH TEST
Select the Breath Test icon to perform a breath test using a
mouthpiece. Always insert a clean mouthpiece to ensure an accurate
breath sample.
PREPARING FOR TEST is displayed, followed by READY.
Blow into the mouthpiece. A continuous tone can be heard, indicating
proper breath ow. Continue blowing until the tone
ends. A failure tone with ABORT displayed indicates
that a proper breath sample was not provided.
Follow the directions on the display for a retest.
ANALYZING is displayed for a few seconds,
followed by the numeric BrAC result and the Print
icon on the display. The mouthpiece port will also
illuminate:
Other manuals for Alert J5
3
Table of contents
Other ACS Test Equipment manuals

ACS
ACS ALCOSIM User manual

ACS
ACS ALCOHOL INTERLOCK V3 User manual

ACS
ACS ALCOLOCK V3 B-2 WI-FI Series Use and care manual

ACS
ACS SAF'IR EVOLUTION User manual

ACS
ACS WR3 User manual

ACS
ACS DRIVESAFE User manual

ACS
ACS DRIVESAFE User manual

ACS
ACS ALCOLOCK B-2 Series Use and care manual

ACS
ACS ALERT J4X.ec User manual

ACS
ACS WR3 User manual

ACS
ACS ALCOSENTRY User manual

ACS
ACS ALCOLOCK LR User manual

ACS
ACS DRIVESAFE evoc User manual

ACS
ACS DRIVESAFE User manual

ACS
ACS ALCOLOCK IR User manual

ACS
ACS UK1401 User manual

ACS
ACS ALCOCHECK User manual

ACS
ACS ALCOLOCK LR Programming manual

ACS
ACS Alcolock L OEM User manual

ACS
ACS Alcolock WR2 Installation and operating manual


