ATCOM AT-610P User manual

AT-610P User Manual
ATCOM TECHNOLOGY CO., LIMITED
AT-610P User Manual
ISSUE 1.0
2009-9-11

AT-610P User Manual
ATCOM TECHNOLOGY CO., LIMITED
1st、AT-610P’s Network Features.................................................................4
1、The View ................................................................................................................4
2、Interfaces ..............................................................................................................4
3、Electricity characteristic...................................................................................4
4、Software.................................................................................................................4
5、Network:..............................................................................................................5
6、Management and Maintenance.....................................................................5
7、Protocol ..................................................................................................................6
8、Compliant Standard...........................................................................................6
9、Operating Requirement....................................................................................6
10、Packing List...........................................................................................................6
11、Installation............................................................................................................7
2nd、Feet installation instruction............................................................7
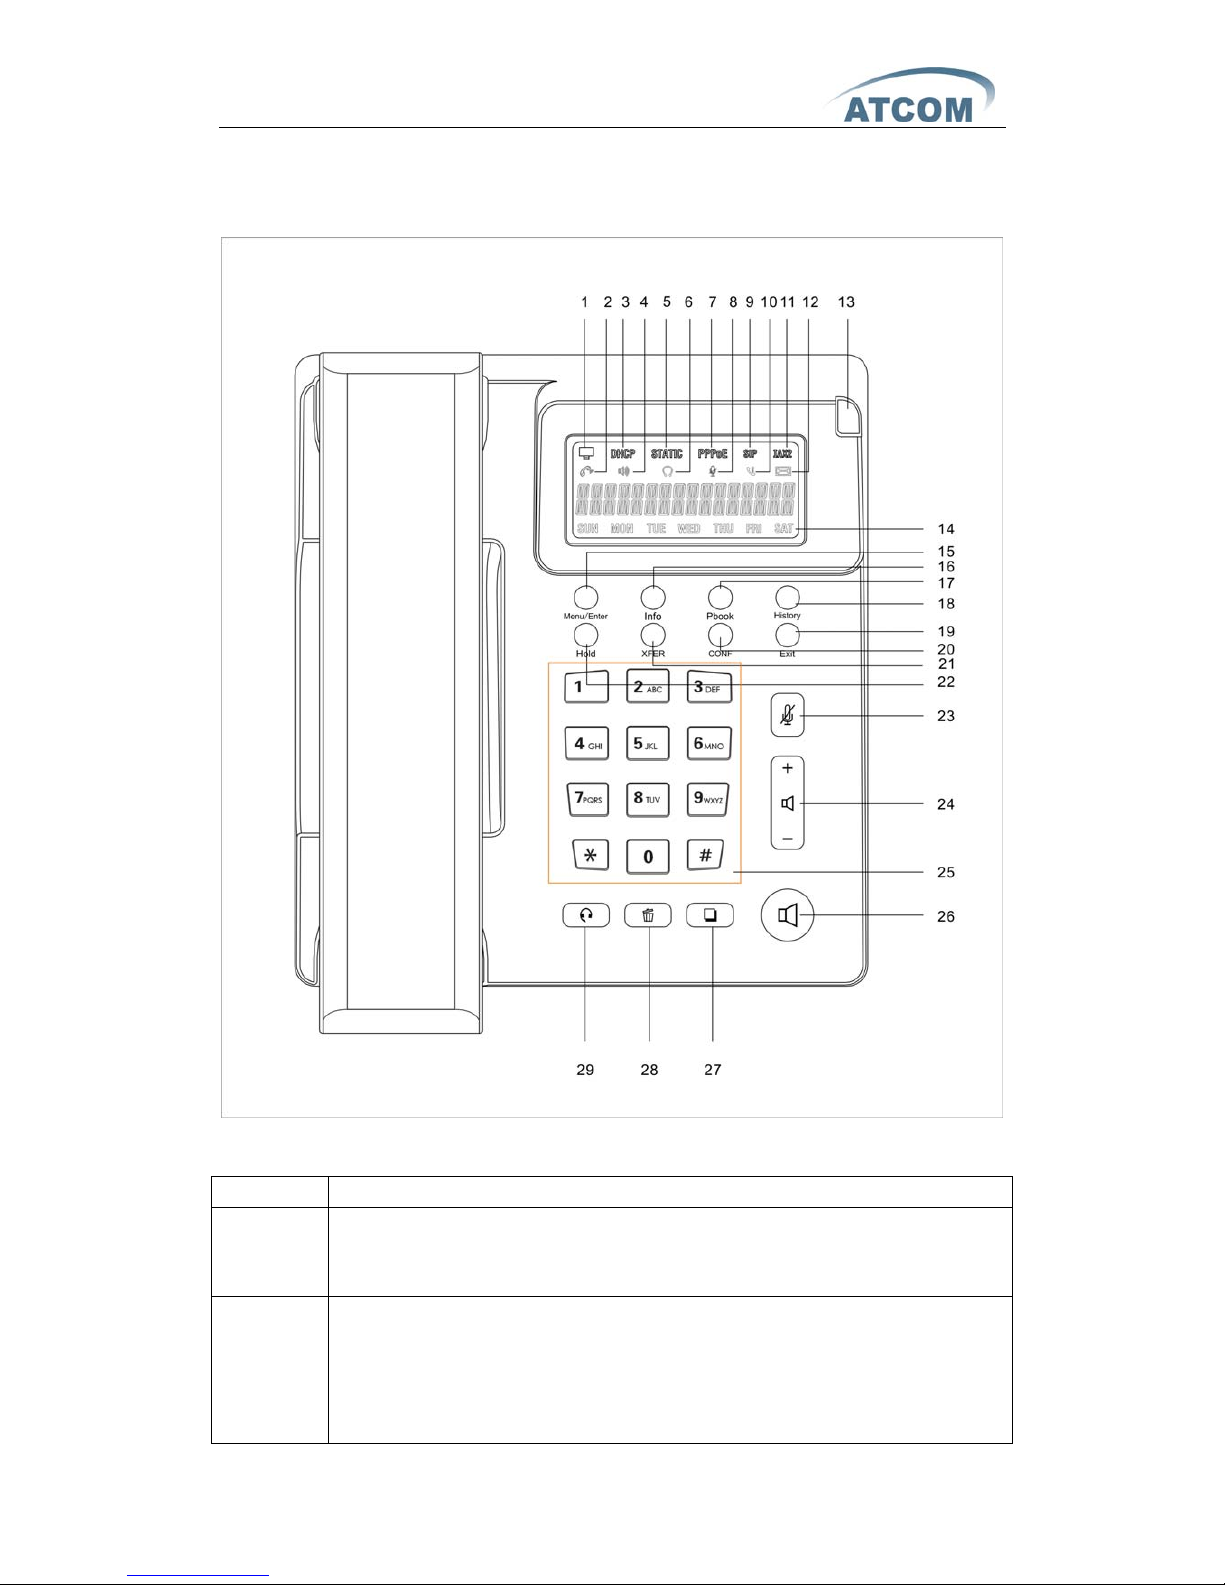
3rd、Keypad of IP Phone:.....................................................................10
4th、Basic functions and operations...................................................12
1、Answer the calls................................................................................................12
2、Make Call .............................................................................................................13
3、Hang up the phone..........................................................................................13
4、Call Transfer........................................................................................................13
5、3-way conference call.....................................................................................14
6、Call Hold...............................................................................................................14
7、Call History..........................................................................................................14
8、Call pickup...........................................................................................................15
9、Join call.................................................................................................................15
10、Redial/Unredial..................................................................................................15
11、vport......................................................................................................................16
12、Click to dial.........................................................................................................17
13、Preload Password..............................................................................................17
14、Check the Phone’s IP.......................................................................................17
5th、Web settings.......................................................................................17
1、Current state......................................................................................................18
2、Network................................................................................................................18
3、VoIP........................................................................................................................20
4、Advance................................................................................................................23
4.1.SIP .................................................................................................... 23
4.2.Digital Map ...................................................................................... 26
4.3.Stun ................................................................................................. 27
4.4.Call Service ..................................................................................... 28
4.5.Audio Settings ................................................................................ 29

AT-610P User Manual
ATCOM TECHNOLOGY CO., LIMITED
5、Dial Peer...............................................................................................................30
6、Config Manage...................................................................................................33
7、Update ..................................................................................................................33
7.1.Web Update .................................................................................... 33
7.2.FTP/TFTP Update ........................................................................... 34
7.3.Auto Provisioning ........................................................................... 35
8、System Manage.................................................................................................36
8.1.Account Manage ............................................................................. 36
8.2.Phone Book ..................................................................................... 37
8.3.Syslog Config .................................................................................. 37
8.4.Time Set .......................................................................................... 39
8.5.Call Log ............................................................................................ 40
8.6.Logout ............................................................................................... 40
8.7.Reboot ............................................................................................... 40

AT-610P User Manual
ATCOM TECHNOLOGY CO., LIMITED
1st、AT-610P’s Network Features
1、The View
2、Interfaces
¾Power: Output Power: 12VDC, 500mA.
¾WAN: RJ45 port.
¾LAN: RJ45 port.
3、Electricity characteristic
¾Specialty of electric: output 12V 500mA DC
¾The network connects: 2 RJ45 connect, a WAN, a LAN
¾Headset jack : RJ9 jack * 2
¾Support PoE
4、Software
¾Sip 2.0 (RFC3261)
¾Two lines SIP, support IAX2

AT-610P User Manual
ATCOM TECHNOLOGY CO., LIMITED
¾STUN
¾Jitter Buffer(200ms),VAD,CNG
¾G.711A/u、G722、G.723、G.729 Codec
¾G.168 compliant 96ms echo cancellation
¾Support SIP domain,SIP authentication(none,basic,MD5).
¾Support inbound audio, RFC2833 and SIP info , DTMF transmission way
¾SIP Call Forward、Call transfer、Call hold、Call waiting, 3-way talking、
Pickup、Join call、Redial、Unredial、Call Park、Vport、Click to dial
¾Dial without register
¾Support Hotline、DND(Do Not Disturb)、Blacklists、Call Limitation、DND、
Incoming list
¾Dial-peer calling rule, IP to IP call
¾SIP server conference
¾Phone book with 500 records, 100 answered call、missed call for each
¾Support HTTP、FTP TFTP updating the configuration and firmware
¾Syslog
¾Answering machine
¾Support SNTP client
¾Telnet, WEB visit terminal
¾Support different level user management
5、Network:
¾WAN/LAN:Support bridge or route mode
¾Support base of NAT and NAPT
¾Support PPPoE,(ADSL,cable modem use for internet connecting)
¾WAN support Primary and Alter function
¾WAN support DHCP Client
¾Qos support Diffserv
¾Support Network command tool: include ping, trace route, telnet
6、Management and Maintenance
¾Support safe mode and firmware updating under safe mode
¾Support different level user management
¾Configuration via web , keyboard and command
¾Firmware and configuration updating via HTTP , FTP and TFTP
¾Support system log and calling record
¾configuration auto provision

AT-610P User Manual
ATCOM TECHNOLOGY CO., LIMITED
7、Protocol
¾IEEE 802.3 /802.3 u 10 Base T / 100Base TX
¾PPPoE:PPP over Ethernet
¾SIP RFC3261, RFC 2543
¾TCP/IP: Transfer Control Protocol/Internet Protocol
¾RTP: Real-time Transport Protocol
¾RTCP:RTP Control Protocol
¾VAD/CNG
¾Telnet:remote host access protocol
¾DNS: Domain Name Server
¾TFTP:Trivial File Transfer Protocol
¾HTTP:Hypertext Transfer Protocol
¾FTP:File Transfer Protocol
8、Compliant Standard
¾CE:EN55024,EN55022
¾FCC part15
¾Comply with ROHS in EU
¾Comply with ROHS in China
¾
Explanation:
The letter “e” is the first letter of “environment: and “electronic”. The rim is
a round with two arrow, stands for recycle. The number 20 stands for the
years of environment protection. Please note the years of environment
protection is not discarding year nor usage life.
9、Operating Requirement
¾Operation temperature: 0 to 40° C (32° to 104° F)
¾Storage temperature: -30° to 65° C (-22° to 149° F)
¾Humidity: 10 to 90% no dew
10、Packing List
¾AT-610P IP phone
¾Power adaptor (output 12v ,500mA)
¾Manual CD

AT-610P User Manual
ATCOM TECHNOLOGY CO., LIMITED
11、Installation
Use Ethernet cable to connect AT-610P’s LAN port and your computer. Set
computer’s IP to the network 192.168.10.x or using dynamic obtain IP. Open
web browser and key in 192.168.10.1. Then user will see the logon page of
AT-610P, the default username and password is admin/admin for administrator
and guest/guest for guest.
Set up page for VoIP user only:
2nd、Feet installation instruction
1、Desktop position:
A、Put the bottom side of the IP phone upside and press the plate with letter “PUSH”into
the slot, please refer the picture as below:

AT-610P User Manual
ATCOM TECHNOLOGY CO., LIMITED
B、Press the other plate into the slot in accordance with the direction of the arrow
C、Repeat A and B. It is the right picture of putting on desk after fixing the two feet below:
D、Disassemble the feet:
Press the plate with word “PUSH” and pull the feet with the direction of arrow. When the
plate is pull out of the slot (there will be a sound of “pa”) you can take off the feet
2、On wall postion
A、Put the bottom side of the IP phone upside and push the plate with letter “PUSH”into
the slot, please refer the picture as below:

AT-610P User Manual
ATCOM TECHNOLOGY CO., LIMITED
B、Push the other plate into the slot in accordance with the direction of the arrow
C、Repeat A and B. It is the picture of wall mounting after fixing the two feet below:
D、Disassemble the feet way:
Press the plate with word “PUSH” and pull the feet with the direction of arrow. When the
plate is pull out of the slot (there will be a sound of “pa”) you can take off the feet
Attention: Please rotate the hook to the position as in
picture with a coin or other tools

AT-610P User Manual
ATCOM TECHNOLOGY CO., LIMITED
3rd、Keypad of IP Phone:
SketchMapofPhone
Description:
Number Function description
1 Network status indicator
A、when the network is OK , it’s on
B、when the network can not connect , it blinks
3、5、7 Network mode indicator
A、Number 3 stands for DHCP , when the IP phone get IP address in DHCP Mode .
the indicator is on , or else it blinks
B、Number 5 stands for Static , when the IP phone get IP address in Static mode .
the indicator is on , or else it blinks

AT-610P User Manual
ATCOM TECHNOLOGY CO., LIMITED
C、Number 7 stands for PPPoE, when the IP phone get IP address in PPPoE mode .
the indicator is on , or else it blinks
2、4、6 Answering mode indicator ,
A、Number 2 stands for answering call with handset
B、Number 4 stands for answering call in hand-free mode
C、Number 6 stands for answering call with headset
8 Mute indicator , when the phone is muted , this indicator is on , when the muted
mode is canceled the indicator will be off
9、11 Protocol indicator
A、Number 9 stands for SIP
¾When you enable register and successfully register to SIP server , this
indicator is on
¾when you enable register but do not successfully register to server , this
indicator blinks
¾when you disable register , this indicator is off
B、Number 11 stands for IAX protocol
¾When you enable register and successfully register to IAX server , this
indicator is on
¾when you enable register but do not successfully register to server , this
indicator blinks
¾when you disable register , this indicator is off
10 Missed call indicator , when there is the missed call , this indicator will be on .
After you checked all the missed calls , this indicator will turn off
12 Voicemail indicator , when there is new voice mail , this indicator will be on , after
you checked all the voicemail , this indicator will turn off
13 incoming call indicator
A、when the phone is in standby without incoming call , the indicator is off
B、when the Ethernet connection is off , the indicator is on
C、when there is the incoming call , indicator blinks
D、when there is a new voicemail , the indicator blinks
14 Monday to Sunday indicator , the correct day will be on while others will be off
15 This is the multi function key
A、In standby mode , press Menu/Enter to enter the Menu
B、In functional menu , press Menu/Enter to confirm selection.
16 Press info to check network status
17 press Pbook to enter the phone book and edit or delete.
18 Press History button to check call history including incoming calls , outgoing calls
and missed calls.
19 Exit button
A、when you’re dialing , press exit to delete the dialed number and return to and
you can dial a new number
B、in functional menu , press EXIT to exit current menu and return to the upper

AT-610P User Manual
ATCOM TECHNOLOGY CO., LIMITED
menu
20 conference key , when you want to realize conference call , press CONF key and
key in the third party number
21 Transfer key
22 Press Hold to hold the call when you are talking
23 Press mute , you can hear the voice from the other end but he can not hear you
speaking.
24 Voice volume key
A、press + to turn up the voice volume
B、press - to turn up the voice volume
25 Numeral leys
26 Hand-free button to enter hand-free mode
27 Dial button , when you finish dialing the telephone number , press this button to
send out the phone number
28 Del button is used to delete a single number or letter
29 Headset button is used to enter headset answering mode
4th、Basic functions and operations
1、Answer the calls
When there is an incoming call, AT610P will remind user with ringing. There
are 5 ways to answer the call
A、Answer by handset
Pick up the handset and talk with the caller. If you want to hang up, just put
back the handset.
B、Hand-free mode
Press the hand-free button in the phone and talk with callers by built-in
Micro-phone and Speaker. If you want to hang up, please press the hand-free
button again.
C、Answer by earphone
Keep your earphone connected with the RJ9 earphone jack, when there is an
incoming call, press the earphone button on the IP phone and talk with the caller.
If you want to hang up, please press the earphone button again.
D、Handset to hand-free
When you are phoning with the handset and want to phone with hand-free
mode, please press the hand-free button and put down the handset.
E、Hand-free mode to handset

AT-610P User Manual
ATCOM TECHNOLOGY CO., LIMITED
If you are phoning under hand-free mode and want to change to speaker
phone, juts pick up the handset without press any buttons.
2、Make Call
A、Use the handset
Pickup the handset, the LCD will show the current lines. User can input the
number with the keyboard and press # to send the number. When you hear the
tones of “du~~du~~” with dialed number showed on the LCD, the called’s
phone is ringing. If the called answer the call, the phone call is established and
the LCD will show the calling time and the called’s number.
B、Answer the phone under hand-free mode
Press the Speaker Phone button, the LCD will show the current lines. User
can input the number with the keyboard and press # to send the number. When
caller hear the tones of “du~~du~~” with dialed number showed on the LCD,
the called’s phone is ringing. If the called answers the call, the phone call is
established, and the LCD will show the calling time and the called’s number.
C、Used phone book
a、Pick up the phone.
b、Press " Pbook” button .
c、Press “Menu/Enter” to enter the phone list and use "Vol+" or "Vol-" keys
to find the contact person.
d、When you find the certain contact person, press" Menu/Enter" to show
the details.
e、Press "Edit" to edit the number or press" Dial" to call.
3、Hang up the phone
1) Headset hang up
When use handset mode calling, put back the handset to hang up.
2) Hands free hang up
When use hands free calling, press soft button “speaker phone” to hang up.
3) Earphone Hang up
When use Earphone calling, Press the soft button “headset” to hang up.
4、Call Transfer
¾Unattended transfer
If A is using AT510 talking with B , B want to speak to C. A just press XFER
and dial C’s number
¾Attended transfer:

AT-610P User Manual
ATCOM TECHNOLOGY CO., LIMITED
Only SIP support attended Transfer. If A is using AT510 talking with B , B
want to speak to C. A just press Hold and dial C’s number to ask whether he can
answer the call from B. C agree , then press Hold to talk with B and press XFER
to transfer the call
5、3-way conference call
Enable Three Way Call
If A is using AT-510 talking with B and B want to make conference call with
A and B. A just press Hold and dial C’s number . Then press CONF to initiate
conference call
6、Call Hold
User can hold the current call by pressing soft button “Hold”. And by
pressing soft button “Hold” again,.
7、Call History.
AT-610P supports 100 missed calls, incoming calls and dialed calls record. When
the storage is full, the latest call will update the history. When the phone reboots
or be out of power, all the call history will be cleared.
¾Missed call
1) When the LCD screen display the Missed call icon and the status LED is 2s on,
500ms off.
2) Press history button, press “Vol+” or “Vol-“ to LCD display “Missed”.
3) Press “Menu/Enter” to display the records of Missed call
4) press “Vol+” or “Vol-“ browse missed call history.
5) Choose the missed call record, press “Redial” button to call this number.
¾Incoming call
1) Press “History” button and press “Vol+” or “Vol-“to LCD display “RECEIVED”.
2) Press “Menu/Enter” to display received call records.
3) press “Vol+” or “Vol-“ browse received call records.
4) Choose the received call record, press “Redial” button to call this number.
If there is no record, the LCD screen display “List is Empty”.
¾Out coming call
1) Press “History” button and press “Vol+” or “Vol-“to LCD display
“DIALED”.
2) Press “Menu/Enter” to display out coming call records.
3) press “Vol+” or “Vol-“ browse out coming call records.

AT-610P User Manual
ATCOM TECHNOLOGY CO., LIMITED
4) Choose the received call record, press “Redial” button to call this
number.
If there is no record, the LCD screen display “List is Empty”.
8、Call pickup
Call pickup is simulated from “Pickup” function processes from IPPBX. When A
call B with no reply after ring tones, C could pick up the call from A for B by
inputting the prefix and B’s phone No.
C needed to set the dial peer with prefix code as follow
To refer *1* as the set prefix code, C could get the call from A to B by dialing
*1*+B,
*1* prefix could be freely set as long as no confliction with other dialing rules.
9、Join call
“A” could join in the conference call,by input a prefix plus a phone No. which is
already in the conference.
A requested to set the prefix code for dial peer as follow
To refer *2* as the set prefix code,“A” could join in the conference by dial *2*
plus the call No. which is already in the conference.
*2* prefix could be freely set as long as no confliction with other dialing rules.
10、Redial/Unredial
In order to being efficiently to contact the busy line, A could use Redial to call B
the busy line with setting prefix. When B is free A could get through the call
as usual. When B is busy, A could hang the phone with checking B’s situation
with every 60S by the set of prefix.
IP Phone of User A would ring and prompt picking up handset if B is
available. It would call B automatically once A picking up handset. The call
would get through as soon as had set being picked up at B. A could dial the
predecessor which set already add number of B to cancel the call before the
phone automatic redialing if A is not available suddenly or don’t want to call B

AT-610P User Manual
ATCOM TECHNOLOGY CO., LIMITED
anymore.
*3* is the predecessor. Then A could make the redial function via dialing *3* +
number of B.
*4* is the predecessor. Then A could make the redial function via dialing *4* +
number of B.
User could name any predecessor like *3*/*4* if it is compliant with present dial
rule.
11、vport
Vport makes more flexible calling application. Eg. It could forward a call from
Line 1 to one account of Line 2 after configuring forward type and number@line
via web interface. The forward could make either from Line 1 to Line 2 or Line
2 to Line 1. But the end user may not aware the configuration being made
therefore probably the end user should be advised that it may cost with the
forward function. The forwarding could be done via either Line Key to select the
line or dialing IP after calling under server. It could be implemented by the
following 4 ways:
Point to Point Call Forward
Make the configuration like @ip:port in the column of Forward Number. Then
it could make SIP call point to point with this IP and port in system. User could
select forward type accordingly.
Point to Point Blind Transfer
Transfer the call via dialing IP directly.
Call Forward, Call Transfer (Blind Transfer/ Attended Transfer) in different
Line.
Make the configuration like sip: username@n in the column of Forward
Number. Then system would select Line N and make call accordingly.
SIP Line (eg:0/1/2. Or 0.0.0.0/0.0.0.1/0.0.0.2/255.255.255.255 which is
compliant with former configuration).
Call Forward, Call Transfer (Blind Transfer/ Attended Transfer) between SIP
Line and Point to Pint.
It is compliant for the Call Forward, Call Transfer (Blind Transfer/ Attended
Transfer) between SIP Line and Point to Pint.

AT-610P User Manual
ATCOM TECHNOLOGY CO., LIMITED
12、Click to dial
When User A accesses web interface and calls User B via clicking one link which
is direct to B, IP Phone of User A would ring. Then call B automatically once User
A picking up handset.
13、Preload Password
There are 2 models to set the authority of web accessing and command line:
Guest model and Admin model. User could view and configure all items in Admin
model. While user couldn’t change the SIP (1-2) and IAX2 configuration as well
as server address and port but only access and view the information. User would
enter different model after input different user name and password:
zGuest Model
User Name:guest
Pass word:guest
zAdmin Model:
User Name:admin
Pass word:admin
14、Check the Phone’s IP
Press the up or down navigation button to check the phone’s IP address
5th、Web settings
Enter AT-610P IP addresses in the web browser to go to the log on page, and key
in the username and password to access AT-610P setting page.
Default username and password is:
Administrator: Username: admin password: admin
User: Username:guest Username: guest

AT-610P User Manual
ATCOM TECHNOLOGY CO., LIMITED
1、Current state
This page shows the IP phone working status.
The network part shows the connection status of WAN and LAN.
Phone Number part shows the phone number and register status for Line1、
Line2 and IAX2
2、Network
There are 3 ways to connect to the internet DHCP, Static and PPPoE, please
choose one according to your own situation
A、DHCP,the IP phone will get IP address from DHCP server , you do not
have to fill in the date of IP address , net mask etc , just choose DHCP and
submit . Please refer to the below picture
Parameters:
9Active IP:IP phone’s address
9Current Net mask:network net mask
9MAC Address:MAC of IP phone

AT-610P User Manual
ATCOM TECHNOLOGY CO., LIMITED
9Current Gateway:the IP address of the router
B、If your ISP provide you with the fixed IP address, please choose static and
fill in the correct information of IP Address、Net mask、Gateway、Primary DNS
etc. If you do not know it please refer to your ISP provider or network
management stuff. The reference picture is as below
Parameters:
9Static IP Address: fixed IP address
9Net mask: LAN net mask
9Gateway: Gateway IP address
9DNS Domain: input DNS domain name if it’s provided
9Primary DNS: Primary DNS address
9Alter DNS: Alternative DNS address
C、when you use PPPoE to get IP address,please select “PPPoE”,and input
ADSL account information as below picture:

AT-610P User Manual
ATCOM TECHNOLOGY CO., LIMITED
Parameters:
PPPoE Server: sever name, if the ITSP have no special requirements, keep the
ANY as default
Username: ADSL account user name
Password: ADSL account password
Attention:
1)After configuration setting please click “Apply” to effect the change
2)If the IP address is changed after effecting the configuration change , the
webpage will lose response former address, so you must get to the webpage
with new address
3)If the LAN IP address is happened to be the same as WAN IP which is allocated
from DHCP server. The LAN IP address will be changed automatically by adding
1 at the last digital
3、VoIP
Other manuals for AT-610P
2
Table of contents
Other ATCOM IP Phone manuals

ATCOM
ATCOM AT820 series User manual

ATCOM
ATCOM AT820 series User manual

ATCOM
ATCOM AT530P User manual

ATCOM
ATCOM A10 User manual

ATCOM
ATCOM AT840 series User manual

ATCOM
ATCOM AT800DP User manual

ATCOM
ATCOM D2X User manual

ATCOM
ATCOM AT810P Owner's manual

ATCOM
ATCOM AT-610 User manual

ATCOM
ATCOM AT800D User manual
Popular IP Phone manuals by other brands

Planet Networking & Communication
Planet Networking & Communication IP-1000PT user manual

Avaya
Avaya one-X 9621G user guide

AudioCodes
AudioCodes 400HD Series User's and Administrator's manual

Sedna
Sedna P1K user manual

Polycom
Polycom VVX-150 Series user guide

Huawei
Huawei eSpace 6805 Administrator's guide