M5S 514M5S 514 DEUTSCH
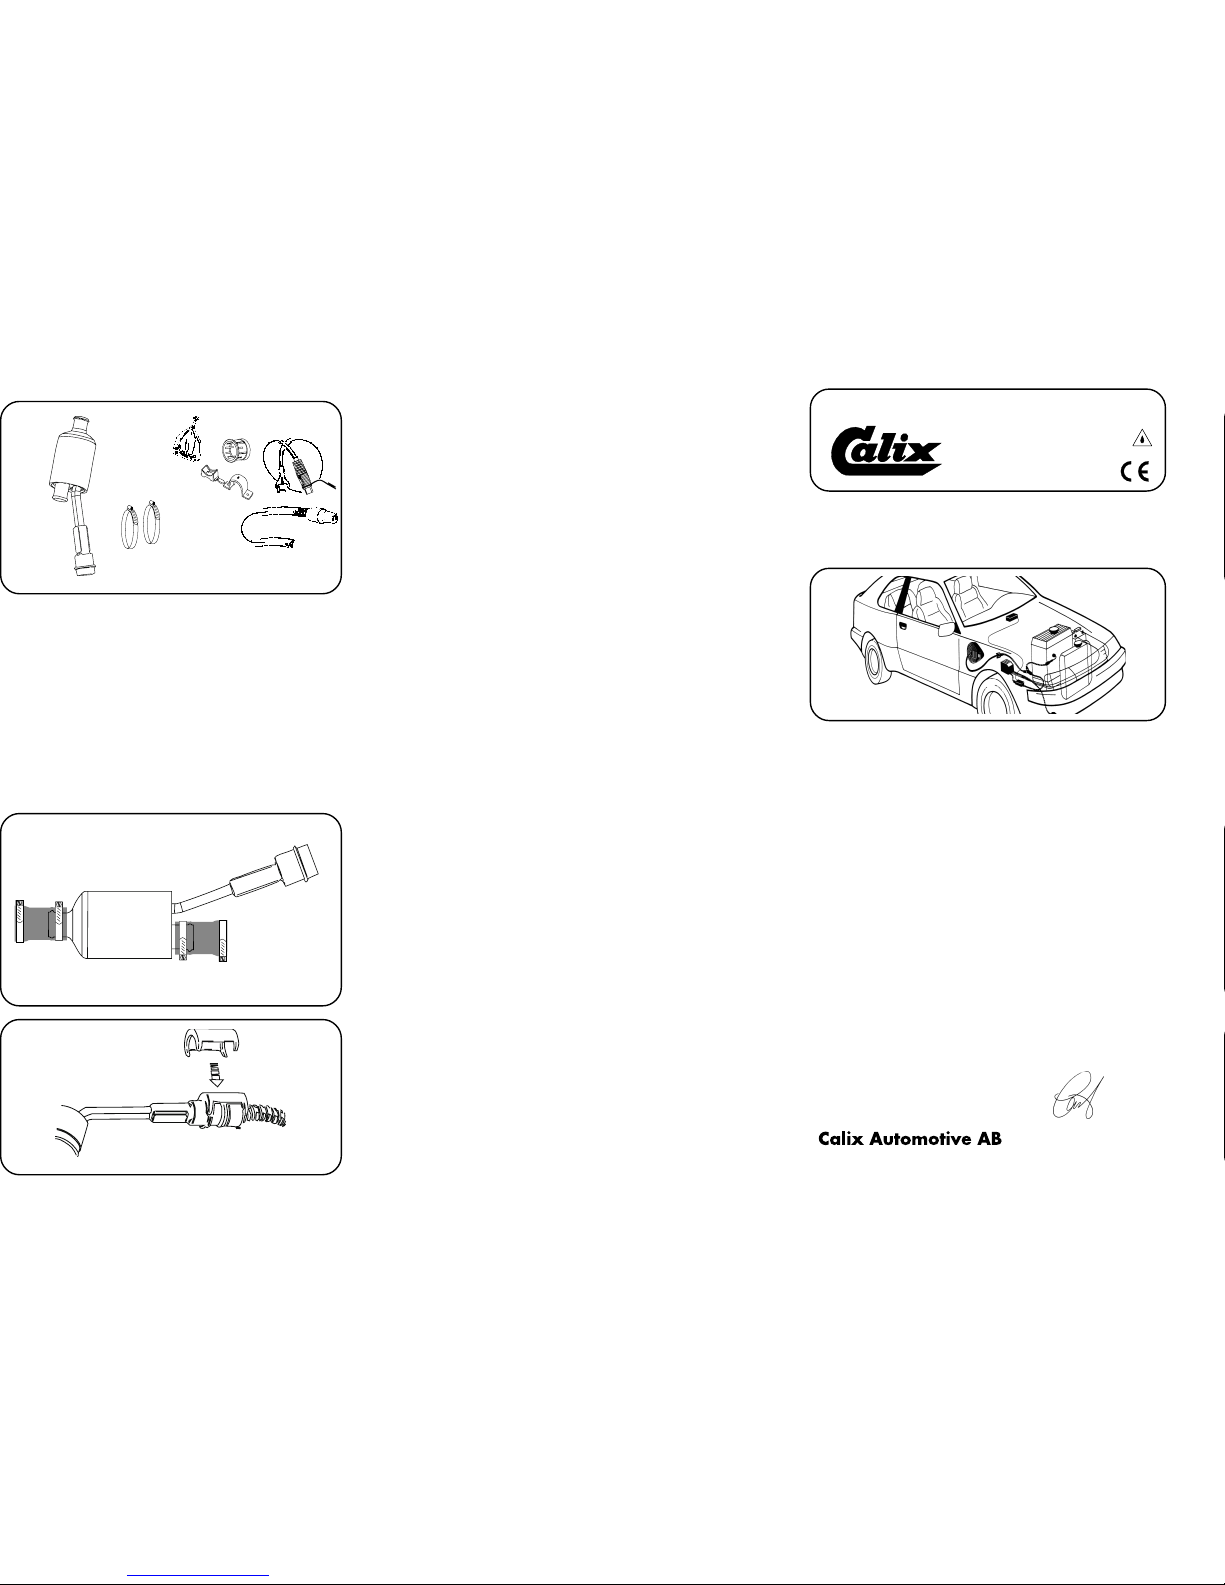
A. Einbauhinweisesorgfältigdurchlesen.SämtlicheDetailsinclusiveZubehörlaut
Pkt A kontrollieren. Nur zur Übersicht - keine Wiedergabe von Einzel-heiten.
B. Einbau des Heizelementes
1. Kühlwasserablassen.
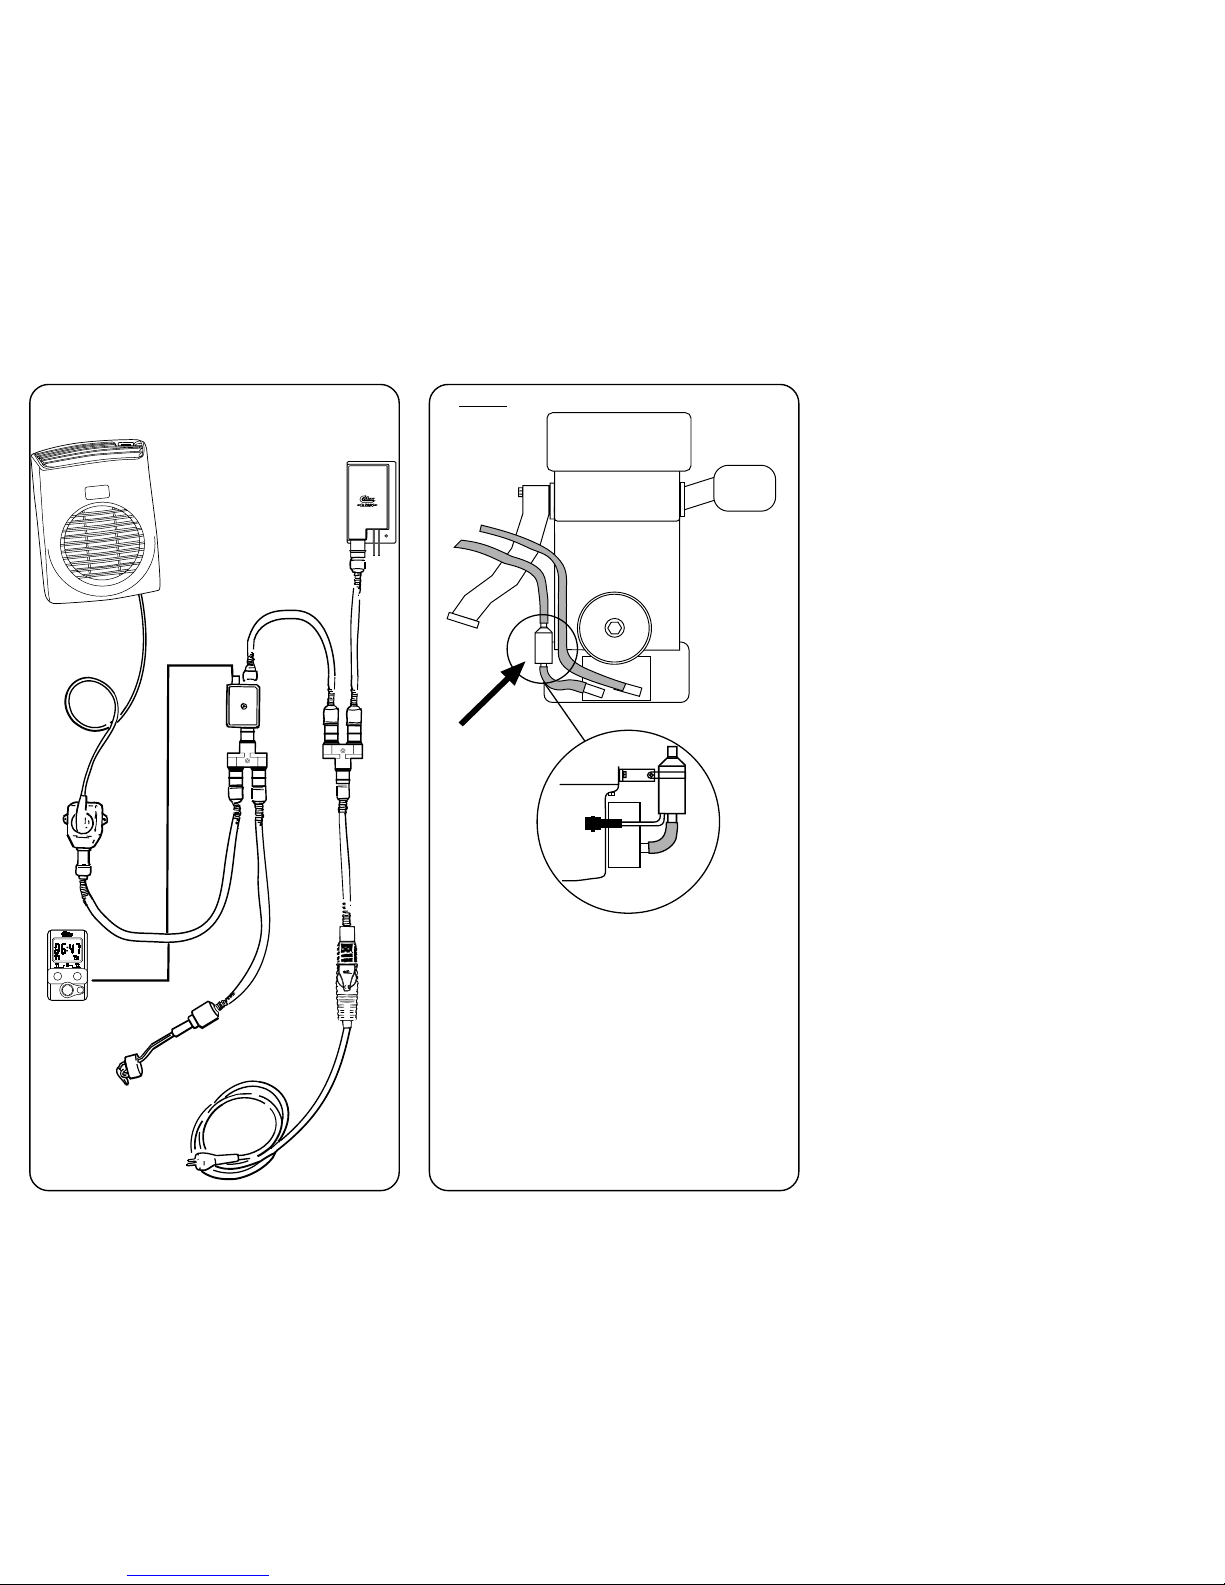
2. Heizer auf den Schlauch zwischen den Kühler und den Motor (den unteren
Schlauch)anbringen (siehe Bild). Den Schlauch etwa 160mm vom Ende, das
aufdenKühlersitzt(sieheSkizze),abkappenundden Heizer + den Anschluss
und die Schläuche mit Schlauchschellen montieren (siehe Skizze), die
Schlauchschellen so aufpassen, dass die genau vor die Erhöhung der
LeitungsendenkommenBildC. Zubeachten;das Haus des Heizers darf nicht
denMotorblockberühren.
3. Einbaukabel (mit Anbaustecker) von außen in den Motorraum ziehen.
Steckverbindung von Heizung und Kabel bis zum Anschlag ineinander-
schiebenO-Ringmußvöllig dichtschließen. Zu beachten: EtwasÖlaufdenO-
Ring geben. Die Zusammenkupplung wird dann erleichtert. Verbindung muß
unbedingt auf diese Weise hergestellt werden.
4. Wasser einfüllen und Kühlsystem lüften. Hinweise der Kfz-Betriebs-anleitung
beachten. Motor laufen lassen und Einbaustelle auf Dichtigkeit prüfen.
C. Einbau des steckers
Siehemitgeliefertemontierungsanleitung.
D. Probelauf
1. Kühlwasserniveaukontrollieren.
2. Kühlsystem sorgfältig entlüften, da Heizpatrone sonst durchbrennen kann.
3. Dichtheit, auch bei warmen Motor überprüfen.
4. Nur eine geerdete Steckdose verwenden. Steckverbindungen überprüfen.
Funktion des Gerätes kontrollieren - beim Heizvorgang kann ein leichtes
Siedegeräuschvernommenwerden.
E. Wichtig
1. Immer ausreichend Frostschutzmittel beimischen.
2. Motorheizer nur an eine geerdete Steckdose anschliessen. Der Mantel der
Motorheizung, die Karosserie und der Schutzleiter der Steckdose müssen
unbedingtleitend miteinander verbunden sein.
3. Die Anschlußleitung (zwischen Netzsteckdose und Anbaustecker) muß eine
ölbeständige Gummischlauchleitung (wie CEE (2) 57, 3x1,5) sein. Sonstige
Ausfürung:SteckvorrichtungenausthermoplastischemKunststoff,wasserdicht.
Leitungsorgfältig behandeln und vor scharfen Kanten schützen, damit Mantel
und Isolierung nicht beschädigt werden.
4. Das Kabel regelmäßig auf Beschädigungen oder Alterungserscheinungen
kontrollieren. Ein beschädigtes Kabel muß sofort ausgetauscht werden.
5. Installationsteile dürfen Motorenteile, die erwärmt werden oder in bewegung
sind,nicht berühren. Der Abstand zumAuspuffsystem soll mindestens50 mm
(auch bei Turbo-Aggregat) betragen - sonst den Calix Strahlungsschutz
verwenden.
6. Einbaukabel und eventuelle Verbindungskabel müssen dicht neben den
Verbindungsstecker mit den mitgelieferten Klammer befestigt werden.
F. Warnung
Abbrennen des Heizelementes (des Widerstandsdrahtes) kann erfolgen bei
• unsauberer Kühlflüssigkeit • ungenügender Kühlwassermenge
• nicht entlüftetem Kühlwassersystem • Verwendung von Kühlerzement
In diesen Fällen kann keine Garantileistung erfolgen.
ENGLISH
A. Read the assembly instructions carefully. Check that all parts and
fittings illustrated under ”A” are included. Survey view only, without
detailed reproduction.
B. Installation of the heater
1. Drain the coolant.
2. Install the engine heater on the hose between the oil cooler and the
engine (the lower hose), see figure. Cut the hose 160 mm from the end
that is mounted on the oil cooler (see drawing) and install the heater
+ bracket and hoses with the supplied hose clamps (see drawing). Make
sure that the hose clamps end up completely inside of the raised parts
on the pipe ends, figure C. NOTE! Make sure that the engine heater
housing does not rest against the engine block.
3. Pull the cable with socket for the engine heater into the engine
compartment. Press the plug-in connection between the engine
heater and cable fully together so that the O-ring seals properly and
there is no gap. Apply a few drops of oil on the O-ring. The connection
can then be made easier. It is very important that connection is made
this way.
4. Fil up with coolant and vent the cooling system, see the instruction book.
Run the engine and check that there is no leakage.
C. Fitting of lead-in
See separate mountinginstruction.
D. Test-running
1. Check that the cooling system is full of coolant.
2. Make sure that allair has been removedfrom the cooling systemas the heater
element will immidiately burn out if surrounded by air.
3. Check that all seals are tight even with the engine warm.
4. Check the heater by connecting it to an earthed point. A low sizzling noise will
be heard when the water on the surface of the heater element boils.
E. Important
1. Always use anti-freeze in the cooling system.
2. The engine heater must only be connected to an earthed point. There must
alwaysbeacontinuousinternalearthconnectionrunningfromtheengineheater
casing through the body and right up to the earthed point.
3. The cable between the lead-inand contactplug must be of oil-resistantrubber
hose of a type not lighter than H05RN-F 3x1,5 mm2. The contact plug should
be of thermoplastic and of approved moisture-proof type. Take care not to
damagethecable, and particularythatdoors, bonnet lidorother sharp objects
do not press against it so that the insulation is damaged.
4. Inspectthecableperiodicallyfordamageorageing.Adamagedcablemustbe
replaced without delay.
5. No parts of the installation must be allowed to come into contact with moving
orhot parts of the engine.The distanceto all parts of theexhaust systemmust
beatleast50mm(2”).(Alsoapplicablefortheturbounitifany.)OtherwiseCalix
Heat Shield must be used.
F. Warning
The heater element can be burnt out if:
• the coolant is dirty • there is insufficient coolant
• there is air in the system • there is sludge in the cooling system
• radiator cement is added to the coolant
In such cases the warranty is not valid.
SUOMI
A. Tutustu asennusohjeeseen huolellisesti ja tarkista, että kaikki
kohdassa A, mainitut osat ovat pakkauksessa mukana. Yleiskuvia, ei
yksityiskohtaisia.
B. Lämmittimen asennus.
1. Poistakaa jäähdytysneste.
2. Moottorilämmitin asennetaan moottorin ja öljynlauhduttajanväliseen
letkuun (alempi letku), katso kuva. Leikkaa letku poikki niin, että
öljynlauhduttajasta tulevan letkun pituus on 160mm, katso luonnos.
Asenna moottorilämmitin + kiinnike ja letkut pakkauksen mukana olevilla
letkunkiristimillä, katso luonnos. Varmista että letkukiristimet ovat
putkipätkien kohoamien sisäpuolella, kuva C. HUOM.! Tarkista ettei
moottorilämmittimenpesä hankaamoottoria vasten.
3. Lämmittimen kaapeli pistokkeineen vedetään etupuskurista
moottoritilaan ja moottorilämmittimeen. Työnnä pikaliitäntä, joka on
moottorilämmittimen ja kaapelin välillä kokonaan yhteen niin, että O-
rengas tiivistää kunnolla. HUOM. Tiputa muutama pisara öljyä O-
renkaan päälle. Tämä helpottaa kytkentää. On erittäin tärkeää että
kytkentää tapahtuu tällä tavalla.
4. Täytä jäähdytysjärjestelmä ja suorita ilmaus käyttöohjekirjan
mukaisesti. Käynnistä moottori ja tarkista mahdolliset vuodot.
C. Pistokytkimenasennus.
Katso asennusohjeet.
D. Koeajo.
1. Tarkista jäähdytysnesteen määrä.
2. Varmistaudu siitä, että ilma poistuu jäähdytysjärjestelmästä. Vastus
palaa hetkessä poikki, jos se joutuu ilman kanssa kosketuksiin.
3. Tarkista, ettei vuotoja esiinny moottorin ollessa lämmin.
4. Kokeile lämmitintä yhdistämällä verkkojohto maadoitettuun pistorasiaan.
Kuuluu pientä sirinää veden kiehuessa lämmittimen pinnassa.
E. Tärkeää
1. Käytä aina riittävää määrää pakkasnestettä.
2. Moottorilämmittimen saa liittää ainoastaan maadoitettuun pistrasiaan ja on
varmistettava että maadoituskosketus on hyvä moottorilämmit-timestä ja
auton korista maadoitettuun pistorasiaan.
3. Liitosjohtona on käytettävä: A05RN-F 3x1,5mm² tai H05RN-F 3x1,5mm².
Ammattitaitoisen asentajan on suoritettava asennustyö. Lämmitin on
suojamaadoitettava, mistä syystä seinäkoskettimeen tuleva pistokkeen on
oltavavarustettumaadoituskoskettimellajamieluimmintermoplastpäällyksellä.
Käsittele kytkentäjohtoa varovasti. Varo erityisesti konepellin ja korin väliin
aiheutuvista puristusvaurioista sekä terävien peltiosien aiheuttamaa
viiltovaurioidenvaaraa.MääräystenmukainenverkkoliitäntäjohtoA05RN-F
3x1,5mm²taiH05RN-F3x1,5mm²onhankittavamoottorilämmittimenoston
yhteydessä, ellei autossa ole ennestään.
4. Tutki kaapeli säännöllisesti vaurioiden sekä vanhenemisen suhteen.
Vaurioitunutkaapeli pitää vaihtaa välittömästi.
5. Mikäänlämmittimenosistaeisaakoskettaamoottorinlämpeneviätailiikkuvia
osia. Etäisyys pakosarjaan vähintään 50 mm (koskee myös turbolaitetta).
Muissa tapauksissa on käytettävä lämmöneristettä.
6. Panssarikaapelit voidaan pidentää jatkokaapeleilla pikaliittimien avulla.
Tällöinonpakauksessa olevat kaapelikiinnikkeet kiinnitettäväliitos-kohdon
molemminpuolinmahdollisimmanlähellepikaliittimiä.
F. Varoitus
Vastuselementti palaa poikki jos
• jäähdytysneste on likainen • jäähdytysnestettä ei ole tarpeeksi
• jäähdytysjärjestelmässä on ilmaa tai jääsohjoa
• jäähdyttäjän tiivistysainetta käytetään
Näissä tapauksissa takuu ei ole voimassa.