manuals.online logo
Brands
  1. Home
  2. •
  3. Brands
  4. •
  5. Cisco
  6. •
  7. Conference System
  8. •
  9. Cisco TelePresence System Profile 52” Dual Assembly instructions

Cisco TelePresence System Profile 52” Dual Assembly instructions

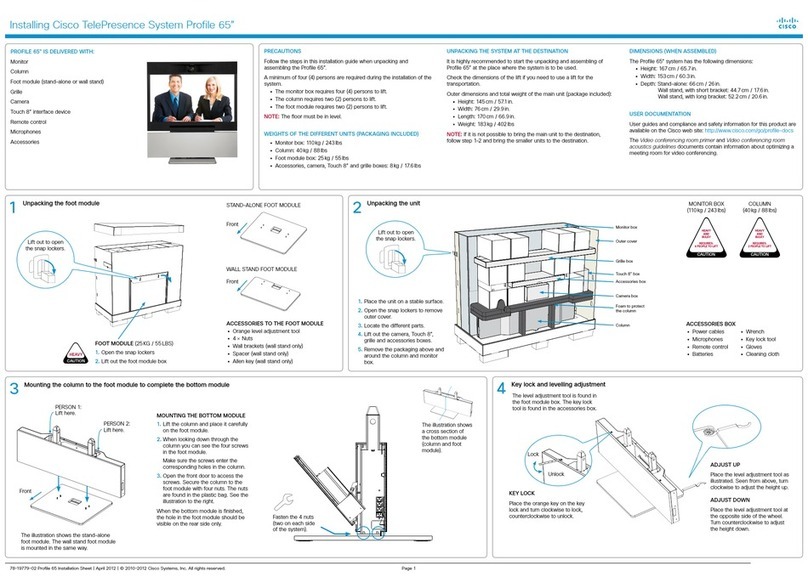
Installing Cisco TelePresence System Profile 52” Dual
Page 178-19776-01revB Profile 52 Dual Installation Sheet | April 2012 | © 2010-2012 Cisco Systems, Inc. All rights reserved.
PRECAUTIONS
Please follow the steps in this installation guide when unpacking and
assembling Profile 52” Dual.
MANPOWER
A minimum of two (2) persons are required when installing
Profile 52” Dual.
UNPACKING THE SYSTEM AT THE DESTINATION
It is highly recommend to start the unpacking and assembling of
Profile 52” Dual at the place where it is to be used.
If it is not possible to bring the complete delivery to the room where
Profile 52” Dual is to be used, then unpack and bring the smaller units
to the destination.
• The monitor box requires two (2) persons to lift 55kg / 121lb).
• The bottom module column requires two (2) persons to lift
(40kg / 88lb).
• The foot module requires two (2) persons to lift
(stand-alone: 35 kg / 77lb; wall-mounting: 20 kg / 44lb).
INSTALLATION NEAR A SOCKET-OUTLET
The equipment must be installed near a socket-outlet. The socket-
outlet shall be easily accessible after installation.
ROOM GUIDELINES
NOTE: The floor must be in level.
The recommended distance between the Profile 52” Dual and the
meeting room table should be minimum 1.5m / 59 in.
Read more about room guidelines in the Video conferencing room
primer.
USER DOCUMENTATION
The user documentation for this product, including compliance and
safety information, is available on the Cisco web site.
Go to: http://www.cisco.com/go/telepresence/docs.
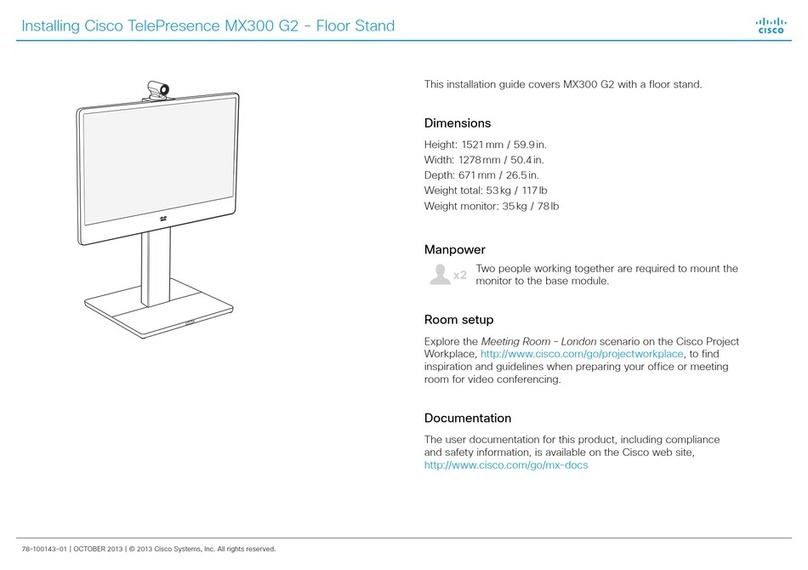
DIMENSIONS OF THE PROFILE 52” DUAL
• Height: 63.8” / 162cm
• Width: 94.9” / 241cm
• Depth (wall mounting): 10.2” / 26 cm
• Depth (stand-alone): 17.7” / 45 cm
• Weight: 518 lb / 235 kg
The Profile 52” Dual delivery contains:
Monitor box:
• Two monitors and
speaker grilles
Bottom module column
Camera
Touch Screen CS
Foot module box:
• Foot module (stand-alone or wall
mounting)
• Four M8×45 screws
• Two wall mounting brackets and four
M6×10 screws (for wall mounting only)
• Wrench
• Level adjustment tool (orange)
Monitor back cover box:
• Monitor back cover
• Monitor brackets
• M4×25 and M4×8 screws for the monitor
brackets
• Camera bracket
• Wing nuts for the camera bracket
Accessories box:
• Cables
• Microphones, 4 pcs
• Remote control and 4 AAA batteries
• Gloves, 2 pairs
• Cleaning cloth
• Allen key, screwdriver
• Four M8×16 screws
1 Content overview
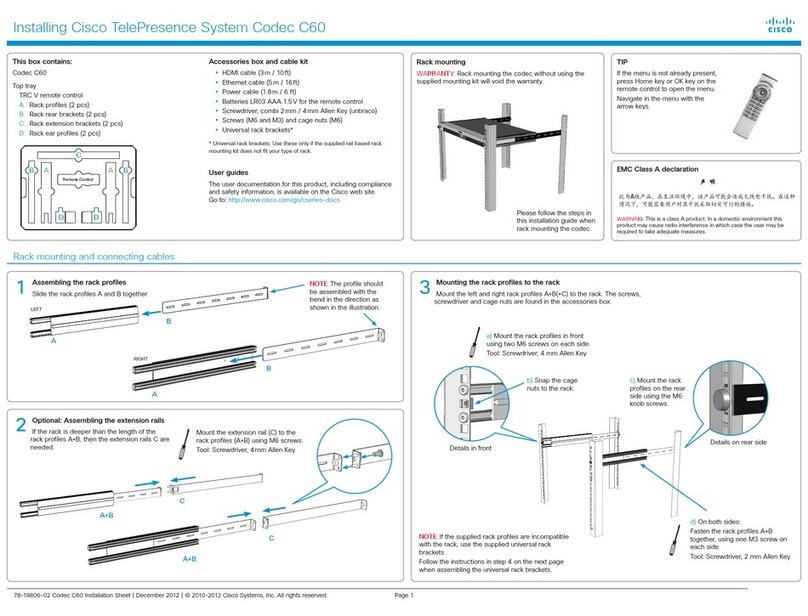
Remove the outer cover and locate the different boxes as illustrated below.
2 Lift the column out of the package. Mount the column to the foot
module to complete the bottom module
Left monitor
Right monitor
Column
Stand-alone
foot module
CAUTION
HE AV Y
3 WHEN YOU HAVE A WALL MOUNTING FOOT MODULE:
Mount the column to the foot module and fasten it to the wall WARNING
Due to the size and weight of this equipment, it is very
important that the wall mount unit is safely installed according
to the installation instructions and that the wall is able to safely
support the product. It is highly recommended that the wall
mounted system is installed by trained personnel.
1. Mount the column to the wall mounting foot module, similar to step 2.
2. Fasten the wall brackets to the bottom module with the four M6×10 screws.
Use the Allen key.
3. Place the bottom module by the wall, mark where to fasten the bracket and
move the bottom module away.
4. Add the suitable fixing device for the screws in the wall, and fasten the
bottom module.
FASTEN THE COLUMN TO THE FOOT MODULE
1. Make sure the foot module has been placed at its permanent location.
2. Place the column on the foot module, open the rear door, and remove the door
stop bracket.
3. Carefully open the rear door completely.
4. Use four M8×45 screws and fasten the column to the foot module.
5. Mount the door stop bracket back in place.
LEVELLING ADJUSTMENT
Make sure the unit is stable.
Place the orange level adjustment tool on the
foot wheel under the foot module for height
adjustment.
Seen from above, turn clockwise to adjust the
height up. Use the opposite side of the tool
and turn counterclockwise to adjust down.
Grab here when
lifting the column.
CAUTION
HE AV Y
CAUTION
HE AV Y
Rev.
Date
Prep.
Checked
Change
-
-
-
Telecom AS
-
-
-
-
-
-
-
-
-
-
-
-
-
-
-
-
-
-
Part weight:
Sheet size:
Scale:
Surface treatment
Specification:
Material
Tolerances
Unit:
European
projection
Sheet 1 of 1
All materials, finishes, and proccesses
must comply with the RoHS directives
Dimensions without paint or finish
Flame class requirement: -
Processes
Type:
Manufacturer:
Type number:
Thickness:
Color:
Surface:
Glossiness:
Flame class:
UL reference:
3D CAD model file 120601
rev. 03 is master
Packaging Kit Profile 52" Dual
120601 rev.
71743g
A3
mm
1:8
Monitor back cover and monitor brackets
Right and left monitor
Bottom module column
Camera
Foot module
Accessories box 4 * M8×45
Allen key
Touch screen
Use the wrench to remove the door
stop bracket on the rear door before
fastening the column to the foot module.
Rear side
Door stop bracket
Fasten the column
to the foot module.
Fasten the column
to the foot module.
Access the innermost screws from these holes.
The bottom module is viewed from the rear side.
Add the suitable fixing device for the screws in the wall.
The wall
4 * M6×10
Allen key
The monitors come in a separate box. The monitor box contains monitors and speaker grilles
for the monitors. Remove the lid and locate the left and right monitor and the speaker grilles.
Unpacking and assembling Profile 52” Dual
CAUTION
HE AV Y
EMC A Class declaration
Installing Cisco TelePresence System Profile 52” Dual
Page 278-19776-01revB Profile 52 Dual Installation Sheet | April 2012 | © 2010-2012 Cisco Systems, Inc. All rights reserved.
6 Mounting the camera cables and the camera
MOUNTING THE CAMERA CABLES
1. Locate the camera cables in the bottom module (the two long cables).
2. Locate the hole in the monitor where the cables can be pushed
through. Push the cables through the hole in the right monitor.
3. On the rear side, place the cables in the foam rails that are going on
the rear side of the monitor.
CAMERA CABLE CONFIGURATION
PrecisionHD 1080p
HDMI
RJ45
For countries with 60 Hz current frequency
you must set the PrecisionHD 1080p camera
DIP switch to: 00100.
MOUNTING THE CAMERA
1. Connect the RJ45 and HDMI cables to the camera, see illustration.
2. Loosen the wing nuts on the camera bracket and move the bracket to
the rear position.
3. Place the camera on the bracket and slide the bracket with the camera
towards the front and tighten the wing nuts.
4. Place the camera cables in the foam rails.
Upper monitor
bracket
Camera bracket
Lower monitor
bracket*
MOUNTING THE CAMERA BRACKET
1. Fasten the camera bracket using two wing nuts.
* The lower monitor bracket is not used on a wall
mounted system. Instead, make sure the monitors
are aligned at the front.
8 Connect the system
Ethernet cable
PC cable
Microphone cable
Power cable
1. Open the rear door and route the cables out through the opening at the lower part of the door.
2. Close the rear door carefully.
3. Place the microphones on the table, connect the microphone cables and place the PC cable
on the table.
4. Connect the Ethernet cable.
5. Connect the power cable, use the country specific power cable that came with the system.
6. Open the front door and turn on the monitor.
7. Follow the instructions in the accompanying Touch Screen CS installation guide to connect and
initialize the touch screen.
8. The system should be up and running in a few minutes.
The rear door
5 Connect the monitor cables to the left and right monitor
Connect the left monitor:
1. HDMI cable
2. Speaker in (15 pin DSUB from DNAM)
3. Power cable
Left monitor connectors
B
B
Right monitor connectors
Connect the right monitor:
1. HDMI cable
2. Speaker in (15 pin DSUB from DNAM)
3. Power cable
CONNECTING MONITOR CABLES
Open the front door and locate the monitor connectors and cables.
4 Unpack the monitor box and lift out the monitors. Fasten the monitors to the bottom module
and mount the camera bracket
LIFTING HANDLES. Locate the
orange lifting handles in the front
and rear side of the monitor.
MOUNTING THE MONITORS
1. Carefully lift the right monitor out of the
packaging as illustrated.
2. See the two triangle holes in the monitor
base. Use these holes to help steering the
monitor to enter the poles on the column.
3. Repeat the above procedure for the left
monitor.
Right monitor
Left monitor
See the two triangular
holes in the base.
Use the holes to help
steering the monitor
to enter the poles on
the column.
4 * M8×16
Allen key
Unpack the
monitor box.
Speaker grille box
Lift out to open the
snap lockers.
CAUTION
HE AV Y
7 Finishing up
MOUNTING THE BACK COVER
1. Enter the back cover on top and
snap it on place with the magnets.
2. Remove the plastic cover in front of
the monitor.
3. Remove the plastic foil on the
monitor frame.
4. Snap on the speaker grille to the
front.
5. Use the supplied cloth to clean the
system.
The magnets are strong. Make sure
your fingers are not trapped.
Power HDMI 1 Speaker in
PowerHDMI 1 Speaker in
MOUNTING THE MONITORS, continued
4. Align the monitors at the top and fasten the two
monitors together using the upper monitor bracket
and the M4×25 screws.
5. Fasten the two monitors together at the bottom using
the lower monitor bracket and the M4×8 screws.
6. Fasten the monitor to the column poles using
four M8×16 screws, two screws at each monitor.
7. Tighten the monitor gently to the bottom module until
the monitor cannot be moved anymore.
EMC Class A declaration
WARNING: This is a class A product. In a domestic environment this product may cause radio
interference in which case the user may be required to take adequate measures.
A级声明 (A Class product declaration)
本产品为 A级ITE,在其使用说明,铭牌等显著位置中已包含如下内容的声明
(We declare here that the subject product is A class ITE product, and the
following statement is clearly marked in the user manual or nameplate):
声明所在位置 (Position of the Declaration): 使用说明 User Manual
铭牌 Nameplate
申请号 (Application No.):
申请人 (Applicant):
型号 (Model Number):
签字/盖章 Signature/Stamp:
日期 Date:
警告
此为 A级产品。在生活环境中,该产品可能会造成无线电干扰。在这种
情况下,可能需要用户对干扰采取切实可行的措施。
WARNING:
This is a class A product. In a domestic environment this
product may cause radio interference in which case the user may be
required to take adequate measures.
B
B

Other Cisco Conference System manuals

Cisco TelePresence Profile 55 User manual

Cisco

Cisco TelePresence Profile 55 User manual

Cisco TelePresence VX Clinical Assistant User manual

Cisco

Cisco TelePresence VX Clinical Assistant User manual

Cisco TelePresence DX80 User manual

Cisco

Cisco TelePresence DX80 User manual

Cisco DX600 series User manual

Cisco

Cisco DX600 series User manual

Cisco EX60 Service manual

Cisco

Cisco EX60 Service manual

Cisco Quick Set C20 Service manual

Cisco

Cisco Quick Set C20 Service manual

Cisco MX Series User manual

Cisco

Cisco MX Series User manual

Cisco TelePresence Codec C-series User manual

Cisco

Cisco TelePresence Codec C-series User manual

Cisco CTS-SX10-K9 User manual

Cisco

Cisco CTS-SX10-K9 User manual

Cisco SX80 Service manual

Cisco

Cisco SX80 Service manual

Cisco TelePresence SX10 User manual

Cisco

Cisco TelePresence SX10 User manual

Cisco ONS 15454 Series User manual

Cisco

Cisco ONS 15454 Series User manual

Cisco Nexus 92300YC Manual

Cisco

Cisco Nexus 92300YC Manual

Cisco TelePresence MX700 User manual

Cisco

Cisco TelePresence MX700 User manual

Cisco TelePresence DX80 User manual

Cisco

Cisco TelePresence DX80 User manual

Cisco Webex Codec Pro User manual

Cisco

Cisco Webex Codec Pro User manual

Cisco TELEPRESENCE VIDEO COMMUNICATION SERVER - COMMAND REFERENCE V... Operating manual

Cisco

Cisco TELEPRESENCE VIDEO COMMUNICATION SERVER - COMMAND REFERENCE V... Operating manual

Cisco 7935 - IP Conference Station VoIP Phone Instruction Manual

Cisco

Cisco 7935 - IP Conference Station VoIP Phone Instruction Manual

Cisco TelePresence User manual

Cisco

Cisco TelePresence User manual

Cisco TelePresence SX20 User manual

Cisco

Cisco TelePresence SX20 User manual

Cisco DX650 User manual

Cisco

Cisco DX650 User manual

Cisco TelePresence MX300 Service manual

Cisco

Cisco TelePresence MX300 Service manual

Cisco TelePresence SX20 User manual

Cisco

Cisco TelePresence SX20 User manual

Cisco Board User manual

Cisco

Cisco Board User manual

Popular Conference System manuals by other brands

SOMFY QuickCopy Interactive operating instructions

SOMFY

SOMFY QuickCopy Interactive operating instructions

Polycom VSX Series Administrator's guide

Polycom

Polycom VSX Series Administrator's guide

Gestton EG-6630M user manual

Gestton

Gestton EG-6630M user manual

Sony IPELA PCS-G70 operating instructions

Sony

Sony IPELA PCS-G70 operating instructions

Lucent Technologies MERLIN LEGEND System manager's guide

Lucent Technologies

Lucent Technologies MERLIN LEGEND System manager's guide

TouchLink CCI Pro 700 user guide

TouchLink

TouchLink CCI Pro 700 user guide

DynaVox Palmtop3 user guide

DynaVox

DynaVox Palmtop3 user guide

LifeSize Icon Guide

LifeSize

LifeSize Icon Guide

BinTec elmeg hybird 120 Reference manual

BinTec

BinTec elmeg hybird 120 Reference manual

Yealink VC110 Admin guide

Yealink

Yealink VC110 Admin guide

Lucent Technologies PARTNER Advanced Communications System System planner

Lucent Technologies

Lucent Technologies PARTNER Advanced Communications System System planner

Audio Technica ATCS-60 Feature overview

Audio Technica

Audio Technica ATCS-60 Feature overview

Poly Polycom RealPresence Group Series user guide

Poly

Poly Polycom RealPresence Group Series user guide

Siemens RF180C operating instructions

Siemens

Siemens RF180C operating instructions

MuxLab MuxMeet Share Base-2 user manual

MuxLab

MuxLab MuxMeet Share Base-2 user manual

LY International Electronics H-8500 Series owner's manual

LY International Electronics

LY International Electronics H-8500 Series owner's manual

Interalia iMCM user guide

Interalia

Interalia iMCM user guide

GONSIN DCS-3024 user manual

GONSIN

GONSIN DCS-3024 user manual

manuals.online logo
manuals.online logoBrands
  • About & Mission
  • Contact us
  • Privacy Policy
  • Terms and Conditions

Copyright 2025 Manuals.Online. All Rights Reserved.