2/ Note before installation
Check the contents of the pack before installing.
WARNING: In order to prevent the risk of an electric shock, injury or fire when using electric ap- pliances,
read and follow the basic safety instructions below:
The ìnstaIIatìon must be made by a qualified person.
The ìnstaIIatìon must be further than 20 cm from an inflammable product.
Cut the mains power supply before any work.
All damaged power cables must be replaced by qualified person.
Mechanically or electrically altering the light is prohibited.
This light is not compatible with dimmers.
If, when unpacked, the item includes plastic bags, they must not be left within the reach of children
due to the risk of suffocation.
Do not install or operate a damaged light or a light with missing parts.
Make sure you only connect your light when the installation is complete.
Do not use the DRIVER for a lamp other than the LED panel.
3.3/ Surface Installation
4/ Electrical connection
4.1/ Connect the live and the neutral from the 230V circuit to the driver’s live and neutral
using a terminal block (not included).
4.2/ Connect the driver’s male jack to the LED panel female jack.
5/ Care:
The light should be cleaned regularly by dusting it or using a damp wipe.
The light source on this light is not repleaceable: when the light source reaches the end of its service life,
the entire appliance must be repleaced.
IFP
LED Flat panel
INSTALLATION INSTRUCTIONS -ENGLISH
TECHNICAL INFORMATION
Voltage & Frequency: 220 -240 V -50/60 Hz
Power Factor: > 0,95 at full load
UGR < 19
Built-in microwave sensor available asanoptional accessory Insulation Class: I
Installation methods: Recessed, Suspend, Surface Mount
TA min/max ( °C ) -10°C / +40° C (Lumen Packages: L1-12 / L4-22 / L 4-22B / L4-14 / L8-24)
Max weight: L1-12 1.8 Kg/ L4-22 2.2 Kg / L4-22B 2.5 Kg / L4-14 2.3 Kg / L8-24 4.6 Kg
Risk Group 0 according to IEC 62471:2008
WARNING: Please read these instructions carefully before installing, and keep the instructions
available. Product for indoor use only.
1/ Specificaons: L1-12 1.8 Kg L4-22 2.5 Kg L4-14 2.3 Kg L8-24 4.6 Kg
Rated power 15 W 33 W 35 W 70 W
Rated voltage 220 - 240 V 220 - 240 V 220 - 240 V 220 -240 V
Light flow 1648 LM 3640 Lm 3640 Lm 7500 Lm
Colour temperature 30—40 K 30—40 K 30—40 K 30—40 K
Dimensions 300 x 300 mm 600 x 600 mm 300 x 600 mm 600 x 1200 mm
Type of lamp LED LED LED LED
Protecon rang IP40 (Exposed part) IP40 (Exposed part) IP40 (Exposed part) IP40 (Exposed part)
Pack contents: LED panel / transformer / instrucons
2/ Note before installation
Check the contents of the pack before installing.
WARNING: In order to prevent the risk of an electric shock, injury or fire when using electric ap-
pliances, read and follow the basic safety instructions below:
The ìnstaIIatìon must be made by a qualified person.
The ìnstaIIatìon must be further than 20 cm from an inflammable product.
Cut the mains power supply before any work.
All damaged power cables must be replaced by qualified person.
Mechanically or electrically altering the light is prohibited.
This light is not compatible with dimmers.
If, when unpacked, the item includes plastic bags, they must not be left within the reach of children due
to the risk of suffocation.
Do not install or operate a damaged light or a light with missing parts.
Make sure you only connect your light when the installation is complete.
Do not use the DRIVER for a lamp other than the LED panel.
3.1/ Recessed Installation
See Figure A -
Electrical
connections
5
*
3.2/ Suspended Installation
See Figure A -
Electrical
connections
4/ Electrical connection
4.1/
Connect the live and the neutral from the 230V circuit to the driver’s live and neutral using a terminal
block (not included).
4.2/
Connect the driver’s male jack to the LED panel female jack.
Note: in some cases the live wire may be red or black.
5/ Care:
The light should be cleaned regularly by dusting it or using a damp wipe.
The light source on this light is not repleaceable: when the light source reaches the end of its service
life, the entire appliance must be repleaced.
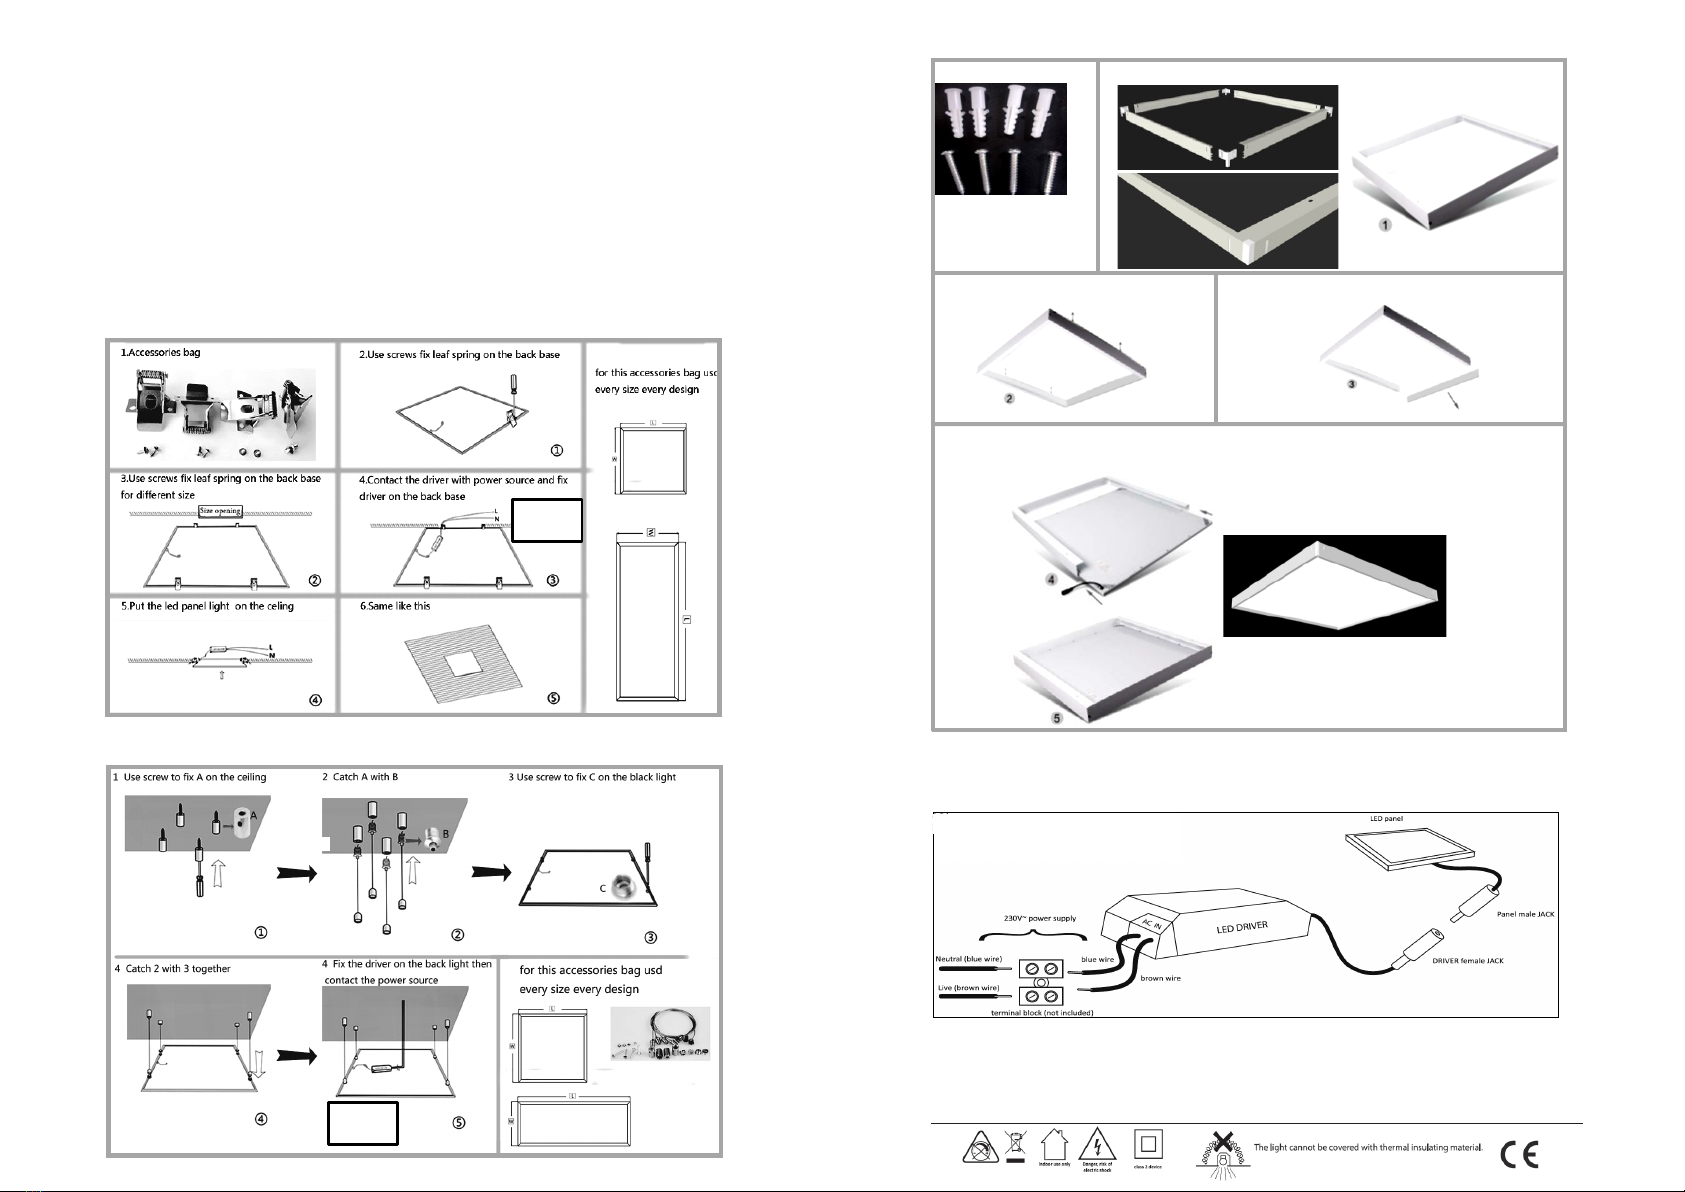
FIGURE A
1.Accessories bag 2. Assemble the frame
4.Remove one side of the frame
3.3/ Surface Installation
5.Connect the driver with the power source (see Figure A -Electrical connecons) and insert the led panel in
the frame -Close the frame.
3. Use the wall plugs to install the frame
4/ Electrical connection
4.1/
Connect the live and the neutral from the 230V circuit to the driver’s live and neutral using a terminal
block (not included).
4.2/
Connect the driver’s male jack to the LED panel female jack.
Note: in some cases the live wire may be red or black.
5/ Care:
The light should be cleaned regularly by dusting it or using a damp wipe.
The light source on this light is not repleaceable: when the light source reaches the end of its service
life, the entire appliance must be repleaced.
FIGURE A
1.Accessories bag 2. Assemble the frame
4.Remove one side of the frame
3.3/ Surface Installation
5.Connect the driver with the power source (see Figure A -Electrical connecons) and insert the led panel in
the frame -Close the frame.
3. Use the wall plugs to install the frame


