manuals.online logo
Brands
  1. Home
  2. •
  3. Brands
  4. •
  5. D-Link
  6. •
  7. IP Phone
  8. •
  9. D-Link DWR-720 User manual

D-Link DWR-720 User manual

1. On the home screen, press Contacts (Right Option Key) > then press [Options] (Left Option Key)
2. Select [Add contact]
3. Select where you would like to save the contact (SIM or phone) > press [OK]
4. Type the contact’s name and phone number into the elds provided
5. Press [Options] > and select [Save] to save your new contact.
HOW DO I ADD A CONTACT TO MY CONTACT LIST?
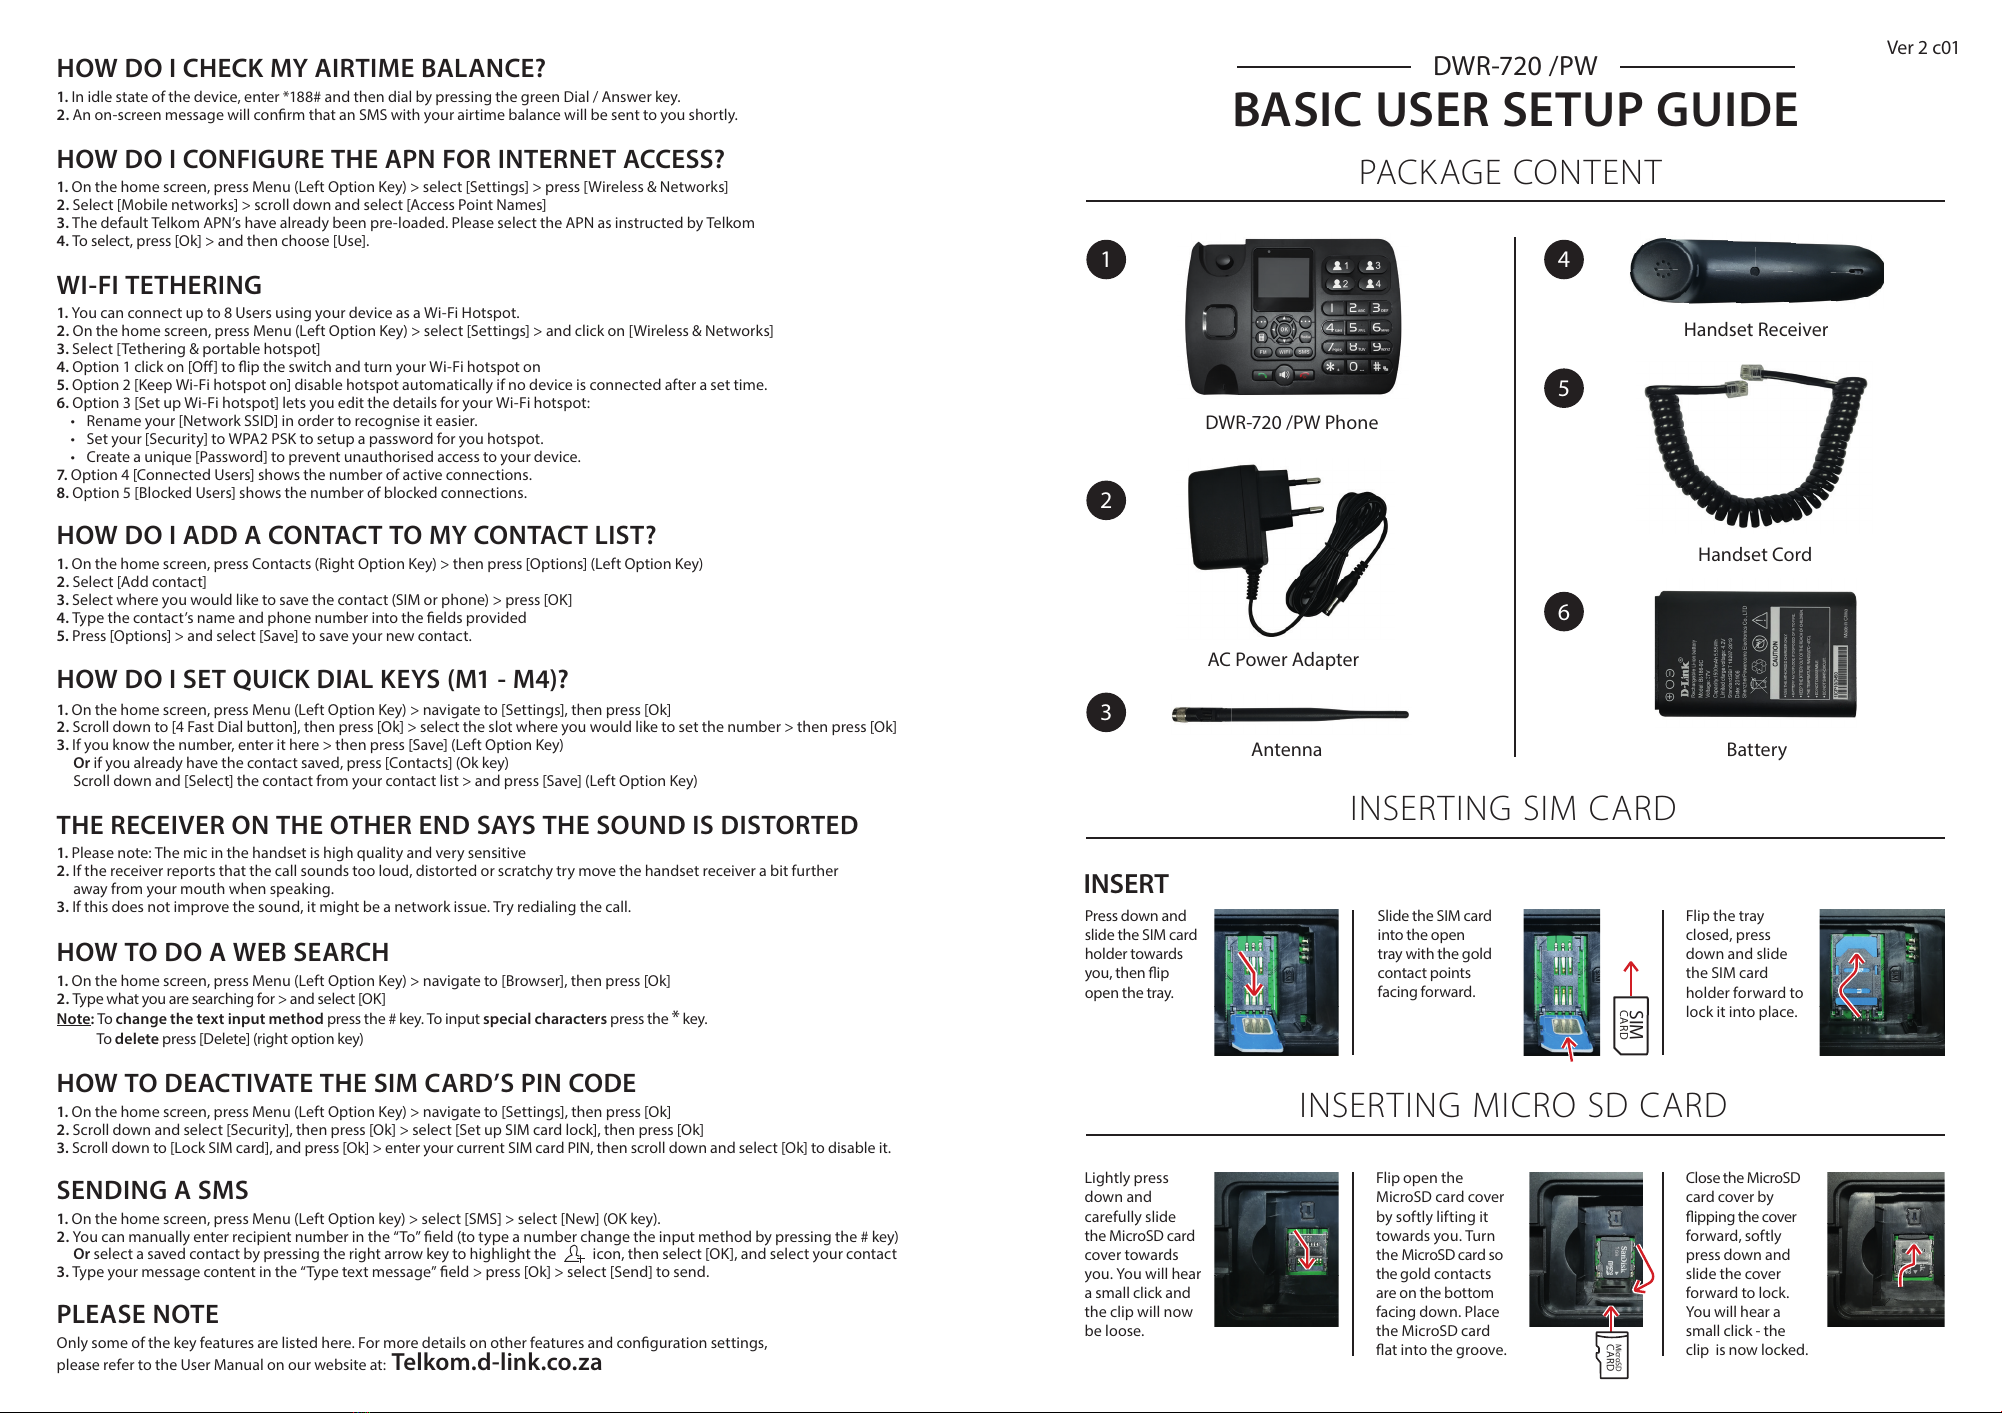
PACKAGE CONTENT
INSERTING SIM CARD
INSERTING MICRO SD CARD
DWR-720 /PW
BASIC USER SETUP GUIDE
1
DWR-720 /PW Phone
3
Antenna
2
AC Power Adapter
5
Handset Cord
4
Handset Receiver
6
Battery
Press down and
slide the SIM card
holder towards
you, then ip
open the tray.
Lightly press
down and
carefully slide
the MicroSD card
cover towards
you. You will hear
a small click and
the clip will now
be loose.
Flip open the
MicroSD card cover
by softly lifting it
towards you. Turn
the MicroSD card so
the gold contacts
are on the bottom
facing down. Place
the MicroSD card
at into the groove.
Close the MicroSD
card cover by
ipping the cover
forward, softly
press down and
slide the cover
forward to lock.
You will hear a
small click - the
clip is now locked.
Flip the tray
closed, press
down and slide
the SIM card
holder forward to
lock it into place.
INSERT
Only some of the key features are listed here. For more details on other features and conguration settings,
please refer to the User Manual on our website at: Telkom.d-link.co.za
PLEASE NOTE
HOW DO I CONFIGURE THE APN FOR INTERNET ACCESS?
1. On the home screen, press Menu (Left Option Key) > select [Settings] > press [Wireless & Networks]
2. Select [Mobile networks] > scroll down and select [Access Point Names]
3. The default Telkom APN’s have already been pre-loaded. Please select the APN as instructed by Telkom
4. To select, press [Ok] > and then choose [Use].
HOW TO DEACTIVATE THE SIM CARD’S PIN CODE
1. On the home screen, press Menu (Left Option Key) > navigate to [Settings], then press [Ok]
2. Scroll down and select [Security], then press [Ok] > select [Set up SIM card lock], then press [Ok]
3. Scroll down to [Lock SIM card], and press [Ok] > enter your current SIM card PIN, then scroll down and select [Ok] to disable it.
THE RECEIVER ON THE OTHER END SAYS THE SOUND IS DISTORTED
1. Please note: The mic in the handset is high quality and very sensitive
2. If the receiver reports that the call sounds too loud, distorted or scratchy try move the handset receiver a bit further
away from your mouth when speaking.
3. If this does not improve the sound, it might be a network issue. Try redialing the call.
WI-FI TETHERING
1. You can connect up to 8 Users using your device as a Wi-Fi Hotspot.
2. On the home screen, press Menu (Left Option Key) > select [Settings] > and click on [Wireless & Networks]
3. Select [Tethering & portable hotspot]
4. Option 1 click on [O] to ip the switch and turn your Wi-Fi hotspot on
5. Option 2 [Keep Wi-Fi hotspot on] disable hotspot automatically if no device is connected after a set time.
6. Option 3 [Set up Wi-Fi hotspot] lets you edit the details for your Wi-Fi hotspot:
• Rename your [Network SSID] in order to recognise it easier.
• Set your [Security] to WPA2 PSK to setup a password for you hotspot.
• Create a unique [Password] to prevent unauthorised access to your device.
7. Option 4 [Connected Users] shows the number of active connections.
8. Option 5 [Blocked Users] shows the number of blocked connections.
1. On the home screen, press Menu (Left Option Key) > navigate to [Settings], then press [Ok]
2. Scroll down to [4 Fast Dial button], then press [Ok] > select the slot where you would like to set the number > then press [Ok]
3. If you know the number, enter it here > then press [Save] (Left Option Key)
Or if you already have the contact saved, press [Contacts] (Ok key)
Scroll down and [Select] the contact from your contact list > and press [Save] (Left Option Key)
HOW DO I SET QUICK DIAL KEYS (M1 - M4)?
SENDING A SMS
1. On the home screen, press Menu (Left Option key) > select [SMS] > select [New] (OK key).
2. You can manually enter recipient number in the “To” eld (to type a number change the input method by pressing the # key)
Or select a saved contact by pressing the right arrow key to highlight the icon, then select [OK], and select your contact
3. Type your message content in the “Type text message” eld > press [Ok] > select [Send] to send.
HOW DO I CHECK MY AIRTIME BALANCE?
1. In idle state of the device, enter *188# and then dial by pressing the green Dial / Answer key.
2. An on-screen message will conrm that an SMS with your airtime balance will be sent to you shortly.
HOW TO DO A WEB SEARCH
1. On the home screen, press Menu (Left Option Key) > navigate to [Browser], then press [Ok]
2. Type what you are searching for > and select [OK]
Note:To change the text input method press the # key. To input special characters press the *key.
To delete press [Delete] (right option key)
Ver 2 c01
SIM
CARD
Slide the SIM card
into the open
tray with the gold
contact points
facing forward.
MicroSD
CARD
All manuals and user guides at all-guides.com
Screw the antenna
into the TNC
Antenna Port
05
INSTALLATION
Ensure the DWR-720 /PW is powered o before performing the steps below.
Flip the phone
around and
open the Battery
Cover at the
bottom of the
device.
01
Plug the one
end of the hand-
set cord into the
handset receiver.
06
On the front of the
device, hold the
Red End call / Power
key for ±5 seconds.
A loading screen will
display to indicate
that the phone is
starting up.
09
Connect the charging
point of the Power
Adapter to the DC
power jack on the top
of the phone.
Plug the power
adapter into a
wall outlet.
08
02
Insert the SIM
Card as shown
on page 1.
KEY LOCATION
OTHER IMPORTANT KEYS
+ KEY: Press and hold the [*] key to input a +
when dialling a number.
CHANGING CALL VOLUME
Press the Up / Down direction key to adjust
the volume while on a call.
POWER ON/OFF
ON: On the front of the device, hold the Red
End call / Power key for 5 seconds.
OFF: Hold the Red End / Power Key for 5 seconds.
Note: In this state, all reminders and alarms will
still sound.
NETWORK DEPENDANT
FEATURES
Call forwarding, call barring, call waiting and
voice mail.
SETTINGS
1. You can change your language, time
& date, Call settings, Sound and
Display settings, Etc.
2. Edit Volume, Security.
3. Check your phone information.
Open the MicroSD
card holder and insert
the MicroSD card at
into the groove.
03
Insert the Battery
with the metal end
on the top right. Close
Battery Cover.
04
Note: The battery comes partially charged.
You can use the device while charging.
If prompted for a PIN
number enter the 4 digit PIN
indicated on the larger card
supplied with the SIM card.
Push the left Soft Key and
select “OK” to unlock.
10
Plug the other end
of the handset cord
into the headset
port on the left side
of the phone.
07
Note: If the phone has no signal or shows “Mobile Network Not
Available” when you try to dial please phone Telkom on 081 180
to verify that your SIM is active and your area has coverage.
MicroSD
CARD
*188# Check Mobile Balance and get all your balances SMS’d to you
*180# Mobile Account Menu (buy bundles, transfer airtime/data, manage spend limit,
get device settings, change tari, BIS)
*1# Check what your mobile number is (Indicated by MSISDN)
*140*mobile number# Send a Please Call Me
181 / 10120 / 10121 Listen to your voicemails
USEFUL TELKOM MOBILE USSD CODES
FAQ
MY PHONE SAYS MOBILE NETWORK NOT AVAILABLE WHEN DIALLING
1. If this is a new installation, your SIM card may not be active. This could take between 24 - 48 Hrs.
2. Or there is no mobile service (signal) / coverage in your area.
Check that your SIM Card has been inserted correctly (as indicated on page 1 of this user guide).
If problem persists please phone Telkom on 081 180 to verify that your SIM card is active and that your area has coverage.
MAKING AND ENDING A CALL
1. On the home screen, enter the number you want to dial and press the green Dial / Answer key.
2. With the handset on hook the hands free call (Loud speaker) will be initiated.
3. Pick up the handset receiver to switch over to handset calling.
4. During an active call, press the large speaker icon to enable hands free call.
5. To end an active call, press the red End / Power key or hang up.
PIN: xxxx
PUK: xxxx
Rubber Feet Grip
Handset Port
Battery Cover
TNC Antenna Port
Micro USB Port
Sticker with Wi-Fi &
Bluetooth details
DC Power Jack
M1-M4 Quick
Dial keys
Right option key
Direction key
Left option key
Redial key
Calculator
Wi-Fi key
FM radio
SMS
Dial/Answer key
Load Speaker key
End / Power key
Keypad
SIM
CARD
All manuals and user guides at all-guides.com

Other manuals for DWR-720

3

This manual suits for next models

1

Other D-Link IP Phone manuals

D-Link DPH-125MS - VoiceCenter VoIP Phone User manual

D-Link

D-Link DPH-125MS - VoiceCenter VoIP Phone User manual

D-Link DPH-70E User manual

D-Link

D-Link DPH-70E User manual

D-Link EXPRESS ETHERNETWORK DPH-140S User manual

D-Link

D-Link EXPRESS ETHERNETWORK DPH-140S User manual

D-Link DPH-150SE User manual

D-Link

D-Link DPH-150SE User manual

D-Link DHA-130 User manual

D-Link

D-Link DHA-130 User manual

D-Link DPH-128MS - VoiceCenter VoIP Phone User manual

D-Link

D-Link DPH-128MS - VoiceCenter VoIP Phone User manual

D-Link DPH-80 User manual

D-Link

D-Link DPH-80 User manual

D-Link DWR-720/PW User manual

D-Link

D-Link DWR-720/PW User manual

D-Link DPH-120S Instruction manual

D-Link

D-Link DPH-120S Instruction manual

D-Link DPH-125MS - VoiceCenter VoIP Phone User manual

D-Link

D-Link DPH-125MS - VoiceCenter VoIP Phone User manual

D-Link VoiceCenter DVX-2000MS User manual

D-Link

D-Link VoiceCenter DVX-2000MS User manual

D-Link DPH-100H User manual

D-Link

D-Link DPH-100H User manual

D-Link DPH-70 User manual

D-Link

D-Link DPH-70 User manual

D-Link DPH-150S User manual

D-Link

D-Link DPH-150S User manual

D-Link DWR-920/PW User manual

D-Link

D-Link DWR-920/PW User manual

D-Link DPH-10U User manual

D-Link

D-Link DPH-10U User manual

D-Link DPH-150S User manual

D-Link

D-Link DPH-150S User manual

D-Link DPH-80 User manual

D-Link

D-Link DPH-80 User manual

D-Link DPH-150S User manual

D-Link

D-Link DPH-150S User manual

D-Link DPH-80 User manual

D-Link

D-Link DPH-80 User manual

D-Link DPH-150S User manual

D-Link

D-Link DPH-150S User manual

D-Link GLV-540 User manual

D-Link

D-Link GLV-540 User manual

D-Link DPH-120SE User manual

D-Link

D-Link DPH-120SE User manual

D-Link DVG-5121SP Owner's manual

D-Link

D-Link DVG-5121SP Owner's manual

Popular IP Phone manuals by other brands

Htek U Series user manual

Htek

Htek U Series user manual

Avaya IP Office 4602 user guide

Avaya

Avaya IP Office 4602 user guide

LV switch SIP-H680 Series user manual

LV switch

LV switch SIP-H680 Series user manual

Vonage Yealink T33 user guide

Vonage

Vonage Yealink T33 user guide

NEC Univerge SV 9500 Reference sheet

NEC

NEC Univerge SV 9500 Reference sheet

Panasonic NT346-B - KX - VoIP Phone Quick reference guide

Panasonic

Panasonic NT346-B - KX - VoIP Phone Quick reference guide

LG-Nortel LDP7016 Function guide

LG-Nortel

LG-Nortel LDP7016 Function guide

Ultrative UTT?205 user manual

Ultrative

Ultrative UTT?205 user manual

Cisco 3905 Features

Cisco

Cisco 3905 Features

Hanlong UC826 quick reference

Hanlong

Hanlong UC826 quick reference

Alcatel Voice over WLAN (R1.1.1) Design guide

Alcatel

Alcatel Voice over WLAN (R1.1.1) Design guide

Cisco 7965G - Unified IP Phone VoIP user guide

Cisco

Cisco 7965G - Unified IP Phone VoIP user guide

TRENDnet ClearSky TVP-SP1BK Quick installation guide

TRENDnet

TRENDnet ClearSky TVP-SP1BK Quick installation guide

Cisco Unified 8961 quick start guide

Cisco

Cisco Unified 8961 quick start guide

Yealink T46S Skype for Business user guide

Yealink

Yealink T46S Skype for Business user guide

Yealink Telkom W52P Quick start up guide

Yealink

Yealink Telkom W52P Quick start up guide

Avaya 4400 Series user manual

Avaya

Avaya 4400 Series user manual

Geemarc PHOTOPHONE 300 user guide

Geemarc

Geemarc PHOTOPHONE 300 user guide

manuals.online logo
manuals.online logoBrands
  • About & Mission
  • Contact us
  • Privacy Policy
  • Terms and Conditions

Copyright 2025 Manuals.Online. All Rights Reserved.