Ergon BT Road User manual

BT Road, BT Allroad,
BT Gravel
ERG_MAN_BT_ROAD_ALLROAD_GRAVEL_NOV_2021
Ergon®is a worldwide trademark.
Ergon reserves the right to change any products
without prior notice. Subject to misprints,
errors and changes.
Ergon Bike Ergonomics
RTI Sports GmbH
Am Autobahnkreuz 7, 56072 Koblenz / Germany
T +49 (0) 261 899998-28, F +49 (0) 261 899998-19
[email protected], ergonbike.com
ergonbike.com
Bitte lesen Sie diese
Anleitung sorgfältig
durch.
Diese Fahrrad-
Lenkerbänder müssen
fachgerecht montiert
werden. Fragen Sie
im Zweifelsfall eine
Fachwerkstatt.
Jegliche Modikationen
dieses Produkts sind
unzulässig und können
unter Umständen Ihre
Sicherheit oder sogar
Ihr Leben gefährden.
Bewahren Sie diese
Anleitung zum späteren
Nachschlagen an einem
sicheren Ort auf.
Sollten Sie dieses
Produkt an eine dritte
Person weitergeben, so
ist diese Anleitung oder
eine Kopie beizulegen.
Bei Verlust kann die
Anleitung unter
ergonbike.com herun-
tergeladen werden.
Please read this
manual carefully.
This bicycle bar tape
should be profes-
sionally tted. If in
doubt please consult
a professional bicycle
retailer.
This product must not
be modied in any way.
Doing so may endanger
your safety or life.
Please keep these
instructions in a safe
place to refer to at
a later date. Should
you pass the product
on to a third person,
please include these
instructions or a
copy thereof. Should
you misplace these
instructions, a copy
can be downloaded at:
ergonbike.com.
Veuillez lire
attentivement ce
manuel.
Ces guidolines pour
vélo doivent être
montées de manière
conforme. En cas de
doute, adressez-vous
à un professionnel/un
atelier de réparation
spécialisé.
Toute modication de
ce produit est interdite
et peut mettre en
danger votre sécurité
ou même votre vie.
Conservez ce manuel
dans un endroit sûr pour
pouvoir vous y référer
ultérieurement.
Si vous transmettez ce
produit à une tierce
partie, veuillez joindre
ce manuel ou une copie.
En cas de perte, le
manuel peut être télé-
chargé sur ergonbike.
com.
(DE) Bedienungsanleitung
(EN) User Instructions
(FR) Manuel d’utilisation
WARNUNG WARNING AVERTISSEMENT
100%
Paper
Printed
with Soy Ink
Please recycle
(DE) (EN) (FR)

32
DE DE
Es ist wichtig, diese Gebrauchsanleitung gelesen und verstanden zu haben,
bevor Sie dieses Ergon-Produkt verwenden.
Außerdem sollten Sie sich der mit der Aktivität verbundenen Verletzungs- und
Todesrisiken bewusst sein.
Erklärung Zeichen / Symbole in dieser Anleitung:
Schenken Sie den folgenden Symbolen besondere Beachtung bei der Montage.
Warnung: Dieses Symbol verweist auf eine sicherheitsrelevante
Information, deren Nichtbefolgen Ihr Leben / Ihre Gesundheit gefährden
kann.
Information: Dieses Symbol kennzeichnet Zusatzinformationen, z.B. über
die Handhabung des Produkts.
Die oben geschilderten möglichen Konsequenzen werden in der Anleitung nicht
immer wieder geschildert, wenn diese Symbole auftauchen.
WARNUNG
Inhalt der Verpackung
Zusätzliche Information
Für weitere Informationen zur Lenkerband-Wicklung können Sie auch
unser Erklär-Video schauen. Scannen Sie dazu einfach diesen QR-Code:
www.youtube.com/ergonbike
left
right
Benötigtes Werkzeug
%
ALC.
2. Schneiden Sie ein Stück des Lenkerbandes ab, mit dem Sie später die
Bremsgri-Aufnahme kaschieren.
3. Zurückklappen des Gri-Gummis.
1. Den Lenker im Montagebereich mit Alkohol / Isopropanol reinigen/entfetten.
Mehr im
Video

54
DE DE
6. Wickeln Sie bis kurz vor den Bremsgri. Kaschieren Sie mit dem zuvor
abgeschnittenen Stück Lenkerband die Bremgsgri-Aufnahme.
4. Wickeln Sie das Lenkerband um den entsprechenden Lenker. Bitte von außen
nach innen wickeln und unten beginnen. Achten Sie zu Beginn derWicklung
darauf, dass Sie das Lenkerband zwei Drittel überstehen lassen. Das überschüssige
Band wird später mit dem Endstopfen in den Lenker gestülpt.
5. Das Lenkerband verfügt über eine dreigeteilte Textur. Diese gilt als
Wickelhilfe. Wickeln sie stets so, dass jede neue Wicklung zwei Drittel (A)
oder ein Drittel (B) dervorherigen Wicklung überdeckt.
7. Das Lenkerband bis zur gewünschten Griposition am Oberlenker wickeln.
Für einen sauberen Abschluss lassen Sie circa 10 cm Lenkerband übrig.
8. Das Lenkerband-Ende an der gewünschten Stelle kürzen. Schneiden Sie das
Lenkerband hierfür schräg ab.
11. Beide Endstopfen einsetzen. Das überstehende Lenkerband mit dem
Endstopfen in den Lenker einstülpen.
left
right
10. Klappen Sie das Gri-Gummi zurück.
9. Wickeln Sie das Band zu Ende und xieren Sie es mit dem beiliegenden
Abschlussband.
A:
mehr
Dämpfung
B:
direktes
Gefühl

76
DE DE
Sachmängelhaftung:
Während der ersten zwei Jahre nach dem Kauf dieses Produkts haben Sie vollen
Anspruch auf die gesetzliche Sachmängelhaftung (vormals Gewährleistung). Be-
denken Sie jedoch, dass Fahrrad-Lenkerbänder einer natürlichen Abnutzung und
einem Farbverlust unterliegen, was nicht durch die Sachmängelhaftung abgedeckt
wird. Sollten Mängel auftreten, wenden Sie sich bitte unterVorlage des Kaufbelegs
an Ihren Ergon-Fachhändler.
Detailliertere Informationen zur Sachmängelhaftung / Reklamation nden Sie online
unter www.ergonbike.com/warranty oder scannen Sie einfach QR-Code.
www.ergonbike.com/warranty
Reinigung und Pflege:
Damit Sie mit Ihren Ergon-Lenkerbändern lange Freude haben, sollten Sie diese
nur mit handwarmem Seifenwasser reinigen und anschließend gut abspülen.
Ergon-Lenkerbänder sollten nicht mit petroleumhaltigen Stoen wie minerali-
schen Ölen und Fetten sowie scharfen Reinigern oder sonstigen Chemikalien in
Kontakt gebracht werden.

EN EN
98
It is important to have read and understood these instructions before using this
Ergon product. You should also be aware of the risk of injury and death associa-
ted with the activity.
Explanation of signs / symbols used in these instructions:
Please pay particular attention to the following symbols when mounting the
product.
Warning: This symbol indicates an important step which must be follo-
wed. Failure to do so could cause inury or death.
Information: This symbol indicates additional information, for example
about how to handle the product.
The explanation here serves as a description of the possible consequences of not
following the instructions. These consequences won‘t always be repeated when
the symbols are used.
WARNING
Contents of packaging
Additional information
For more information on handlebar tape wrapping you can also watch our
explanatory video. Simply scan this QR code:
www.youtube.com/ergonbike
left
right
Requiered tools
%
ALC.
2. Cut o a piece of the handlebar tape that you will later use to conceal the brake
lever mount.
3. Fold back the rubber grip.
1. Clean/deagrease handlebar before tting using isopropanol / alcohol.
Watch the
Video

EN EN
1110
6. Wrap until just before the brake lever. Use the previously cut piece of
handlebar tape to cover the brake lever mount.
4. Wrap the handlebar tape around the corresponding handlebar. Please wrap
from the outside inwards and start at the bottom. At the beginning of the
wrapping, make sure that you leave two thirds of the handlebar tape protruding.
The excess tape is later tucked into the handlebar with the end plug.
5. The handlebar tape has a three-part texture. This is considered a
wrapping guide. Always wrap so that each new wrap covers two thirds (A)
or one third (B) of the previous wrap.
7. Wind the handlebar tape to the desired grip position on the upper handlebar.
Leave about 10 cm of handlebar tape for a neat nish.
8. Shorten the end of the handlebar tape at the desired point. To do this, cut the
handlebar tape at an angle.
11. Insert both end plugs. Push the protruding handlebar tape into the handlebar
with the end plug.
left
right
10. Fold back the handle rubber.
9. Finish wrapping the ribbon and secure it with the enclosed nishing tape.
A:
more
Damping
B:
direct
Feeling

EN EN
1312
Sachmängelhaftung:
Ergon warrants to the original retail purchaser that this product is free from defects
in material and workmanship for (2) two years from the date of original retail
purchase. However, bear in mind that bicycle handlebar tapes are subject to natural
wear and tear and colour loss, which is not covered by the warranty for material de-
fects. If you have any cause to return the product please take it to a specialist bicycle
retailer together with proof of purchase.
Please see the current full warranty policy at www.ergonbike.com/warranty
or scan QR-code for details.
www.ergonbike.com/warranty
Cleaning and Maintenance
In order to enjoy your Ergon handlebar tapes for a long time, you should only clean
them with lukewarm soapywater and then rinse them well. Ergon handlebar tapes
should not come into contact with petroleum-based substances such as mineral
oils and greases as well as harsh cleaners or other chemicals.

14
FR FR
15
Il est important d’avoir lu et compris ce manuel d’utilisation avant d’utilisr ce
produit Ergon. En outre, vous devriez avoir conscience des risques de blessures
et de mort liés à votre activité.
Explication des signes / symboles utilisés dans ce manuel:
Lors du montage, soyez particulièrement attentif(ve) aux symboles suivants.
Avertissement: Ce symbole fait référence à une information importante
pour la sécurité, dont le non-respect peut entraîner des risques pour votre
vie/santé.
Information: Ce symbole indique des informations complémentaires, p. ex.
sur la manipulation du produit.
Les conséquences possibles décrites ci-dessus ne sont pas toujours décrites dans
le manuel lorsque ces symboles apparaissent.
AVERTISSEMENT
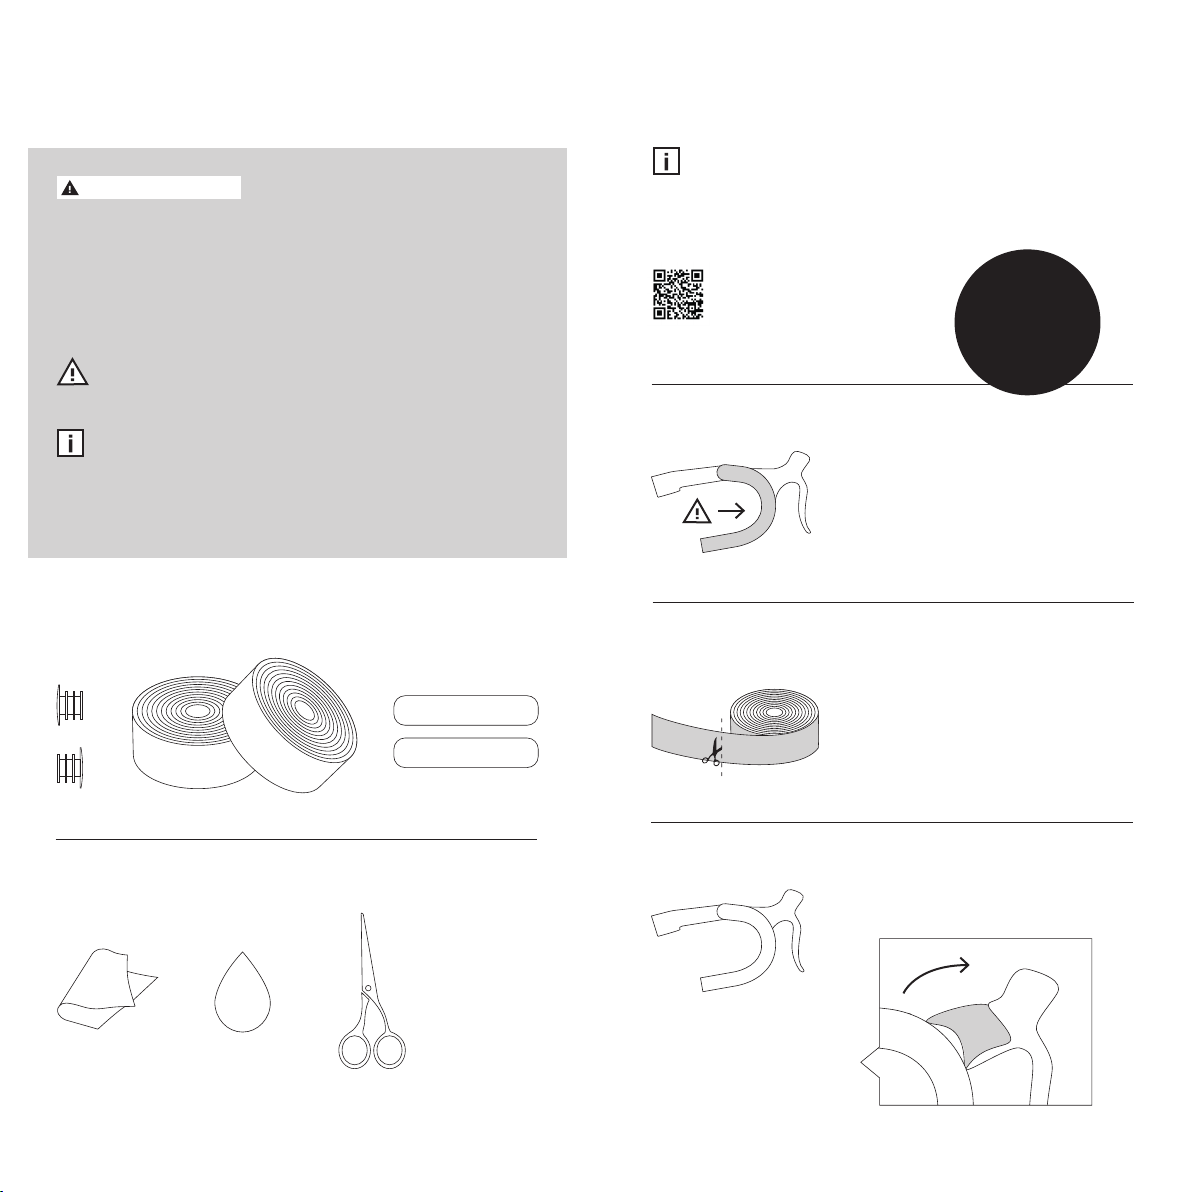
Contenu de l’emballage
Informations complémentaires
Pour plus d’informations sur l’enroulage des guidolines, vous pouvez également
visionner votre vidéo explicative. Pour ce faire, il vous sut de scanner ce QR
Code:
www.youtube.com/ergonbike
left
right
Outil nécessaire
%
ALC.
2. Couper un morceau de guidoline avec lequel vous
recouvrirez le logement de la poignée de frein par la suite.
3. Rabattre le caoutchouc de la poignée.
1. Nettoyer/Dégraisser le guidon avec de l’alcool/isopropanol au niveau de la zone
de montage.
Plus en
Vidéo

16
FR FR
17
6. Continuer d’envelopper jusqu’à arriver non loin de la poignée de frein.
Recouvrir le logement de la poignée de frein avec le morceau de guidoline
préalablement coupé.
4. Envelopper la guidoline autour du guidon correspondant. Envelopper de
l’extérieur vers l’intérieur, en commençant par le bas. Au début de cette opération,
veillez à ce que la guidoline dépasse de deux tiers. La bande excédentaire sera
ensuite rabattue dans le guidon avec les bouchons de fermeture.
5. La guidoline dispose d’une texture en trois parties. Elle permet
de l’envelopper plus facilement. Enveloppez toujours de sorte que
chaque nouveau tour recouvre d’un tiers (A) ou de deux tiers (B) le tour
précédent.
7. Envelopper la guidoline jusqu’à la position souhaitée sur le bras supérieur.
Pour une nition propre, laissez environ 10cm de guidoline en plus.
8. Raccourcir l’extrémité de la guidoline jusqu’à l’endroit souhaité. Pour ce faire,
couper la guidoline en biseau.
11. Placer les deux bouchons de fermeture. Rabattre la guidoline qui dépasse dans
le guidon avec les bouchons de fermeture.
left
right
10. Rabattre le caoutchouc de la poignée.
9. Envelopper la guidoline sur l’extrémité et la xer avec la bande de fermeture
fournie.
A:
Meilleure
absorption
des chocs
B:
Sensations
plus directes

18
FR FR
19
Responsabilité pour les défauts matériels:
Pendant les deux premières années suivant l’achat de ce produit, vous avez droit
à la responsabilité légale pour les défauts matériels (anciennement garantie). En
cas de défaut, veuillez contacter votre revendeur Ergon et lui présenter la preuve
d’achat. Veuillez néanmoins noter que les guidolines de vélo sont soumises à une
usure naturelle et à une décoloration qui ne sont pas couvertes par la responsabi-
lité pour défauts matériels. En cas de défaut, veuillez contacter votre revendeur
Ergon et lui présenter la preuve d’achat.
ous trouverez des informations plus détaillées concernant la responsabilité en
cas de défauts matériels / réclamations en ligne à l’adresse www.ergonbike.com/
warranty ou bien en scannant le code QR.
www.ergonbike.com/warranty
Nettoyage et entretien:
Pour proter longtemps de vos guidolines Ergon, nettoyez-les uniquement avec
de l’eau savonneuse tiède, puis rincez abondamment. Les guidolines Ergon ne
doivent pas entrer en contact avec des substances contenant du pétrole telles que
les huiles et graisses minérales ni avec des produits nettoyants abrasifs ou d’autres
produits chimiques.
This manual suits for next models
2
Table of contents
Languages:
Other Ergon Bicycle Accessories manuals