Escene ES380 User manual

www.escene.cn/en ESCENE Communication Limited. 1
Office IP Phone ES380
User Manual

www.escene.cn/en ESCENE Communication Limited. 2
Copyright and Disclaimer
Copyright
Any enterprises or individuals cannot extract, copy, and spread in any form of this document without our written permission. In accordance
with the law, copying includes translating the document into other languages or conversing into other formats. When this document is
transmitted in network media, Escene Limited Ltd allows downloading or printing for private use. Any parts of the document are not allowed
to be modified or used for commercial purposes. Escene Limited Ltd will not assume any responsibility for the injuries and losses caused
by any unauthorized modification or conversion of the document.
Declaration
Information regarding this guide is subject to change without any notice.
This manual provides accurate statement, information, and recommendation to the largest extent, but will not guarantee any express or
implies. Users should take full responsibility for the application of products. Escene Limited Ltd will not make any guarantee for this manual,
including but not limited to warranties for implies merchantability and purposes. Escene Limited Ltd does not assume any responsibility for
indirect or consequential loss caused by the misuse of this manual.
About this manual
Thank you for choosing Office IP Phone ES380.This IP Phone is specially designed for the user under the Office with fashionable
appearance and complete functions. This manual aims to help you quickly use Office IP Phone ES380. Before use, please read the
packing list and safety notes section of this manual, communicate with the system administrator to confirm if the current network
environment can meet the requirements of configuring the Phone. If this is your first time to use Office IP Phone ES380, we recommend
that you should read the quick operation guide and product technical manual. The document can be downloaded from the following
website: http: //www.escene.com. This document updated and revised by Nolto Bilişim Telekomünikasyon (www.nolto.com) who is
Escene Turkey distributor at June 2020.
Summary
Copyright and Disclaimer 2
Summary 2
1. Getting Started 5
1.1 About 5
1.2 Feature Highlights 5
2. Set up the Phone 5
3. Phone User Interface 9
3.1 Hardware Component Instructions 9
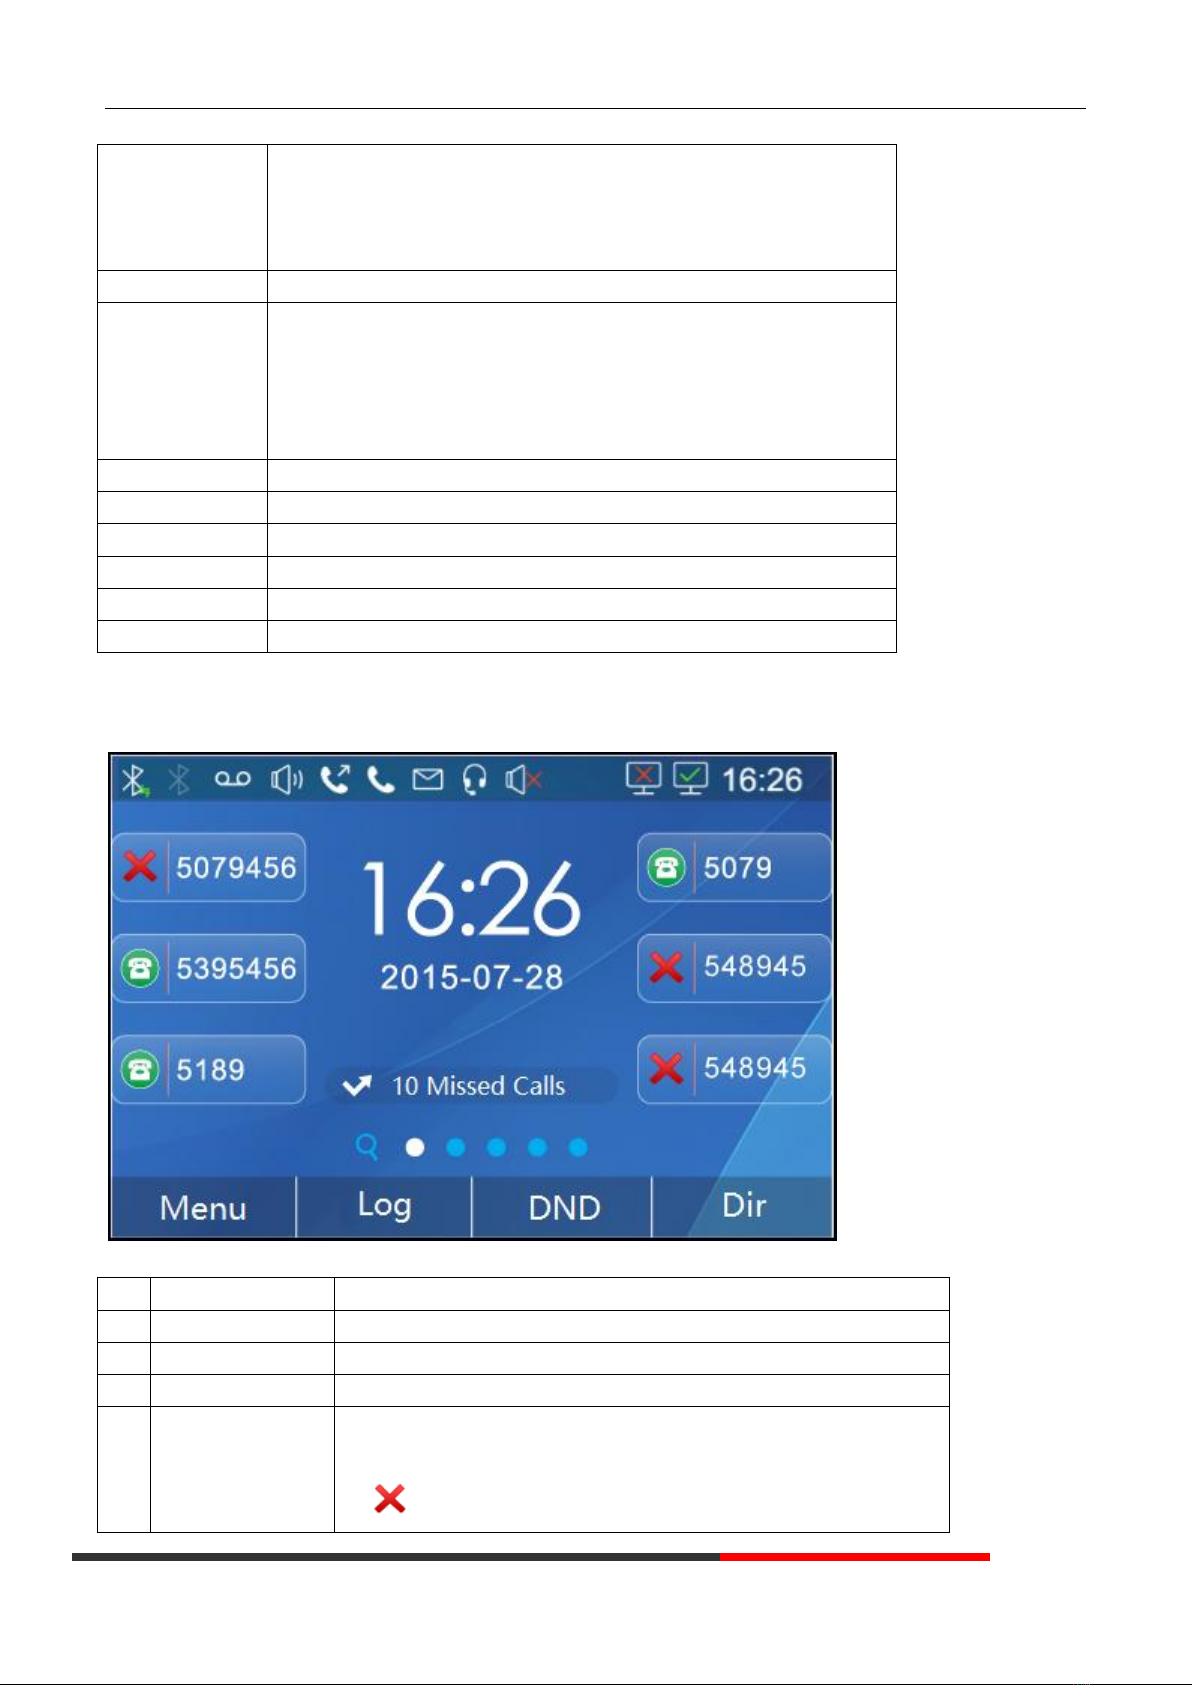
3.2 Phone Screen Display Features 10
3.3 Basic Network Settings 11
3.4 SIP Account Settings 12
3.5 Basic Features. 13
3.5.1 Making a Call 13
3.5.2 Anonymous Call 13
3.5.3 Redial 13
3.5.4 Call Log 13
3.5.5 Making Calls to Contact14
3.5.6 Multi-lines to Answer the Call 14

www.escene.cn/en ESCENE Communication Limited. 3
3.5.7 Auto-Answer 14
3.5.8 Ending a Call 14
3.5.9 Using Hold and Recover (Switch Calling Line)15
3.5.10 Transferring Calls 15
3.5.11 Using Mute 15
3.5.12 Do Not Disturb 15
3.5.13 3-way Conference 16
3.5.14 Voice Mail16
3.6 Advanced Settings 16
3.6.1 Using the phone book 16
3.6.2 Using Call Logs 18
3.6.3 Peer-to-Peer 18
3.7 Keypad Setting 18
3.7.1 Language Setting18
3.7.2 Message 18
3.7.3 Time & Date 19
3.7.4 Ring Tone and Volume Setting 19
3.7.5 Searching Phone Book 19
3.7.6 Cannot Set the Features with Keypad 20
4. WEB User Interface20
4.1 Network 22
4.1.1 Wi-Fi Setting 22
5 SIP Account 27
5.1Basic 27
5.2 Advanced 29
6 DSS Keys 31
6.1 Paperless Program keys 31
6.2 Line Keys 32
6.3 Function Keys 32
6.4 Soft Key 33
7 Settings 34
7.1 Basic 34
7.2 Features 35
7.3 Time Settings38
7.4 Keyboard Lock 39
7.5 VoIP Call Forwarding 39
7.6 Remote Control 39
7.7 Action URL 39
7.8 EP+ 39
7.9 Audio 40
7.10 Ring 42
7.10 Dial Plan 42
7.11 BLF Setting 44
7.12 TR06945

www.escene.cn/en ESCENE Communication Limited. 4
7.13 MPL Error! Bookmark not defined.
8 Phone Book 45
8.1 Contact45
8.2 Group 46
8.3 LDAP 46
8.4 Blacklist 47
8.5 Phone Call Info 48
9 Maintenance 48
9.1 HTTP Upgrade 48
9.2 FTP Upgrade49
9.3 TFTP Upgrade 50
9.4 Auto Provisioning 51
9.5 Log 52
9.5 Local Log 53
Check the log file on the local. 53
9.6 Default Settings 53
9.7 Reboot 53
10 Security 53
10.1 Password 53
10.2 Trusted Certificates 54
10.3 IP Strategy 54
11 WEB Other Settings or Information - Appendix54
11.1 Logout54
11.2 Note Tips 54

www.escene.cn/en ESCENE Communication Limited. 5
1. Getting Started
1.1 About
Escene ES380 is a feature-added IP Phone. Using 2.8’320x240 pixel color backlight screen and except normal features of a 6 lines
HD IP Phone. It comes with an EP+ communicationAPP which can all you use the cell phone to make an IP Phone call, switching talking,
etc.
1.2 Feature Highlights
a) Multi-Language
The LCD display supports Multi-Language.
b) HD Voice
Special voice processing technology, high-fidelity voice quality, HD encoding, HD Handset, ensure clear, realistic smooth communication.
c) Senior Calling Ability
6 lines with double color (GREEN & RED) LEDs, synchronously control or manage 6 calls, Call queue, Switch between lines. Multi-parties
conference call transfer.
d) All kinds of Phone Book
It supports XML Personal Phone Book\LDAP\Enterprise Phone Book etc. This feature satisfies customer's phone book requirements.
e) Support HTTP\TFTP\FTP\Auto-Provision.
f) 2 gigabit Ethernet ports, built-in POE, built-in Bluetooth.
g) Multi-angle adjustable bracket.
h) Up to 30 programmable keys, (6 lines+ 24 paperless programmable keys).
i) EP+ Support external APPLE/Android mobile phone.
j) Built-in USB interface, USB support external Unifi adapter and charging.
2. Set up the Phone
a) Packing List:
Check the packing list before installation, if you find anything missing, contact your system administrator.
⚫1*ES380 IP Phone
⚫1*Handset
⚫1*Handset Cable
⚫1*Ethernet Cable
⚫1*Quick Operation Guide
⚫1*Power Adapter
⚫1*Bracket

www.escene.cn/en ESCENE Communication Limited. 6

www.escene.cn/en ESCENE Communication Limited. 7
NOTE: The cable install method is short Aconnect the handset, longer B connect the IP Phone.
b) Phone Installation:
This section introduces how to install the phone with the components in the packing list:
⚫Adjust the Bracket
⚫Connect the Handset and optional Headset
⚫Connect the Network and Power
Adjust the Bracket
Pls follow the following picture to let the bracket adjust to safety
Connect the Handset and optional Headset

www.escene.cn/en ESCENE Communication Limited. 8
Connect the Network and Power
You have two options for power supply. Your system administrator will advise you which one to use.
⚫AC power adapter
⚫POE (Power over Ethernet) IEEE802.3af
⚫USB (Standard 0.5A)

www.escene.cn/en ESCENE Communication Limited. 9
Note: If inline power (PoE: Power over Ethernet) is provided, you do not need to connect the power adapter. Make sure the Ethernet
cable and hub/switch are PoE compliant.
3. IP Phone User Interface
3.1 Hardware Component Instructions
The main hardware components of the ES380 IP Phone are the LCD screen and the keypad.
Hardware component instructions of the ES380 IP Phone are:
ITEM
DESCRIPTION
LCD Screen
Displayed information about calls, messages, soft keys, time, date, and other relevant
data:
• Call information — caller ID, call duration
• Icons (e.g. )
• Missed calls or second incoming caller's information
•Time and date
Light Status
White-Flashing: There is an incoming call or be Hold.
White-Steady: Hook-off. or be in a usual conversation.
Line Key
Green-Steady: There is a conversation making on the line
Red-Flashing: There is call coming in
Green-Flashing: The line is on hold
Dark: Accounts are idle
Soft Key
Labels automatically to identity their context-sensitive features
Navigation Key
Scroll through the displayed information, and in the idle feature:

www.escene.cn/en ESCENE Communication Limited. 10
UP: Open the "All CONTACT LOG"
DOWN: Open the "MISSED CALL"
RIGHT: Open the "RECEIVED CALL"
LEFT: Open the "DAIL CALL"
OK Key
Confirm the action
C Key
Cancels actions or rejects an incoming call, and the other feature:
In the idle: Open the "Phone Status".
Diagnosis: Press and hold 3 second to open "Hardware Diagnosis".
MUTE: "MUTE" feature is enabled if you press it while the conversation making on
the phone.
Functions Key
Message\Redial\Transfer\Hold
Speaker Key
Toggles the hands-free speaker phone mode.
Mic
Voice input
Volume Key
Adjusts the volume of the handset, headset, speaker, and ringer
Keypad
Provides the digits, letters, and special characters in context-sensitive applications.
Headset Key
Toggles and indicates the headset mode.
3.2 Phone Screen Display Features
If the phone has successfully started up and after using, the idle LCD display will show information as below:
ITEM
DESCRIPTION
1
TIME & DATE
TIME & DATE display in the middle of the screen.
2
Auto-Answer icon
Enable this feature, it will display "AA" at the top right corner.
3
Missed Call
Missed Call under the TIME in the middle of screen
4
Line Status
There are four status as below:
a. LAN: Disconnect: Disconnect the network
b. : Account failed to register

www.escene.cn/en ESCENE Communication Limited. 11
c. : Account successfully registered
d. : Account successfully registered and DND feature is enabled. The DND
icon also will display at the top right corner.
5
Soft Key Area
Labels automatically to identity their context-sensitive features
6
Screen Icon
The Screen Top Icon from left to right is:
: Handset Hand on status
: Speaker Hand on status
: Headset Hand on status
: Call MUTE
: Missed Call
: Call Forward
: Text Message
: Keypad Lock
: Network is unavailable
3.3 Basic Network Settings
The phone supports Three Modes of Network Setting. Include Wi-Fi Setting\Static IP\DHCP.
Wi-Fi Setting
Note: This feature must be work with UniWIFI device. More about this, pls contact your system administrator.
To more easily and quickly implement Wi-Fi series phone deployment, we provide EWFC (Enhanced WIFI Fast Connection) technology to
implement automatic connection between the 5.8G Wi-Fi phone andAP-3.
Note: This feature must be work with AP-3 device. More about this, pls contact your system administrator.
①When theAP-3 is set up wireless parameters by the administrator, you can long press "ok" to enter the password to connect it.
②If you do not use EWFC rapid deployment, you can According to the normal method for manual connection and settings as following:
Feature
Operating Steps
Wi-Fi
Press OK or MENU> System Settings> Advanced Settings> Password (Default is Empty)>
Network> Wi-Fi Setting
⚫Press Wi-Fi Setting to login into the menu
⚫Select "Wi-Fi", and choose “enable”
⚫Press "Save" key

www.escene.cn/en ESCENE Communication Limited. 12
⚫Select “Hotspot List”
⚫Press "Enter" key
⚫Select the hotspot which you want to connect
⚫Enter “Password”
⚫Press "OK" key to make it work
DHCP Setting
Feature
Operating Steps
DHCP
Press OK or MENU> System Settings> Advanced Settings> Password (Default is Empty)>
Network> IP Setting
⚫Press IP Setting to login into the menu
⚫Select "DHCP" mode
⚫Press "Enter" key
⚫Set the DNS\web port\telnet port
⚫Press "Save" key to make it work
⚫Tips "Network is changed, press OK reboot "
Static IP Setting
Feature
Operating Steps
Static IP
Press OK or MENU> System Settings> Advanced Settings> Password (Default is Empty)>
Network> IP Setting
⚫Press IP Setting to login into the menu
⚫Select "Static" mode
⚫Press "Enter" key
⚫Set the IP\Mask\GW\DNS\web port\telnet port
⚫Press "Save" key to make it work
⚫Tips "Network is changed, press OK reboot "
3.4 SIP Account Settings
ES380 IP phone makes calls based on sip accounts, it can support Single account or Multi-account, each account can be configured to the
different SIP server.
If you want to…
Then...
Create a SIP account
--1) Select “System setting” > “Advanced setting”.
--2) Enter the password required(The default is empty).
--3) Select “SIP” > “Account sip”.
--4) Select one of the accounts you want to set, you can configure the following
parameters
-Enable account*: Select Enable
-Line Keys Use: Default is 1
-Description: description of this account
-Display Name: The name displayed on the screen
-Authentication user: TheAuthenticated users are matched with the SIP
server. (The default with the same account)
-Account*: the account matches with the SIP server. (extension number)

www.escene.cn/en ESCENE Communication Limited. 13
-User password*: the user password matches with the SIP server
-SIP Server*: The primary SIP server, all calls through this server
-Out Bound Server: The out bound SIP server
-STUN Type: Enable/Disable STUN feature
-STUN: Input STUN URL
-Auto Answer: Enable/Disable this account auto answer feature
* Note: When you finish the setting, you can press Save to make it work, and then
you can see the status icon in the LCD idle. The parameters with the *
mark must be set.
Disable sip account
--1) Select “System setting” > “Advanced setting”.
--2) Enter the password required(The default is empty).
--3) Select “SIP” > “Account sip”.
--4) Select “Enable account” > “Disable”.
--5) Select “Save” to saves settings
3.5 Basic Features.
3.5.1 Making a Call
Here are some easy ways to place a call on IP Phone:
If you want to...
Then…
Place a call using the
handset
Pick up the handset
--1) You can hear dial tone.
--2) Enter a number.
--3) Press #button (default),
-or wait 5s (default), then it sends the number
automatically.
Place a call using a
speakerphone
Press Speaker button
Place a call using a
headset
Put on your headset, active
Headset button so that the
status light is Red, and then do
as using speakerphone
3.5.2 Anonymous Call
You can use anonymous call feature to block the identity and phone number from showing up to the called party when you call someone.
E.g., you want to call to consult some of the services, but you do not want to be harassed.
Enable Anonymous Call
Press OK or MENU> Function Setting> Anonymous
--Press Enter or OK button,
-You can select which Account want to use, enable/disable this feature, and
enable/disable reject anonymous
3.5.3 Redial
To redial the last placed call from your phone
Redial
--Press REDIAL button to dial the last number
-or press Navigation Button-Left > “Dialed number”, select a number, and press
3.5.4 Call Log
Dial from a call log
--1) Press MENU or OK button >“Call history”, you can select "All Calls", “Missed

www.escene.cn/en ESCENE Communication Limited. 14
calls”, “Received calls” and “Dialed numbers”,
- or press Navigation button (in Standby interface) > select "All Calls" (up)
“Missed calls” (down), “Received calls” (left)and “Dialed numbers” (right)
--2) Then press button.
NOTE: You also can press the "log" to login this menu when in the idle.
3.5.5 Making Calls to Contact
You can also dial a contact from the Personal Phone Book.
Placing Calls to Contacts
--1) Press MENU or OK button >“Phone Book”, you can select "Personal Phone
Book", “Enterprise Phone Book”, “LDAP” and “Blacklist”,
- or press Navigation button (in Standby interface) > select the desired contact.
--2) Then press button.
NOTE: You also can press the "DIR" to login this menu when in the idle.
3.5.6 Multi-lines to Answer the Call
Multi-lines to Answer the
Call
--1) Another Line button is Red and flashing, Light strip is Red and flashing.
--2) Press the flashing Line button to answer (at this time, the original call will be
hold.)
3.5.7 Auto-Answer
You can set the phone and let it auto-answer the coming call.
Auto-Answer the Coming
Call
--1) Enable theAuto-Answer feature.
--2) Auto-Answer mode you can set in the MENU>Function Setting>Auto
Answer >Device
⚫Speaker
⚫Handset
⚫Headset
When you use the Handset mode, at this time you need to hand up the handset and
then it can work at this status.
--3) Filter Groups
Auto-answer the coming call in this special groups.
3.5.8 Ending a Call
To end a call, hang up. Here are some more details.
Hang up while using the
Handset
--Return the handset to its cradle,
-or press End
Hang up while using the
Speakerphone
--Press Speaker button,
-or press Line button for the appropriate line,
-or press End
Hang up while using the
Headset
--Press Handset button, (Do not keep the headset mode),
-or press End (keep the headset mode)
Hang up one call, but preserve
another call on the other line
--Press End,
-or refer to the above three methods

www.escene.cn/en ESCENE Communication Limited. 15
3.5.9 Using Hold and Recover (Switch Calling Line)
You can hold and resume calls. You can take a call in one line at any time, and the other lines would be hold. As a result of that, you can
switch different calling line on our phone.
If you want to...
Then...
Put a call on hold
--Press HOLD button,
-or press soft key
Hold a line and switch to another
line
Press another Line button for the appropriate line
Resume a call on current line
--Press Line button,
Release a call on different line
Select the line want to release hold, press the line, so recovery;
NOTES
•Engaging the Hold feature typically generates music or a beeping tone.
• A held call is indicated by the green and flashing Line button or Hold in the LCD.
3.5.10 Transferring Calls
Transfer redirects a connected call. The target is the number to which you want to transfer the call.
Talk to the transfer
recipient before
transferring a call
(consult transfer)
--1) Press TRANSFER button or press XFER.
--2) Enter number.
--3) press “#” (default),
-or press then transfer the call,
-or wait five seconds (default)then transfer the call
Transferred to idle lines or
other numbers without
talking to the transfer
recipient
(Blind transfer)
--1) Press TRANSFER button or XFER.
--2) Press ;
--3) Enter number.
--4) Press “#” (default)
-or press , then transfer the call.
-or wait five seconds (default)then transfer the call
Blind transfer to the
held line
--1) Press TRANSFER button or press XFER.
--2) Press the Line button of held line
3.5.11 Using Mute
With Mute enabled, you can hear other parties on a call, but they cannot hear you. You can use mute in conjunction with the handset,
speakerphone, or a headset。
Toggle Mute on
Press C button, then the screen top and left will have a MUTE icon
Toggle Mute off
Press C button again, then the button lights off
3.5.12 Do Not Disturb
You can use the Do Not Disturb (DND) feature to block incoming calls on your phone with a busy tone(Can also be set to their voice mail
or other extension numbers, etc.).
Enable global DND
--1) Press DND.
--2) All enabled line on the phone would changes to status. and the icon is
.

www.escene.cn/en ESCENE Communication Limited. 16
Enable DND on a single
line
Press MENU or OK button > “Function setting” > “DND” > (select line) “Enable”
Disable DND
--Global DND enabled, press to disable global DND.
--Line DND enabled, press twice ,
-or press MENU or OK button > “Function setting” > “DND” > (select line) “Disable”
3.5.13 3-way Conference
You can enable a three-party conference, during the conversation three phone parties can communicate with every party.
If you want to...
Then...
Invite the transfer recipient
into a conference in a
transferring
--1) When the transfer recipient answers the call, press "CONF" soft key on your
phone.
--2) Then the held one, transfer recipient and you will be into a conference, and the
LCD will display Conference: 0: 0: 10 status.
Invite the third party into a
conference in an active call
--1) Press "CONF" soft key in an active call.
--2) Enter the third-party number.
--3) After connected the third party, press "CONF" soft key again
establish a conference
withheld line
--1) when one phone line is holding on and the other line is busy.
--2) Press "CONF" Soft key
--3) Press the held line's programmable button, the 3-way Conference is enabling.
3.5.14 Voice Mail
When the Phone get a voice mail from server.
Voice Mail
--1)Press the Voice Mail button
--2)Enter the User Password
--3)It will login into the voice mail server. You need to follow the IVR to do it.
3.6 Advanced Settings
3.6.1 Using the phone book
Enterprise Phone Book
Search the Contacts
from Enterprise Phone
Book
--1) Press DIR in the idle status,
-or press "MENU" or "OK" button > “Phone book”> “Enterprise Phone Book”,
--2) Select “Enterprise Phone Book”, press "OK" button.
--3) Press "Find" and input the name who you want to search.
Call the Contact from
Enterprise Phone Book
--1) Press "DIR" in the idle,
-or press "MENU" or "OK" button > “Phone book”> “Enterprise Phone Book”,
--2) Select “Enterprise Phone Book”, press "OK" button.
--3) Press "Find" and input the name who you want to search.
--4) When you search the person, you can dial it.
Personal Phone Book
Add Contacts
--1) Press Phone Book,
-or press "MENU" button > “Phone book”> “Personal phone book>View All”,
-or press "OK" button > “Phone book”> “Personal phone book>View All”.

www.escene.cn/en ESCENE Communication Limited. 17
--2) Select “Add contact”, press "OK" button.
--3) Use the navigation keys to select content, press "OK" button to set and modify:
-Name: set the name of contact,
-Office Number: Setting the contact Office Number
-Mobile Phone Number: Setting the contact Mobile Phone Number
-Others Number: Setting the contact Others Number
-SIP Account: Setting the contact call SIP account
-Group: the contacts be divided into different user’s groups
--4) Press "Save" soft key to complete
Add group
--1) Press "DIR" soft key,
-or press "MENU" button > “Phone book”> “Personal phone book>View All”,
-or press "OK" button > “Phone book”> “Personal phone book>ViewAll”.
--2) Select the “add group” then press OK button.
--3) Use the navigation keys to select content, press OK button to set and modify:
-Group name: name of the group
--4) Press "Save "soft key to complete
Modify group
--1) Press "DIR" soft key,
-or press "MENU" button > “Phone book”> “Personal phone book>View All”,
-or press "OK" button > “Phone book”> “Personal phone book>ViewAll”.
--2) Select the “Modify group” then press "OK" button.
--3) Select the group you want to modify, press the "OK" button to set and modify,
press "Save" to save the change
Delete group
--1) Press "DIR" soft key,
-or press "MENU" button > “Phone book”> “Personal phone book>View All”,
-or press "OK" button > “Phone book”> “Personal phone book>ViewAll”.
--2) Select the “Delete group” or OK button.
--3) Select a group you want to delete, press OK button
LDAP
Search the Contacts
from LDAP
--1) Press "DIR" in the idle,
-or press "MENU" or OK "button" > “Phone book”> “LDAP”,
--2) Select “LDAP”, press "OK" button.
--3) Press "Find" and input the name or number who you want to find search from the
LDAP server.
Call the Contact from
LDAP
--1) Press "DIR" in the idle,
-or press "MENU" or "OK" button > “Phone book”> “LDAP”,
--2) Select “LDAP”, press "OK" button.
--3) Press "Find" and input the name or number who you want to find from the LDAP
server.
--4) When you search the person, you can dial it.
Blacklist
Add the Contacts
--1) Press "DIR" in the idle,
-or press "MENU" or "OK" button > “Phone book”> “Blacklist”,

www.escene.cn/en ESCENE Communication Limited. 18
--2) Select “Blacklist”, press "OK" button.
--3) Press "Add" and input the name\office number\mobile number\other number\SIP
account who what you want to add into the Blacklist.
View the Contact from
Blacklist
--1) Press "DIR" in the idle,
-or press "MENU" or "OK" button > “Phone book”> “Blacklist”,
--2) Select “Blacklist”, press "OK" button.
--3) Press "RUN" to view someone who what you want to find.
--4) If you want to move or change it, you can follow the RUN to do.
3.6.2 Using Call Logs
Your phone maintains records of your missed, placed, and received calls.
View call logs
--1) Press "MENU" or "LOG" button > “All Call” > “Missed Calls”, “Received Calls”, or
“Dialed numbers”
--2) Use the navigation keys to view the call record information.
Delete/Save Call Logs
--1) Login into the Call Logs
--2) Use the navigation keys to view the call record or select DEL key.
--3) Use the navigation keys to view the call record or select Save key.
3.6.3 Peer-to-Peer
When all the phone accounts were disable or not register. it will be showing this mode in the idle. It can use by when the new workstation is
not having SIP server.
Peer-to-Peer
Disable all of accounts or not register.
Make Call with
Peer-to-Peer
--1)Press OK or MENU button> System Setting>Advanced Setting> SIP Account.
--2)Disable all of accounts or un-register.
--3)Turn back the phone idle, you can call someone use IP address.
3.7 Keypad Setting
series IP Phone can through two ways configuration it, one is setting in MENU, another is setting in website. Here just description in
MENU.
NOTES: When you want to input the IP address like ".", it was replaced by the "*".
3.7.1 Language Setting
ES380 IP Phone support Multi-Language setting, as below is an example.
Switch the Language
between Chinese and
English
--1)Press OK or MENU button> System Setting> Phone Setting> Language
--2)Here you can select
English\French\Italian\Polish\Protuguese\Runssian\Spanish\Turkish\Chinese
--3) After you finish select, press Save to make it work.
3.7.2 Message
ES380 have Message feature. It will display in the LCD when it has a New Message.
Create a Message
--1)Press OK or MENU button.
--2)Select "Messaging"
--3)Voice Message: Setting the Voice Message code in here.
Text Message: Write down the Text Message in here.
--4)Select Text Message> New Message.
--5)Input the receiver and write down message body, and then press send to finish.
Message Inbox
--1)Select Message Inbox.
--2)Select which one you want to check.

www.escene.cn/en ESCENE Communication Limited. 19
--3)You can press Enter to read or press Del to delete.
3.7.3 Time & Date
SNTP
--1)Press OK or MENU button.
--2)Press OK or MENU button> System Setting> Phone Setting> Time & Date> Time and
Date setting> SNTP
--3)SNTP
-Time Zone:Setting the time zone
-NTP Server 1:NTP server address 1
-NTP Server 2:NTP server address 2
-DayLight:Enable/Disable Day Light
SIP Server
--1)Press OK or MENU button.
--2)Press OK or MENU button> System Setting> Phone Setting> Time & Date> Time and
Date setting>SIP Server
--3)Press Save to make it work
Manual Setting
Press OK or MENU button.
--2)Press OK or MENU button> System Setting> Phone Setting> Time & Date> Time and
Date setting> Manual Setting
--3)Manual Setting
- Manual Setting: Year\Month\Days\Hours\Minutes\Seconds
Time Display
Format
--1)Press OK or MENU button.
--2)Press OK or MENU button> System Setting> Phone Setting> Time & Date> Time Display
Format
--3)Time Mode: 24hour\12hour
Date mode:
DDMMWWW\MMDDWWW\WWWDDMMM\DDMMMYY\YYYYMMDD\DDMMYYYY\MMDDY
Y\DDMMMYYYY\WWWDDMMM etc.
3.7.4 Ring Tone and Volume Setting
Ring Type
--1)Press OK or MENU button.
--2)Press OK or MENU button> System Setting> Phone Setting>Ring Type
--3)Select the ring type from 1 to 8 or custom ring, and then press Save to make it work.
Volume Setting
--1)Press OK or MENU button.
--2)Press OK or MENU button> System Setting> Phone Setting> Volume Setting
--3)Volume Setting: Handset\Speaker\Headset\Ring volume
--4) Press Enter to adjust the volume and press Save to make it work
NOTES: For the Custom Ring Type you need to upload it from website.
3.7.5 Searching Phone Book
Accurate Search
--1)Press MENU or OK button >“Function Setting”, you can select " Accurate Search "
--2) Then press Enable/Disable and Save.
--3) When you back to idle, you can use the digital keypad to search the contact.
T9 Search
--1) Press MENU or OK button >“Function Setting”, you can select " T9 search"
--2) Then press Enable/Disable and Save.
--3) When you back to idle, you can use the digital keypad to search the contact.
NOTES: The Search Phone Book setting default isAccurate Search.

www.escene.cn/en ESCENE Communication Limited. 20
3.7.6 Cannot Set the Features with Keypad
As below features are cannot setting with the keypad:
1) Dial Plan.
2) Custom Ring Type
3) SNTP Server and Time & Date
4) Update the Firmware or Backup.
4. WEB User Interface
In addition to the phone user interface, you can also customize your phone via web user interface. To access the web user interface, you
need to know the IP address of your new phone. To obtain the IP address, press the C key on the phone. Enter the IP address (e.g. HTTP:
//192.168.0.10 or 192.168.0.10) in the address bar of web browser on your PC. The default username is admin (case-sensitive) and the
password is admin (case-sensitive).
Main Interface-Phone Status
Here you can see as below information: System Run Time, Register Status, Network Status, System Information,
Table of contents
Other Escene IP Phone manuals

Escene
Escene ES620 User manual

Escene
Escene SayHi CC800v2 User manual

Escene
Escene SayHi GS620 User manual

Escene
Escene ES320 User manual

Escene
Escene ES330-PEG User manual

Escene
Escene Sayhi ES410 User manual

Escene
Escene ES 3 Series User manual

Escene
Escene SayHi CC800 User manual

Escene
Escene ES/DS/410 User manual

Escene
Escene Sayhi ES220 User manual

Escene
Escene ES282-PC User guide

Escene
Escene 102 Series User manual

Escene
Escene WS320 User manual

Escene
Escene ES220P User manual

Escene
Escene ES282-PC User manual

Escene
Escene ES320P User manual

Escene
Escene HS108-PS Manual

Escene
Escene ES205 User manual

Escene
Escene SayHi ES280 User manual

Escene
Escene Sayhi ES410 User manual