READ THIS FIRST:
Check the pack and make sure you have all of the
parts listed on the front of this booklet. If not,
contact the outlet where you bought this product.
As the buyer, installer and/or user of this product it
is your own responsibility to ensure that this tting
is t for the purpose for which you have intended
it. Eterna Lighting cannot accept any liability for
loss, damage or premature failure resulting from
inappropriate use.
Switch o the mains before commencing installation
and remove the appropriate circuit fuse or lock o
MCB.
Use only with the driver/inverter provided. Do not
connect directly to the mains.
This unit is suitable for indoor use only.
This product is designed for permanent connection
to xed wiring: this must be a suitable circuit
(protected with the appropriate MCB or fuse).
Do not cover the tting, battery and driver with any
insulating materials.
The driver should be placed where it cannot come
into contact with water or moisture.
You are advised at every stage of your installation to
double-check any electrical connections you have
made. After you have completed your installation
there are electrical tests that should be carried out,
these tests are specied in the current IEE wiring and
building regulations.
The batteries supplied with this tting are a
consumable part and therefore may be outside of
any warranty oered.
INSTALLATION:
Choose the location for the new tting taking the
above points into consideration.
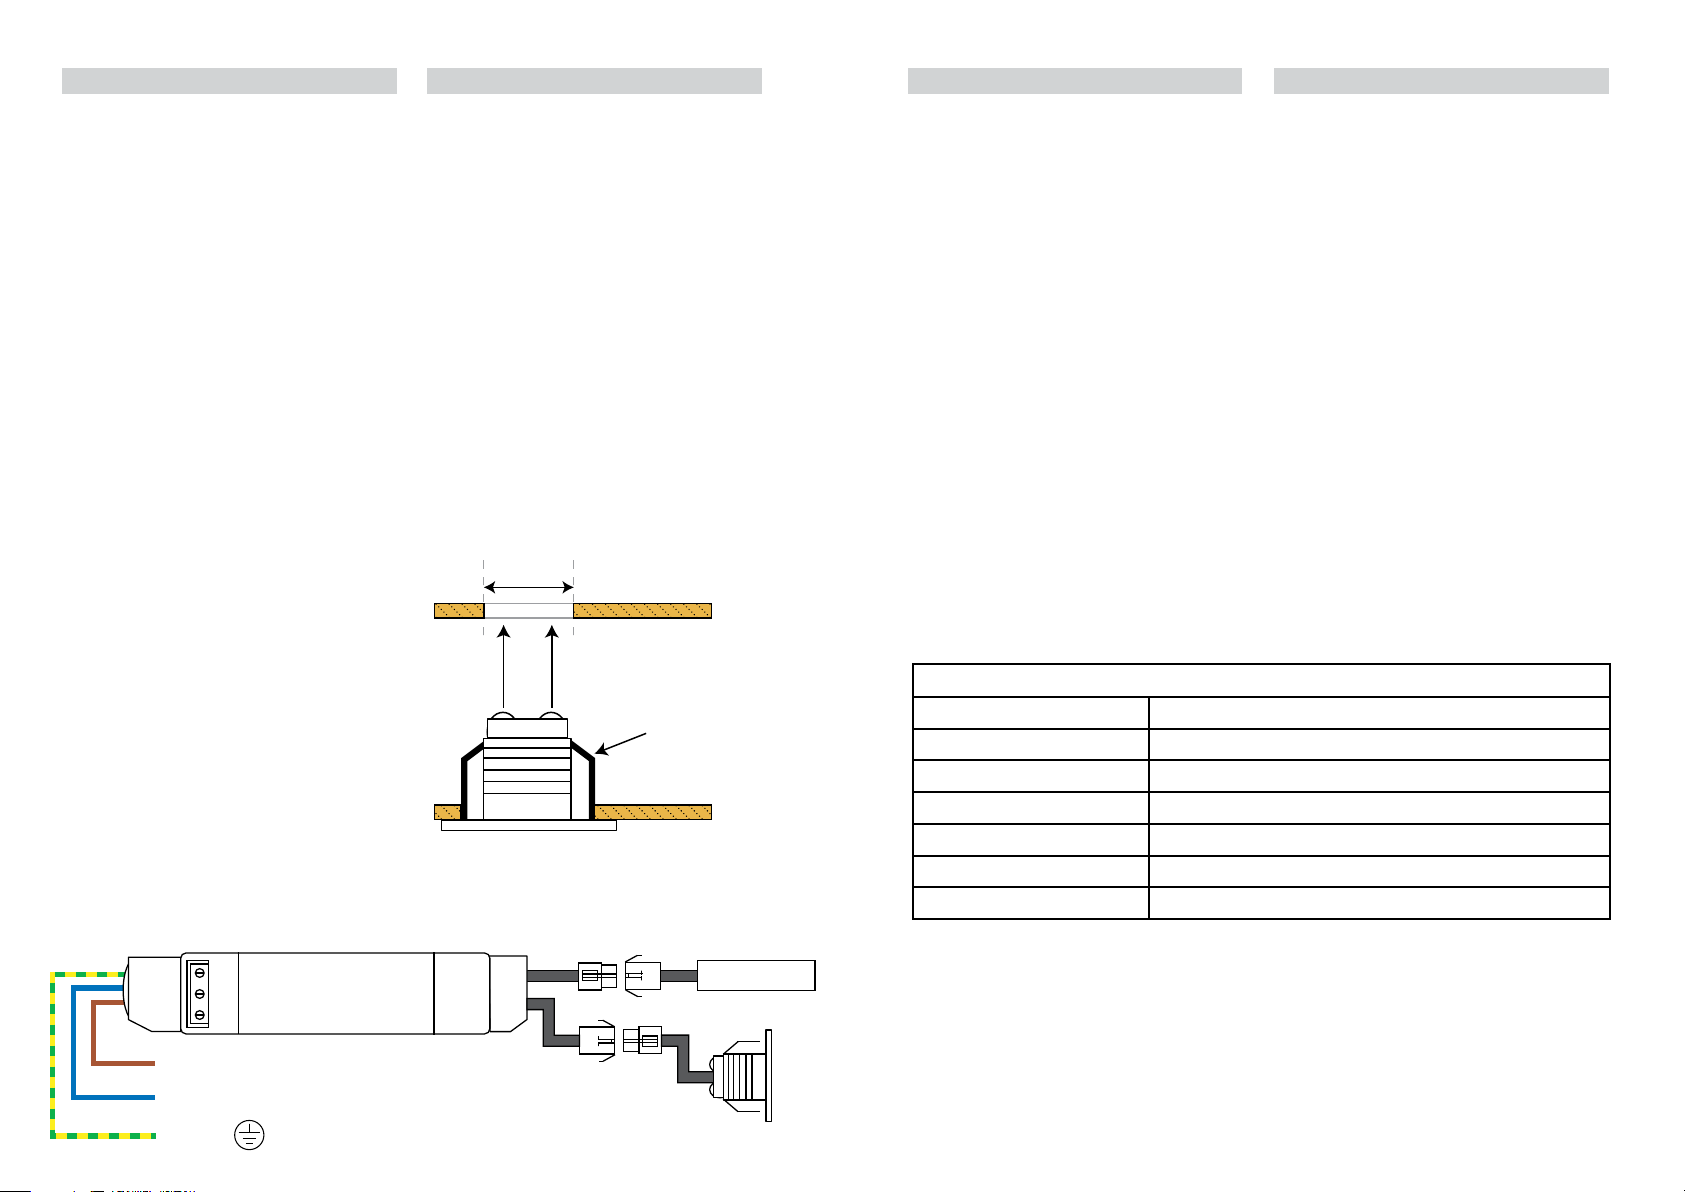
1) Mark the locations of your downlight and then
using an appropriate hole cutter, make a 32mm
diameter hole. (See below).
2) Prepare the route for the mains cable and feed
through the hole and make the connections to the
input side of the driver/inverter.
3) Write commissioning date on to battery.
4) Feed the driver/inverter through the hole,
followed by the battery pack, which can lay
adjacent to the hole.
5) Feed the excess cable through the hole and press
the down light into position (see below) until it is
retained by the springs. The tting may require
some manipulation in order to pass through the
hole. Do not enlarge the hole to make tting
easier.
6) Restore the power and check tting is working
correctly.
DRIVER
E
N
L
BATTERY
INPUT 220-240VAC
50/60Hz
1.4W LED
LIVE
NEUTRAL
EARTH
Ceiling
Ceiling
Clips will lock
fitting into place
DRIVER
E
N
L
BATTERY
INPUT 220-240VAC
50/60Hz
1.4W LED
Dia = 32mm
Ceiling
Ceiling
Clips will lock
fitting into place
OPERATION CHECKS:
This product is tted with an automatic, self-test
function that will commission and test itself in
accordance with the requirements of the British
Standards. Monthly and annual tests will be
automatically completed as detailed below with
tests including battery charge condition, functional
test and duration test.
Monthly – ten minute functional test
Annually – full three-hour duration test
• On installation a date will be randomly assigned for
the rst monthly and rst annual test.
• The initial monthly test will be between 16 and 30
days from installation.
• The initial full-duration test will be between 200
and 360 days from installation (annual tests will
then be conducted every 360 days).
• The schedule of these tests will be remembered
for a period of 7 days if no power is supplied to the
luminaire.
• If there is a mains failure in 24 hours before a test
is due to be conducted, the test will automatically
be postponed until sucient time is allowed to
recharge the battery.
• If there is a mains failure during the self-test
operation the unit will go into emergency mode.
TESTING
This product is designed to conduct self-testing in
accordance with EN 62034, the results of monthly
and annual tests should be endorsed on the test
record form supplied.
Because of the possibility of a failure of the normal
lighting supply occurring shortly after a period of
testing of the emergency lighting system or during
the subsequent recharge period, all full duration
tests shall wherever possible be undertaken
preceding time of low risk to allow for battery
recharge.
Daily:
Visual inspection of the battery charge LED.
Each Month:
The product will be energised from its battery for
adequate time to ensure that emergency mode is
functioning correctly.
Once Each Year:
The product will be placed into emergency mode
and check that the duration provided meets the
specied time period.
PERFORMANCE AND FAULT INDICATORS:
Normal operation constant green LED
Duration test underway red indicator ashing rapidly
Battery circuit failure red indicator ashing once every 3 seconds
Light source failure red indicator ashing twice every 3 seconds
Failure of duration test red indicator ashing three times every 3 seconds
Auto test function fails red indicator ashing four times every 3 seconds
LED indicator o in emergency mode (mains failure)


