FAAC J355 HA M50 EFO User manual

Translation of the original instructions ENGLISH
CONTENTS
1. BOLLARD J355HA M50 ........................................... 4
1.1 General instructions.............................................. 4
1.2 Technical descriptions and specifications...................... 4
1.3 Dimensions........................................................ 5
2. INSTALLATION ..................................................... 6
2.1 Configuration ..................................................... 6
2.2 Construction of the foundation cage .......................... 7
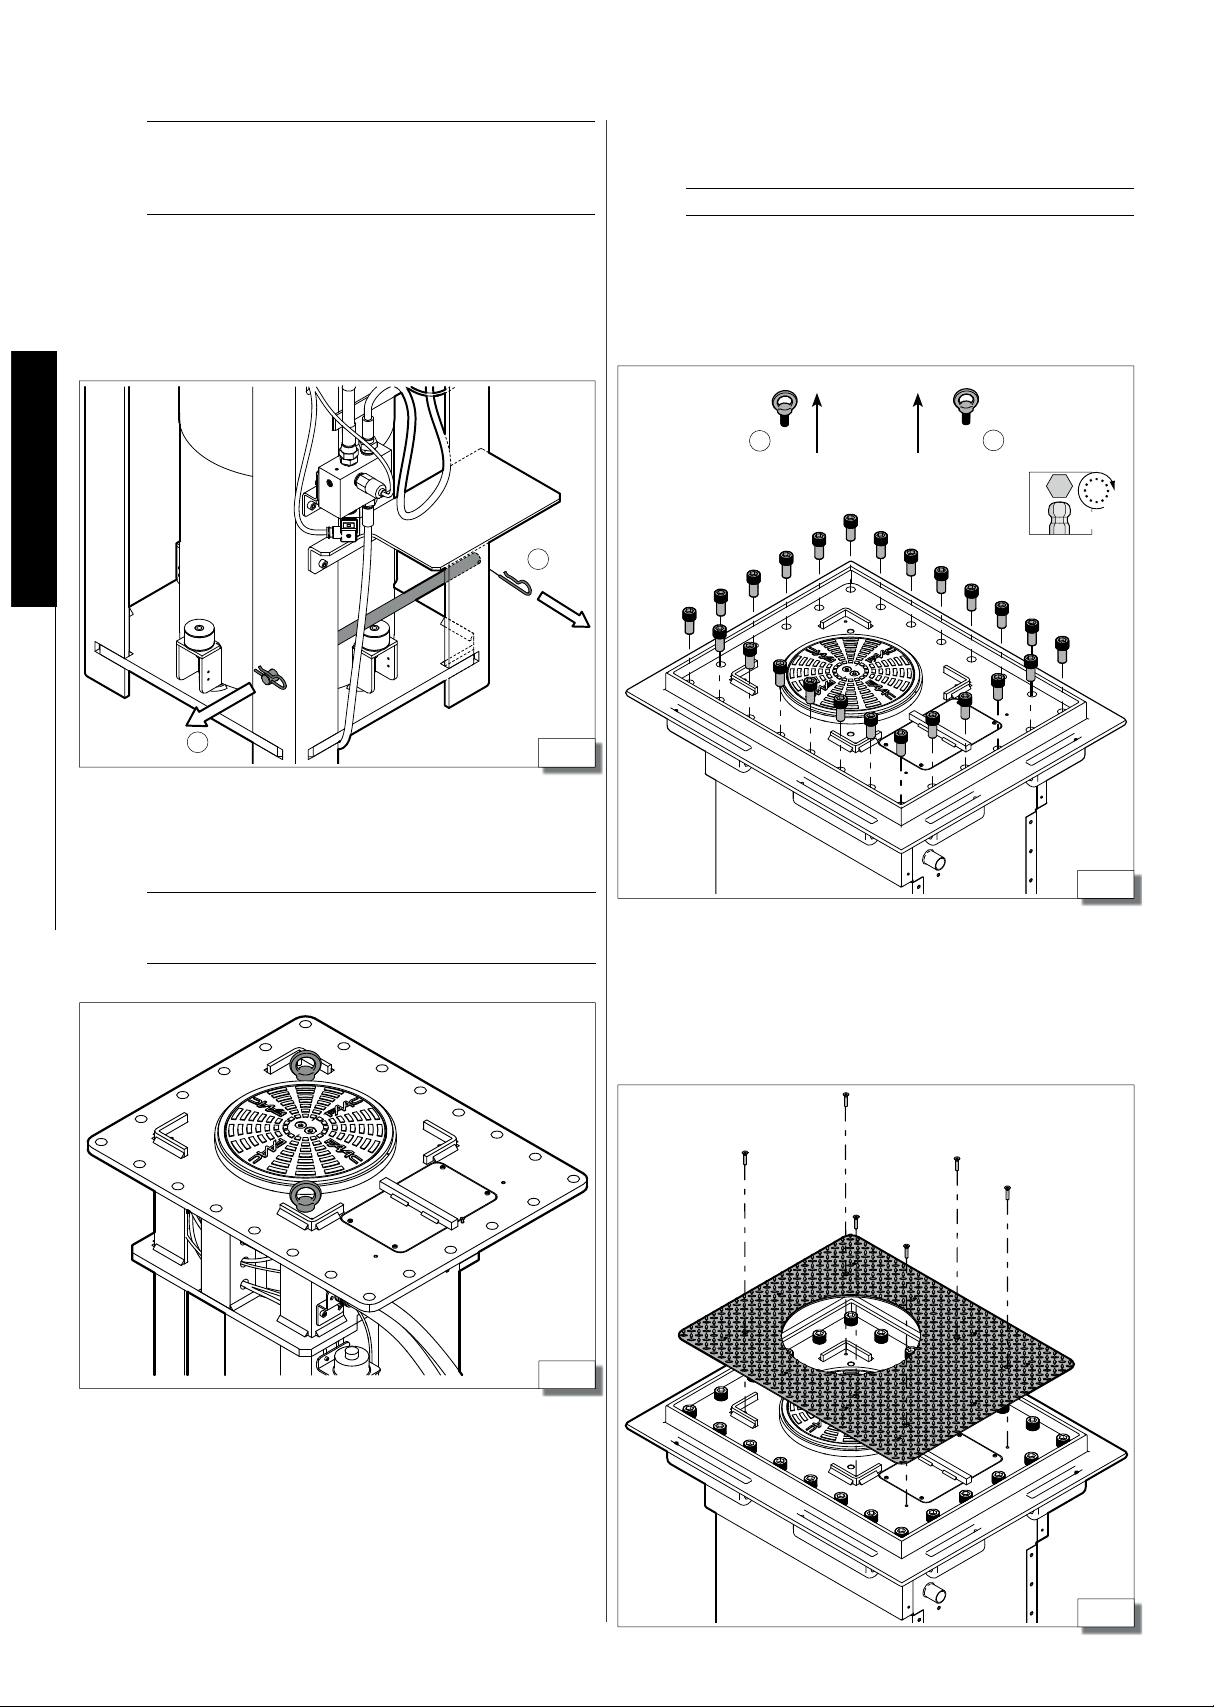
2.3 Fixing the pit in place ............................................ 8
2.4 Electrical wiring..................................................10
2.5 Insertion into the pit ............................................11
2.6 Fixing the top cover .............................................11
2.7 EFO (Emergency Fast Operation - optional) ..................12
2.8 Manual operation (optional) ...................................12
2.9 Automatic operation ............................................12
2.10 Maintenance....................................................12
3. ELECTRONIC DEVICE JE275.................................... 13
3.1 Electrical connections ...........................................13
3.2 board programming ............................................14
3.3 Troubleshooting .................................................14
3.4 Connecting several bollards (master/slave) ..................15
WARNINGS FOR THE INSTALLER
GENERAL SAFETY OBLIGATIONS
1. WARNING!The following instructions must be read and followed in full in order
to ensure the security and safety of individuals. Incorrect installation and/or
incorrect use of the product could cause serious harm to people.
2. Read the instructions carefully before attempting to install the product.
3. The packaging materials (plastic, polystyrene, etc.) must not be left within
reach of children as they are potential sources of danger.
4. Keep these instructions for future reference.
5. This product has been designed and built strictly for the use indicated in
this documentation. Any other use that is not expressly specified in these
instructions could affect the integrity of the product and/or represent a
source of danger.
6. FAAC declines all liability deriving from misuse or any use other than that for
which the automated system is intended.
7. Do not install the equipment in an explosive atmosphere: the presence of
flammable gas or fumes represents a serious safety hazard.
8. FAAC is not responsible for failure to observe the rules of good technical
practice during construction of motorised gates or closure devices, or for any
damage which occurs during use of these.
9. Installation must be performed in compliance with Standards currently in
force.
10. Before performing any operation on the system, disconnect the power supply.
11. The power mains of the automation system must be fitted with a multi-pole
power switch with a switch-contact gap of at least 3 mm. It is advisable to
use a 6A circuit breaker with a multi-pole power switch.
12. Ensure there is a residual current device with a 0.03 A threshold upstream
of the system.
13. Check that the earthing system is constructed in accordance with the highest
standards of workmanship and connect this to the metal parts of the gate.
14. The automated system is equipped with a built-in anti-crushing system
consisting of a torque control device. It is nonetheless necessary to check
the activation threshold, in accordance with the rules set out in point 10.
15. The safety devices (pursuant to standard EN 12978) protect any potentially
dangerous areas against mechanical movement risks, such as crushing, drag-
ging, shearing and lifting.
16. For each system, operators are advised to install at least one flashing light
(e.g. integrated into the bollard head), as well as an adequately secured
warning sign.
17. FAAC cannot be held responsible for any issue regarding the safety and cor-
rect operation of the device in any case in which components not produced
by FAAC are used.
18. For maintenance, only original parts manufactured by FAAC must be used.
19. Do not modify the components of the automation system in any way.
20. The installer must supply all information relating to the manual operation of
the system in case of emergency to the user.
21. Do not allow children or adults to remain near the product during operation.
22. Keep all remote controls or any other pulse generator out of the reach of
children, to prevent the automated system from being activated involuntarily.
23. The bollard must only be crossed when the device is fully lowered.
24. The user must not attempt any kind of repair or any other form of direct
operation on the device, and must only contact qualified personnel in order
to do this.
25. Anything else not expressly specified in these instructions is not permitted.

1
6
4 5
7
8
10
15
11
16
1 2 3
18
14 13
17
9
12
Translation of the original instructions ENGLISH
1. BOLLARD J355HA M50
Please read this manual carefully. It accompanies the product, providing important information regarding safety, installation and use.
1.1 GENERAL INSTRUCTIONS
These instructions apply to the model
J355HA M50
This model refers to automatic hydraulic counter-terrorism traffic bollards. The cylinder is moved by a hydraulic unit inside the structure.
1.2 TECHNICAL DESCRIPTIONS AND SPECIFICATIONS
1 Flashing LED
2 Head
3 Cylinder
4 High position magnetic contact (N.C.)
5 Junction box
6 4 stops devices, upper position
7 Oil filler plug with dipstick
8 Hydraulic control unit
9 Lowering solenoid valve
10 Cable guides
11 EFO accumulator
12 Pressure switch
13 EFO solenoid
14 Ø 100 mm hole for drainage or pump connection
15 4 stops devices, lower position
16 Low position magnetic contact (N.C.)
17 Plunger
18 Foundation pit

2
735
900
355
515
1100
1790
790
Translation of the original instructions ENGLISH
1.3 DIMENSIONS
Dimensions in mm
1 Table A - Technical specifications
MODEL J355HA M50
Power supply 230 V~ (+6% -10%) 50 (60) Hz
Max. Power Consumption (W) 3900
Max. force (N) 9000
Maximum pump flow (lpm) 8
Minimum rise time (sec) 6
Minimum rise time (with EFO) (sec) 2
Minimum lowering time (sec) 2
Operating temperature (° C) -15+55
Weight of bollard and pit (kg) 850 (bollard)
235 (pit)
Oil quantity (l) (1) 6 (standard version)
6.7 (EFO version)
Ingress protection IP66
Size See 2
Condenser (2) 70µF - 400V
Resistance to breakage (J) (3) 1852000
(1) Check the oil level using the dipstick positioned under the
filler cap (1-7) with the piston rod fully inside and the EFO
system under pressure.
(2) The starting capacitor (70F - 400v) is pre-wired inside the junc-
tion box (1-5).
(3) certified according to PAS 68:2013 V/7500/[N3]/80/90 e
IWA 14-1:2013 V/7200/[N3C]/80/90

3
1850
1600
3100
750
500
900
1300
50250
Translation of the original instructions ENGLISH
2. INSTALLATION
2.1 CONFIGURATION
A flexible hose with a diameter of Ø100 mm should be fitted for drainage. Dig the hole to a depth of approximately 1.85 m
Dimensions in mm
UNPROTECTED AREA
IMPACT DIRECTION
PROTECTED AREA
GroundExcavation

4
Translation of the original instructions ENGLISH
2.2 CONSTRUCTION OF THE FOUNDATION CAGE
Build the foundation cage (not supplied by FAAC) as shown in 4 using the Ø 12mm and Ø 20 mm iron rods - CLASS B450C

6
5
10 mm
11
Translation of the original instructions ENGLISH
2.3 FIXING THE PIT IN PLACE
Weld the rods
(900mm - Ø 20mm)
to the cage
Lay the metal cage in the hole and plumb it in. In order to limit the
entry of rain water into the pit, the upper level of the counterframe
must be around 10mm higher than ground level, as shown to the left.
When the pit has been installed, lay one flexible sheath Ø50mm
between the connections for this purpose inside the metal pit (1-
10) and the electronic board (7).
Pour class C30/37 concrete around the cage to secure it properly, up
to about 10 cm from ground level.Wait a minimum of 7 days to allow
the concrete to cure properly.
Lay the piping necessary for connecting the bollard, the control board
and any additional devices and finish the road surface with the same
type of concrete.
N.B.: All piping must be laid in compliance with the applicable rules
in force.
Once the foundation cage has been constructed, secure the counter-
frame to the pit plate with the M10x25 screws (5).
Then, position the pit inside the cage (6), and weld four 900 mm
- Ø20mm (6-1) rods to the cage

7
1600
1850
750
550 550
3100
500
100
900
750
550
==
Translation of the original instructions ENGLISH
Road surface
Concrete
Ground Flexible sheath Ø 50mm
Dimensions in mm
UNPROTECTED AREA PROTECTED AREA
IMPACT DIRECTION
The foundation concrete can be poured directly into the excavated
hole. Concrete specifications:
- Class C30/37.
- Concrete with aggregate 10-30 pursuant to UNI EN 12620
- The bollard must only be installed once the concrete has cured
for at least 7 days.
The compaction index of the surrounding soil should be at least 90%
of the optimal "Proctor" curve, pursuant to the UNI EN 13286-2:
2005 standard.
The steel reinforcement complies with the B450C class (ASTM A615
Grade 60).
!Whilst the concrete is curing, insert one or more of contrast supports inside the pit, to prevent the walls from bowing inwards
due to the load of the fresh concrete.

8
2
3
1
Translation of the original instructions ENGLISH
2.4 ELECTRICAL WIRING
To connect the bollard, use a multi-pole cable such as FG7OR-0.6/1kV-
16G1.5 (16 wires of 1.5mm2) between bollard and control board and a
FG7OR-0.6/1kV-3G4 cable (3 wires of 4 mm2) for the motor power supply,
both measuring a maximum of 50 metres in length.
The cables must be laid inside a sheath of Ø50mm and passed through
the cable guides provided on the pit sheet (8-1) and through the
two corrugated conduits supplied with the pit.
Pass the wires through on the guides on the bollard frame as per as
8-2then connect the corrugated conduits to the supports on the
bollard frame, as indicated in 8-3.
Complete the electrical connections in the terminal box at the side
of the bollard as shown in
14
.
Any additional accessories (e.g. Open/close buttons, etc.) that are
connected to the control board must be double insulated.

12
10
9
11
19
50 Nm
2
1
11
Translation of the original instructions ENGLISH
2.5 INSERTION INTO THE PIT
Before inserting the bollard into the pit, complete the electrical
connections as shown in §2.4 and §3.1, check that these function
correctly, and also check the function of the safety devices (see "JE275
ELECTRONIC EQUIPMENT" 13).
In order to position the bollard in the pit (wait for at least 7 days for
the concrete to cure), remove the safety bar, pulling the cotter pin
out first 9-1then the bar 9-2.
After you have fully inserted the bollard, resting it against the coun-
terframe, remove the two eye bolts 11-1and fix the bollard in place
using the 24 TCEI M24x50 screws supplied with the pit.
!IMPORTANT: Tighten the screws to a torque of 50Nm
2.6 FIXING THE TOP COVER
After fixing the bollard in place, complete the installation by position-
ing and fixing the top cover with the six M8x40 steel screws provided.
Screw the two male M20 eye bolts onto the upper part, as shown
in10, using them as hooking points for lifting with belts or chains.
Raise the bollard and place fully into the pit.
During this phase, take care to position the corrugated conduits
correctly so that they are not pinched between the pit and the bol-
lard frame

13
16
1
3
2
5
4
5
Translation of the original instructions ENGLISH
2.7 EFO (EMERGENCY FAST OPERATION -
OPTIONAL)
The bollard J355HA M50 can be equipped with an EFO (Emergency
Fast Operation) emergency activation system, which can be activated
at any time to raise the cylinder immediately. The EFO system consists
of a tank, a pressure switch and a solenoid control valve powered by
230V ~
In order to connect the solenoid valve (this varies depending on the
N.O. / N.C. option adopted), refer to 13, terminals 4 and 5.
The N.O. solenoid valve (“Blackout” model) enables the EFO to be
activated, both on the command of the operator and in the event of
a power failure, while the N.C. version only allows for the voluntary
activation of the device.
2.8 MANUAL OPERATION (OPTIONAL)
In order to manually lower the bollard, use the release device in ac-
cordance with the following guidelines:
1. Unscrew and remove the six M8x40 screws that secure the top
cover in place (12).
2. Remove the top cover.
3. Unscrew and remove the fourTORXT30 screws securing the cover
of the hydraulic control unit in place (13-1).
4. Remove the cover of the hydraulic control unit.
5. Unscrew the lock nut 13-2and loosen the screw 13-3to move
the cylinder downwards.
2.9 AUTOMATIC OPERATION
To restore automatic operation:
1. Turn the screw 13-4 until the stop point in order to restore
automatic operation.
2. Tighten the lock nut 13-5
3. Reposition the hydraulic control unit cover and fix in position using
the TORX T30 screws (13-1)
4. Reposition the top cover and fix in position using the M8x40
screws (12).
2.10 MAINTENANCE
The standard sequence of routine maintenance is as follows:
1. Clean the pit by sucking out any deposited material
2. Clean the water drainage systems at the bottom of the pit
3. Check and if necessary rectify any oil leaks from the movement
piston
4. Carry out a general check to ensure that the bollard screws are
correctly tightened
5. Carry out a general clean of the moving cylinder and touch up
any paintwork
6. Check the hydraulic control unit, topping up the oil level
7. Check to ensure the EFO system is functioning properly

14
1
2
3
4
5
6
7
8
9
10
11
2 4 6 14 A2
1 3 5 13 A1
PE
COM APCL
LN
19
18
OUT 4
GND
16 17
151412 131189674523 101
OPEN A
STOP
LOOP 1
LOOP 2
LOOP 2
LOOP 1
CL OSE
FSW
EMERGENCY
OUT 1
OUT 2
OUT 3
GND
GND
+24 V
+24 V
OUT 3
252321 26242220
MOT1
COM
MOT2
COM
COM
LAMP
FAN
J1
NLPE
J5
J3
A1
A1
4
5
910
EMERGENCY
GND
R1
12
R1
4
5
910
EMERGENCY
GND
R1
R1
J2
J9
230 V ~
230 V ~
230 V~ 230 V~
FG7OR - 3G4
FG7OR - 16G1,5
+24V
Translation of the original instructions ENGLISH
3. ELECTRONIC EQUIPMENT JE275
BOLLARD SIDEJE275 BOARD SIDE
Limit switch
UP
Limit switch
DOWN
Lights
+24V
Limit switch UP
Limit switch DOWN
Limit switch common
EFO pressure
switch
EFO
solenoid valve
Heater
(optional)
Refer to the
diagram below
EFO N.O. connection (activtes also in case of black out) EFO N.C. connection (voluntary activation only)
!Before performing any work on the electronic equipment (connections, maintenance), always turn the power off.
Install a differential thermal breaker upstream with adequate tripping threshold (0.03A).
Connect the ground cable to the terminal on the J9 connector on the equipment (14).
Check that the mains switch is equipped with a locking key, unless this is fitted under the supervision of the operator/maintainer
The equipment must be installed at a height between 0.4 m and 2.0 m.
3.1 ELECTRICAL CONNECTIONS
Solenoid valve
Contactor Motor
Bollard side Bollard sideBoard side Board side
Brown
Blue
Black

15
Translation of the original instructions ENGLISH
3.2 BOARD PROGRAMMING
After connecting and switching on the power to the control board as
per the previous chapter, select the work pre-setting for the bollard
J355HA M50 by performing the following operation:
1. Access level 1 programming by holding down the F button on the
control board (15). The display will show the letters dF.
2. Release the F button and with the
+
+ button, select the value 06
3. Press the F button and hold it down whilst simultaneously pressing
the
-
button to exit programming screen and save the changes
made.
4. Press the F button and hold it down, as well as pressing + for
around 10 seconds, until the display shows 01
5. Release the buttons, then press the F button scroll until you reach
the b6 parameter
6. Set the value b6 = Y
7. Press the F button and hold it down whilst simultaneously pressing
the
-
button to exit programming screen and save the changes
made.
For more information on programming the equipment, please refer
to the relevant instructions.
3.3 TROUBLESHOOTING
Below are a series of tips to help identify and solve a number of
particular issues.
CONDITION SUGGESTION
The bollard will not rise, it remains in
the low position.
Check that you have selected default No. 6 on
the JE275 control board
Check that the bollard is set to automatic
operation (§2.9)
Check the wiring of the motor
The bollard will not lower, and remains
in the high closed position.
Check that there is nothing between the cyl-
inder and the slide bushing that is preventing
movement
Check the wiring of the motor
The flashing LED does not work Check that you have selected default No. 6 on
the JE275 (§3.2) control board
Checkthat the powerconnector locatedunder
the head is properly inserted.

16
JE275
MASTER JE275
SLAVE
J
E27
5
SL
A
VE
A
A
12 n
191816 17151412 1310 11 191816 171514
12
10896421
JE275 MASTER JE275 SLAVE
1.
dF
=
06
2. o 1 = 11
P1 = no
o
2= 12
P2 = no
3. b6 = Y
8974231
J1 J1
55 6
OUT 4
GND
OP EN A
STOP
L OOP 1
L OOP 2
L OOP 2
L OOP 1
CLOSE
FSW
EMERGENCY
OUT 1
OUT 2
OUT 3
GND
GND
+24 V
+24 V
OUT 3
OUT 4
GND
OP EN A
STOP
L OOP 1
L OOP 2
L OOP 2
L OOP 1
CLOSE
FSW
EMERGENCY
OUT 1
OUT 2
OUT 3
GND
GND
+24 V
+24 V
OUT 3
3711
13
1.
dF
=
06
LO
=
C
3.
03
=
Y
4.
LO
=
Cu
FF
F
F
+
-
F
+
-
F
+
+
F
+
+ F
+
-
F
+
-
F
+
-
10 s
F
+
+ F
+
-
10 s
Translation of the original instructions ENGLISH
3.4 CONNECTING SEVERAL BOLLARDS (MASTER/SLAVE)
You can operatemore than one bollard simultaneously, and these can be interconnected using the corresponding JE275 device in the MASTER-
SLAVE configuration. Follow the following guidelines for proper wiring and operation of the devices.
This manual suits for next models
8
Table of contents
Other FAAC Control System manuals
Popular Control System manuals by other brands

Triple Plus
Triple Plus CLM Installation & operation manual

FRONIUS
FRONIUS String Control 250/25 operating instructions

VALCOBABY
VALCOBABY MELTON CP-40 instructions

Gema
Gema MagicControl 4.0 Operating instructions and spare parts list

System air
System air Topvex SoftCooler TR09-15 Operation and maintenance instruction

Fly Sky
Fly Sky FS-i6 Programming Instruction