manuals.online logo
Brands
  1. Home
  2. •
  3. Brands
  4. •
  5. FRAME IT ALL
  6. •
  7. Lawn And Garden Equipment
  8. •
  9. FRAME IT ALL 800001191 User manual

FRAME IT ALL 800001191 User manual

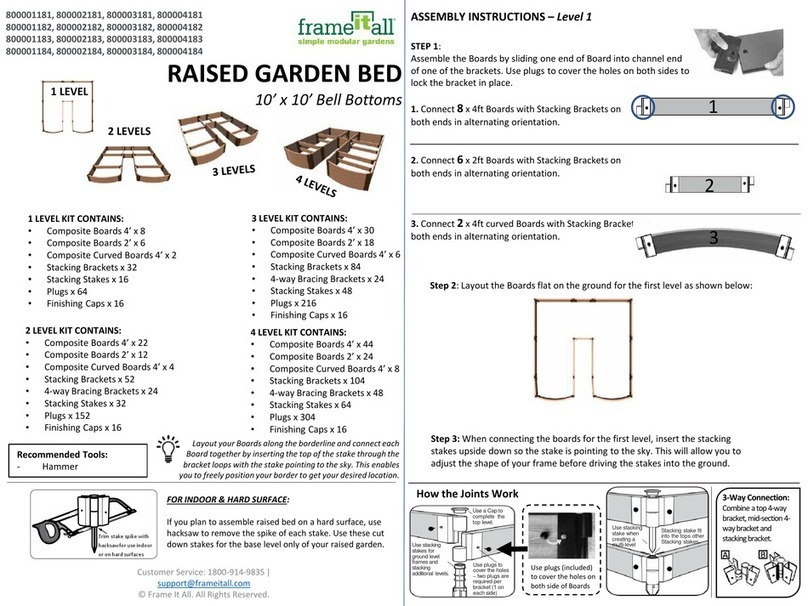
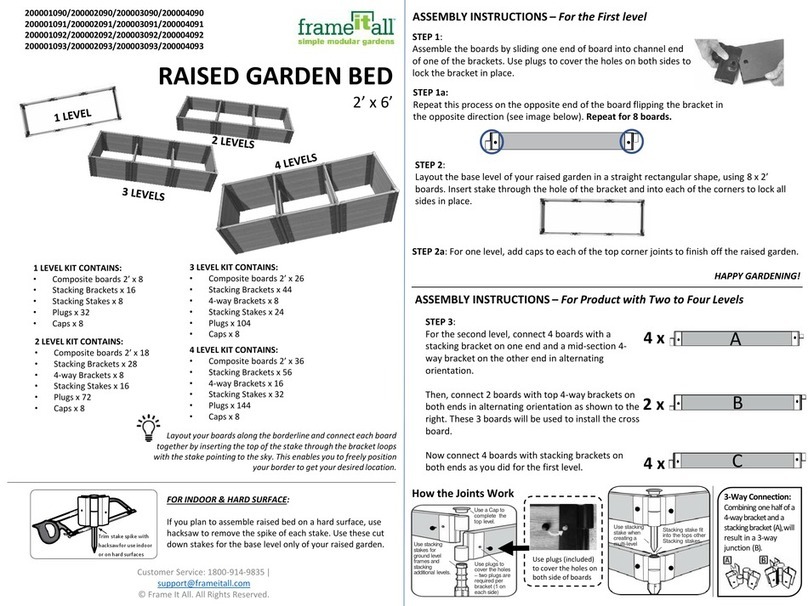
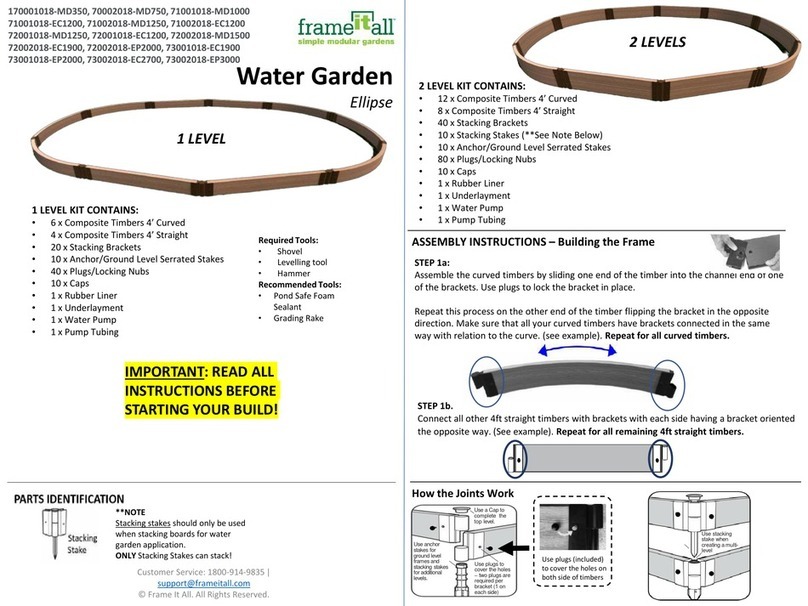
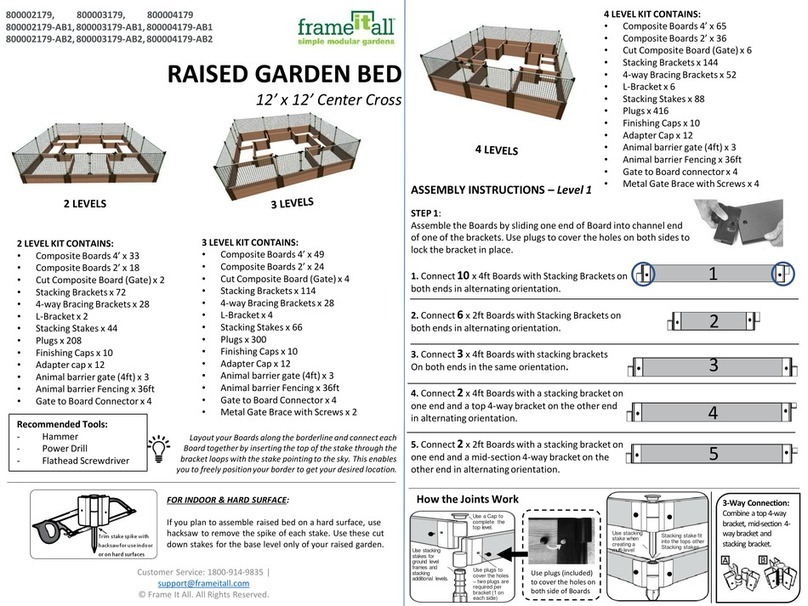
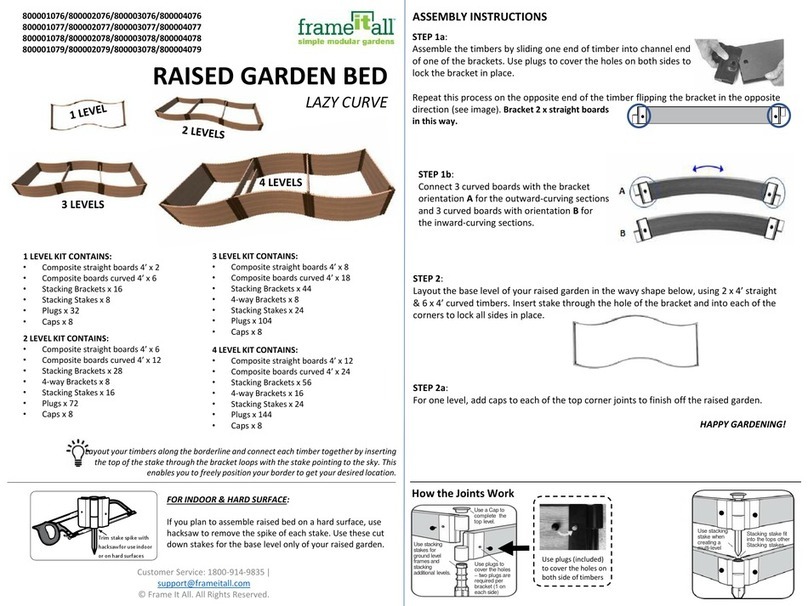
STEP 1:
Assemble the Boards by sliding one end of Board into channel end
of one of the brackets. Use plugs to cover the holes on both sides to
lock the bracket in place.
1. Connect 11 x 4ft Boards with Stacking Brackets on
both ends in alternating orientation.
2. Connect 4x 2ft Boards with a stacking bracket on
one end and a mid-section 4-way bracket on the
other end in alternating orientation.
3. Connect 3 x Curved boards with stacking brackets
on both ends in alternating orientation .
(Bracket all curved boards exactly as shown to the right)
800001191, 800002191, 800003191, 800004191
800001192, 800002192, 800003192, 800004192
800001193, 800002193, 800003193, 800004193
800001194, 800002194, 800003194, 800004194
RAISED GARDEN BED
8’ x 16’ Easy Reach
Layout your Boards along the borderline and connect each
Board together by inserting the top of the stake through the
bracket loops with the stake pointing to the sky. This enables
you to freely position your border to get your desired location.
Customer Service: 1800-914-9835 |
[email protected]m
© Frame It All. All Rights Reserved.
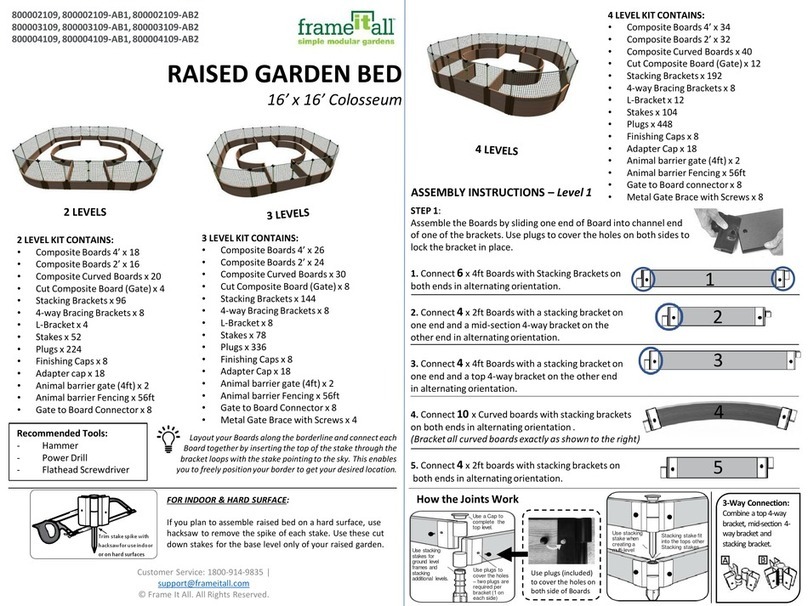
2 LEVEL KIT CONTAINS:
•Composite Boards 4’ x 29
•Composite Boards 2’ x 8
•Composite Curved Boards x 6
•Stacking Brackets x 58
•4-way Bracing Brackets x 28
•Stacking Stakes x 36
•Plugs x 172
•Finishing Caps x 18
ASSEMBLY INSTRUCTIONS –Level 1
FOR INDOOR & HARD SURFACE:
If you plan to assemble raised bed on a hard surface, use
hacksaw to remove the spike of each stake. Use these cut
down stakes for the base level only of your raised garden.
Trim stake spike with
hacksawfor use indoor
or on hard surfaces
How the Joints Work
Use plugs (included)
to cover the holes on
both side of Boards
Use plugs to
cover the holes
–two plugs are
required per
bracket (1 on
each side)
Use a Capto
complete the
top level.
Use stacking
stakes for
ground level
framesand
stacking
additional levels.
Use stacking
stake when
creating a
multi-level
Stacking stake fit
into the tops other
Stacking stakes
3-Way Connection:
Combine a top 4-way
bracket, mid-section 4-
way bracket and
stackingbracket.
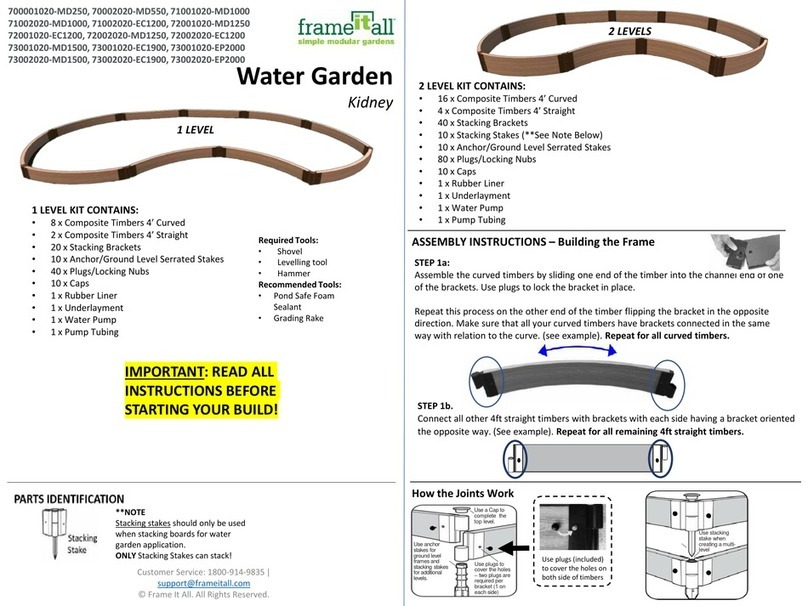
3 LEVEL KIT CONTAINS:
•Composite Boards 4’ x 40
•Composite Boards 2’ x 12
•Composite Curved Boards x 9
•Stacking Brackets x 94
•4-way Bracing Brackets x 28
•Stacking Stakes x 54
•Plugs x 244
•Finishing Caps x 18
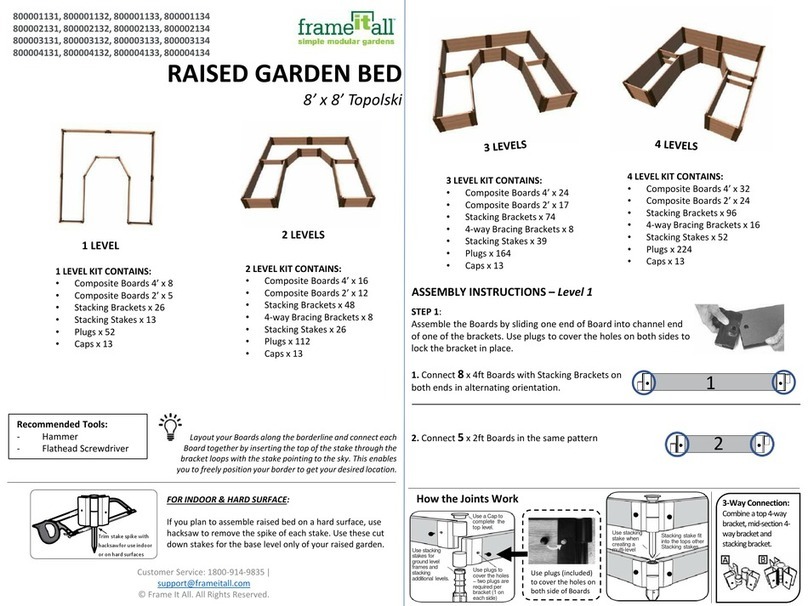
4 LEVEL KIT CONTAINS:
•Composite Boards 4’ x 58
•Composite Boards 2’ x 16
•Composite Curved Boards x 12
•Stacking Brackets x 116
•4-way Bracing Brackets x 56
•Stacking Stakes x 72
•Plugs x 344
•Finishing Caps x 18
1
2
3
Recommended Tools:
- Hammer
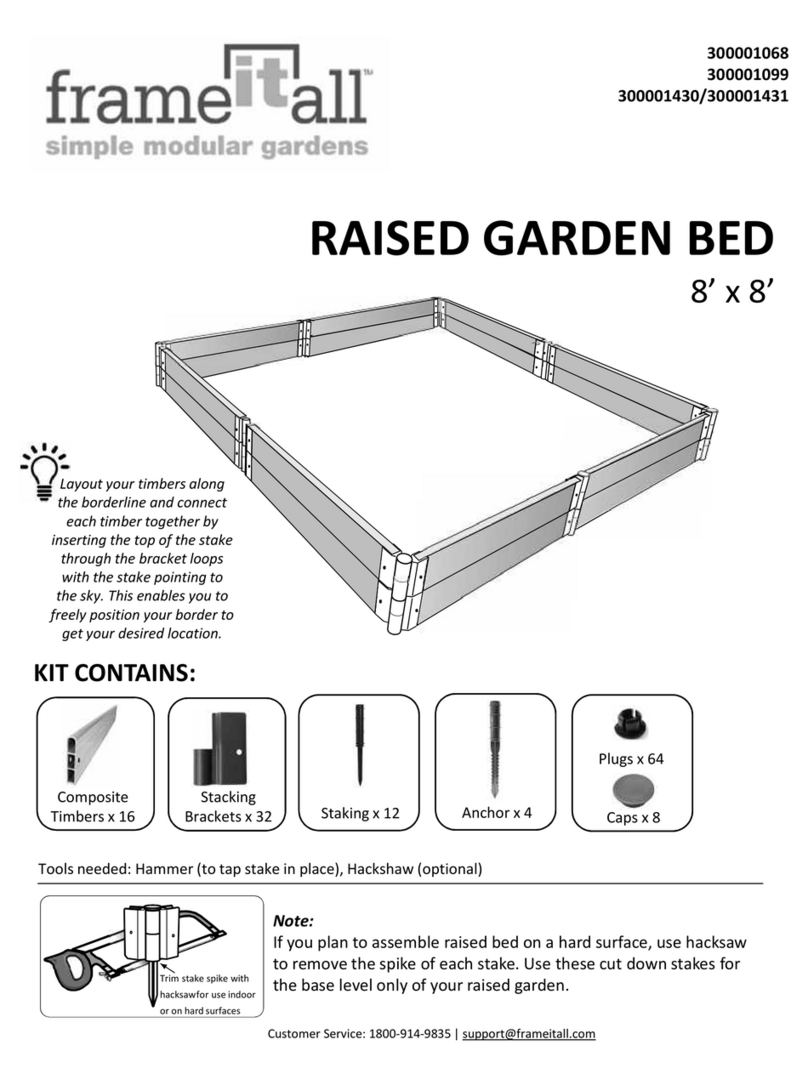
1 LEVEL KIT CONTAINS:
•Composite Boards 4’ x 11
•Composite Boards 2’ x 4
•Composite Curved Boards x 3
•Stacking Brackets x 36
•Stacking Stakes x 18
•Plugs x 72
•Finishing Caps x 18
2 LEVELS
1 LEVEL
Step 2: Layout the Boards flat on the ground for the first level as shown below:
Step 3: When connecting the boards for the first level, insert the stacking
stakes upside down so the stake is pointing to the sky. This will allow you to
adjust the shape of your frame before driving the stakes into the ground.
STEP 5:
Connect the boards for your second level in the quantity and orientation as shown below.
1. Connect 3x 4ft Boards with Stacking Brackets on
both ends in alternating orientation.
2. Connect 3 x Curved boards with stacking brackets
on both ends in alternating orientation .
(Bracket all curved boards exactly as shown to the right)
.
3. Connect 8x 4ft Boards with a stacking bracket on
one end and a top 4-way bracket on the other end
in alternating orientation.
4. Connect 3 x 4ft boards with mid-section 4-way
brackets on both sides in alternating orientation.
5. Connect 2 x 2ft boards with mid-section 4-way
brackets on both sides in alternating orientation.
6. Connect 2x 4ft boards with a top 4-way bracket
on one end and a mid-section 4-way bracket on the
other end in alternating orientation.
7. Connect 2 x 2ft boards with a stacking bracket
on one end and a top-4-way bracket on the other end
in alternating orientation.
8. Connect 2x 4ft boards with a top 4-way bracket
on one end and a mid-section 4-way bracket on the
other end in the same orientation.
ASSEMBLY INSTRUCTIONS –Level 1 Continued
Step 4: Once you finish with the adjustments of your base level frame, flip over the
stakes and hammer them into the ground. If you are assembly a 1 level design, the
last step is to insert your finishing caps on top of each joint. If assembling a multi-
leveled design, continue to Step 5.
1
3
2
4
5
6
7
8
Step 6: Before stacking your boards, lay them out around your 1st level frame.
NOTE: Stacking stakes will be used for all additional levels and can insert into
the top of existing stakes.
Step 7. For a 3-level design, repeat the board layout of level 1 for level 3. For
a 4-level design, repeat the board layout of level 2 for level 4.

This manual suits for next models

15

Other FRAME IT ALL Lawn And Garden Equipment manuals
FRAME IT ALL RAISED GARDEN BED User manual

FRAME IT ALL

FRAME IT ALL RAISED GARDEN BED User manual

FRAME IT ALL 300001058 User manual

FRAME IT ALL

FRAME IT ALL 300001058 User manual

FRAME IT ALL 70001024-MD550 User manual

FRAME IT ALL

FRAME IT ALL 70001024-MD550 User manual

FRAME IT ALL 70001025-MD250 User manual

FRAME IT ALL

FRAME IT ALL 70001025-MD250 User manual

FRAME IT ALL 70001019-MD350 User manual

FRAME IT ALL

FRAME IT ALL 70001019-MD350 User manual

FRAME IT ALL 800001076 User manual

FRAME IT ALL

FRAME IT ALL 800001076 User manual

FRAME IT ALL Stack & Extend User manual

FRAME IT ALL

FRAME IT ALL Stack & Extend User manual

FRAME IT ALL 700001020-MD250 User manual

FRAME IT ALL

FRAME IT ALL 700001020-MD250 User manual

FRAME IT ALL 800002179 User manual

FRAME IT ALL

FRAME IT ALL 800002179 User manual

FRAME IT ALL Alamo User manual

FRAME IT ALL

FRAME IT ALL Alamo User manual

FRAME IT ALL Center Circle 16' x 16' User manual

FRAME IT ALL

FRAME IT ALL Center Circle 16' x 16' User manual

FRAME IT ALL 200001090 User manual

FRAME IT ALL

FRAME IT ALL 200001090 User manual

FRAME IT ALL 300001068 User manual

FRAME IT ALL

FRAME IT ALL 300001068 User manual

FRAME IT ALL Cumberland User manual

FRAME IT ALL

FRAME IT ALL Cumberland User manual

FRAME IT ALL Stack & Extend User manual

FRAME IT ALL

FRAME IT ALL Stack & Extend User manual

FRAME IT ALL 300000400 User manual

FRAME IT ALL

FRAME IT ALL 300000400 User manual

FRAME IT ALL 300001178 User manual

FRAME IT ALL

FRAME IT ALL 300001178 User manual

FRAME IT ALL Topolski 8' x 8' User manual

FRAME IT ALL

FRAME IT ALL Topolski 8' x 8' User manual

FRAME IT ALL Stack & Extend VEGGIE WALL User manual
FRAME IT ALL

FRAME IT ALL Stack & Extend VEGGIE WALL User manual

FRAME IT ALL Alamo 8' x 8' User manual

FRAME IT ALL

FRAME IT ALL Alamo 8' x 8' User manual

FRAME IT ALL 70001023-MD250 User manual

FRAME IT ALL

FRAME IT ALL 70001023-MD250 User manual

FRAME IT ALL 300001078 User manual

FRAME IT ALL

FRAME IT ALL 300001078 User manual

FRAME IT ALL 200001100 User manual

FRAME IT ALL

FRAME IT ALL 200001100 User manual

FRAME IT ALL 300001063 User manual

FRAME IT ALL

FRAME IT ALL 300001063 User manual

Popular Lawn And Garden Equipment manuals by other brands

XPOtool 51707 Operation manual

XPOtool

XPOtool 51707 Operation manual

Mauki GX200 Operator's manual

Mauki

Mauki GX200 Operator's manual

VEVOR HL24025 instructions

VEVOR

VEVOR HL24025 instructions

Sabo 31-V EL Operator's manual

Sabo

Sabo 31-V EL Operator's manual

Redpath CLOC6 Assembly & Installation Guidelines

Redpath

Redpath CLOC6 Assembly & Installation Guidelines

Forest SCP90 instructions

Forest

Forest SCP90 instructions

Stihl MM 56 instruction manual

Stihl

Stihl MM 56 instruction manual

Happy Garden PAR546 Directions for use

Happy Garden

Happy Garden PAR546 Directions for use

ABSCO SHEDS 30152SK Assembly & instruction manual

ABSCO SHEDS

ABSCO SHEDS 30152SK Assembly & instruction manual

Fieldmann FZV 2102-E user manual

Fieldmann

Fieldmann FZV 2102-E user manual

Little Wonder PRO CRACK CLEANER 6236-00-01 Operator's & parts manual

Little Wonder

Little Wonder PRO CRACK CLEANER 6236-00-01 Operator's & parts manual

Alice's Garden ANEMONE manual

Alice's Garden

Alice's Garden ANEMONE manual

Hard Head 022198 operating instructions

Hard Head

Hard Head 022198 operating instructions

Greenes RCPUSB Assembly instructions

Greenes

Greenes RCPUSB Assembly instructions

juwel Biostar 2000 Assembly

juwel

juwel Biostar 2000 Assembly

Kress Robotik MISSION KR233E owner's manual

Kress Robotik

Kress Robotik MISSION KR233E owner's manual

Classen SC-12/5.5 Operator's & parts manual

Classen

Classen SC-12/5.5 Operator's & parts manual

tekkiwear DGS-111 user manual

tekkiwear

tekkiwear DGS-111 user manual

manuals.online logo
manuals.online logoBrands
  • About & Mission
  • Contact us
  • Privacy Policy
  • Terms and Conditions

Copyright 2025 Manuals.Online. All Rights Reserved.