manuals.online logo
Brands
  1. Home
  2. •
  3. Brands
  4. •
  5. FV
  6. •
  7. Toilet
  8. •
  9. FV E181 User manual

FV E181 User manual

FV se reserva el derecho de modificar,
cambiar, mejorar y/o anular materiales,
productos y/o diseños sin previo aviso.
MEDIDAS SUGERIDAS PARA LA INSTALACIÓN (en cm):
Código:
Asegúrese que la persona que vaya a instalar el
producto
sea un profesional en la materia, para
prevenir
errores que afecten las instalaciones o
el correcto funcionamiento del producto
.
Realice
los ajuste del sanitario UTILIZANDO
una
herramienta adecuada para que la
s
uperficie y el acabado del producto no se raye
o lastime.
Recuerde
que todos los productos tienen un
mecanismo
de control que debe ser revisado y
cambiado
de ser necesario, ya que este puede
deteriorarse debido a la frecuencia de uso.
To
prevent any error that may affect the facilities
or
the correct functioning of the product, make
sure
that the person who is going to install the
p
roduct is a professional. Install the product
u
sing suitable tools, so that it is not scratched.
Remember
that all products have a control
mechanism that must be reviewed and changed
if
necessary, since it can deteriorate due to the
frequency of use.
RECOMENDACIONES:
RECOMMENDA
TIONS:
MEDIDAS / MEASURES:
Dimensiones en milímetros / Dimensions in millimeters
Dimensiones en pulgadas / Dimensions in inches
REPUESTOS
E101.10-COLORE181.1-COLOR
1
2
3
1 Ref.: HE.1.3-CR
2 Ref.: HE.1.10.01
3 Ref.: HE.1.11.04
305
12"
307
12 1/8”
14 3/8”
365
622
24 1/2”
150
5 7/8”
410
16 1/8”
677
26 11/16”
305
12"
307
12 1/8”
14 3/8”
365
622
24 1/2”
150
5 7/8”
410
16 1/8”
677
26 11/16”
VERSION ANTERIOR
305
12"
307
12 1/8”
14 3/8”
365
622
24 1/2”
150
5 7/8”
410
16 1/8”
677
26 11/16”
305
12"
307
12 1/8”
14 3/8”
365
622
24 1/2”
150
5 7/8”
410
16 1/8”
677
26 11/16”
VERSION ANTERIOR
1. Ubicar el inodoro en la posición que irá, verificar la alineación del inodoro respecto
a la pared y posicionar de acuerdo a las dimensiones (gráfico # 1).
Build the water supply and drainage according to the measures suggested in
graph 1.
LEA LAS INSTRUCCIONES COMPLETAMENTE ANTES DE INSTALAR / READ ALL INSTRUCTIONS BEFORE EXECUTING ANY WORK
3. Perforar y colocar los tacos de fijación #10 (no incluidos) (gráfico # 3).
Drill and fit the fitting plugs (not included) to attach the toilet to the floor. Graph 3
4- Voltear hacia abajo el inodoro y colocar el anillo de cera alrededor del
desagüe
(gráfico # 4).
Remove the tank lid and flip the toilet to place the wax ring around the drain.
2. Marcar (gráfico # 2).
Mark as shown in graph 2.
INSTRUCCIONES DE INSTALACIÓN / INSTALLATION INSTRUCTIONS:
• Blanco / White : BL
• Bone / Bone : BO
30.5 cm
15 cm
15 cm
Agujeros
para fijación
Fixation holes
30.5 cm
15 cm
15 cm
Agujeros
para fijación
Fixation holes
30.5 cm
15 cm
15 cm
Agujeros
para fijación
Fixation holes
30.5 cm
15 cm
15 cm
Agujeros
para fijación
Fixation holes
VERSION ANTERIOR
1
2
3
Colores Disponibles/
Available Colors:
E181
Inodoro una pieza Ischia Plus /
Ischia Plus one piece toi
let
VERSION ANTERIOR
Fecha: 2017 - 01 - 11
FV - ÁREA ANDINA S.A. se reserva el derecho de modificar, cambiar, mejorar y/o anular materiales, productos y/o diseños sin previo aviso.
ECUADOR 1-800 FV FV FV (1-800 38 38 38)
Bogotá: 672 02 32 / 018000 11 36 00
(51-1) 222 2078
fvresponde@fvecuador.com
[email protected]
[email protected]
COLOMBIA
PERÚ
FV Responde
Centro de atención al usuario
Encuentre
Repuestos Legítimos FV y
la Garantía Total FV en:
www.fvandina.com
Encuentre
Repuestos Legítimos FV y
la Garantía Total FV en:
www.fvandina.com
NTE INEN 968
Sello de Calidad
Instituto Ecuatoriano de Normalización
NTE INEN 1571
Sello de Calidad
Sanitarios
Instituto Ecuatoriano de Normalización
30.5 cm
15 cm
15 cm
Agujeros
para fijación
Fixation holes
30.5 cm
15 cm
15 cm
Agujeros
para fijación
Fixation holes
1 Ref.: E266.02 DH CR
1
30.5 cm
15 cm
15 cm
Agujeros
para fijación
Fixation holes
30.5 cm
15 cm
15 cm
Agujeros
para fijación
Fixation holes
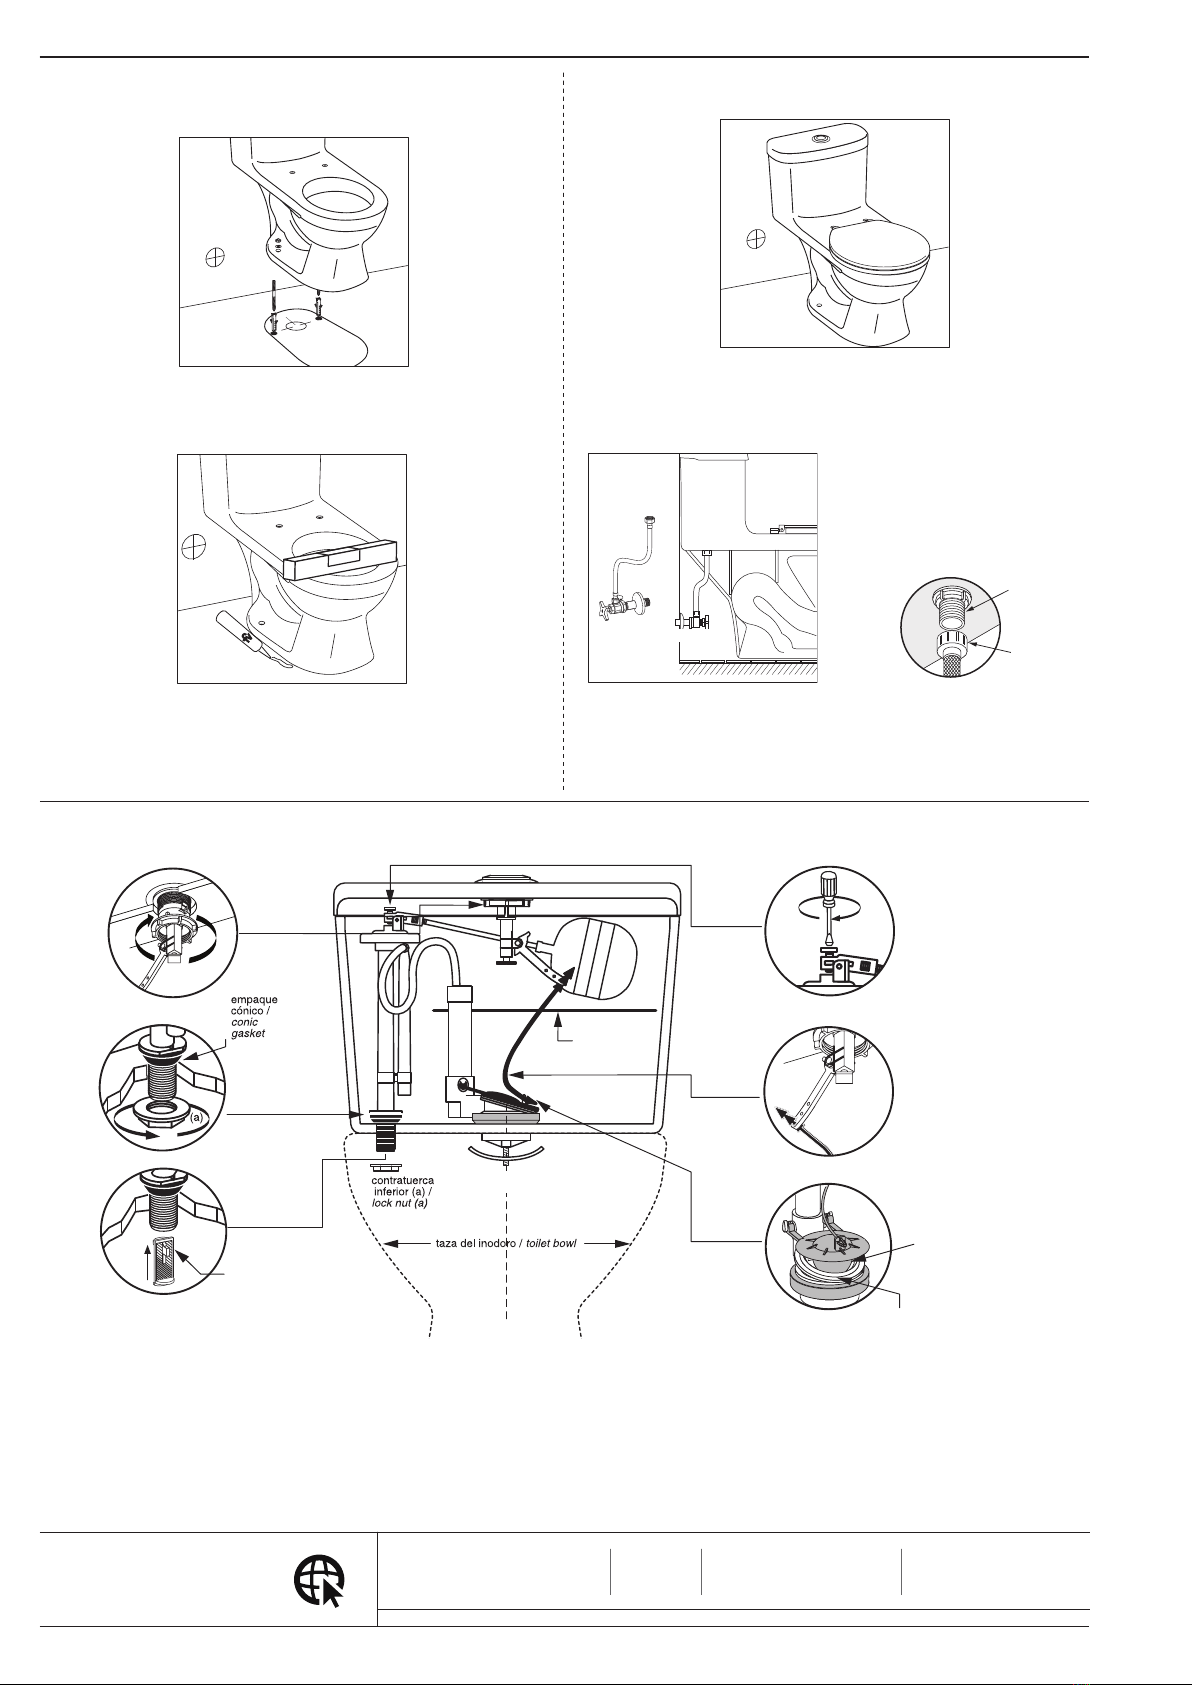
5. Fijar el inodoro al piso con pernos (gráfico # 5).
Place the toilet over the drain, level and secure it to the floor with screws.
7. Coloque la tapa del tanque e instale el asiento (gráfico # 7).
Place the tank and seat (graphic # 7).
8.
Instale el herraje en el tanque.
Para la conexión a la acometida de agua usted
puede usar: llave angular F.V. - (gráfico # 8).
Install the tank fittings. To connect water supply, you can use: F.V. angle stop valve
(Graph 8)
6. Nivelar el inodoro y fijar al piso con un cordón de silicona (gráfico # 6).
Level the toilet and seal the connection between the toilet and the floor with a of
silicone.
CONSEJOS DE MANTENIMIENTO / MAINTENANCE ADVICES:
Los sanitarios F.V. son fabricados con porcelana sanitaria vitrificada, cumpliendo normas
internacionales, garantizando así su larga vida útil. Por las características propias de los
materiales utilizados y la tecnología empleada en su desarrollo, se limpian fácilmente evi-
tando el desarrollo de gérmenes y hongos.
Realice la limpieza utilizando productos limpiadores y desinfectantes para baños de marcas
reconocidas. Ayúdese de una esponja o un paño húmedo. En lo posible evite productos de
limpieza fuertemente abrasivos. La porcelana sanitaria vitrificada no permite adherencias y
las grasas se eliminan con facilidad.
La porcelana sanitaria mantiene el brillo propio de su esmalte sin necesidad de pulimentos.
FV products are made of vitreous sanitary ware, meeting international standards and ensur-
ing durability. The characteristics of the materials and the technology used to make the
products help by preventing the development of germs and fungi.
Clean the product using cleaning agents and bathroom antiseptics. Use a sponge or damp
cloth. If possible avoid highly abrasive cleaning products. Sanitary ware doesn´t allow adhe-
sions and it can be easily washed.
There is no need to polish sanitary ware because it will always maintain its shine.
En caso de tener algún problema con el herraje verifique los siguientes puntos / If you have any problem with the fitting and installation process, please verify the following
ltro /
lter
nivel de agua /
water level
Ajuste /
Adjustment
2
3
5
4
6
Limpie /
Clean Limpie el borde /
Clean the flapper
Calibre-Verifique el nivel
del agua / 4. Calibrate/Verify
water level
verifique que el cordel
de caucho no este
muy tenso / Verify that the
lift strapis not too tight.
flapper /
flapper
válvula de descarga /
flush valve
Verifique que la base
del flapper este en
buenas condiciones /
Verify that the base of
the flapper is in good
conditions
tornillo y placa para asegurar /
screw and locking plate
Ajuste /
Adjustment
1
ltro /
lter
nivel de agua /
water level
Ajuste /
Tight up
Ajuste /
Tight up
2
1
Armado /
Assembled
A
3
5
4
6
Limpie /
Clean
Limpie el borde /
Clean the rim
Calibre-Verifique el nivel
del agua / Calibrate-Verify
the water level
verifique que el cordel
de caucho no este
muy tenso / Verify that the
rubber string is not tight
flapper /
flapper
válvula de descarga /
flush valve
Verifique que la base
del flapper este en
buenas condiciones /
Verify that the base of
the flapper is in good
conditions
tornillo y placa para asegurar /
screw and locking plate
versiones anteriores
Nota: No es recomendable usar cemento en la base del inodoro y antes de instalar el tanque
verifique que la tubería de alimentación este limpia y libre de impurezas y residuos de cons-
trucción.
Notice: The use of concrete at the base of the toilet to secure it to the floor is NOT recom-
mended.
IMPORTANTE: Antes de conectar la válvula de entrada a la acometida de agua
verifique que la tubería de alimentación esté limpia, libre de impurezas y residuos
de construcción.
IMPORTANT: Before connecting the fill valve to the water supply, check that every
piece is clean and free of impurities and construction debris.
Nota: el exceso de ajuste de la tuerca B
puede causar la ruptura de la válvula de
ingreso A.
Note: Over tightening of screw B, can
cause rupture of the inlet valve A.
A
B

Other FV Toilet manuals

FV Bellini E184 User manual

FV

FV Bellini E184 User manual

FV Catania E194 User manual

FV

FV Catania E194 User manual

FV PARMA E157 User manual

FV

FV PARMA E157 User manual

FV E158-E User manual

FV

FV E158-E User manual

FV Ischia Plus E181 User manual

FV

FV Ischia Plus E181 User manual

FV Milan E116-E User manual

FV

FV Milan E116-E User manual

FV E193 User manual

FV

FV E193 User manual

FV Roma E113-E User manual

FV

FV Roma E113-E User manual

FV E113 User manual

FV

FV E113 User manual

FV Greco Touchless 4.8 L User manual

FV

FV Greco Touchless 4.8 L User manual

FV New Greco 4.8 LPF User manual

FV

FV New Greco 4.8 LPF User manual

FV E183 User manual

FV

FV E183 User manual

FV E470 User manual

FV

FV E470 User manual

FV E158-E User manual

FV

FV E158-E User manual

FV Parma E157 User manual

FV

FV Parma E157 User manual

FV E181-S User manual

FV

FV E181-S User manual

FV A115-S User manual

FV

FV A115-S User manual

FV Liber E168 User manual

FV

FV Liber E168 User manual

FV Ginebra E152 User manual

FV

FV Ginebra E152 User manual

FV E112-E User manual

FV

FV E112-E User manual

FV Trento E176 User manual

FV

FV Trento E176 User manual

FV E149 User manual

FV

FV E149 User manual

FV E192 User manual

FV

FV E192 User manual

FV Ischia Plus User manual

FV

FV Ischia Plus User manual

Popular Toilet manuals by other brands

American Standard 8019A60GPC installation instructions

American Standard

American Standard 8019A60GPC installation instructions

Kohler CIMARRON K-5697T-TFC installation instructions

Kohler

Kohler CIMARRON K-5697T-TFC installation instructions

STUDIOLUX SLT500 installation instructions

STUDIOLUX

STUDIOLUX SLT500 installation instructions

Kohler Heated French Curve K-4649 Homeowner's guide

Kohler

Kohler Heated French Curve K-4649 Homeowner's guide

Xylem Jabsco 37045 Series manual

Xylem

Xylem Jabsco 37045 Series manual

Etac Cloo manual

Etac

Etac Cloo manual

Sanela SLPN 02C Instructions for use

Sanela

Sanela SLPN 02C Instructions for use

Arcisan Neion NE041250 installation manual

Arcisan

Arcisan Neion NE041250 installation manual

Swiss Madison SM-WT449 installation instructions

Swiss Madison

Swiss Madison SM-WT449 installation instructions

Toto NEOREST installation guide

Toto

Toto NEOREST installation guide

Cinderella Comfort product manual

Cinderella

Cinderella Comfort product manual

FCI SmartFlush user manual

FCI

FCI SmartFlush user manual

Kohler PERSUADE K-3654T-W installation instructions

Kohler

Kohler PERSUADE K-3654T-W installation instructions

Toto DRAKE CST775 installation manual

Toto

Toto DRAKE CST775 installation manual

EcoLet 25e owner's manual

EcoLet

EcoLet 25e owner's manual

Nabis Blossom Fitting instructions

Nabis

Nabis Blossom Fitting instructions

Kohler K-23188X-C Installation and care guide

Kohler

Kohler K-23188X-C Installation and care guide

Kallista P70001-00 installation guide

Kallista

Kallista P70001-00 installation guide

manuals.online logo
manuals.online logoBrands
  • About & Mission
  • Contact us
  • Privacy Policy
  • Terms and Conditions

Copyright 2025 Manuals.Online. All Rights Reserved.