manuals.online logo
Brands
  1. Home
  2. •
  3. Brands
  4. •
  5. FV
  6. •
  7. Toilet
  8. •
  9. FV A115-S User manual

FV A115-S User manual

FV se reserva el derecho de modificar,
cambiar, mejorar y/o anular materiales,
productos y/o diseños sin previo aviso.
MEDIDAS SUGERIDAS PARA LA INSTALACIÓN (en cm):
Código:
Asegúrese que la persona que vaya a instalar el
producto
sea un profesional en la materia, para
prevenir
errores que afecten las instalaciones o
el correcto funcionamiento del producto
.
Realice
los ajuste del sanitario UTILIZANDO
una
herramienta adecuada para que la
s
uperficie y el acabado del producto no se raye
o lastime.
Recuerde
que todos los productos tienen un
mecanismo
de control que debe ser revisado y
cambiado
de ser necesario, ya que este puede
deteriorarse debido a la frecuencia de uso.
To
prevent any error that may affect the facilities
or
the correct functioning of the product, make
sure
that the person who is going to install the
p
roduct is a professional. Install the product
u
sing suitable tools, so that it is not scratched.
Remember
that all products have a control
mechanism that must be reviewed and changed
if
necessary, since it can deteriorate due to the
frequency of use.
RECOMENDACIONES:
RECOMMENDA
TIONS:
MEDIDAS / MEASURES:
Dimensiones en milímetros / Dimensions in millimeters
Dimensiones en pulgadas / Dimensions in inches
1. Coloque el inodoro sobre el sitio en el que se lo instalará de acuerdo a las medidas
sugeridas. Verifique la alineación del inodoro respecto a la pared (gráf. # 1).
Place the toilet on the site in which will be installed according to the suggested
measures. Check the alignment of the toilet to the wall (graph # 1).
15 cm
15 cm
acometida de agua
water supply
agujero
para fijación
fixation hole
30.5 cm
E266.02 DH CR
15 cm
15 cm
acometida de agua
water supply
agujero
para fijación
fixation hole
30.5 cm
E266.02 DH CR
3. Perfore y coloque los tacos plásticos y los pernos de sujeción # 10 (no incluidos)
(gráf. # 3).
Drill and insert the plastic plugs and fixation bolts # 10 (not included) (graph # 3).
15 cm
15 cm
acometida de agua
water supply
agujero
para fijación
fixation hole
30.5 cm
E266.02 DH CR
2. Realice las marcas indicadas para los agujeros de fijación (gráf. # 2).
Make the markings for the fixing holes (graph # 2).
15 cm
15 cm
acometida de agua
water supply
agujero
para fijación
fixation hole
30.5 cm
E266.02 DH CR
4. Sobre una superficie suave (cartón o un pedazo de tela gruesa) voltee el inodoro
hacia abajo e inserte el anillo de cera en el desagüe del inodoro (gráf. # 4).
On a soft surface (cardboard or thick cloth) turn the the toilet upside down and
insert the wax ring on the toilet drain (Graph. # 4).
680
26” 3/4
400
15” 3/4
305
12”
670
26” 3/8
305
12”
367
14” 13/32
150
5” 7/8
VERSION ANTERIOR
680
26-3/4”
400
15-3/4”
305
12”
670
26-3/8”
305
12”
367
14-13/32”
150
5-7/8”
320
12-5/8”
270
10-5/8”
A115.2.1
A115.2.2
HP.04
kit antivandálico /
antivandalic kit
• Blanco / White : BL
• Bone / Bone : BO
Colores Disponibles/
Available Colors:
E110.1-COLOR
E101.08-COLOR
A115.2-COLOR
E102.08
LEA LAS INSTRUCCIONES COMPLETAMENTE ANTES DE INSTALAR / READ ALL INSTRUCTIONS BEFORE EXECUTING ANY WORK
INSTRUCCIONES DE INSTALACIÓN/ INSTALLATION INSTRUCTIONS:
A115-S
Inodoro Milán antivandálico / Milan Antivandalic Toilet
FV - ÁREA ANDINA S.A. se reserva el derecho de modificar, cambiar, mejorar y/o anular materiales, productos y/o diseños sin previo aviso.
Fecha: 2019 - 04 - 23
ECUADOR 1-800 FV FV FV (1-800 38 38 38)
Bogotá (57) 318 827 2964 / 315 335 0065
(51-1) 717 8744 / 715 3256
fvresponde@fvecuador.com
fvrespondecolombia@grupofv.net
[email protected]
COLOMBIA
PERÚ
FV Responde
Centro de atención al usuario
Encuentre
Repuestos Legítimos FV y
la Garantía Total FV en:
www.fvandina.com
Encuentre
Repuestos Legítimos FV y
la Garantía Total FV en:
www.fvandina.com
NTE INEN 3123
Sello de Calidad
Instituto Ecuatoriano de Normalización
NTE INEN 1571
Sello de Calidad
Sanitarios
Instituto Ecuatoriano de Normalización
Los sanitarios F.V. son fabricados con porcelana sanitaria vitrifi-
cada, cumpliendo normas internacionales, garantizando así su
larga vida útil. Por las características propias de los materiales
utilizados y la tecnología empleada en su desarrollo, se limpian
fácilmente evitando el desarrollo de gérmenes y hongos.
Realice la limpieza utilizando productos limpiadores y desinfec-
tantes para baños de marcas reconocidas. Ayúdese de una
esponja o un paño húmedo. En lo posible evite productos de
limpieza fuertemente abrasivos. La porcelana sanitaria vitrificada
no permite adherencias y las grasas se eliminan con facilidad.
La porcelana sanitaria mantiene el brillo propio de su esmalte sin
necesidad de pulimentos.
F.V. products are made of vitreous sanitary ware, complying
international standards and ensuring durability. The characteris-
tics of the materials and the technology used to make the prod-
ucts help by preventing the development of germs and fungi.
Clean the product using cleaning agents and bathroom anti-
septics. Use a sponge or damp cloth. If possible avoid highly
abrasive cleaning products. Sanitary ware doesn´t allow ad-
hesions and it can be easily washed.
There is no need to polish sanitary ware because it will al-
ways maintain its shine.
Porcelaine enamel maintains its own brightneed without the
need of polishing.
15 cm
15 cm
acometida de agua
water supply
agujero
para fijación
fixation hole
30.5 cm
E266.02 DH CR
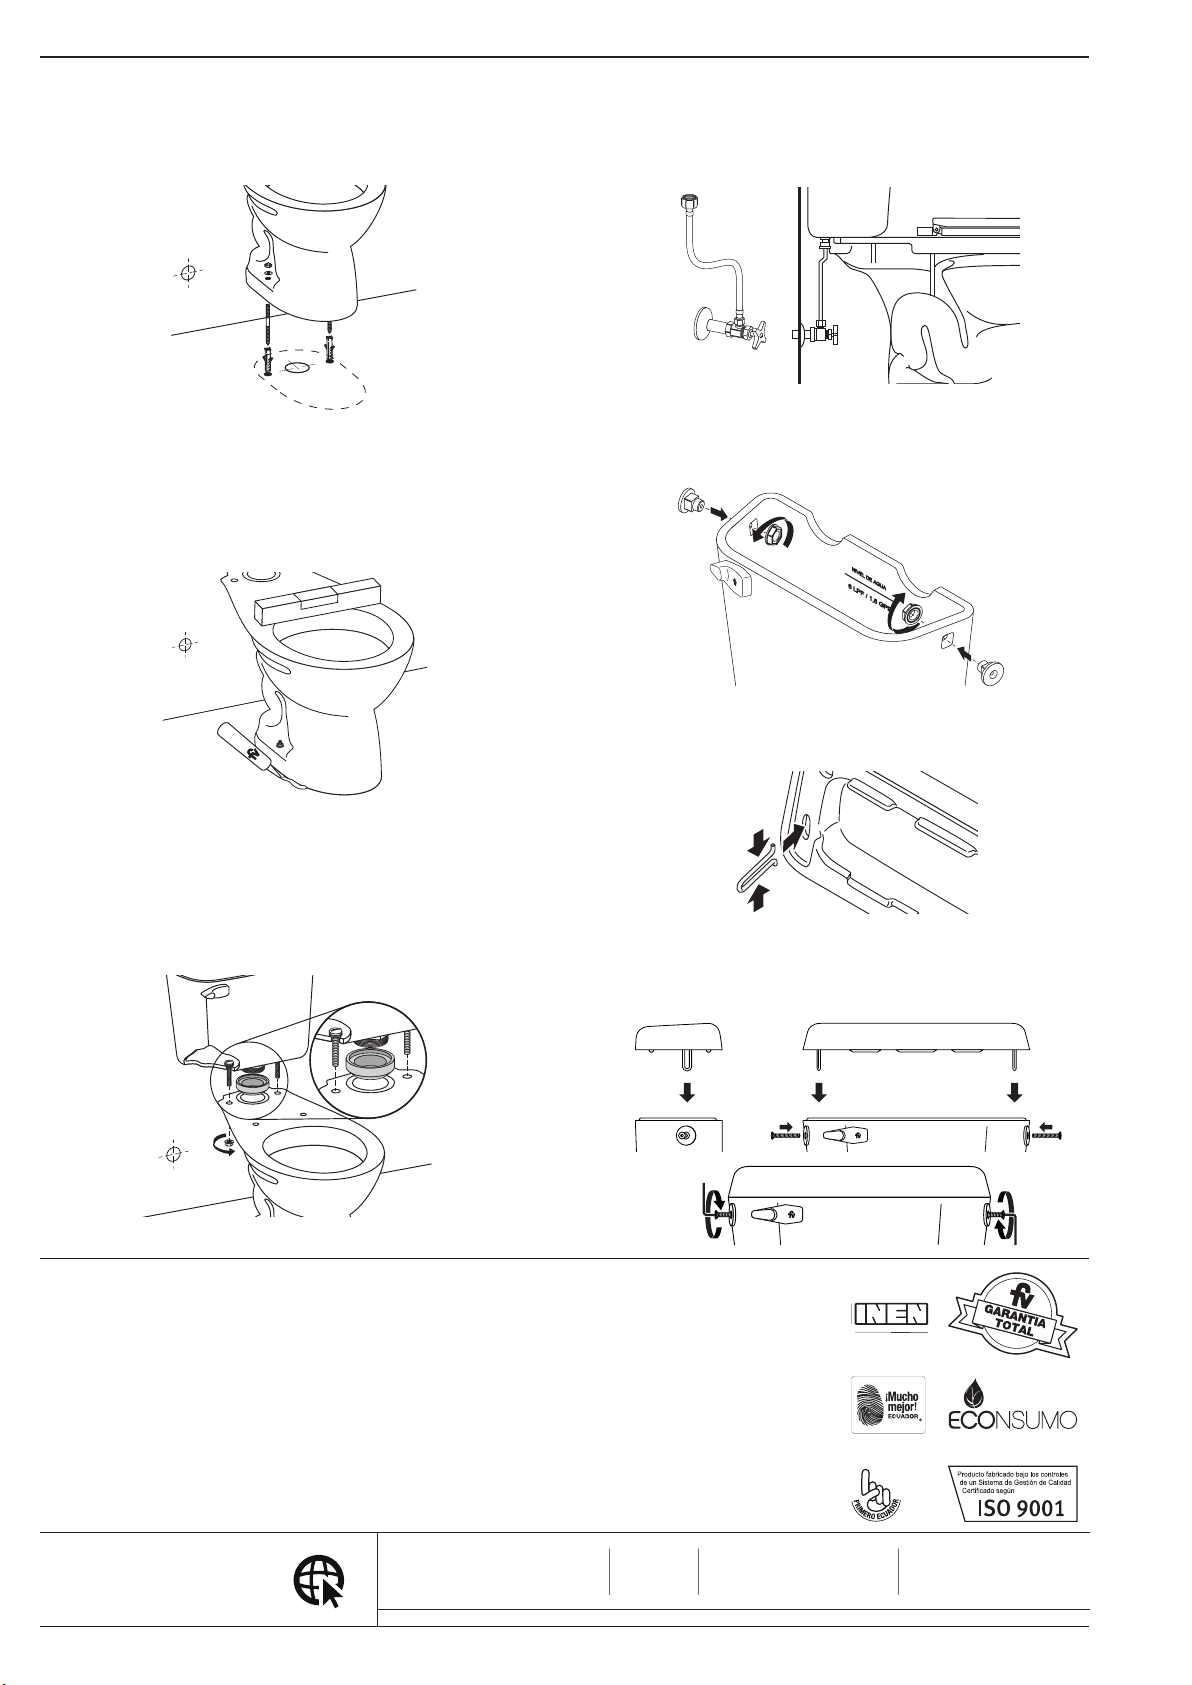
5. Coloque el inodoro sobre el sitio marcado guiándose por los pernos que están en
el piso (gráf. # 5).
Place the toilet on the marked site guided by the bolts that are on the floor
(graph # 5).
15 cm
15 cm
acometida de agua
water supply
agujero
para fijación
fixation hole
30.5 cm
E266.02 DH CR
7. Instale el herraje en el tanque de acuerdo a las instrucciones que vienen en su
funda de embalaje. Coloque el empaque espumoso. Ubique el tanque sobre el
inodoro y fíjelo mediante los pernos provistos con el producto.
Install the tank fittings with foam gaskets according to the directions. Place the tank
over the toilet and secure it with the bolts provided.
15 cm
15 cm
acometida de agua
water supply
agujero
para fijación
fixation hole
30.5 cm
E266.02 DH CR
6. Nivele el inodoro y fíjelo con las arandelas y tuercas en los pernos de sujeción (no
incluidos). Selle la base del inodoro con un cordón de silicona (gráf. # 6).
Level the toilet and secure it with washers and nuts in the bolts (not included). Seal
the base of the toilet with a bead of silicone (graph # 6).
9. Instale los soportes plásticos antivandálicos y fíjelos al tanque con las respectivas
tuercas, las mismas que ajustan girando en sentido antihorario (gráf. # 9).
Install antivandalic plastic brackets and fix them to the tank with the proper nuts,
turning the screws counterclockwise to adjust them. (graphic 9)
10. Apriete el gancho "U" e introdúzcalo en la tapa del tanque. Repita el proceso para
el segundo gancho "U" (gráf. # 10).
Tighten both hooks “U” and place them inside the tank lid.
8. Realice la conexión a la acometida de agua que está en la pared mediante una
llave angular FV (ref.: E266.02 DH CR) (gráf. # 8). Regule el herraje
a la altura
del nivel de agua marcada en el depósito
.
Connect water supply to the toilet valve using a F.V. angle bracket with flexible hose
ref. E266.02 DH CR, (not included). Regulate the fittings to the height of labeled
water level in the tank.
15 cm
15 cm
acometida de agua
water supply
agujero
para fijación
fixation hole
30.5 cm
E266.02 DH CR
11. Coloque la tapa en el tanque y utilizando una llave hexagonal de 4 mm (no incluida)
asegúrela con los dos pernos laterales de sujeción provistos con el producto.
Place the tank´s lid and using a 4mm hex wrench (not included) secure it with the
side bolts comprised in the product
Encuentre
Repuestos Legítimos FV y
la Garantía Total FV en:
www.fvandina.com
Encuentre
Repuestos Legítimos FV y
la Garantía Total FV en:
www.fvandina.com
NTE INEN 3123
Sello de Calidad
Instituto Ecuatoriano de Normalización
NTE INEN 1571
Sello de Calidad
Sanitarios
Instituto Ecuatoriano de Normalización
Encuentre
Repuestos Legítimos FV y
la Garantía Total FV en:
www.fvandina.com
Encuentre
Repuestos Legítimos FV y
la Garantía Total FV en:
www.fvandina.com
NTE INEN 3123
Sello de Calidad
Instituto Ecuatoriano de Normalización
NTE INEN 1571
Sello de Calidad
Sanitarios
Instituto Ecuatoriano de Normalización

Other FV Toilet manuals

FV Ginebra E152 User manual

FV

FV Ginebra E152 User manual

FV Victoria E170 User manual

FV

FV Victoria E170 User manual

FV Bellini E184 User manual

FV

FV Bellini E184 User manual

FV Roma E113-E User manual

FV

FV Roma E113-E User manual

FV E158-E User manual

FV

FV E158-E User manual

FV E122 User manual

FV

FV E122 User manual

FV E149 User manual

FV

FV E149 User manual

FV Apolo E182 User manual

FV

FV Apolo E182 User manual

FV E183 User manual

FV

FV E183 User manual

FV Liber E168 User manual

FV

FV Liber E168 User manual

FV E149 User manual

FV

FV E149 User manual

FV E112-E User manual

FV

FV E112-E User manual

FV E193 User manual

FV

FV E193 User manual

FV E192 User manual

FV

FV E192 User manual

FV E113 User manual

FV

FV E113 User manual

FV Ginebra E152 User manual

FV

FV Ginebra E152 User manual

FV Ischia Elongado E187 User manual

FV

FV Ischia Elongado E187 User manual

FV E158-E User manual

FV

FV E158-E User manual

FV Milan E116-E User manual

FV

FV Milan E116-E User manual

FV Trento E176 User manual

FV

FV Trento E176 User manual

FV Catania E194 User manual

FV

FV Catania E194 User manual

FV New Greco 4.8 LPF User manual

FV

FV New Greco 4.8 LPF User manual

FV Ischia Plus User manual

FV

FV Ischia Plus User manual

FV Greco Touchless 4.8 L User manual

FV

FV Greco Touchless 4.8 L User manual

Popular Toilet manuals by other brands

Grohe Sensia Arena 39354SH1 installation manual

Grohe

Grohe Sensia Arena 39354SH1 installation manual

Mirabelle GALATIA MIRGA241 installation instructions

Mirabelle

Mirabelle GALATIA MIRGA241 installation instructions

Geberit AQUACLEAN MERA COMFORT user manual

Geberit

Geberit AQUACLEAN MERA COMFORT user manual

Kohler K-3399 installation guide

Kohler

Kohler K-3399 installation guide

Volvo 9700 Driver's handbook

Volvo

Volvo 9700 Driver's handbook

Toto CS819 Series installation manual

Toto

Toto CS819 Series installation manual

Project Source DANVILLE MT-20206TC manual

Project Source

Project Source DANVILLE MT-20206TC manual

Kohler REACH K-8433T-S installation instructions

Kohler

Kohler REACH K-8433T-S installation instructions

Sanela SLP 32RB Mounting instructions

Sanela

Sanela SLP 32RB Mounting instructions

Kohler K-25042-SS-0 installation guide

Kohler

Kohler K-25042-SS-0 installation guide

Toto MS604114CEFG instruction manual

Toto

Toto MS604114CEFG instruction manual

Glacier bay N2441EB Series Use and care guide

Glacier bay

Glacier bay N2441EB Series Use and care guide

Thetford C-250 Series Instructions for use

Thetford

Thetford C-250 Series Instructions for use

Toto CS300D Series installation manual

Toto

Toto CS300D Series installation manual

Swiss Madison Vivante SM-STS01 installation instructions

Swiss Madison

Swiss Madison Vivante SM-STS01 installation instructions

Laufen RIGO manual

Laufen

Laufen RIGO manual

Glacier bay N2428R-DF TBD manual

Glacier bay

Glacier bay N2428R-DF TBD manual

Arcisan Neion Plus instruction manual

Arcisan

Arcisan Neion Plus instruction manual

manuals.online logo
manuals.online logoBrands
  • About & Mission
  • Contact us
  • Privacy Policy
  • Terms and Conditions

Copyright 2025 Manuals.Online. All Rights Reserved.