manuals.online logo
Brands
  1. Home
  2. •
  3. Brands
  4. •
  5. FV
  6. •
  7. Toilet
  8. •
  9. FV Catania E194 User manual

FV Catania E194 User manual

MEDIDAS / MEASURES:
A
segúrese que la persona que vaya a instalar el producto sea
u
n profesional en la materia, para prevenir errores que afecten
l
as instalaciones o el correcto funcionamiento del producto.
R
ealice los ajuste del sanitario UTILIZANDO una herramienta
a
decuada para que la superficie y el acabado del producto no
s
e raye o lastime.
R
ecuerde que todos los productos tienen un mecanismo de
c
ontrol que debe ser revisado y cambiado de ser necesario, ya
q
ue este puede deteriorarse debido a la frecuencia de uso.
T
o prevent any error that may affect the facilities or the correct
f
unctioning of the product, make sure that the person who is
g
oing to install the product is a professional. Install the product
u
sing suitable tools, sothat it is not scratched.
R
emember that all products have a control mechanism that
m
ust be reviewed and changed if necessary, since it can
d
eteriorate due to the frequency of use.
RECOMENDACIONES:
R
ECOMMENDATIONS:
Dimensiones en milímetros / Dimensions in millimeters
Dimensiones en pulgadas / Dimensions in inches
1 cm
piso terminado /
finished floor
pared terminada / finished wall
30,5 cm
12”
desagüe del inodoro /
toilet draining
acometida de agua / water connection
15 cm
5
-2
3/3
2”
1 cm
piso terminado /
finished floor
pared terminada / finished wall
18 cm
7-
3/3
2”
desagüe del inodoro /
toilet draining
acometida de agua / water connection
15 cm
5
-2
3/3
2”
1 cm
piso terminado /
finished floor
pared terminada / finished wall
18 cm
7-
3/3
2”
desagüe del inodoro /
toilet draining
acometida de agua / water connection
10 cm
4”
E194
Inodoro Catania
Toilet Catania
1. Realice la acometida de agua y el desagüe de acuerdo a las medidas sugeridas
Execute the water supply and drainage according to the measures suggested in
the graph.
LEA LAS INSTRUCCIONES COMPLETAMENTE ANTES DE INSTALAR / READ ALL INSTRUCTIONS BEFORE INSTALLING
3.
Remove the toilet to drill and the EPEC-DH-BL (included) plugs to
attach the toilet to the
4. Retire la tapa del tanque y volteé hacia abajo el inodoro para colocar el anillo
de cera alrededor del desagüe.
Remove the tank lid and down the toilet to place the wax ring around the
drain.
2. Trace una línea de 14cm de la pared y alinee con la parte posterior del inodoro
Draw a line of 14 cm from the wall and with the back of the toilet on the
and mark the holes for
INSTRUCCIONES DE INSTALACIÓN / INSTALLATION INSTRUCTIONS:
COLORES DISPONIBLES /
AVAILABLE COLORS:
• Blanco / White : BL
Los sanitarios FV - Franz Viegener
están fabricados pensando en el cuidado del ambiente y en evitar el desperdicio. Nuestros inodoros disponen de des
carga simple y doble que permiten al usuario seleccionar la evacuación de líquidos y sólidos.
150
5-23/32”
385
15-2/16”
715
28-2/16”
305
12”
625
24-5/8”
385
15-2/16”
E194.1-BL E194.2.2-BL E102.33
E101.33-BL
(A)
(B)
14 cm
(5.5”)
14 cm
mc51
mc51
tornillo / screw
tacos / studs
agujeros
para fijación
/
fixation holes
F.V. - ÁREA ANDINA S.A. se reserva el derecho de modificar,
cambiar, mejorar y/o anular materiales, productos y/o diseños
sin previo aviso.
Visítenos en: www.franzviegener.com
Fecha: 2015-03-10
ECUADOR 1-800 FV FV FV (1-800 38 38 38)
Bogotá: 672 02 32 / 018000 11 36 00
(51-1) 717 87 44 / (51-1) 717 87 99
fvresponde@fvecuador.com
[email protected]
[email protected]
COLOMBIA
PERÚ
FV Responde
Centro de atención al usuario
Ref.: E266.02 DH CR Ref.: E266.02 DH CR
E192.1
Ref.: E266.02 DH CR
E193.1
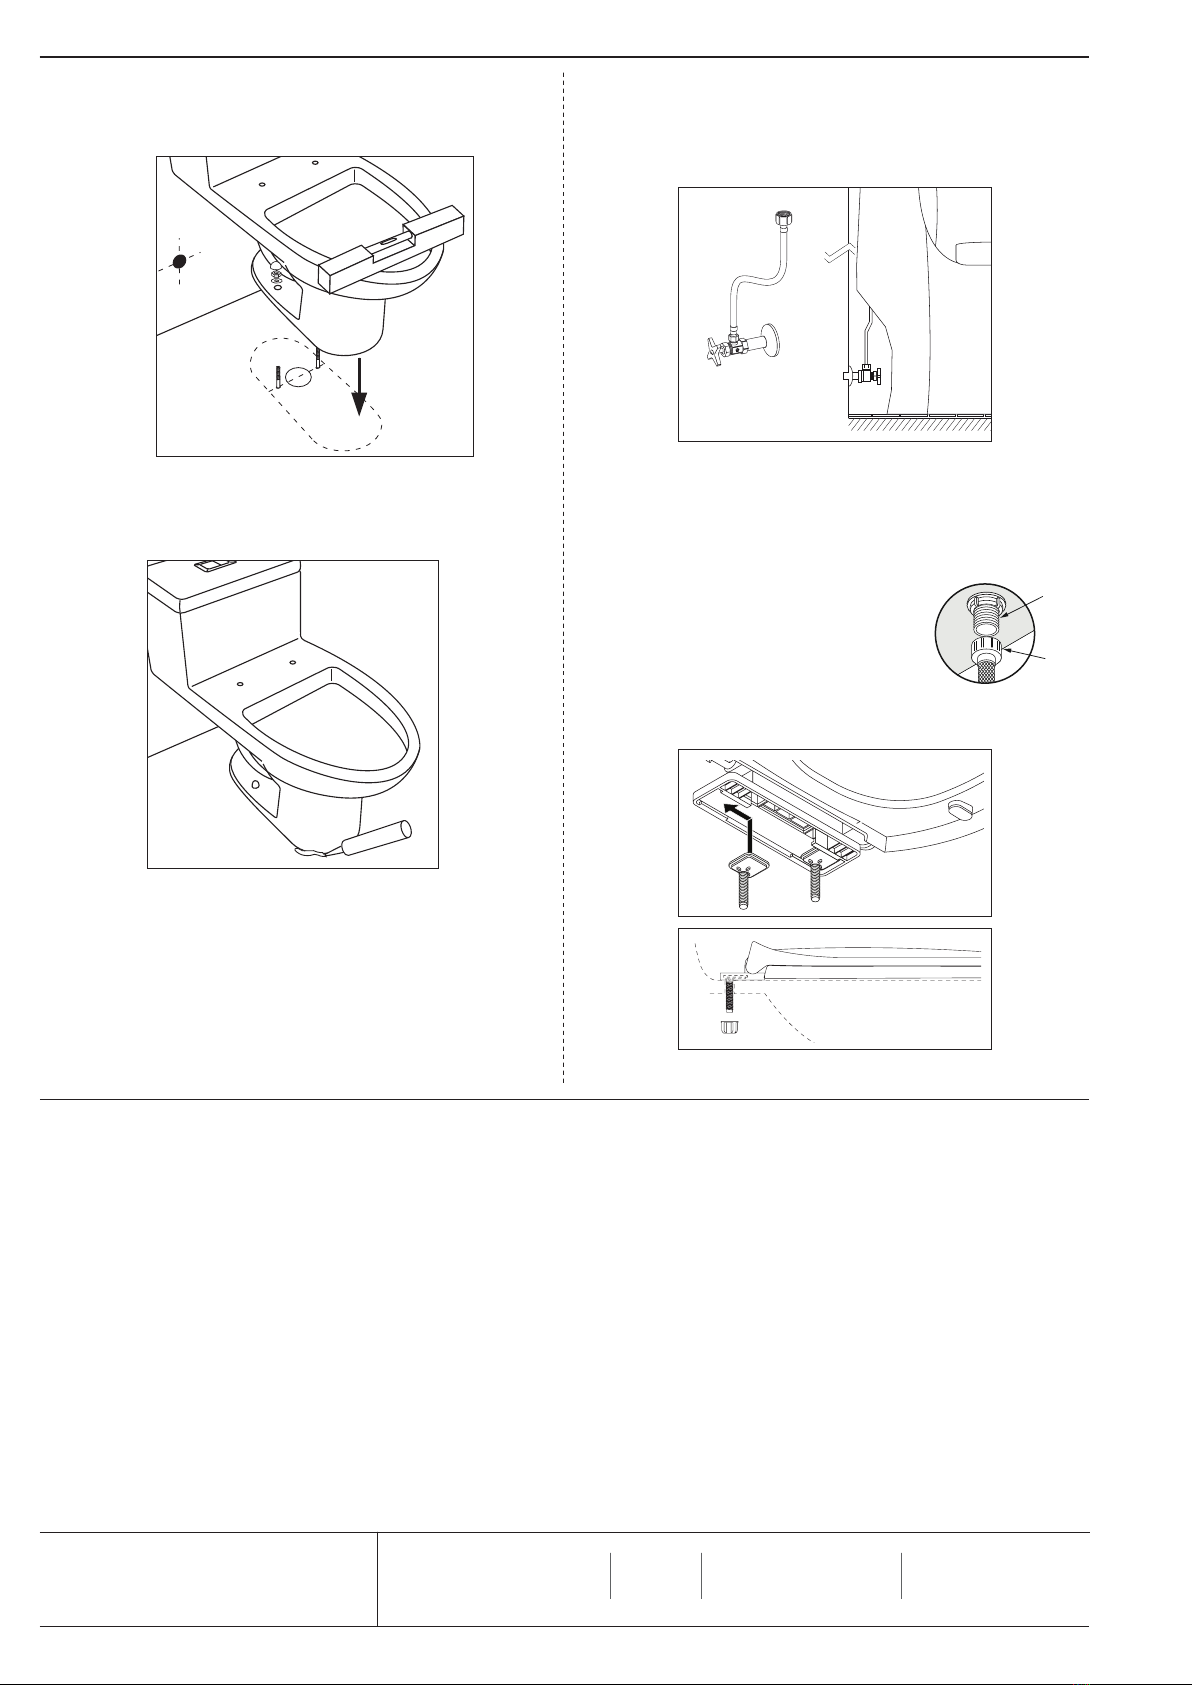
5. Coloque nuevamente el inodoro sobre el codo del desagüe, nivélelo y fíjelo al
piso con los tirafondos.
Placethetoiletoverthedrainagain,levelandsecureittotheoorwithscrews.
7. Verifique que el herraje esté instalado en el tanque. Conecte la acometida de
agua a la válvula de ingreso del inodoro mediante una llave angular F.V. - Franz
Viegener con manguera exible, ref.: E266.02 DH CR, (no incluida).
ConnectwatersupplytothetoiletvalveusingaF.V.FranzViegeneranglebracketwith
flexiblehoseref.E266.02 DH CR,(notincluded).
8. Coloque el asiento en el inodoro.
Placethetoiletseatandseatcover.
6. Selle la unión entre el inodoro y el piso con un cordón de silicona.
Sealtheconnectionbetweenthetoiletandoorwithabeadofsilicone.
CARACTERÍSTICAS / CHARACTERISTICS
- Fabricado en porcelana sanitaria vitricada, cumpliendo con normas internacio-
nales, garantizando así una durabilidad indenida.
- Diseño de una sola pieza con anillo cerrado.
- Herraje de doble descarga, con botones en la tapa del tanque.
- Upperdualushchromedbutton.
-Madeofvitreoussanitaryware,complyinginternationalstandards,ensuringdu-
rability.
-Onepiecedesignwithclosedring
Nota: el exceso de ajuste de la tuerca Bpuede causar
la ruptura de la válvula de ingreso A.
Note: Over tightening screw B, can cause rupture of the
inlet valve A.
Nota: No es recomendable usar cemento en la base del inodoro y antes de instalar el tanque
verifique que la tubería de alimentación este limpia y libre de impurezas y residuos de
construcción.
Notice: The use of concrete at the base of the toilet to secure it to the floor is NOT recom-
mended.
IMPORTANTE: Antes de conectar la válvula de entrada a la acometida de agua
verifique que la tubería de alimentación esté limpia, libre de impurezas y residuos
de construcción.
IMPORTANT: Beforeconnectingthellvalvetothewatersupply,checkthatevery
pieceiscleanandfreeofimpuritiesandconstructiondebris.
A
B
CONSEJOS DE MANTENIMIENTO: MAINTENANCE:
Los sa ni ta rios F.V. - Franz Vie ge ner son fa bri ca dos con por ce la na sa ni ta ria vi tri fi-
ca da, cum plien do nor mas in ter na cio na les, ga ran ti zan do así su lar ga vi da útil. Por
las ca rac te rís ti cas pro pias de los ma te ria les uti li za dos y la tec no lo gía em plea da en
su desarrollo, se limpian fácilmente evitando el desarrollo de gérmenes y hongos.
Rea li ce la lim pie za uti li zan do pro duc tos lim pia do res y de sin fec tan tes pa ra ba ños
de mar cas re co no ci das. Ayú de se de una es pon ja o un pa ño hú me do. En lo po si ble
evi te pro duc tos de lim pie za fuer te men te abra si vos. la por ce la na sa ni ta ria vi tri fi ca-
da no permite adherencias y las grasas se eliminan con facilidad.
La porcelana sanitaria mantiene el brillo propio de su esmalte sin necesidad de
pulimentos.
F.V. - Franz Viegener products are made of vitreous sanitary ware, complying
internationalstandardsandensuringdurability.Thecharacteristicsofthematerials
andthetechnologyusedtomaketheproductshelpbypreventingthedevelopment
of germs and fungi.
Cleantheproductusingcleaningagentsandbathroomantiseptics.Useasponge
ordampcloth.Ifpossibleavoidhighlyabrasivecleaningproducts.Sanitaryware
doesn´tallowadhesionsanditcanbeeasilywashed.
Thereisnoneedtopolishsanitarywarebecauseitwillalwaysmaintainitsshine.

Other FV Toilet manuals

FV E113 User manual

FV

FV E113 User manual

FV E183 User manual

FV

FV E183 User manual

FV Liber E168 User manual

FV

FV Liber E168 User manual

FV Trento E176 User manual

FV

FV Trento E176 User manual

FV Victoria E170 User manual

FV

FV Victoria E170 User manual

FV New Greco 4.8 LPF User manual

FV

FV New Greco 4.8 LPF User manual

FV Apolo E182 User manual

FV

FV Apolo E182 User manual

FV E192 User manual

FV

FV E192 User manual

FV E165 User manual

FV

FV E165 User manual

FV Ginebra E149 User manual

FV

FV Ginebra E149 User manual

FV Parma E157 User manual

FV

FV Parma E157 User manual

FV E470 User manual

FV

FV E470 User manual

FV E158-E User manual

FV

FV E158-E User manual

FV Ginebra E152 User manual

FV

FV Ginebra E152 User manual

FV PARMA E157 User manual

FV

FV PARMA E157 User manual

FV Milan E116-E User manual

FV

FV Milan E116-E User manual

FV E149 User manual

FV

FV E149 User manual

FV E149 User manual

FV

FV E149 User manual

FV E112-E User manual

FV

FV E112-E User manual

FV Ischia Elongado E187 User manual

FV

FV Ischia Elongado E187 User manual

FV E193 User manual

FV

FV E193 User manual

FV E181 User manual

FV

FV E181 User manual

FV E181-S User manual

FV

FV E181-S User manual

FV E122 User manual

FV

FV E122 User manual

Popular Toilet manuals by other brands

KELISS T162A Series instruction manual

KELISS

KELISS T162A Series instruction manual

WimTec MULTI 2 Assembly and operating instructions

WimTec

WimTec MULTI 2 Assembly and operating instructions

Wostman EcoFlush Troubleshooting

Wostman

Wostman EcoFlush Troubleshooting

Agua TABORA manual

Agua

Agua TABORA manual

SFA SaniCompact Star installation instructions

SFA

SFA SaniCompact Star installation instructions

Project Source MT-39201 manual

Project Source

Project Source MT-39201 manual

Scarabeo Moon 5522 manual

Scarabeo

Scarabeo Moon 5522 manual

TUSHY TUSHY SPA quick start guide

TUSHY

TUSHY TUSHY SPA quick start guide

Glacier bay N2428R Use and care guide

Glacier bay

Glacier bay N2428R Use and care guide

Toto CT447CFG01 installation manual

Toto

Toto CT447CFG01 installation manual

DURAVIT SensoWash 2129590000 Mounting instructions

DURAVIT

DURAVIT SensoWash 2129590000 Mounting instructions

Kohler K-3900X-2 Homeowner's guide

Kohler

Kohler K-3900X-2 Homeowner's guide

Dometic 310 Series instruction manual

Dometic

Dometic 310 Series instruction manual

Cinderella CLASSIC maintenance

Cinderella

Cinderella CLASSIC maintenance

Dometic CT 4110 operating manual

Dometic

Dometic CT 4110 operating manual

Thetford C260 Cassette Toilet user manual

Thetford

Thetford C260 Cassette Toilet user manual

Geberit AQUACLEAN MERA COMFORT user manual

Geberit

Geberit AQUACLEAN MERA COMFORT user manual

agape 750 ACER0750WRRS Assembly instructions

agape

agape 750 ACER0750WRRS Assembly instructions

manuals.online logo
manuals.online logoBrands
  • About & Mission
  • Contact us
  • Privacy Policy
  • Terms and Conditions

Copyright 2025 Manuals.Online. All Rights Reserved.