Impresión: Tamaño: Unidades:
Material:
Colores:
Acabados:
NOTA:
Elaborado por:
Modificado por:Dpto.:
Fecha Elaboración:
Fecha Modificación:
Código:
TIRO Y RETIRO 210 x 297
Papel Bond de 75 gr.
- TINTA NEGRA (escala de grises).
Diseño Fábricas
milimetros
Formato A4 (210 x 297 mm).
Tolerancia impresión: +/- 1mm
Impresión: Tamaño: Unidades:
Material:
Colores:
Acabados:
NOTA:
Elaborado por:
Modificado por:
Modificado por:Dpto.:
Fecha Elaboración:
Fecha Modificación:
Código:
TIRO Y RETIRO 210 x 297
Papel Bond de 75 gr.
- TINTA NEGRA (escala de grises).
Diseño Fábricas
milimetros
Formato A4 (210 x 297 mm).
Tolerancia impresión: +/- 1mm
HOJA DE INSTALACIÓN INODORO GINEBRA E152
(SECCIÓN SANITARIOS) HT- 1030F
ESTE BOCETO ESTAAL 45%
Maggie Ramos
2011/10/26
FV se reserva el derecho de modificar,
cambiar, mejorar y/o anular materiales,
productos y/o diseños sin previo aviso.
MEDIDAS SUGERIDAS PARA LA INSTALACIÓN (en cm):
Código:
Asegúrese que la persona que vaya a instalar el
sea un profesional en la materia, para
errores que afecten las instalaciones o
el correcto funcionamiento del producto
.
los ajuste del sanitario UTILIZANDO
herramienta adecuada para que la
uperficie y el acabado del producto no se raye
que todos los productos tienen un
de control que debe ser revisado y
de ser necesario, ya que este puede
deteriorarse debido a la frecuencia de uso.
To
prevent any error that may affect the facilities
the correct functioning of the product, make
that the person who is going to install the
roduct is a professional. Install the product
sing suitable tools, so that it is not scratched.
that all products have a control
mechanism that must be reviewed and changed
necessary, since it can deteriorate due to the
frequency of use.
RECOMENDACIONES:
RECOMMENDA
TIONS:
MEDIDAS / MEASURES:
Dimensiones en milímetros / Dimensions in millimeters
Dimensiones en pulgadas / Dimensions in inches
E150.2-COLOR
1
2
1
2
3
1
2
3
1
2
3
version anteiror
3
version anterior version anterior
E150.1-COLOR
E101.04-COLOR
305
12”
395
725
15-9/16”
28-9/16”
13”
5-7/8”
16-15/16”
710
5-3/4”
481
18-15/16”
363
146146
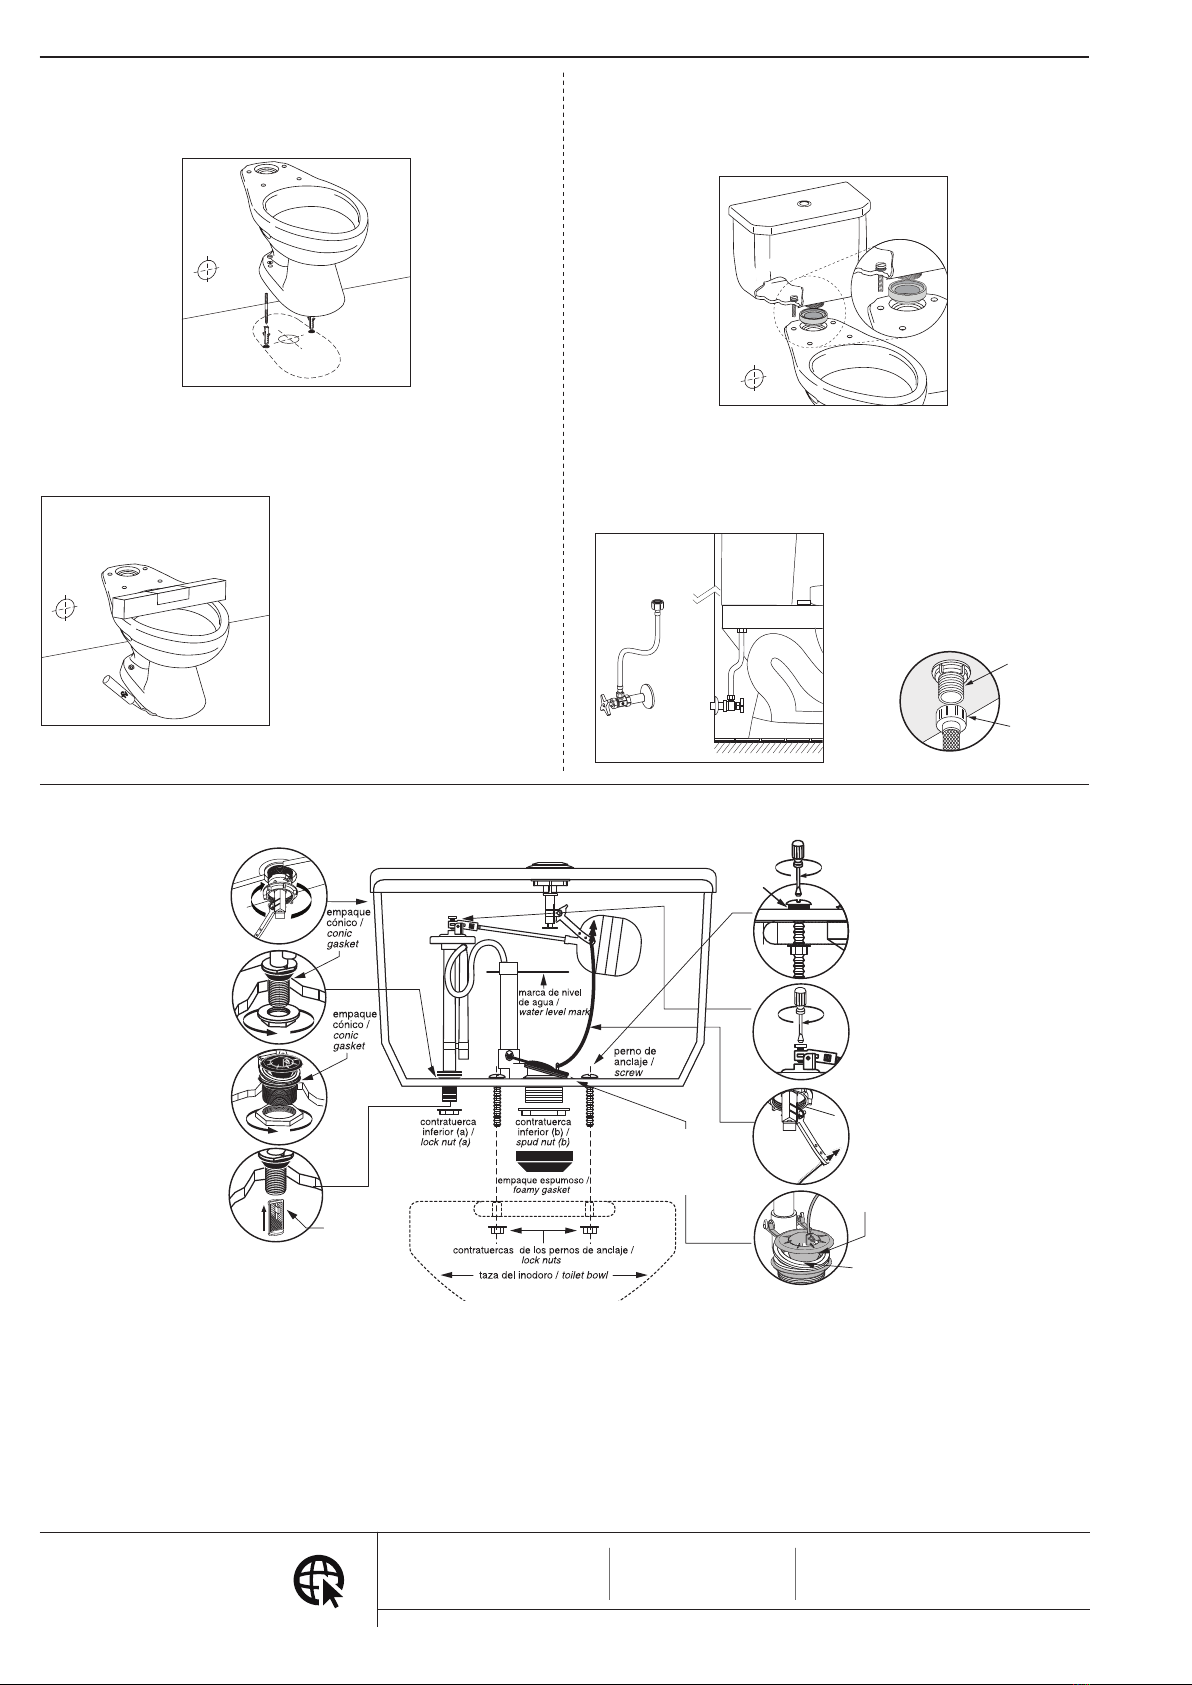
1. Ubique el inodoro en la posición en la que irá, verifique la alineación del inodoro
respecto a la pared y posicione de acuerdo a las dimensiones indicadas en el
gráfico.
Verify the alignment of toilet regarding the wall and place it according to the dimen-
sions (see graphic). For drilling mark on the floor the hole's position.
LEA LAS INSTRUCCIONES COMPLETAMENTE ANTES DE INSTALAR / READ ALL INSTRUCTIONS BEFORE INSTALLING
3.
Retire el inodoro para perforar y colocar los tacos de jación EPER-DH (no
incluidos) para jar el inodoro al piso.
Remove the toilet to drill and t the EPER-DH tting plugs (not included) to
attachthetoilettotheoor.
4- Voltee el inodoro sobre una superficie suave para no rasparlo y coloque el anillo de
cera en la salida del desagüe.
Turnthetoiletaround(onitsring)overasoftsurfaceso thatit willnot bescraped
andinstallthewaxringinthedrainoutlet.
2. Marque en el piso los orificios para su fijación.
Marktheholesinthefloortomounttheproductcorrectly.
INSTRUCCIONES DE INSTALACIÓN / INSTALLATION INSTRUCTIONS:
COLORES DISPONIBLES /
COLORS AVAILABLE:
• Azul Cielo / Skylight : AC
• Azul Mediterráneo /
MediterraneBlue : AM
• Blanco / White : BL
• Bone / Bone : BO
• Caribbean Shell : CS
• Ciprés / Cypress : CI
• Gris /Gray : GR
• Merlot : ME
• Negro / black : NE
• Verde Primavera /
Sea Foam : VP
llave angular F.V. /
F. V. angle valve
agujeros
para fijación /
fixation holes
1 cm
piso terminado /
nished oor
pared terminada / nished wall
30,5 cm
desagüe
del inodoro /
toilet draining
acometida de agua /
water connection
10 cm
10 cm
15,5 cm
30,5 cm
15 cm
15,5 cm
30,5 cm
15 cm
15,5 cm
30,5 cm
1 cm
piso terminado /
nished oor
pared terminada / nished wall
30,5 cm
desagüe
del inodoro /
toilet draining
acometida de agua /
water connection
10 cm
llave angular F.V. /
F. V. angle stop set
agujeros
para fijación /
fixation holes
15 cm
15,5 cm
30,5 cm
15 cm
15,5 cm
30,5 cm
1 cm
piso terminado /
nished oor
pared terminada / nished wall
30,5 cm
desagüe
del inodoro /
toilet draining
acometida de agua /
water connection
10 cm
llave angular F.V. /
F. V. angle stop set
agujeros
para fijación /
fixation holes
15 cm
15,5 cm
30,5 cm
1 cm
piso terminado /
nished oor
pared terminada / nished wall
30,5 cm
desagüe
del inodoro /
toilet draining
acometida de agua /
water connection
10 cm
llave angular F.V. /
F. V. angle stop set
agujeros
para fijación /
fixation holes
E150.2.2
E150.2.1
E102.13
E152
Inodoro Ginebra / Toilet Ginebra
FV - ÁREA ANDINA S.A. se reserva el derecho de modificar, cambiar, mejorar y/o anular materiales, productos y/o diseños sin previo aviso.
FV Responde
Centro de atención al usuario
ECUADOR
1-800 FV FV FV (1-800 38 38 38)
PERÚ
CENTROAMÉRICA
Encuentre
Repuestos Legítimos FV y
la Garantía Total FV en:
www.fvandina.com
Encuentre
Repuestos Legítimos FV y
la Garantía Total FV en:
www.fvandina.com
NTE INEN 3123
Sello de Calidad
Instituto Ecuatoriano de Normalización
NTE INEN 3082
Sello de Calidad
Sanitarios
Instituto Ecuatoriano de Normalización
Ajuste /
Tight up
Ajuste /
Tight up
Ajuste /
Tight up
2
3
ltro /
lter
4
Limpie /
Clean
8
Limpie el borde /
Clean the rim
flapper /
flapper
válvula de descarga /
flush valve
6
5
7
Calibre-Verifique el nivel
del agua / Calibrate-Verify
the water level
1
verifique que el cordel
de caucho no este
muy tenso / Verify that the
rubber string is not tight
Nota: En caso que no pase el agua al tanque, retire el
filtro, limpielo y vuelva a colocar en su sitio / Note: if
water dose not go into the tank remove the filter, clean it
up and put the filter back.
Asegure el tanque
al inodoro con los pernos
de anclaje / Fasten the tank
to the touilet bowl with the
screws.
empaque /
gasket
Verifique que la base
del flapper este en
buenas condiciones /
Verify that the base of
the flapper is in good
conditions
b
15 cm
15,5 cm
30,5 cm
15 cm
15,5 cm
30,5 cm
1 cm
piso terminado /
nished oor
pared terminada / nished wall
30,5 cm
desagüe
del inodoro /
toilet draining
acometida de agua /
water connection
10 cm
llave angular F.V. /
F. V. angle stop set
agujeros
para fijación /
fixation holes
15 cm
15,5 cm
30,5 cm
15 cm
15,5 cm
30,5 cm
1 cm
piso terminado /
nished oor
pared terminada / nished wall
30,5 cm
desagüe
del inodoro /
toilet draining
acometida de agua /
water connection
10 cm
llave angular F.V. /
F. V. angle stop set
agujeros
para fijación /
fixation holes
15 cm
15,5 cm
30,5 cm
15 cm
15,5 cm
30,5 cm
1 cm
piso terminado /
nished oor
pared terminada / nished wall
30,5 cm
desagüe
del inodoro /
toilet draining
acometida de agua /
water connection
10 cm
llave angular F.V. /
F. V. angle stop set
agujeros
para fijación /
fixation holes
Ref.: E266.02 DH CR
15 cm
15,5 cm
30,5 cm
15 cm
15,5 cm
30,5 cm
1 cm
piso terminado /
nished oor
pared terminada / nished wall
30,5 cm
desagüe
del inodoro /
toilet draining
acometida de agua /
water connection
10 cm
llave angular F.V. /
F. V. angle stop set
agujeros
para fijación /
fixation holes
5. Coloque nuevamente el inodoro sobre el codo del desagüe, nivélelo y fíjelo al
piso con los tirafondos.
Placethetoiletoverthedrainagain,levelandsecureittotheoorwithscrews.
7. Instale el herraje al tanque (ver instrucciones en su embalaje). Coloque el em-
paque espumoso en la salida del herraje. Alinee el tanque sobre el inodoro y
fíjelo con los pernos de sujeción.
Installthetankttings(seeinstructionsinthepackaging).Placethefoampack-
inginthetting’send.Alignthetankoverthetoiletandsecurewiththebolts.
8. Conecte la válvula de ingreso del tanque a la acometida de agua mediante una
llave angular FV con manguera exible, ref.: E266.02 DH CR (no incluida).Por
último, coloque el asiento en el inodoro.
Connectwatersupply to thetoiletvalve using aF. V. anglevalvewith exible
hose ref. E266.02 DH CR, (notincluded).
6. Selle la unión entre el inodoro y el piso con un cordón de silicona.
Sealtheconnectionbetweenthetoiletandoorwithabeadofsiliconadhesive..
CONSEJOS DE MANTENIMIENTO / ADVICES MAINTAI NANCE:
En caso de tener algún problema con el herraje verifique los siguientes puntos / Ifyouhaveanyproblemwiththefitting,pleaseverifythefollowingpoints:
Nota: el exceso de ajuste de la tuerca B
puede causar la ruptura de la válvula de
ingreso A.
Note: Over tightening screw B, can cause
rupture of the inlet valve A.
A
B
CONSEJOS DE MANTENIMIENTO
Los sanitarios F.V. son fabricados con porcelana sanitaria vitricada, cumpliendo
normas internacionales, garantizando así su larga vida útil. Por las características
propias de los materiales utilizados y la tecnología empleada en su desarrollo, se
limpian fácilmente evitando el desarrollo de gérmenes y hongos.
Realice la limpieza utilizando productos limpiadores y desinfectantes para baños
de marcas reconocidas. Ayúdese de una esponja o un paño húmedo. En lo posible
evite productos de limpieza fuertemente abrasivos. La porcelana sanitaria vitrica-
da no permite adherencias y las grasas se eliminan con facilidad.
La porcelana sanitaria mantiene el brillo propio de su esmalte sin necesidad de
pulimentos.
MAINTENANCE
F.V. productsaremadeofvitreoussanitaryware,meetinginternationalstandards
and ensuring durability.The characteristics of the materials and the technology
usedtomaketheproductshelpbypreventingthedevelopmentofgermsandfungi.
Cleantheproductusingcleaningagentsandbathroomantiseptics.Useasponge
ordamp cloth.If possibleavoid highlyabrasivecleaningproducts.Sanitaryware
doesn´tallowadhesionsanditcanbeeasilywashed.
Thereisnoneedtopolishsanitarywarebecauseitwillalwaysmaintainitsshine.
Nota: No es recomendable usar cemento
mortero en la base del inodoro. La
Garantía FV no cubre inodoros instala-
dos con mortero.
Antes de instalar el tanque verifique que
la tubería de alimentación este limpia y
libre de impurezas y residuos de construc-
ción.
Note: Itisnotadvisableto use cement in
thebaseofthetoilet.The warranty
doesn't cover toilets installed with
cement.
TofixitBeforeinstallingthetank,verifythat
thefeedingpipeiscleanandfreeofsludge
andconstructionresiduals.
TIRO RETIRO
2012/05/03 Cambio formato de horizontal
a vertical y se añade el logo econsumo.
2013/05/10 Se cambia el herraje y los
grácos.
2014/06/23 Se agrega nota de válvula.
2015/02/17 Se cambia textos en ingles
2017/01/05 Cambia diseño e información.
2017/09/11 cambia la nota del mortero
2019/10/07 Cmabia FV responde
Maggie Ramos