manuals.online logo
Brands
  1. Home
  2. •
  3. Brands
  4. •
  5. FV
  6. •
  7. Toilet
  8. •
  9. FV Liber E168 User manual

FV Liber E168 User manual

FV se reserva el derecho de modificar,
cambiar, mejorar y/o anular materiales,
productos y/o diseños sin previo aviso.
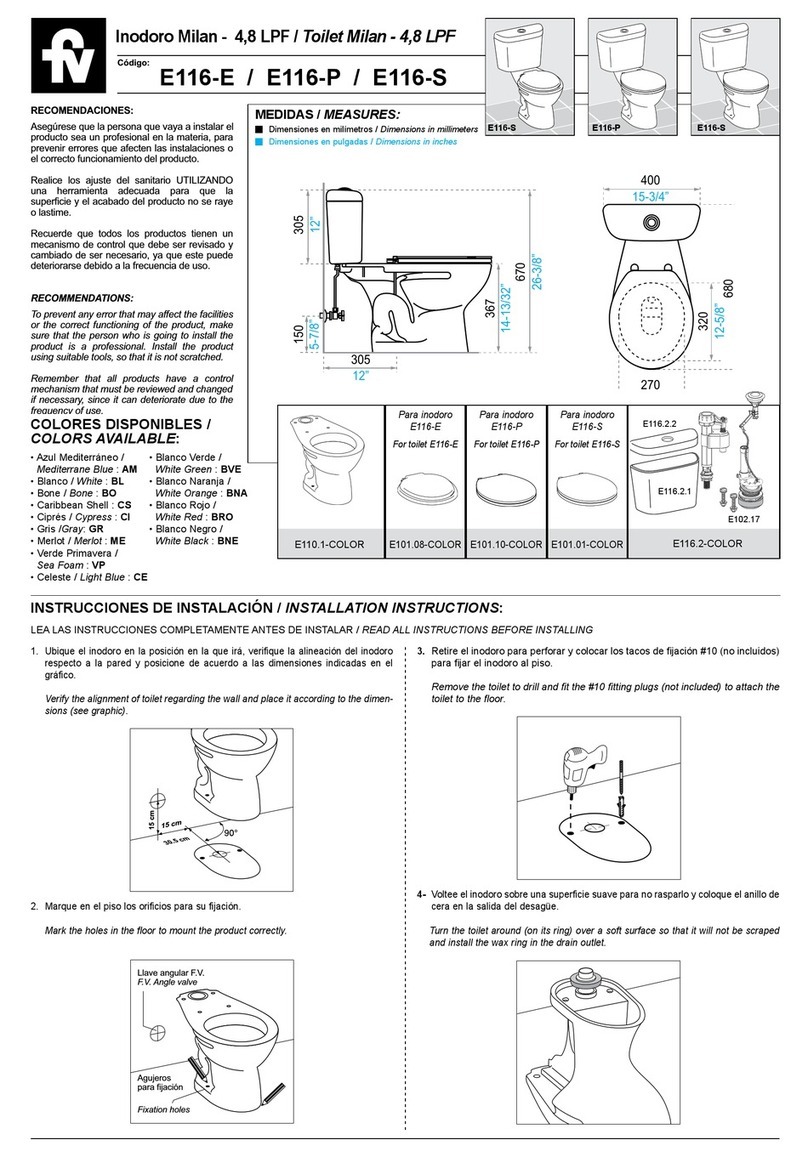
MEDIDAS SUGERIDAS PARA LA INSTALACIÓN (en cm):
Código:
Asegúrese que la persona que vaya a instalar el
producto
sea un profesional en la materia, para
prevenir
errores que afecten las instalaciones o
el correcto funcionamiento del producto
.
Realice
los ajuste del sanitario UTILIZANDO
una
herramienta adecuada para que la
s
uperficie y el acabado del producto no se raye
o lastime.
Recuerde
que todos los productos tienen un
mecanismo
de control que debe ser revisado y
cambiado
de ser necesario, ya que este puede
deteriorarse debido a la frecuencia de uso.
To
prevent any error that may affect the facilities
or
the correct functioning of the product, make
sure
that the person who is going to install the
p
roduct is a professional. Install the product
u
sing suitable tools, so that it is not scratched.
Remember
that all products have a control
mechanism that must be reviewed and changed
if
necessary, since it can deteriorate due to the
frequency of use.
RECOMENDACIONES:
RECOMMENDA
TIONS:
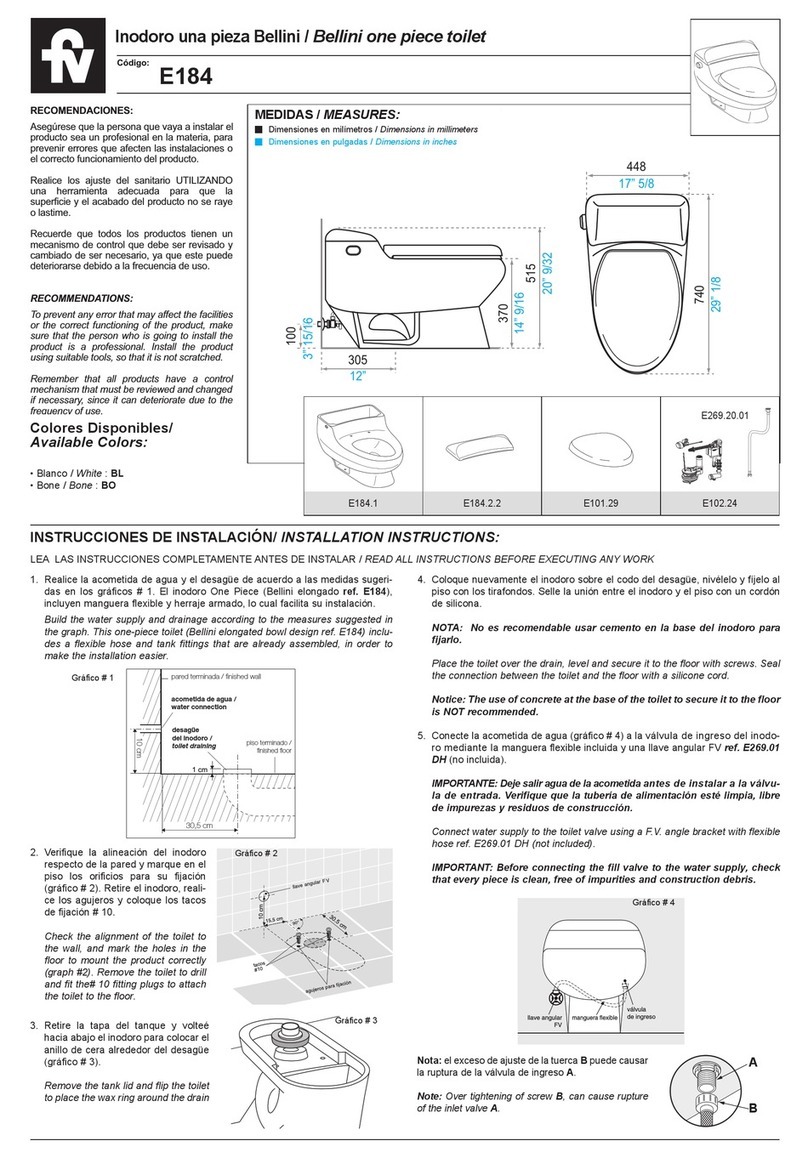
MEDIDAS / MEASURES:
Dimensiones en milímetros / Dimensions in millimeters
Dimensiones en pulgadas / Dimensions in inches
E168.1 BL E101.09 BL HP.01.68
ECAP-DH
desagüe
tubo de ingreso
de agua
tubo de ingreso
de agua
(kit de instalación
cód.: E369.02 CR,
no incluido)
grifería (no incluida)
válvula / fluxómetro
30.5
12”
370
10
agua fría
15,3 (6”)
piso terminado
pared terminado
tubería 1” G
395
15” 9/16
4” 15/16
400
15” 3/4
14” 9/16
1. Una vez instalada la grifería y el kit en la pared, ubique temporalmente el ino-
doro en la posición que irá. Verifique que la entrada de agua de la grifería y
el desagüe del piso se encuentren en las posiciones correctas con respecto
la inodoro (ver gráfico).
Nota: Si es el alargue se encuentra muy largo y no permite la instalación
correcta del inodoro, verifique la dimensión del alargue y retire para cortar.
After the faucet and the kit have been installed on the wall, temporarily place
the toilet in the position it will go. Check that the water inlet of the faucet and
the floor drain are in the correct positions with respect to the toilet. (view
graphic).
Note: If the extension is too long and does not allow the correct installation of
the toilet, check the extension´s dimension and remove to cut.
3. Perforar y colocar los tacos de fijación #10 (no incluidos) (ver gráfico).
Drill and place the fixation bolts #10 (not included) (view graphic).
30.5 cm
37 cm
Agujeros
para fijación
Fixation holes
30.5 cm
37 cm
Agujeros
para fijación
Fixation holes
30.5 cm
37 cm
Agujeros
para fijación
Fixation holes
2. Marcar (ver gráfico).
Mark (view graphic).
INSTRUCCIONES DE INSTALACIÓN / INSTALLATION INSTRUCTIONS:
• Blanco / White: BL
Colores Disponibles/
Available Colors:
E168
Inodoro Liber de alimentación posterior / Liber Power supply toilet
kit instalación
Fecha: 2020 - 08 - 06
FV - ÁREA ANDINA S.A. se reserva el derecho de modificar, cambiar, mejorar y/o anular materiales, productos y/o diseños sin previo aviso.
FV Responde
Centro de atención al usuario
ECUADOR
1-800 FV FV FV (1-800 38 38 38)
fvresponde@fvecuador.com
info.colombia@grupofv.comCOLOMBIA
info.peru@grupofv.com
PERÚ
info.cea@grupofv.com
CENTROAMÉRICA
Encuentre
Repuestos Legítimos FV y
la Garantía Total FV en:
www.fvandina.com
Encuentre
Repuestos Legítimos FV y
la Garantía Total FV en:
www.fvandina.com
NTE INEN 3123
Sello de Calidad
Instituto Ecuatoriano de Normalización
NTE INEN 3082
Sello de Calidad
Sanitarios
Instituto Ecuatoriano de Normalización
5. Instale el inodoro colocando un cordón de silicona en el empaque HP.01.68
(incluido) e inserte en la entrada posterior del inodoro.
Install the toilet by placing a silicone cord in the package HP.01.68 (included)
and inserting it into the back entrance of the toilet.
6. Fije el inodoro al piso con pernos (ver gráfico).
Fix the toilet to the floor with bolts (see graphic).
30.5 cm
37 cm
Agujeros
para fijación
Fixation holes
30.5 cm
37 cm
Agujeros
para fijación
Fixation holes
30.5 cm
37 cm
Agujeros
para fijación
Fixation holes
CONSEJOS DE MANTENIMIENTO
Los sanitarios F.V. son fabricados con porcelana sanitaria
vitricada, cumpliendo normas internacionales, garantizando
así su larga vida útil. Por las características propias de los
materiales utilizados y la tecnología empleada en su desarro-
llo, se limpian fácilmente evitando el desarrollo de gérmenes
y hongos.
Realice la limpieza utilizando productos limpiadores y des-
infectantes para baños de marcas reconocidas. Ayúdese de
una esponja o un paño húmedo. En lo posible evite productos
de limpieza fuertemente abrasivos. La porcelana sanitaria vi-
tricada no permite adherencias y las grasas se eliminan con
facilidad.
La porcelana sanitaria mantiene el brillo propio de su esmalte
sin necesidad de pulimentos.
MAINTENANCE
F.V. products are made of vitreous sanitary ware, complying
international standards and ensuring durability. The charac-
teristics of the materials and the technology used to make the
products help by preventing the development of germs and
fungi.
Clean the product using cleaning agents and bathroom anti-
septics. Use a sponge or damp cloth. If possible avoid highly
abrasive cleaning products. Sanitary ware doesn´t allow adhe-
sions and it can be easily washed.
There is no need to polish sanitary ware because it will always
maintain its shine.
Encuentre
Repuestos Legítimos FV y
la Garantía Total FV en:
www.fvandina.com
Encuentre
Repuestos Legítimos FV y
la Garantía Total FV en:
www.fvandina.com
NTE INEN 3123
Sello de Calidad
Instituto Ecuatoriano de Normalización
NTE INEN 3082
Sello de Calidad
Sanitarios
Instituto Ecuatoriano de Normalización
Encuentre
Repuestos Legítimos FV y
la Garantía Total FV en:
www.fvandina.com
Encuentre
Repuestos Legítimos FV y
la Garantía Total FV en:
www.fvandina.com
NTE INEN 3123
Sello de Calidad
Instituto Ecuatoriano de Normalización
NTE INEN 3082
Sello de Calidad
Sanitarios
Instituto Ecuatoriano de Normalización
30.5 cm
37 cm
Agujeros
para fijación
Fixation holes
4- Voltear hacia abajo el inodoro y colocar el anillo de cera alrededor del desa-
güe (ver gráfico).
Turn the toilet around and install the wax ring in the drain outlet. (see graphic)
7. Nivelar el inodoro y fijar al piso con un cordón de silicona (ver gráfico).
Level the toilet and fix it to the floor with a silicone cord (see graphic).
Nota: No es recomendable usar cemento mortero en la base del inodoro. La
Garantía FV no cubre inodoros instalados con mortero.
Antes de instalar el tanque verifique que la tubería de alimentación este limpia y libre
de impurezas y residuos de construcción.
Note: It is not advisable to use cement in the base of the toilet. The warranty doesn't
cover toilets installed with cement.
Before installing the tank, verify that the feeding pipe is clean and free of sludge and
construction residuals.

Other FV Toilet manuals

FV A115-S User manual

FV

FV A115-S User manual

FV Greco Touchless 4.8 L User manual

FV

FV Greco Touchless 4.8 L User manual

FV Milan E116-E User manual

FV

FV Milan E116-E User manual

FV Ischia Plus User manual

FV

FV Ischia Plus User manual

FV E165 User manual

FV

FV E165 User manual

FV E158-E User manual

FV

FV E158-E User manual

FV PARMA E157 User manual

FV

FV PARMA E157 User manual

FV Ischia Elongado E187 User manual

FV

FV Ischia Elongado E187 User manual

FV Victoria E170 User manual

FV

FV Victoria E170 User manual

FV New Greco 4.8 LPF User manual

FV

FV New Greco 4.8 LPF User manual

FV E149 User manual

FV

FV E149 User manual

FV Parma E157 User manual

FV

FV Parma E157 User manual

FV E158-E User manual

FV

FV E158-E User manual

FV Roma E113-E User manual

FV

FV Roma E113-E User manual

FV Ischia Plus E181 User manual

FV

FV Ischia Plus E181 User manual

FV E183 User manual

FV

FV E183 User manual

FV E112-E User manual

FV

FV E112-E User manual

FV E113 User manual

FV

FV E113 User manual

FV E181 User manual

FV

FV E181 User manual

FV Parma E157 User manual

FV

FV Parma E157 User manual

FV E149 User manual

FV

FV E149 User manual

FV Ginebra E149 User manual

FV

FV Ginebra E149 User manual

FV Bellini E184 User manual

FV

FV Bellini E184 User manual

FV E193 User manual

FV

FV E193 User manual

Popular Toilet manuals by other brands

Kogan KATOPOTPNKA user guide

Kogan

Kogan KATOPOTPNKA user guide

Geberit Centaurus 236400600 Care Instructions

Geberit

Geberit Centaurus 236400600 Care Instructions

Drive DeVilbiss Healthcare TSE 150 Instructions for use

Drive DeVilbiss Healthcare

Drive DeVilbiss Healthcare TSE 150 Instructions for use

Meissen Keramik GENERA Comfort user manual

Meissen Keramik

Meissen Keramik GENERA Comfort user manual

Kohler K-4026 installation guide

Kohler

Kohler K-4026 installation guide

Pfister Fullerton VTP-R31W Quick installation guide

Pfister

Pfister Fullerton VTP-R31W Quick installation guide

Swiss Madison SM-1T112 installation instructions

Swiss Madison

Swiss Madison SM-1T112 installation instructions

Wellis CLEMENT MONOBLOCK WF00031 installation manual

Wellis

Wellis CLEMENT MONOBLOCK WF00031 installation manual

TUSHY Ace owner's manual

TUSHY

TUSHY Ace owner's manual

Inax RS Series Installation and use manual

Inax

Inax RS Series Installation and use manual

Dometic MasterFlush 8100 Series installation manual

Dometic

Dometic MasterFlush 8100 Series installation manual

Timago KING-15-20 user manual

Timago

Timago KING-15-20 user manual

Milano BCTWC001 installation guide

Milano

Milano BCTWC001 installation guide

Jacob Delafon BASTILLE EDAB102 installation manual

Jacob Delafon

Jacob Delafon BASTILLE EDAB102 installation manual

Premier N2450E Use and care guide

Premier

Premier N2450E Use and care guide

Woodbridge T-0035 Installation and care guide

Woodbridge

Woodbridge T-0035 Installation and care guide

Franke HDTX0020 Installation and operating instructions

Franke

Franke HDTX0020 Installation and operating instructions

Glacier bay G15 Use and care guide

Glacier bay

Glacier bay G15 Use and care guide

manuals.online logo
manuals.online logoBrands
  • About & Mission
  • Contact us
  • Privacy Policy
  • Terms and Conditions

Copyright 2025 Manuals.Online. All Rights Reserved.